Make a three-dimensional postcard with your own hands. Eight-bit heart.
This original three-dimensional postcard is quite simple to make, despite the fact that its design seems intricate.
It is ideal for a loved one (girlfriend, mother, grandmother) and the occasion can be any: birthday, March 8 or Valentine's Day.
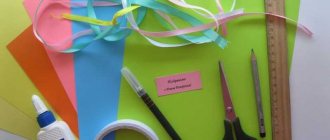
You will need:
- cardboard or thick paper
- stationery or wallpaper knife
1.
First you need to print the postcard template, which is located
here
. Just in case there are 2 copies.
* You can try to draw a heart layout yourself using a pencil and a ruler, it’s not difficult.
2.
Using a utility knife, make vertical cuts on your template.
3.
Now you need to carefully fold the card without creasing the parts. First make the folds, which are indicated by yellow lines in the picture. Next, begin to carefully fold the card.
*The rest of the card should fold on its own. Don't forget to smoothly stroke the card with your fist so that all the elements work smoothly.
* For convenience, you can temporarily attach the postcard to the table using tape.
4.
Decorating a voluminous card. You can cover the edges of the card with paper of a different color.
Now almost everything is ready, all that remains is to add warm words.
Popular ideas for children's cards for March 8
Here are the most popular ideas that you can offer your child for a DIY postcard for March 8th in elementary school:
- a simple card in the shape of a book;
- applique card;
- mini postcard;
- figured postcard;
- A4 size postcard.
The simplest card with congratulations for March 8 is a figure eight cut out of colored cardboard, decorated with paper flowers. Do you like originality? Take a closer look at such postcard making techniques as kirigami, vytynanka, quilling.
An uninitiated person may find them quite difficult to master. In fact, this is not true. The main thing is to strictly follow the sequence of actions.
As an example of a postcard for March 8th with your own hands in kindergarten, you can give this postcard in the form of a pot of flowers. Work algorithm:
- Draw the blanks using a regular pencil, or print a template from the Internet. For younger children, it is recommended to make cardboard parts.
- Transfer the elements of the pot onto fabric or brightly colored wrapping paper and carefully cut out.
- Create flowers from colored cardboard/paper. Glue the finished bouquet to the pot.
- Decorate the craft with ribbons and write wishes.
Looking through photographs of handmade cards, it is worth saying that this is a very unusual and exclusive gift that brings joy to both the recipient and the giver. So buy some paper, glue and scissors and get creative!
https://youtu.be/AiCQfFmDFNohttps://youtu.be/i9UvgapFVhE
_
DIY voluminous postcard. Heart.
Despite its simplicity, this card will look beautiful if you do it right. Anyone can make a Valentine card like this.
You will need:
- white thick paper
- red paper
- glue
- scissors.
1.
You will need a postcard template (or you can draw one yourself - look at the picture for how to do this).
2.
Cut out a card from white paper.
3.
Fold the red paper into an accordion shape. Next you need to cut it out.
4. P
Glue the resulting hearts to the card.
Ready! All that remains is to decorate to taste and sign.
How to make a greeting card in Word?
Creating a greeting card in MS Word
Creating a greeting card in MS Word is not difficult. Although the program is most often used to create text files, here you can make a beautiful card for any occasion. Create an e-card in six easy steps:
Step 1: Open the program and go to the File menu.
Click on the “File” tab
Step 2. Select the “Create” tab, write the word “Postcard” in the search bar that opens.
Open the “Create” tab, enter the word “postcard” in the search field
Step 3. Choose a ready-made, high-quality e-card template. In the right side list you can select the appropriate category.
In the “Category” section, select the appropriate one, click on the selected template
Step 4. Click on the selected template and click “Create”. Wait for the template to open in a new file.
Click on the template and click “Create”
Step 5. Fill in the blank fields. Write your congratulations, signature and other necessary information.
By clicking on the template, enter the text
Step 6: Make sure the text fits within the margins of the card. If necessary, change the sheet orientation from portrait to landscape.
In the “Page Layout” section, click on the “Orientation” button and select the appropriate one
Step 7. Save the postcard (“File” – “Save As”), and then send it to the recipient or print it.
Click on the “File” tab
Click “Save As”, select “Desktop” or another location
Click “Save”
To print a postcard, click “File”, then “Print”
Video - How to make a greeting card in MS Word
How to make a three-dimensional postcard. Volcano of hearts.
This card consists of two halves that are glued together.
You will need:
- colored paper
- thick paper
- scissors
- glue
*You can try to draw hearts yourself, but you need to know certain rules - they are listed below.
1.
Remove the large heart from the middle (it's right on the fold).
2.
Cut out the hearts, leaving only their folds intact (see picture).
3.
Make cuts on the hearts shown in the picture (gray lines on opposite hearts), this way you can fasten them.
* The card will close better if you cut the paper at the center fold and glue them separately to the base (the base is thick red paper that serves as the background for the card).
4.
Glue the halves to the base and connect the hearts in which you made the cuts.
Rules
*The sizes of the hearts on both sides are the same.
*The blue line in the diagram shows that the distance from the fold in the middle to the cut is the same, and the red lines indicate the same distance between the hearts close to the middle of the card.
DIY application for March 8th in elementary school with templates
Kids will be able to make such a cute applique; I will provide templates for this. It will be both the number “8” and a terry tulip. But there is one more trick - we will make a background for the picture. This will give the applique a more interesting look.
Print or trace the templates. You can simply cut and glue, or you can transfer it onto your own colored paper.
On dark blue A4 paper, use curly scissors to cut off the edges on all sides (cut off about 1cm).
Glue this sheet in the middle of a light blue sheet.
In the middle of the dark blue sheet we glue a “figure eight” cut out using a template.
Making a terry tulip:
- We prepare 8 tulip blanks according to the template: 4 green and 4 red. You can simply print and cut out the finished tulips.
- Glue the red buds with green stems and leaves. (if you didn’t print it, but used colored paper)
- We bend the workpieces in half.
Glue the halves of the tulip blanks to each other.
Glue the tulip onto the base.
Author https://www.youtube.com/watch?v=ZGJlVZMgy4w
Both the figure eight and the flower can be made in any color.
Another option is bells. We also make them voluminous by bending them in half and gluing the parts. Download and print a postcard template with bells in PDF format
Author
And the inside can also be decorated, for example, with voluminous hearts.
To do this, we outline 3 plates of different diameters on red paper.
Fold them like an accordion (the thinner the better).
Then we fold the resulting accordion in half and glue it together. We get a heart.
Glue it by the outer edges inside the card.
The number of hearts depends on your desire!
Author
Volumetric postcard templates
2.
Make cuts in the indicated places (see the picture - where the red lines need to make cuts, where the green lines are folds).
3.
As you begin to fold the card, your little monster will begin to “hatch” out of the paper. Take your time, do everything carefully.
* If the mold does not come out automatically, try helping yourself with a toothpick or something similar.
4.
Glue the card to separate paper, which will hide the holes and serve as a base for the card.
*You can put your postcard in an envelope.
Beautiful postcard for mother on March 8th from paper (templates)
If you download these templates and use them to make cards, you will get very beautiful gifts for your mother. One moment! The card can be made from paper of different colors or one that already has a beautiful pattern.
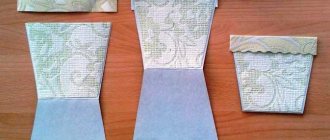
Using a template, cut out an openwork pattern on one half of the workpiece on colored paper. It is convenient to cut with a breadboard knife, but if desired, you can do it with ordinary stationery or even nail scissors.
Download template – shablon-otkritki
We place the sheet with the template on a thin sheet of cardboard, secure it with paper clips and cut out along the contours.
We bend the blank in half so that the decor remains on only one side of the card.
Glue a white rectangle to the inside of the card.
You can sign the card, for example, write a short poem.
Congratulations on March 8th! I wish you happiness and joy! For me, you are dearer than everyone else, After all, no one can live without mothers.
You are the best in the world. May success await you, May there be a sea of health, and may all illnesses go away!
Templates make your work easier. But it’s worth helping your baby cut out some details.
You can cut out any pattern, the main thing is to use contrasting paper for the background. Here are a few more templates for vytynanka. You don’t even have to print it out, just circle it from the screen. If you print, print in 2 sheets on one sheet format so that the printout takes up half the sheet.
Volumetric card for mom
You will pleasantly surprise your mother or grandmother with this beautiful three-dimensional card. It will be suitable for birthdays and March 8th, or maybe you can come up with a reason yourself.
You will need:
- colored paper
- colored cardboard
- scissors
- glue stick
- ruler
1.
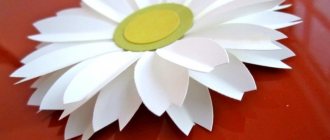
Cut out a stem with leaves from green paper. Use any other color of paper for the flowers.
2.
Fold 2 sheets of construction paper in half.
3.
Set one sheet aside, and from the other, measure 8cm from the edge and 5cm from the bottom (see picture). Now you need to cut along the solid line and fold along the dotted line. Do the same procedure on the opposite side of the sheet, and bend the resulting steps inward, they will serve as a support for the flowers and create a volume effect.
4.
Measure 4cm from the edge of the sheet and 2.5cm from the bottom (see picture). Now bend the steps inward again.
5.
Start gluing the stems to the steps, and flowers and leaves on top of the stems.
6.
Now you need to hide the holes made for the steps - to do this, glue your postcard to another sheet that you first folded - it will serve as the cover.
Ready! All that remains is to add the appropriate text.
The benefits of homemade cards
Congratulation cards created by the author can be given not only to family members, but also to friends. A DIY postcard for March 8th for your mother or sister should show your feelings for these representatives of the weaker half of humanity. For your friend, you can choose harmoniously contrasting shades. For a friend, it is advisable to choose a clear picture.
To amaze the person being gifted, you must have a developed imagination and acquire the materials needed for this type of “handicraft”.
You can decorate finished products with beads, seed beads, rhinestones, lace, satin ribbons, textile scraps, buttons, pieces of foil, dried plants, autumn leaves, pasta, etc. The choice of decorations for a custom-made greeting card is limited only by the budget and imagination of the craftswoman.
Postcard using scrapbooking technique from March 8
Scrapbooking is a special technique that children really like. You can decorate the card with new interesting details to your liking. Lace, cut-out pictures, ribbons... all this is the same material that can be used.
Using a shaped hole punch, we cut out patterns on the edges of a rectangle of craft paper.
Using white and pink paint, we make a “pattern” of drops on the workpiece. Just splatter paint on a brush or toothbrush.
We tear off a strip of scrapbooking paper and glue it to the workpiece with double-sided tape.
Glue the congratulatory inscription with tape.
We decorate the card with flowers.
We sew decorative buttons or glue rhinestones onto the workpiece.
Now you can glue the blank onto the base of the postcard.
Patterns can be complicated or, on the contrary, simplified to your liking.
Author
Another simple option is to glue the lace onto the base.
We glue beautiful cardboard with figure eight holes on top.
We decorate with flowers, rhinestones, ribbons as desired.
Author
Coloring book - postcard with the holiday of spring
Coloring pages are already drawn outlines of all the details of the postcard. All that remains is to choose the appropriate colors and apply them to the picture. Such cards are easy to prepare for the holiday even for very young children. There are very different coloring pages in this collection, you just need to choose the right ones.
You can download everything at once in an archive here.