Features of cold porcelain
The classic recipe for the material includes cornstarch, oil, glycerin and glue. Modern compositions may include more accessible components and vary depending on the preparation method used.
Using various techniques, you can obtain completely white porcelain, which does not require additional decorative processing.
Benefits of using cold porcelain
The main advantages of the practical use of cold porcelain are:
- Availability of all ingredients.
- Absolute safety, even for children's skin. The components included in the working mass do not cause irritation or allergic reactions.
- The material is very plastic, which allows you to give products any shape.
- A product made of cold porcelain quickly hardens in air and does not require additional firing.
- All crafts made by the master turn out stylish and beautiful, and are an excellent basis for subsequent decoration.
Crafts made from liquid porcelain, made by hand, are used in a wide variety of fields of art: jewelry, hairpins, brooches, collections of tea sets, souvenirs.
Bright jewelry
Cold porcelain can be used to make wonderful and unique jewelry. The principle is as follows: various parts are made, and after drying with PVA glue they are attached to the fittings. Let's say you want to make earrings from flowers. Blind them, place them on some oblong object (for example, a needle) and leave the flowers to dry. After the elements are ready, pull out the needle - you will get a hole through which you can pull the thread or fishing line. They make excellent parts for making jewelry.
Photos of cold porcelain jewelry:
For decoration you can use various materials - beads, beads, crystals, pendants, shells. Their combination looks very beautiful and elegant.
The most interesting thing about cold porcelain is that you can make it yourself. But this is not a very easy process, and before you try to do it, it’s better to practice sculpting with a store-bought one - what if you don’t like working with porcelain? In addition, it is difficult for beginners to make high-quality material on the first try, and if the cold porcelain does not turn out very good, you may be disappointed in the ceramics and not understand that with properly prepared cold porcelain, a completely different process of work occurs.
Related article: Tunic with one-piece sleeves: master class on sewing without a pattern
This modeling mass is prepared from starch (corn or rice gives the mass a white color, potato serite material), PVA glue, glycerin, cream and citric acid. Starch and glue create the porcelain itself, while PVA gives it the property of self-hardening in the open air. There are several cooking methods - with cooking, without cooking and in the microwave. Such porcelain is stored in tight packaging, with minimal air penetration, from 3 weeks to six months. This is a very rough recipe that every needlewoman tries to improve on her own. If you enjoy working with cold porcelain, then try to prepare it yourself in the future - this is a fun process that will save you money. In addition, by experimenting, you can come up with your own recipe for ideal cold porcelain.
Materials for preparing cold porcelain
You can purchase working mass at almost any art and home improvement store. However, you can prepare plastic and high-quality material with your own hands. To work you will need to prepare the following set:
- Containers for mixing components.
- Wooden or plastic skewers for stirring the working solution.
- Oilcloth to protect the table surface from glue and other ingredients that make up porcelain.
- PVA glue (preferably with a dispenser to make it convenient to add it to the composition).
- Glycerin-based hand cream.
- Corn starch.
- Glycerin (solution in bottles is sold at any pharmacy).
You may need Vaseline, lemon juice, stearin and other ingredients.
As you can see, only ingredients that are safe for humans are used to prepare cold porcelain, which can only cause irritation in individual cases.
Possible porcelain crafts
Before getting acquainted with the basic recipes for preparing cold porcelain, you should study the possible areas of application of crafts made from this material. DIY cold porcelain products:
- Children's toys (bears, giraffes, fish).
- Flower bouquets of all possible shapes and sizes.
- Details for homemade jewelry (miniature flowers, stars, beads).
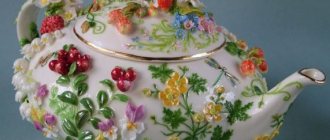
- Sets of tableware for interior decor (plates, cups, tea sets).
- Dolls, including interior models.
After drying, all finished products are decorated by applying paints, coloring pigments or opening them with acrylic varnish. The work also uses a combination with other materials (felt, corrugated paper, beads, seed beads, buttons).
Drying and painting
Some needlewomen don’t like the fact that a porcelain product takes too long to dry. The period depends on the size of the craft and can range from 1 to 5 days. This drawback can be eliminated if you help the process with an ordinary household hairdryer, place the figurine/decoration in the microwave or in an oven with a minimum temperature - slightly heated and turned off.
If the fact of long drying does not bother you, it is better not to rush things. In this case, the product must be turned over from time to time to ensure air access to all its surfaces. Before work, you need to take into account one important fact - the finished craft loses a little in size, so products are usually created in slightly larger sizes, taking into account their slight shrinkage.
Coloring
There are two options here. The most common method is to add a coloring compound during kneading. It doesn’t matter at all what type of dye you use: you can mix both dry (for example, tempera) and liquid - watercolor, acrylic, gouache.
Coloring the finished product with powders is not so popular, but this option allows you to use even food coloring. They are applied with a brush, then the products are held over steam. This way the pigment is quickly absorbed into the surface, and the color looks natural.
Making cold porcelain with your own hands is not difficult, as long as you follow the recipe and recommendations. This mass is pliable, high quality and inexpensive. It is completely safe, and the products are incredibly attractive. To get a closer look at the relatively new raw material, as well as to see with your own eyes the entire process of making an unusual type of “porcelain,” it is recommended that you first watch one of the most viewed videos. For example this one:
Porcelain recipes
Today there are a huge number of recipes for making cold porcelain. Before starting work, you should familiarize yourself with some rules for handling the working mass:
- All components must be thoroughly mixed.
- The proposed proportions must be observed to obtain a mass that is optimal in terms of its properties.
- Cold porcelain is very sensitive to dust and dirt, which quickly settles on the surface. It will no longer be possible to remove dust without consequences, and grains of dust will be especially noticeable on a white or light mass.
- By changing the qualitative composition or proportions of the components, you can prepare liquid porcelain with your own hands.
If you wish, you can always use ready-made step-by-step instructions, video lessons from experienced craftsmen on making cold porcelain at home.
Classic recipe
The traditional modeling mixture contains four ingredients:
- 1 cup cornstarch.
- 1 bottle of PVA glue (you need to keep an eye on the volume, which should be 200 ml).
- 60 ml of glycerin (volume approximately equal to 2 tablespoons).
- 30 ml of hand cream (you can use baby cream with a neutral acidity level and optimal glycerin content).
Instructions on how to prepare cold porcelain for modeling at home with your own hands:
- The adhesive base is mixed with hand cream in a separate container. Under no circumstances should you use aluminum cookware, as this will negatively affect the quality of the resulting working mass.
- Place the container with the solution on the stove and cook over low heat.
- The mixture is constantly stirred with a wooden spatula, gradually adding glycerin and starch (you can use potato starch instead of corn starch).
- As soon as the consistency becomes close to a curdled mass, remove the container from the heat.
- The cutting board is greased with hand cream, and the dough is laid out on its surface.
After a few minutes allotted for the working mass to cool down, it is fashionable to safely begin the sculpting process. Properly prepared porcelain should have a viscous and elastic consistency.
Manufacturing of material
The finished raw material for crafts is a soft, homogeneous material. Due to its good ductility and smooth texture, it is convenient to use. This composition for artistic modeling was invented in Argentina at the beginning of the 20th century. The production of decorative products does not require heat treatment. There are several options for processing the material. In some cases, heating will be required.
List of basic ingredients:
- glue;
- starch;
- oil;
- glycerol.
Over time, the original recipe underwent minor changes and was improved due to the emergence of better quality ingredients. Now it is possible to vary the list of ingredients and try all kinds of ingredients. This will allow you to find the best cold porcelain recipe.
Mixture based on PVA glue
PVA glue is one of the most commonly used components. The recipe is very simple. You will need several ingredients:
- 200 ml PVA glue;
- 200 g starch (preferably corn, but potato can also be used);
- 2 tbsp. l. glycerin;
- 1 tbsp. l. any baby cream.
Pour glue into the cooking container and put on fire. Then, stirring constantly, add the cream one by one, and after a while - glycerin and starch. Initially, the material acquires a consistency reminiscent of cottage cheese. Transfer the mixture to the table, coat with oil and cool. After thorough kneading it will become homogeneous.
Without heat treatment
A recipe for cold porcelain without cooking using potato starch and other additional ingredients. Preparation will take no more than 10 minutes. For this you will need:
- 2 tbsp. l. potato or corn starch;
- 1 tbsp. l. liquid Vaseline or baby oil;
- baking soda;
- 2 tbsp. l. PVA glue;
- a few drops of glycerin;
- hand cream.
Rub the starch and oil thoroughly with your hands so that there are no lumps. Add a little baking soda (at the tip of a teaspoon), mix well again. Pour in 2 tbsp. l. glue (PVA is possible). After kneading, coat the mixture with regular hand cream and pack in a bag. If the mixture turns out to be very sticky, roll the lump in starch and knead well again.
Glue-free mass
Cold porcelain without glue is also very easy to prepare. The consistency of the mixture is slightly different, but it is also convenient to use. To create such a mass you will need:
- corn starch - 200 g;
- soda - 200 g;
- vegetable oil;
- water - 100 ml.
Take baking soda and starch in equal quantities. Gradually adding water, knead. Pour in a little vegetable oil. Then put on low heat and stir thoroughly. The mass should thicken. Turn off the stove and cover the contents of the pan with a damp towel. The mixture will harden. After this, you need to knead it with your hands to obtain a uniform and smooth texture.
White porcelain recipe
A significant drawback of the classic recipe is that the material obtained is not white, but with a slightly yellow tint. Some crafts or jewelry require a material with a perfectly white surface. To prepare such a mass you will need:
- Glue in a volume of 0.5 liters.
- Rice starch in a volume of 1.5 cups.
- 30 ml each of sodium benzoate, lemon juice, stearin and emulsion to whiten the dough.
- 60 ml of glycerin and liquid petroleum jelly.
Note!
- DIY satin ribbon bows: photos of original design ideas, step-by-step DIY master class
DIY hair bands - ideas for decorating homemade rubber bands + step-by-step instructions for making them yourself
DIY shadow theater: step by step how to do it at home! 175 real photos
You will also need a container of sufficient volume that does not have an aluminum base. Instructions for making cold porcelain with your own hands:
- First, PVA glue and starch are mixed in the recommended proportions.
- Add all other ingredients to the mixture one by one, gradually stirring the composition.
- Place the container on the fire (it is better if it is a frying pan with a non-stick coating). The gas under the container is reduced to a minimum so as not to disrupt the porcelain preparation technology.
Cook the working mass, stirring gradually. The criterion for the “readiness” of porcelain is the curdling of the mass in a frying pan (or other container) and the free lump leaving the walls.
A simple and affordable recipe for cold porcelain that always works
In this master class I will tell you in detail how I make my cold porcelain. This master class will be of interest not only to those who want to make their first flower, but do not dare to make cold porcelain themselves, but also to those who have been sculpting for a long time and professionally, because as a result of the usual recipe I have modified, the clay obtained is almost like Thai modern or fleur (a comparison will be given below).
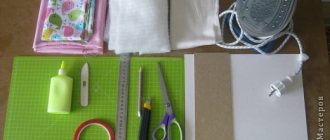
In the title photo you can see what we need for this (exactly this). The main thing in this set is, of course, glue. It must be with a plasticizer, otherwise nothing will work. Initially, I made clay from the same glue, only in a red jar with D2 plasticizer, but the clay turned out to be viscous, dried quickly, and did not roll out well. I decided to change the glue to this one in a white jar, it has a D1 plasticizer.
This glue is sold in construction stores such as Megastroy, Leroy Merlin. Trust me, it's worth looking...
Regarding starch: I haven’t tried using potato starch, I don’t know, corn starch is better, as it gives whiteness and velvety.
Regarding the cream: I haven’t found a better one than Nivea cream in a blue jar. It contains everything for good clay: Vaseline oil, wax, paraffin, glycerin (use only this).
Regarding Jonsos oil: if you don’t have it, you can replace it with petroleum jelly (sold at the pharmacy), but Jonsos also contains coconut oil, it is a softener, gives the mass tenderness, softness, velvety - almost like baby’s bottoms 
I haven’t tried using lemon juice instead of citric acid; it seems to me that liquid is not needed here.
Let's begin! I will write in great detail so that you don’t make my mistakes and everything works out for you.
1. Pour 100 ml of glue into the first glass.
2. Pour the same amount of starch into the second glass (hit the glass on the table so that it settles and, if necessary, add more starch so that there is an even amount). Then take a teaspoon and add 3 more small heaped spoons. It should look like this:
3. It is also important what you cook the mass in. You need a container with a thick bottom and a good non-stick coating so that the mass gradually warms up. I once cooked it in a thin frying pan with a glossy non-stick coating (it didn’t work), the only time I threw it in a bucket. Another point: there should be no dust or lint on the frying pan and spatula, so wipe with a damp cloth and then with a waffle towel or paper napkin, otherwise it will all be in your snow-white porcelain.
4. Pour glue into the frying pan, then Nivea cream, oil, citric acid. Proportions in the picture.
You need a full teaspoon of oil (a little spilled out when I took the photo).
5. We put the frying pan on low heat and at this moment we don’t go anywhere and don’t get distracted. Using a wooden spatula, mix vigorously and smoothly until the cream is completely dissolved.
6. When the pan becomes warm, but not hot, the first bubbles appear, then pour in half a glass of starch and stir vigorously, then the second part and stir without stopping.
7. You need to stir in a circular motion, as if collecting the mass into a lump. An important point: when to remove from the pan? You can either undercook or overcook. I do this: when a lump has formed, as in the last photo, I press it against the frying pan with a spatula and lift it; if it falls freely, remove it immediately; if it sticks, it’s too early.
8. Prepare a clean, smooth surface for kneading in advance. Sprinkle a little starch and lay out the lump. Let it cool down.
At this time, wash the frying pan and everything that was with glue. The glue can be quickly washed off with a simple detergent and hot water. After this, wipe your hands with a damp cloth and a dry waffle towel (otherwise everything will remain in porcelain), powder your hands with starch and begin to intensively knead the mass. The mass should be warm, not hot, otherwise there will be a paste. I don’t knead on the board, but do it in my hands - knead it like plasticine, stretch it, crush it, and so on. If it sticks to your hands, lightly powder the mixture and continue for 5 minutes. The mass should turn out to be plastic (not torn), soft, velvety, snow-white.
We wrap it in a plastic bag, letting out the air, and put it in any opaque container away from the battery. By the way, I don’t lubricate the bag with cream, since the mass does not stick (the cream gives the mass shine and plasticity). Stores perfectly. After a month it does not lose its properties. Let's compare purchased clay and mine.
Let's compare plasticity, transparency, color.
Personally, my conclusions and feelings:
Cold porcelain is no worse than store-bought Thai clay - it is just as soft, flexible, even more velvety and whiter, takes paint well, does not shrink, and tolerates moisture well.
But there is one But: after 10-12 hours of hardening, you can correct the shape of the product, but after two days this is no longer possible.
What do the Thais add to their clay to maintain plasticity? Maybe someone knows?
I present my work, made entirely from porcelain of my own production.
This concludes my first master class in my life, so, my dears, do not judge me harshly, please.
Ask questions, I will answer everyone with great desire!
I wish everyone inspiration, more free time for creativity, smiles and good mood!
Preparation of colored porcelain
There is a secret that experienced craftsmen share on how to get colored cold porcelain. You can decorate the finished craft with pigments, transparent varnish and even pastels.
However, using a little secret, you can get material for modeling with an already selected color. To do this, at the stage of preparing the recipe without cooking, acrylic paints of the selected shade are added to the thick mixture (when heated, the paints can change color, so this trick is used only for extremely cold cooking methods).
Interesting hobby
Thanks to social networks and interest groups, needlewomen from all over the world unite into friendly groups where they share recipes for interesting things. This is how the idea of porcelain flowers gained popularity, not only looking great in the interior, but also captivating you into a world of relaxation even at the preparation stage.
The simplest option for making artificial flowers is ready-made polymer clay. This plastic material is characterized by its low cost and relative maneuverability. However, it is much more profitable and interesting to make porcelain with your own hands.
Before you start creating a masterpiece, it is advised to prepare all the necessary tools and accessories. The fact is that finished porcelain is very impatient. It freezes literally before our eyes, so after preparing it there will be no time left to prepare materials.
So, for work you will need:
- Regular dough roller;
- Cutting molds (gingerbread ones are suitable);
- Wire, preferably two types;
- Scissors;
- Special tape for floristry.
If the craft stores in the area promote porcelain creativity, they are sure to have special molds for flower petals. This device will allow you to create leaves with all their veins and bends. Such a product cannot be distinguished from a real rose!
Formaldehyde recipe
Formalin is very toxic and dangerous to the human body. It causes irritation to the respiratory tract, eyes and nose. And in high concentrations it can even be fatal. However, a minimal addition of the solution to the porcelain composition prevents the formation of cracks on the surface of the crafts.
When working with formaldehyde, it is necessary to wear gloves, a mask and goggles. This method is not suitable for working with children and adolescents, which is dictated by safety requirements.
Practical secrets of working with porcelain
There are several practical tips that are best followed when working with porcelain:
- You can start decorating only after the product has dried.
- To prevent the formation of fungus inside the craft, you should cover its surface with oil. This approach will significantly extend the life of decorative jewelry and crafts.
- Do not store the working mass in the refrigerator.
- Excess moisture in the composition can be removed by simply changing the storage bag.
Using the popular and fairly simple method of preparing cold porcelain, you can get incredibly beautiful stylish accessories, jewelry and souvenirs for the interior.
Note!
- DIY bracelets | Selection of the best models and master class on making beautiful bracelets
DIY bird feeder - interesting ideas on how to make it quickly and easily from scrap materials
DIY curtains - types of curtains, choice of materials for sewing and design + step-by-step instructions and simple patterns for beginners
Teenage girls and their parents can make stylish accessories for their own wardrobe, unique brooches and hairpins. These can also be parts for homemade necklaces, earrings, and bracelets.
Kittens for home decor
From cold porcelain you can create flowers, decorative elements and New Year's toys. Animal figurines are also popular, which will decorate and amuse DIY lovers.
Step-by-step instructions for sculpting a kitten:
- A ball is formed from a small piece of material. This will be the head of the animal.
- Next, small flattened triangles are sculpted, which will become ears.
- A larger triangular piece is turned into a body, marking the legs.
- The tail will be a thin sausage. It should not be too thin so that this part does not fall off when drying.
- On the muzzle, press out the holes for the eyes with the head of a pin and paint over them with a regular marker. You can add color to the eyes after the craft has dried.
- It's great if the cat's nose is pink. You can also paint it after drying.