Option one
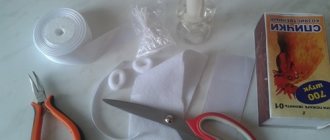
In this tutorial, to create a chamomile, you will need the following materials and tools:
- white satin ribbon four centimeters wide;
- green satin ribbon 1.3 centimeters wide;
- large yellow rhinestones for the core;
- hairpin or elastic band;
- lighter;
- tweezers;
- scissors;
- ruler;
- glue gun;
- white thread;
- needle.
We take a white satin ribbon and cut it into squares, you need to make eleven pieces to create eleven petals for one flower.
To prevent the flower from blooming in the future, the sides of all the squares must be processed using a lighter. Now fold each of the squares in half diagonally.
Then we fold the corners of the resulting triangle towards the middle.
Now you need to bend the rhombus in half vertically with the corners inward, so that a triangle comes out again. We grab the workpiece with tweezers along the long part of the triangle and cut off a straight corner using scissors. Then we treat the cut with a lighter and seal it. Now you need to straighten this blank and a petal will come out. Using the same principle, we create all the petals for the chamomile.
Read this: DIY flower arrangement made from paper and Thomas
We take a thread and a needle and begin to collect the petals into a flower. Take a white ribbon and cut out a circle with a diameter of two and a half centimeters. We process its edges over a lighter. To make the circle neat and even, it is best to make a template from cardboard in advance, trace it on tape and cut it out. Or use an object, for example, a large button.
Again we take the corner and the thread and stitch the edge of the circle, after which we carefully pull the thread together to form a ball and form a backing for the petals. Now it's time to make the leaves.
We take green tape and set it to five-centimeter segments. For one chamomile flower you need two such blanks.
To do this, cut out the leaf, cut off a corner on one side, or trace a template made of cardboard and cut it out. The edges of the workpieces must be processed over fire.
It's time to collect the flower. To do this, take a backing and glue petals to it on one side and green leaves on the other using a glue gun. We attach the back side of the chamomile with an elastic band or a hairpin. To make the decoration secure over the elastic, glue a thin ribbon to the backing of the flower.
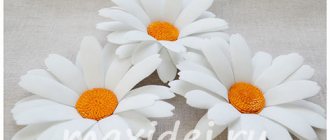
All that remains is to glue the old yellow one into the middle of the daisy.
The image above shows all the stages of creating a daisy flower using this technique. This option is quite simple, but the result is a lush and beautiful flower.
Second way
And in this master class we will analyze the method of creating a daisy from a thin ribbon. For work you will need the following materials and tools:
- white satin ribbon half a centimeter wide;
- a felt circle with a diameter of two and a half centimeters;
- beads for the core;
- liquid glue;
- tweezers;
- candle.
We take a white ribbon and cut it into pieces of eight centimeters. For one flower you will need twenty-four pieces of such blanks.
- Then all the strips need to be folded in half, so that the wrong side is inside, and using your fingers, create a fold in the center.
- We put one side of the segment on the other and seal it over the candle fire.
- Thus, we process all the stripes, creating petals.
We take felt and cut out a circle with a diameter of two and a half centimeters, glue one row of petals to it, consisting of eight pieces, the petals should be located face up.
Read this: Foamiran products using flowers as an example
Now we glue the second row, consisting of eight petals, on top of the first, between the petals of the previous row. And slightly shift the petals towards the middle. Now we take the last eight petals and glue the last row under the bottom of the flower.
It's time to make the core. To do this, apply a little glue to the middle of the flower and distribute it in the form of a circle. Then pour small yellow beads on top and leave the glue to dry for a few minutes, after which we remove the excess.
Using tweezers, correct the shape, creating a circle.
Then we apply glue again and pour in beads.
After this, we turn the chamomile over to remove excess beads. Let it dry for about five minutes, then, while the glue is still not completely dry, adjust it, creating a round shape in the middle. If there are not enough beads somewhere, you can still add them.
The wonderful chamomile is finished.
Video on the topic of the article
- There are many more variations of creating daisies using the kanzashi technique; below are several videos with lessons on creating some of them.
Source: https://knittochka.ru/cvety/romashka-kanzashi-master-klass.html
Daisies using the kanzashi technique
I would like to present to your attention a master class of daisies using the Kanzashi technique . We will make delicate rubber bands for the little fashionista.
We will need the following materials and tools:
- white satin ribbon 5 cm wide,
- a little green satin ribbon 5 cm wide (for leaves),
- rubber bands,
- suitable buttons for the middle,
- needle, white thread (optional),
- candle, matches,
- scissors,
- hot glue gun (or transparent “Moment” universal glue),
- tweezers (I have round nose pliers, they are also very convenient to use),
- decor as desired (for example, ladybugs).
Let's start making daisies...
Cut the ribbon 5 cm wide into squares. For 1 daisy we will need 15 white squares.
We make petals for our chamomile. We first fold the ribbon diagonally, and then fold the corners towards the center. Next we bend it in half...
Back view…
Carefully cut the tip of the petal slightly diagonally, grab it with tweezers, singe it and squeeze it...
Turn the petal over and cut off the base. We seal the lower sections together.
This is how the petal turned out...
If you solder the lower sections separately, you get a petal of a different shape.
In a similar way we make 15 petals.
The petals can be glued together using hot glue, or they can be collected on a string and carefully distributed on the base.
Let's prepare the base (white circle) and the green circle, it will be needed to attach the elastic band.
- We singe the edges on a candle...
- We grease the wrong side of the white satin circle with transparent “Moment” glue and carefully place our chamomile on top.
- Fix the middle with hot glue.
- I cut out the leaves from green satin and stretched them a little when singeing.
- Glue the leaves on the back side...
- On the front side, for beauty, I glued decorative elements: ladybugs.
- We secure the rubber band with a circle of green satin singed on the candle, gluing it on both sides with hot glue.
- Ready…
You can supplement chamomile with sharp green leaves. In this version we will need 13 white and 3 green squares.
Making sharp green leaves. Fold the tape diagonally, then diagonally again. Connecting the corners.
- We cut off the corner and seal the base of the petal well.
- We process the cut on fire.
- Front and back views of the petal...
In a similar way we make 3 leaves. Glue the leaves together and glue the petals to them.
- We fix the rubber band...
- These are the cute kanzashi rubber daisies with leaves we got!
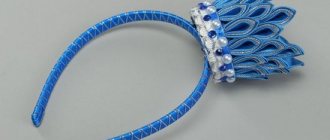
- For the openwork headband I used a thick felt base and simply carefully sewed it on.
- Have fun creating!
- I was glad to help!
Source: https://samayamk.ru/kanzashi/romashki-v-texnike-kanzashi.html
White chamomile flower
In order for the wonderful Kanzashi chamomile to come out, you need to purchase the necessary tools from a specialized store:
- satin ribbons of suitable colors;
- glue gun;
- felt;
- a simple elastic band or hairpin;
- matches or lighter;
- tweezers;
- scissors.
The first thing we need to do is cut the satin ribbons into squares. Their scale is 5 cm. To make one kanzashi daisy, you will need 14 white pieces and 3 green squares. If you want the chamomile to be without petals, then make a little more white blanks.
The overwhelming majority of needlewomen who are interested in the kanzashi technique come up with little tricks to make their work easier. Our master class (mk) was no exception. Look at the photo, with the help of such iron plates, you can prepare even blanks from satin ribbons without any problems.
To create delicate white petals, fold one element obliquely, and then fold the corners into the inner part as shown in the photo.
Then we bend such a blank again. Using tweezers, correctly grasp the element, as shown in the photo.
After which, we remove the unnecessary material indicated in the photo. During such manipulations, you can use a burner, if available. If there is no such tool, then work with scissors or a lighter.
Read
How to make beautiful and airy marshmallows using the kanzashi technique
Turn the petal over and remove its edge. At the end of such actions, this blank is obtained.
In order to consolidate the material and repeat some points of kanzashi, we recommend watching the video located on our resource.
Now we will make emerald leaves for the chamomile. Take a piece of green satin ribbon and wrap it diagonally several times. Take it with tweezers and remove the unnecessary part of the workpiece. In this case, you will have a certain element, as in the photo picture. Having completed the work on the foliage, we move on to creating the central part of the kanzashi chamomile.
If you want to make a beautiful center, use a yellow button. If it is not there, then a piece of felt, the same shade, or a cardboard circle, which is covered with satin, of a suitable color. Place the button on the cardboard and trace it evenly in a circle. Cut out a large circle for the base and a smaller circle for the center. To make two daisies, you need two circles for each. Cover them with satin.
Let's move on to connecting all the elements together. The video shows this process in more detail. In your work, use glue to lubricate the green petals and connect the first two elements, and glue the third with a protrusion. Then, attach all the white petals from the ribbons.
After everything, you should have a space in the central part, which is filled with glue. Wait for it to harden and insert the yellow core. Turn the daisy over and glue a large cardboard base to its back.
Our master class (mk) is finished, and we received the most delicate daisies made from satin ribbons. Use them as decoration for a hairpin, elastic band or headband. As a decorative material, daisies are decorated with small ladybugs.
Kanzashi chamomile - step-by-step master class
Today I want to show you how to make a daisy from satin ribbons using the kanzashi technique. It's very easy to make and a great start for beginners. And it will take very little time to make it. I advise you to try it - and you will be satisfied with your work.
Kanzashi daisies made from satin ribbons - master class
So, to make chamomile we need:
- white ribbon of any width (depending on what size you want to make the flower) I took 2.5 cm;
- thermal gun;
- glue;
- scissors;
- tweezers with a curved end;
- lighter or candle;
- any base (I took an elastic band);
- center for the flower.
Let's start creating a chamomile
1. The choice of fittings has already been made, look at what it should be approximately, and prepare similar parts. The cost of the product will be low.
2. Let's make two types of grass-colored leaves. The simplest ones are droplets made of thin bright green ribbon. More complex ones are pointed ones, made from green strips 2.5 * 10 cm. Bend larger strips in half and draw them diagonally with a soldering iron to cut them into two parts. We will only use one open side.
3. Form white sharp petals, modeling according to the usual pattern. The photo reflects it.
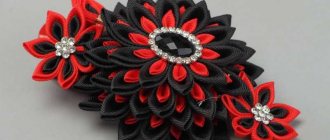
4. For a beautiful flower, prepare larger white sharp petals - 13 pieces from a 4*4 cm ribbon, as well as smaller yellow sharp petals - 11 pieces from a 2.5 * 2.5 cm ribbon. All of them will be used on two layers of chamomile . And also cut out white felt circles.
5. Glue all the white petals around the circumference onto the larger circle, and all the yellow petals around the circumference onto the smaller one. Prepare a sparkling flower button. We now have the main tiers for the future flower.
6. Glue all three indicated fragments on top of each other.
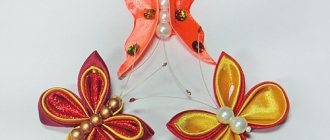
7. Collect green droplets in pairs. Glue a complex stamen to each pair. We used 2 red and 1 green for variety.
8. Glue the resulting mini-bouquets from the bottom to the flower.
9. The last pair of green loops will remain empty, without a stamen.
10. Glue on the leaves as the last layer.
Kanzashi chamomile is ready. And we decided that it would look very nice on an elastic headband for a little girl. This is true. Summer decoration looks original and fresh. In the warm season, mothers often go for a walk with their children, to the park, or to the playground. And why not dress up the girl. This exclusive hair accessory will not go unnoticed.
Video “Daisies from ribbons, kanzashi master class”
You might also be interested in:
- The Scarlet Flower
- Knitting - as a type of needlework, general concepts
- Making an automatic hairpin in kanzashi style
- Mak kanzashi – step-by-step master class
- DIY headband with a bow
- Nine tips for choosing yarn, answers to questions from beginners
- Flowers made of sharp petals in kanzashi style
- Kanzashi for beginners, step-by-step photo lesson,…
- about the author
- New master classes
Svetlana Sorokina
My group VKontakte MK in Kanzashi from Svetlana Sorokina
Chamomile Kanzashi. Three master classes
Hello, dear friends! The first month of spring is coming to an end, many birds have already flown in from the south and are now singing in different voices, delighting the soul with ringing trills! Now it’s rainy and cloudy here, but when the sun shines from time to time, the mood immediately rises 100%), after all, how dependent we are on sunlight, without it there is no life on Earth. And today we will make kanzashi daisies from different types of ribbons, with different centers, all this will be done with step-by-step master classes and video lessons.
In fact, if you take any flower, it can be made from satin ribbons in completely different ways, it all depends on your desire, the availability of certain tools, types of ribbons, and a little on your skills.
Once upon a time I already showed how to make kanzashi daisies, that time we made them as a gift for March 8th. But as I already said, the same flower can be made in different ways from different types of ribbons. Therefore, I decided to slightly supplement that master class and offer you a few more options for daisies made from ribbons.
Kanzashi chamomile
For the first version of chamomile we will need:
- White satin ribbon 1.2 cm wide
- Yellow satin ribbon 0.3 mm wide
- Scissors
- Candle
- Hot glue
- Yellow threads and needle
- Felt circle with a diameter of 3 - 3.5 cm
First you need to cut a white satin ribbon 1.2 cm wide into 4 cm pieces. You will need approximately 24 to 30 such pieces.
Using scissors, we round one edge of the segments, thus forming a semicircular petal.
Now we need a candle, carefully singe the semicircular edges that we just cut out, and to give the petal the appearance of a real one, we bring it from above to the candle flame, this should be done at a distance of about 15 cm from the flame, here you need to look at the situation, how close to bring the petal to candle. If you get too close, the petal may become damaged or curl inward too much, but we need this bend to be light, like that of a real chamomile.
How to make a yellow center for a daisy from a narrow ribbon
After giving the petal the desired shape, we wrap its lower edges inward and, pressing it with tweezers, melt it on the candle. If you want the chamomile to be fuller, the number of petals can be increased.
After you have made at least 24 petals, this is exactly the amount needed for one kanzashi daisy, we begin making the yellow center from 0.3 mm satin ribbon.
To do this, cut a piece 50-60 cm long; the more tape you take, the larger the center will be in diameter.
Now we take a yellow thread with a needle, tie a knot at the end of the thread and begin to string a yellow satin ribbon onto the thread with small stitches, when it has all been collected onto the thread, carefully pull the thread together, collecting the ribbon tightly, you get such an interesting yellow caterpillar.
Now we gradually twist the “caterpillar” into a spiral and stitch it with threads along the way; you can also use hot glue for this purpose. From 50 cm of tape you get a center with a diameter of 1.5 cm; if you need a center with a larger diameter, then simply increase the length of the tape.
When all the components of the kanzashi chamomile are ready, you can begin assembling the flower.
To do this, heat up the glue gun and begin gluing white chamomile petals one by one onto a felt circle with a diameter of 3 - 3.5 cm, lubricating the lower part of the petal with hot glue.
First we pass one row of petals, then we glue the second row of petals between the petals of the first row. If you want the daisy to be more voluminous, you can make additional petals for the third row. I only made two rows.
Grease the yellow center with hot glue and press it to the center of the flower. It turns out this white delicate chamomile. If desired, you can add green petals to it, for example, like we did in kanzashi daffodils.
Or you can leave it as is, just attach the daisy to a hairpin or elastic band, or to a headband or bandage. And then you can watch a video tutorial on how to make such a kanzashi daisy.
Chamomile made from ribbons
The next daisy that we will make will be made from a narrow ribbon; many needlewomen often wonder what kind of flowers to make from a narrow ribbon, and this daisy is one of such contenders. For this we will need:
- White satin ribbon 0.6 mm wide
- Yellow satin ribbon 1.2 cm wide
- Tweezers
- Scissors
- Candle
- Glue gun
- Ruler
- Felt circle with a diameter of 3-4 cm
In this ribbon daisy, the petals are very simple, even a child can make such a flower. We cut a satin ribbon 0.6 mm wide into 10 cm pieces. For one chamomile you will need from 24 to 30 such pieces; you can make more petals if you want to make a lush daisy.
We cut the ribbon, now we form the petal. We bend a piece of ribbon in half with the shiny side facing out, press the bend well with our fingers to form a sharp petal.
We place one part of the tape on the other, look at the photos and videos, squeeze it with tweezers and melt it on the candle. The simplest petal.
One more thing, the daisy turns out to be quite large, if you are making a similar flower for a very little girl, then you need to reduce the length of the segment, make it not 10 cm, but 7 cm.
When all the petals are ready, let's move on to the middle, this time it will be made of yellow satin ribbon 1.2 cm wide. We will need a piece 30-35 cm long. We fold the ribbon in half along the shiny side outward and bring the fold to the candle to fuse it. Then we cut the part of the tape that we did not melt with scissors, leaving a few millimeters at the end.
We made dandelions from foamiran this way, the principle is similar. After the entire section has been processed, fluff the tape with your fingers.
After that, using tweezers and hot glue, we roll the tape in a spiral, forming the middle.
After the entire ribbon is twisted into a spiral, straighten it with your fingers and glue it with hot glue to the center of the flower. So our daisy made from a narrow satin ribbon is ready.
Chamomile made from ribbons
The next daisy that we will make will be made from a narrow ribbon; many needlewomen often wonder what kind of flowers to make from a narrow ribbon, and this daisy is one of such contenders. For this we will need:
- White satin ribbon 0.6 mm wide
- Yellow satin ribbon 1.2 cm wide
- Tweezers
- Scissors
- Candle
- Glue gun
- Ruler
- Felt circle with a diameter of 3-4 cm
In this ribbon daisy, the petals are very simple, even a child can make such a flower. We cut a satin ribbon 0.6 mm wide into 10 cm pieces. For one chamomile you will need from 24 to 30 such pieces; you can make more petals if you want to make a lush daisy.
We cut the ribbon, now we form the petal. We bend a piece of ribbon in half with the shiny side facing out, press the bend well with our fingers to form a sharp petal. We place one part of the tape on the other, look at the photos and videos, squeeze it with tweezers and melt it on the candle. The simplest petal. One more thing, the daisy turns out to be quite large, if you are making a similar flower for a very little girl, then you need to reduce the length of the segment, make it not 10 cm, but 7 cm.
When all the petals are ready, let's move on to the middle, this time it will be made of yellow satin ribbon 1.2 cm wide. We will need a piece 30-35 cm long. We fold the ribbon in half along the shiny side outward and bring the fold to the candle to fuse it. Then we cut the part of the tape that we did not melt with scissors, leaving a few millimeters at the end.
We made dandelions from foamiran this way, the principle is similar. After the entire section has been processed, fluff the tape with your fingers. After that, using tweezers and hot glue, we roll the tape in a spiral, forming the middle. After the entire ribbon is twisted into a spiral, straighten it with your fingers and glue it with hot glue to the center of the flower. So our daisy made from a narrow satin ribbon is ready.
Kanzashi chamomile
Dear needlewomen, Kaleidoscope Decor continues its lessons on creating flowers from fabric, including ribbons. Today we will grow a chamomile from satin ribbons in our “garden of creativity”. Let me say right away that I am not the author of the idea of creating such daisies; they are presented by many craftswomen, including Japanese ones, where the kanzashi technique was invented.
Therefore, I just suggest you familiarize yourself with my method of assembling such a flower.
- For work, prepare the following tools and materials:
- The ribbon is white satin, 5 cm wide, the length of the ribbon depends on the number of flowers, their splendor, that is, the number of petals in each chamomile.
- Yellow ribbon, 3 cm wide, for decorating the core.
- Green ribbon on leaves, 5 cm wide.
- Scissors.
- Lighter or candle.
- Ruler.
- A small piece of thick cardboard or plastic.
Decorations according to your taste. For example, make a ladybug out of plastic according to our lesson.
Glue Moment “Crystal” or “Gel”; if these types of glue are not available, use a glue gun or a needle and thread to match the ribbons.
Cut 5x5 cm squares from white tape; you don’t have to use a ruler, just fold the tape as shown in the photo. Cut along the resulting line.
- Then cut the green and yellow ribbons.
- For one chamomile you will need:
- 12-20 white squares + 1 square for processing “working” areas on the back side of the finished flower,
- 3-5 green,
- 1-2 yellow squares (if the core is made double-sided).
Fold the white square diagonally.
Then from both sides to the middle.
Connect the resulting triangles.
Cut off the bottom part and singe it with a lighter.
Then cut off the bottom corner and heat it.
- This turns out to be a petal like this.
- We made these petals when we were preparing a hoop for a girl for school.
- Let us repeat that the number of petals varies individually according to your wishes, the minimum number is twelve.
- Petals for leaves are made as follows:
- Fold the square diagonally.
- One more time.
- And for the last time again diagonally.
- Cut the bottom corner with scissors and “solder” it with a lighter.
- The number of leaves is from three.
- Cut two circles from a piece of cardboard.
- The first, small in diameter according to the size of the desired core.
- The second one will cover the chamomile petals from the reverse side.
- Cut out a circle from the tape, a few millimeters larger than the cardboard blank, and cover the circle and cardboard (if there is no glue that does not leave marks, the option is to cover it).
- Set the workpiece aside.
Now start assembling the flower itself. Connect the leaves to each other as you wish, for example, glue one petal on both sides (sew) with other leaves, placing them just below the main central one.
- Sew all the petals and prepared leaves at the base, tighten the thread, secure and trim.
- Distribute the petals evenly in a circle.
- The result was a chamomile without a core.
- Cover the second circle with white, green or yellow satin ribbon, just like the core.
- Glue the circle to the back of the daisy.
- Decorate the front side of the flower - glue the middle and the ladybug.
- Sew or glue the finished flower to a hoop, pin, hairpin or elastic bands.
- The original decoration with a daisy made from satin ribbons is ready!
- And now we present to your attention several hoops made according to our previous lessons.
- Each option separately.
- “Rainbow hoop” is a very simple decoration option.
- Ordinary circles are collected on a needle and thread and glued together.
- The joint is covered with any decorative element (plastic button or bead).
- The hoop with a rose was created by analogy with creating a rose from satin ribbons, option two.
Creating beautiful flowers and various decorations using them with your own hands is incredibly interesting. Use your imagination, the Kaleidoscope Decor team wishes you creative success and inexhaustible inspiration!
Source: https://henddecor.ru/2013/06/23/romashka-kanzashi/
Leaves for chamomile
This master class (mk) will teach us how to make several types of green foliage for chamomile. The first method is considered the simplest and fastest. We cut out the elements from the ribbons and singe them with fire, stretching them a little. The resulting result is glued to the underside of the chamomile.
The second option will be a little more complicated. But, at the end of the master class, you will have an original piece of paper.
Read
Creating original brooches, necklaces and belts from ribbons using the kanzashi technique
Such a leaf will be pointed and two-layered in different shades of green. Cut squares of this palette, 5 by 5 scale.
A sharp petal is made like this: take a square and fold it in half. We put the resulting light-colored sheet into the dark element. The boundaries of the first workpiece should be slightly visible.
Fold what you got in half and cut off the unnecessary side, while connecting the edges of the elements with your own hands. At the end of this procedure, we will get a pointed petal. Make three such leaves, as shown in the photo, for two flowers and glue them together using a glue gun.
Look at the photo, you should get exactly the same green leaves as shown in the photo.
Choose your favorite master class (mk), and with its help, create individual and unique daisies, in the kanzashi style. And this step-by-step photo and video material will help you.
DIY chamomile made from satin ribbon
Daisies are cute and beautiful flowers and have won the hearts of many people. Do-it-yourself daisies are made from various materials. On our website you can find daisies made by yourself from plastic bottles, as well as foamiran and other materials.
Today we will look at a master class on making chamomile from a satin ribbon, the author of this master class is Alena Vakhrusheva. Alena has already shared with us her interesting master class on making a flower from corrugated tape. If you are interested you can take a look.
When I hear the word daisies, a well-known song comes to mind.
The daisies hid, the buttercups drooped, When I froze from the bitter words. Why do you girls love beautiful people? Their love is fickle. Why do you girls love beautiful people? Their love is fickle.
To make a daisy we will need: * Satin ribbon 5 cm wide. * Soldering iron. * Ruler. * Glue "Moment".
* Beads or your favorite middle.
How to make chamomile with your own hands: Take a white satin ribbon and cut a piece of 25 cm.
We cut the tape with a soldering iron at 3-4 mm intervals using a ruler (a ruler is needed so that the cuts are even), you also choose the width yourself, it all depends on how wide the petals you want to get.
Do-it-yourself kanzashi daisies: master class. Satin ribbon daisies:
Kanzashi daisies are an easy-to-make flower made from satin ribbons, often used to create jewelry, hair accessories and various decorative elements. This craft can be made in different ways.
Kanzashi “Chamomile”: master class on creating a flower
The easiest way is to collect an inflorescence from individual petals obtained by singeing pieces of tape over a candle or lighter. To work you need to prepare:
- lighter or candle;
- glue gun;
- white tape 12 mm wide;
- scissors;
- tweezers;
- a white felt blank for fastening the chamomile;
- yellow satin cord.
Let's start making the inflorescence.
- Cut the white ribbon into rectangles 3.5 cm long. To make one flower, you will need 26 petals.
- We round each segment on one side using scissors. You can not cut off the corners, but burn the tip of the workpiece more strongly with a lighter from the wrong side, then it will simply bend outward. It is important to use the middle or lower part of the flame, otherwise the edges will char and the tape will have to be cut again.
- On the other side of the petal, both edges need to be bent to the center and secured above the fire.
- Take a felt piece with a diameter of 2.5 cm and begin gluing the petals. There will be two levels in total, each with 13 leaves. The second row is glued in a checkerboard pattern.
- In the center you need to place a yellow cord rolled into a circle. If desired, you can tie a beautiful knot from it.
- Sometimes leaves, which are made from pieces of light green satin, are added to the finished chamomile from kanzashi ribbons. They can be made using a knife heated over a flame or in any other way.
Chamomile made from ribbon 5 cm wide
For the second option of creating a daisy from satin ribbons, you will need material 5 cm wide, white and green. The product consists of 14 square blanks for petals and 3 for leaves. If you plan to make a flower without foliage, there will be 17 petals.
To make a petal, fold one piece of white tape diagonally, turn the edges towards the center, and bend it in half. Grabbing the corner with tweezers, cut off a few millimeters on one side and singe the workpiece over a candle or lighter.
Then we turn the petal over and cut off the edge again. You should get a round petal. From such blanks you can make kanzashi daisies with your own hands not only from satin ribbons, but also from other materials.
On the lower tier, some needlewomen place a row of green leaves made using the same technique.
How to make the center of a flower
To make foliage for a chamomile from satin ribbons, fold a piece of green material diagonally twice, grab the edge with tweezers and cut off the tip. We fix it over the flame. To create the central part of the daisy, you can use a large rhinestone, yellow button or bead.
Another option is to cut out a circle of the desired size from cardboard and cover it with yellow fabric or satin ribbon. A compass or button will help you get an even circle, which you can simply trace with a pencil. Then all that remains is to assemble the flower by gluing the center to a felt blank with petals.
Ready-made chamomile can be used to create beautiful hair ties, headbands and barrettes. The product is well complemented by plastic ladybugs.
Kanzashi daisies from ribbon 1 cm wide
A simple and neat flower is made from a measuring tape, cut into 4 cm pieces. One inflorescence consists of 33 petals. The chamomile turns out to be three-layered, with 11 parts in each row. To assemble, you need to prepare a glue gun, a white felt base and a decorative cord. Separately, leaves are made from light green or green ribbon.
We process the pieces of white tape on both sides in the same way as in the first case. The difference in the technique of making petals in this version is that they are not bent outward, but towards the center. The decorative cord for the middle should be folded into a spiral or tied in a decorative knot. We decorate the center of the kanzashi chamomile with artificial yellow stamens or tint it with paint.
Chamomile from a ribbon 0.5 cm wide
An elegant and neat flower can be made from a 0.5 cm ribbon. The petals for it are made a little differently than in previous versions. The tape is cut into pieces 8 cm long, each of which is folded in half. The free ends are fixed above the candle flame. You need to make 24 petals for one chamomile.
First, 8 petals are glued to the felt blank, then 8 more in a checkerboard pattern. The second row needs to be shifted slightly closer to the central part of the inflorescence. The last layer is glued not on top, but under the first two, to give the chamomile volume.
As the center of the flower, you can use microbeads, decorative cord or small yellow beads strung on a thread or fishing line.
Master class “Kanzashi. Chamomile from a narrow ribbon"
Municipal budgetary educational institution of additional education
Center for Extracurricular Activities of Arzamas District
DEVELOPMENT OF A MASTER CLASS
« KANZASHI. CHAMOMILE FROM NARROW RIBBON.”
Target:
involving parents and children in joint creative activities in a relaxed and friendly atmosphere.
Tasks: -
introducing master class participants to the culture of Japan through the history of kanzashi;
— training in skills of working with satin ribbon;
- development of a sense of beauty and harmony, fantasy, creative imagination.
—
developing in children love and respect for parents and teachers through joint activities;
- fostering a sense of pride from the joint work of adults and children;
Relevance:
The master class is held to strengthen emotional and positive interpersonal relationships between children and parents in the process of making crafts.
Expected results:
— increased motivation of master class participants to form a creative individuality;
— practical mastery of craft manufacturing technology by master class participants;
Master class participants:
parents, children.
Equipment:
- White satin ribbon 0.6 cm wide.
- Green satin ribbon 5 cm wide.
- Glue gun and Moment glue.
- Candle and lighter.
- Felt circle.
- Scissors.
- Ruler.
- Additional decorative elements - ladybug.
- Yellow beads (for the center of the flower).
- Crocodile clip or elastic band.
- Laptop, presentation.
Good afternoon, dear parents and children! I am glad to welcome you to the master class. Today the kanzashi technique will be presented to your attention. You will get acquainted with the history of the technology and learn the skills of working with satin ribbons.
The history of kanzashi
Kanzashi is an original needlework technique that came to us from the East. Namely from Japan. This technique is based on origami, only in this type of needlework it is not paper that is folded, but silk ribbons and squares. The result is very beautiful flowers, which are traditionally used to decorate hair. It is not surprising that more and more fans around the world are mastering this ancient Japanese art.
This type of needlework arose thanks to Japanese geishas, who complemented their kimonos with original makeup and flowers using the kanzashi technique. Chamomiles, roses, asters, chrysanthemums - this is not a complete list of the types of flowers that craftswomen of that time made from silk. In Japan at that time, necklaces and bracelets were prohibited for women, so they decorated themselves using the kanzashi technique. The flowers turned out bright and incredibly beautiful.
A silk daisy or aster, woven into an intricate hairstyle, immediately attracted attention and made the girl stand out from the crowd. At first, flowers made from kanzashi ribbons were simply a fashionable attribute in Japanese society. Over time, such decorations began to reflect social status, belonging to a class of society, the presence of children and a husband. Translated from Japanese, “kanzashi” means hairpin. This refers to a wooden, bone or metal pin on which a silk flower is attached.
Even today, when wearing a kimono, Japanese girls and women always decorate their hair with kanzashi. Schoolchildren also wear silk origami jewelry, and Japanese brides decorate their hair with them at weddings.
This type of needlework does not require any special material costs, the main thing you need for the work is perseverance, accuracy and the desire to make a beautiful thing with your own hands. In this master class we will look at how to make daisies from a narrow ribbon for a hairpin. From a white satin ribbon we will get beautiful miracle flowers!
Chamomile -
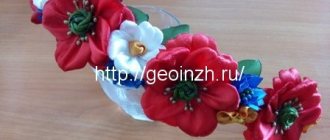
a symbol of family, love, fidelity, sweet simplicity and tenderness. White is the color of purity, the yellow sun of home warmth, uniting the petals into a strong family. Today, kanzashi daisies have become very popular, especially in the city of Murom, because for several years in a row we have been celebrating a wonderful holiday - the Day of Family, Love and Fidelity, of which this flower has become a symbol. Most often, this product is used to decorate hair accessories. Daisies made from ribbons look unusual and beautiful on postcards, photo albums, and notepads.
Chamomile, chamomile is a wild flower.
Chamomile, chamomile, white petal
There is a curl in the hair, a breath of air...
Stages of product execution:
- We take a tape 0.6 cm wide and cut it into 8 cm pieces. There are 35 pieces in total.
- We form petals from ribbons. To do this, bend it in half and swap the ends of the segment. The lower tip goes up, and the upper tip goes down. We combine these ends and solder them over a candle or lighter.
- Glue the petals in a circle onto a felt circle. Diameter approximately 4 cm. There are a total of 15 petals in a circle. In the second row we glue the petals, closing the spaces. There are 13-15 petals in total, which need to be distributed between the petals of the first row.
- Coat the center of the flower with glue and place yellow beads.
- We cut the green ribbon into rectangles of different lengths, fold it in half with the front side inward, cut one side diagonally, seal it and turn it inside out.
- On the back side of the circle with petals we glue two leaves.
- If desired, add decorative elements - a ladybug.
- Glue the finished product to an elastic band or hairpin.
Dear participants of the master class!
Today you got acquainted with the kanzashi technique.
Chamomile, the master class of which is quite simple, turned out to be tender and lush.
Thank you for your active participation and creative work! Thank you all very much! Goodbye.