Tools and materials
In order for the weaving of rubber bands on a slingshot to proceed smoothly and with pleasure, it is necessary to prepare all the materials and tools in advance. The main thing is that everything is at hand:
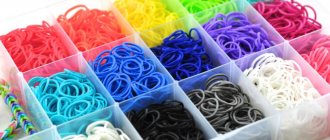
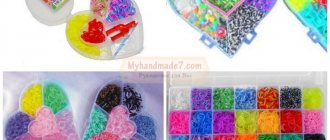
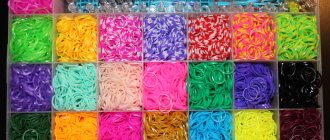
- Multi-colored rubber bands, which, due to their popularity, are sold in many places - in children's departments, handicraft stores, and stationery stores. On sale are both whole sets with a wide variety of shades, as well as individual bags of a certain color. Which shade to choose depends on the preferences of the master.
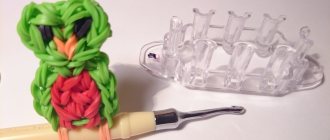
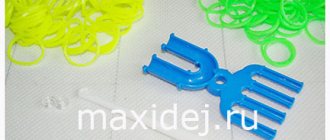
- Slingshot machine. It can be single-sided - with a handle and an arc of two posts, and double-sided - with two and four teeth.
- Hook for weaving with elastic bands.
There are many patterns for weaving products on a machine. It looks like a plastic plate with a different number of posts.
History of irises
Silicone rubber bands appeared on the craft goods market quite recently - in 2021. Their creator is Chong Chun Ng. In the process of helping his daughters weave bracelets, he invented a weaving machine. The prototype for its creation was a piece of board with nails attached to it, and the master used scraps from colored pipes as rubber bands. Chong's machine greatly improved the weaving process. His family invested all the funds from the family budget to support his father’s idea and obtain a patent for production. A Chinese toy factory has released the first sets of the Rainbow Loom brand. They consisted of multi-colored rubber bands and tools - a rainbow loom, a hook and a slingshot loom. Detailed master classes for beginners, filmed by the family, gave a big boost to sales and forever instilled in the hearts of needlewomen a love for a new type of creativity.
It is quite easy to weave small figures and bracelets from multi-colored rubber bands. Once you gain experience in weaving, you will be able to master making more complex crafts - 3D toys, accessories, phone cases. Some craftsmen took a risk and created clothes from this material. As it turned out, many are hunting for such an exclusive, and are willing to pay a lot of money for it. For example, this dress was sold at auction for 170 thousand pounds.
Related article: Crocheted sofa pillows with a popcorn pattern
Weaving figures
The process of weaving from rubber bands is loved by many, especially children, primarily because of the brightness and attractiveness of the resulting products. These can be bracelets, rings, keychains, as well as toys and clothes for a doll. Here are several options for crafts made from rubber bands on a slingshot, which are quite easy to make with your own hands, even for children without outside help.
Cheerful smiley
To create a smiley, you need to prepare yellow and black rubber bands. In the process of work, you need to follow simple step-by-step instructions:
- One yellow rubber band is wound around the right column in three turns.
- Two elastic bands are put on two columns at the same time, then with the help of a hook the triple element is dropped onto them and placed in the middle.
- Throw the next pair over both columns and alternately remove the double loops of the previous pair with a hook on both sides inside the slingshot. Repeat the process with two more pairs of yellow rubber bands.
- The double loop is transferred from the left column to the right one. The hook is inserted into the very first loop and put on the left side of the slingshot.
- A pair of yellow elements is again thrown onto both columns. The double loop is dropped only on the left side.
- Then the process is repeated according to step 3 for three pairs of rubber bands.
- After the third pair, the loops from the left column are transferred to the right one. As a result, there should be four double loops on it.
- A black rubber band is screwed four turns onto the right side of the slingshot. Find the original loop again, hook it and throw it over the left column.
- In the next step, repeat the process described in points 5 and 6.
- A black quadruple loop is dropped from the right prong of the slingshot. Then they do the process with another pair of yellow elements and transfer all the loops from the right side to the left. As a result, there were six double yellow loops on it. Lower them as low as possible.
- Find the original loop again and throw it onto the free right column.
- A black elastic band is wound four turns onto the left side, a pair of yellow ones are thrown on, and the loop is removed from the right side. The product goes down as far as possible.
- With the next three pairs, perform the same operation as in step 3.
- A quadruple black loop is removed from the left side. They weave another yellow pair. Then three double loops are thrown from the left side to the right. As a result, there were four elements on each side. Distribute them evenly on the columns.
- At the next stage, they make Smiley’s mouth. The black part is screwed onto both teeth in two turns. Position it so that it is in the middle between two paired loops.
- Two loops are thrown from the left tooth to the right one, then the black one is removed. The same loops are returned back. The same process is repeated on the right side, only the elements are not returned back.
- The final element. They throw on a couple of yellow parts, and remove all the loops from it. Then the remaining two are transferred to the hook and pulled into the loop. All that remains is to straighten and shape the product.
A smiley figurine made from rubber bands on a slingshot is ready.
Electric guitar on a slingshot
Children really enjoy playing with silicone figures. Many people like to use them not only as a toy, but also as a decorative element. For example, in the form of key chains. A rubber band guitar is a great option for all occasions. Using the instructions, you can weave a guitar from rubber bands on a slingshot. It is necessary to prepare rubber bands of three colors: pink, black and silver. The pink shade can be replaced with any other.
- A black element is thrown onto the right side in two turns.
- The pink part is thrown in the same way, but in four turns.
- Place two pink elastic bands on both teeth, and remove the quadruple pink loop from the right one. Placed in the middle.
- Weave a pair of pink elastic bands.
- Weaving double elements of a silver shade is performed. One loop is thrown from the left column to the right one.
- Remove the black element.
- Crochet the original pink quadruple ring and throw it on the left column.
- Continue weaving with pink parts: a pair on both posts, remove only the left loop.
- Then the usual operations according to points 4 and 5.
- Insert the hook into the first loop of the second chain, pull the double element through it and put it on the left prong of the slingshot.
- Repeat the process described in steps 8 and 4 for two elements.
- All loops from the left column are removed to the right.
- A quadruple ring is formed on the left, and then three elements are thrown onto both cloves. Remove the triple loop and weave through one triple and one double elastic band. Two rings of pink and silver shades are removed from the right tooth. The remaining loops are transferred to the adjacent column.
- A hook is inserted into the very first pink quadruple loop and placed on the right column.
- Three pairs of pink and one silver-colored elements are woven. Transfer the rings from the right to the left column.
- With the first loop of the last chain, perform the procedure according to point 10, only symmetrically. Three pairs of pink are woven again, and the last loop is transferred to the left column.
- They start a new chain. A quadruple ring is formed on the tooth on the right and the process according to step 13 is repeated. Only the last pair is silver.
- Then work is carried out with black parts. Three rubber bands are placed over two prongs. Loops are removed from all columns on it. Weave 6 more pairs of black elastic bands. Remove the rings from the left side to the right.
- On the left they form a pink ring of four turns. Then the next element is made on two teeth in two turns and the first loop is removed on it.
- All the loops on the slingshot are dropped onto three elastic bands.
- Points 19 and 20 are repeated in full. Then the number of elements is reduced: first, a pair of elastic bands are woven and finished with one. The latter is removed onto the hook and the loop is tightened.
Hearts of Angels
Necessary materials:
- Rainbow Loom Bands elastic bands 4 colors;
- clip;
- slingshot;
- hook.
Step-by-step instruction:
- Throw the first rubber band onto the slingshot, twisting it in a figure eight shape.
- Place a yellow elastic band on the tool and slip off the white loop on the right.
- Transfer the yellow elastic band from the left branch of the tool to the opposite one.
- Place a yellow elastic band on two posts and slip the white loop off the left one.
- Transfer the yellow elastic band from the right column to the left.
- Put on a white elastic band and slip the top yellow loops into class=”aligncenter” width=”1615″ height=”899″[/img]
- Throw a pink elastic band over two columns and throw a yellow loop on the right in class=”aligncenter” width=”1607″ height=”885″[/img]
- Transfer the pink loop to the right branch of the slingshot.
- Place the pink elastic band on the tool and slip off the bottom yellow loop on the left post.
- Move the top pink elastic band from the right column to the left.
- Put a white elastic band on the slingshot. Throw the pink loop from the right column into the middle.
- Place the hook under the pink elastic band and grab the white one.
- Throw these loops into the middle. Do the same with the loops of the left column.
- The remaining links of the bracelet are woven in the same sequence. For them you need to take elastic bands of other colors.
- Weave a bracelet of the required length. To complete the process, drop the bottom elastic bands to class=”aligncenter” width=”1613″ height=”895″[/img]
- Place a clip on the remaining two loops and connect the bracelet.
Video: Bracelet made of rubber bands on a slingshot without a machine
Description of the lumigurumi technique
Children really like the bright material for lumigurumi, the ease of working with it, and the huge selection of products that can be made from rubber bands on a slingshot, as well as on a special multi-row machine, an ordinary kitchen fork, and even on their fingers. Various animals that seem to come to life, fruits, cars and other toys, not to mention traditional bracelets: the potential of multi-colored rubber bands is truly limitless.
Together with the children, mothers and fathers are also happy to join in weaving figures from rubber bands on a slingshot. This is another opportunity to spend time with your child and create something together, and the ease of mastering the work makes weaving an easy and enjoyable activity even for beginners.
The kit for their implementation includes:
- machine - slingshot;
- hook (plastic or crochet);
- elastic bands of the required color;
- a little patience.
Working with simple models
There are many knitting methods for such weaving, so each master will be able to choose the optimal tools and materials for work of varying degrees of complexity. The main advantage of this type of needlework can be considered the possibility of complete immersion in the process, since such weaving will not require special skills or knowledge. In this case, it is important to follow the instructions step by step and get maximum pleasure from the work.
It is important to take a closer look at each method of weaving figures, while at the same time studying some popular patterns on how to weave figures from rubber bands on a slingshot. Products can be useful not only in everyday life, but also used as a gift for a loved one.
The slingshot is the main tool used by many beginners as well as more advanced experts. You can create such figures both on machines and without them, the time spent does not change. Slingshot weaving is considered a fairly simple and accessible method, since only two columns are involved in the work.
This procedure can be attributed to preparation for a more complex knitting method, for example, on Monster Tail or Rainbow Loom looms.
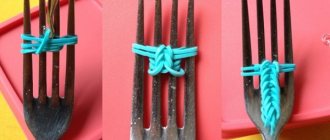
To begin with, it is best to use simpler weaving patterns. Weaving for inexperienced craftsmen includes the following methods of knitting: on fingers, knitting on forks, two sticks and on a slingshot.
Beginners don't need to worry too much about possible difficulties, since many simple toys made from rubber bands can be created using a simple pattern in a few minutes: first step, second step, repeating the second step to create a more voluminous composition and finish the job. Video instructions for creating figures on a slingshot can be viewed on Olya Rambul’s channel.
Tools slingshot and hook
A slingshot for weaving is sold in stores with almost every set of elastic bands. This is the most common lumigurumi tool due to its compactness and ease of use.
A mini-machine slingshot is a plastic device with two “horns” and a handle for holding the tool. The horns on one side are convex, which gives shape to the elastic and protects it from twisting. On the other hand, they are equipped with concave grooves, from which it is easy to pick up the elastic band. When working, the slingshot is positioned with its horns facing up.
Also, the lumigurumi kit usually includes a small plastic hook. It is very convenient for them to remove the rubber bands from the slingshot, moving it into the groove. If this tool is not included in the kit, you can use a regular crochet hook.
Some figurine ideas for beginners
After preparing the tools and materials, you can begin to work. For beginners, here are instructions for weaving the following figures:
Banana weaving using the lumigurumi technique
Due to the fact that the banana has a very simple shape, you can start learning the lumigurumi technique with it. To make it, in addition to the slingshot and hook, you will need 20 yellow and 4 black rubber bands.
We take the slingshot in our hands , placing its horns up and grooves towards us. Now you need to take one black elastic band, throw it on the right post of the slingshot and make three turns around it. Next, take two yellow elastic bands and put them on one by one on both posts, without twisting.
Using a hook, all three black loops are dropped into the center of the weave. This way we get the tail of our future banana.
Again we put yellow elastic bands on the slingshot, this time four pieces. Using a hook, we drop the bottom two from each of the posts into the middle of the weaving.
We throw four more yellow elastic bands on top, and move the four lower ones with a hook to the center of the weave. The last action must be repeated twice more, remembering to throw the four lower elastic bands into the center each time. After all these actions, there are only two yellow rubber bands left: they also need to be put on the slingshot, throwing off the four lower ones.
The banana ends with another tail, so we’ll make that too. To do this, we’ll put two black rubber bands on the slingshot, and throw the remaining two yellow ones in the center . We put the last black rubber band on the posts and remove both bottom ones. Now we transfer the remaining loop from the left column to the right one. The bottom loop of the same elastic band needs to be thrown off the right post with a hook, and the remaining loop should be removed from the slingshot and tightened. Next, give the figure the desired shape and the banana is ready!
Original heart pendant
If the banana turned out without any problems, then you can make a more complex figure: for example, a heart. With this craft you can decorate a pencil or pen in an original way, or attach it to your bag. For the heart you will need 46 identical rubber bands of any color. The classic version of the heart is made from either red or pink elastic bands.
Like last time, we take the slingshot in our hands, not forgetting that the recesses of the horns are located in our direction. We put the first elastic band on the right post and wrap it around it twice.
Next, the heart will be woven with pairs of elastic bands , so for both its halves we will prepare 11 pairs, for a total of 22 pairs.
We will put one pair of elastic bands on both posts of the slingshot and remove the two loops already put on it from the right post. Let's put two more elastic bands on the posts, and move the bottom two to the center. Using this example, you need to weave 11 pairs. After this, remove all the loops from the left column of the slingshot and move what happened to the right side of the column. The first half of the heart is ready!
If you haven’t used the hook before, you will definitely need it now . It should be inserted into the top loop of the first pair that was braided. We'll put this same loop on the left post of the slingshot, and on top of both posts we'll put the next pair of elastic bands. We fold the bottom loop from the left column into the middle and continue to weave the second half of the heart following the example of the first. By the end of the weaving, one last rubber band remains. It needs to be put on both posts of the slingshot, and all the lower loops removed.
Next, we change the elastic loop from the left column of the slingshot to the right one, and throw off the loop that was at the bottom. Remove the last loop from the slingshot and tighten it well so that the craft does not fall apart. All that remains is to give the figurine a heart shape and you can decorate your favorite pen with it.
Small realistic spider
The peculiarity of this interesting figurine , from which you can make a decoration for a pen or a pendant for a phone, is that the elastic bands are cut to imitate spider legs. Therefore, you need to tighten such a toy as tightly as possible.
To create a spider, in addition to traditional tools, we will need 1 yellow elastic band (for the ring) and several black ones.
We hang the yellow rubber band on the right post of the slingshot, while we wrap the first black one around the left one four times. We hook the next black elastic band with a figure eight to both posts.
Now we tie six black elastic bands in pairs and put them on the work machine. From the left column we remove two loops down, then we transfer two loops from the right to the left column.
We put the outer loops in the middle of the weaving, and then turn the slingshot on its side and carefully cut the rubber bands remaining on the right column with nail scissors - these are the legs of our spider.
Now it can be removed by the loop on the left post of the slingshot - it acts as a head. All that remains is to round the head, straighten the spider's legs and hang the little animal on the ring.
Volumetric five-pointed star
Unlike previous ephemeral crafts, the five-pointed star turns out to be quite massive and is perfect as a pendant for a bag. It will require rubber bands of at least three different colors - this will make the figure more fun. Don't forget about the hook and slingshot - our main working tools.
Mouse weaving on a slingshot
For beginners, it will be easiest to weave animals from rubber bands on a slingshot. As an example, you can use the creation of a mouse. For work, rubber bands of different colors are taken: blue - 53 pieces, black - 4 and pink - 1. Additionally, prepare a slingshot and a hook.
Procedure:
- Put a blue elastic band on the right side of the slingshot, wrap it three times and lower it.
- Throw two blue rubber bands over two columns.
- Using a hook, throw the lower elastic band, which is on the right side, onto the upper elastic bands.
- Make the mouse's nose. Take a pink rubber band and scroll it on the right side of the slingshot 4 times. After this, two blue elements are strung together, and the pink one is thrown on top.
- The lower element is folded over the upper one and lowered. Weaving continues with three pairs of blue elastic bands, after which it is necessary to transfer the right part to the left.
- Find the pink part and touch two pairs of rubber bands on the side of it, throw it over the right edge of the slingshot.
- Make an eye. Wrap a black rubber band around the left column 4 times. Insert two pairs of blue ones and cross the chain on the right side. Repeat with double threads and yarn over on both sides. Then a black rubber band is thrown on.
- Make an animal ear. Take a blue elastic band and wrap it 4 times around the right column. A pair of threads of the same shade are draped over both sides, the elastic moves to the right. Put two more pairs of blue elements on the slingshot, yarn over the two lower pairs.
- Knit three pairs of blue elastic bands.
- There are three pairs left on the left side that need to be transferred to the right column.
- Straighten the weave. The muzzle should already be visible - the animal's eye and ear. Now we need to make the second part of the face. To do this, you need to pry four pairs of rubber bands on the side of the pink color and throw them on the left column. We make an eye and an ear.
- Weave a tail. Throw on one blue elastic band and turn once. Move all the remaining parts onto it. Repeat the steps nine more times. Secure the result: throw on the blue one, transfer all the others onto it, remove it onto the hook and tighten the knot.
- Make erect ears. Place two rubber bands near the eye, above the nose and near the other ear. Take a blue elastic band, put it on the hook, and stretch one end through the entire length. Use the other end to tighten the knot. Bring the resulting loop down.
- Make the muzzle sharper. Flip the mouse. Place the hook under a pair of rubber bands over the eye, nose and second eye. Throw on a blue elastic band and stretch it, tie a knot.
- Hide the resulting loops under the elastic bands.
What types of devices are there for weaving from rubber bands?
The weaving process is performed in different ways. The latest hit is a special machine. It is a small platform with several protrusions for putting elastic bands on them. The dimensions of such machines are different.
For beginners, small, 8-column mini Monster Tail machines are suitable. To create complex three-dimensional figures, machines with a large number of protrusions are used.
There are also combined options. In these cases, several elements are connected to each other and form a larger structure.
If you don’t have a machine, you can weave a figure using different colors of elastic bands in other ways:
- On your own fingers. In this case, you will get figures made according to the simplest patterns. For weaving, elastic bands of no more than 2 - 3 colors will be used.
- An ordinary table fork. Simple products are woven on its teeth. A regular bracelet made of silicone rubber bands would work great on it.
- Pencils. They are also successfully used for weaving simple products.
- Hook for elastic bands. With its help, even three-dimensional figures are created.
- A slingshot is one of the types of weaving machines. Consists of two columns connected to each other in the shape of a semi-oval.
The master classes presented below will show you how to weave a figure out of rubber bands in various ways. Including imagination, products are given an original design. To do this, use accessories: beads, plastic rings, etc. You can also diversify the product through color combinations.
How to weave animals from rubber bands
According to Charles Darwin's theory, life originated in the depths of the ocean. Single-celled organisms appeared first. Then, they merged into more complex, but invertebrate forms.
Adapting to environmental conditions, the first inhabitants of the Earth changed. This is how fish appeared. Some of them sought salvation or food on land.
Gradually, the fins transformed into paws. Here come the reptiles. Cold-blooded animals are highly dependent on the weather. To survive, some began to maintain a constant body temperature.
Warm-blooded, for now, the crown of nature. Let's not refute Darwin's theory. Let's create animals in the same order, only not from flesh, but from colored rubber bands.
They became a fashionable hobby that first captured English-speaking countries, and then the whole world.
Clown fish made from rubber bands
The first fish on earth were jawless. The mouth was just an opening. Through it, animals absorbed microorganisms from the bottom sludge.
The class originated 460 million years ago during the Devonian period. Jawless fish did not survive to modern times.
Therefore, in the category “ how to weave animals from rubber bands ” we will consider the Clown.
This fish is not uncommon. The bright inhabitant of the seas even became the hero of the cartoon “Finding Nemo.” The curious fish set off on a journey across the ocean, naturally encountering a lot of dangers along the way.
The fearless hero fell in love with the audience and, of course, entered the series “ How to weave animals from rubber bands - Sergei’s Video .”
Sergey is a renowned master who can knit almost any figure. Here is a master class about the Clown:
Sergei created three-dimensional fish. But, you can weave animal figures and planar figures from rubber bands. Fish do not have to be colored. Here, for example, are monochromatic waterfowl:
How to weave animals from rubber bands? For beginners, the question seems difficult, or rather, the answer to it. But, in fact, knitting many figures is no more difficult than standard bracelets.
Next, there will be a couple of “elementary” animals. For now, he will move on to the next stage of evolution - reptiles.
Gecko made from rubber bands
Geckos can see through their heads. Without turning it, animals get a 360-degree view. So much for cold-blooded. This is clearly not synonymous with primitive.
The gecko mating pattern cannot be called primitive either. It is included in the section “ How to weave animals from rubber bands on a loom .” On fingers, pencils, even a mini-machine called a slingshot, the figure will not work.
Therefore, we stock up on a full-scale version of the installation and get to work:
The most common gecko in the world is the leopard gecko. The animal is named so because of its characteristic color. Green color is less common, but it does not require calculation of the color scheme in weaving from rubber bands on an animal loom.
video shows a monochromatic gecko. Although, you can make the mating process easier by simply choosing another reptile - a snake. She has no paws, her head and body are not as wide as those of lizards.
Scientists believe that birds originated from reptiles. Do you know that some lizards can plan and fly from tree to tree? So, in the past, the paws of some cold-blooded animals not only acquired membranes, but also turned into wings.
Parrot made from rubber bands
How to weave animals from rubber bands without inspiration? Here's the reason for it: - there is a musical group in which the vocalist is a parrot. The team is called Hatebeak.
The creative style is death meta. The vocalist is talented, but is capable of memorizing parts. Therefore, the group does not give live concerts. But Hatebeak albums are on sale. By the way, the macaw parrot sings.
He looks like the one whose figurine we are now knitting. So, let's learn how to weave animals from rubber bands. Video lessons were provided by the same Sergei.
It is interesting that parrots name their chicks. Scientists have found that birds always address their offspring in the same way, observing a certain intonation.
So, the figurine of a parrot is not only a symbol of creativity, beauty, but also intelligence. They say penguins are not deprived of it either.
Their figures can be found in the category “ how to weave animals from rubber bands on a fork .”
A fork is a handy substitute for a professional machine. Despite the primitiveness of the installation, you may end up with a bird like this:
Now we can move on to mammals. This is the largest class of living beings, which includes humans.
Mammals feed their young with milk, are warm-blooded, and are considered the pinnacle of evolution. They are the pinnacle in our business.
Making figurines of animals is more difficult than weaving bracelets from rubber bands. Animals are mastered last, as aerobatics.
Mammals made from rubber bands
Since mammals are the largest class of animals, we will not limit ourselves to one example. Let's start with domesticated individuals. Cats were one of the first to come to people.
Even though they walk on their own, they love affection. Humanity appreciates mustachios for their cute appearance and funny habits. It is even believed that cats can diagnose many diseases and help people treat them.
We invite you to see how to weave felines from rubber bands:
Cats, unlike people and dogs, do not like sweets. This is explained by a mutation in the genes responsible for taste receptors. But you can weave a piece of meat from scarlet rubber bands for a mustachioed one.
The figurine does not have to be attached to the handle. There are diagrams on easily weave animals from rubber bands so that the cats stand firmly on all four paws.
Horses have also been domesticated by humans. Once upon a time, they were the main means of transportation, but now they gallop not along city streets, but at special hippodromes as part of sports races.
But this does not mean that horses are forgotten by people. Films, cartoons, and stories are written about horses.
We will pay tribute to stately and intelligent creatures by learning how to weave animals from rubber bands. Video attached:
Interestingly, the world's first horse, Eohippus, was only 35 centimeters tall and weighed 5 kilograms. It took 60 million years for representatives of the species to grow and take on the appearance familiar to us.
While horses were easy to train, bears remained wild animals.
Among them there are also dwarfs and huge creatures. But the most common species on earth is the brown bear.
This is what we will consider in terms of how to weave animals from rubber bands. The video will easily explain the smallest details of the process:
The brown bear is an inhabitant of northern and temperate latitudes. We will not neglect those who live in the tropics. These include, for example, koalas and pandas.
Both species are listed in the Red Book. Increasing the real population is carried out in zoos and nature reserves. But, there is also a population of toy pandas.
You can weave animals from rubber bands without a machine. video required. The scheme is planar and can be easily performed if you have already mastered 3D bear cubs on the machine.
Giraffes also live in the tropics. The Romans gave them their name from two Latin words: camel and leopard. It seemed to people that the long-necked ones were big, like camels, and their coloring was like that of wild cats.
Giraffes are included in the category “ how to weave the easiest animals from rubber bands .” It only takes a couple of minutes to get to work. No machine needed. The figurine is created using hands and a hook.
So, let's see how to weave light animals from rubber bands. Video attached:
The giraffe is a great example of how to weave rubber bands into animals on your fingers . At the beginning of the article it was promised to give such examples.
But, a tropical inhabitant can be woven into a larger, more voluminous one, and the details of its appearance can be worked out.
So we figured out how to weave animals from rubber bands without a machine , on a machine, how to weave animals from rubber bands on a slingshot and using improvised tools.
Using toys as an example, we remembered Charles Darwin's theory of evolution. Materials also have a peculiar evolution.
Centuries ago, for example, people created only from natural raw materials - metal, wood, shells, clay. Now, synthetic materials are trending. Among them is latex.
By creating figures from rubber bands, we keep up with the times, making fashionable, unique and affordable toys. Hobbies develop imagination, fine motor skills, and charge with positivity.
Master class for beginners
For those who have picked up rubber bands for the first time, here is a master class on how to make the “Spider” ring. It is performed on two columns of the machine or a mini-slingshot, using a hook. Black rubber bands are used.
Further actions are performed according to the instructions:
- One elastic band is placed on the left column of the slingshot. The second - on the right, winding it four turns. The third is put on in two turns on both columns.
- Using a hook, an element created from four turns is removed from the right column and thrown into the middle of the machine so that it ends up on a double elastic band.
- Spider legs are formed. To do this, take two elements, put them on top of each other, and intertwine them so that they are connected to each other. In this way one pair of legs is obtained. In total you will need three pairs of legs.
- Place the blanks one by one on the machine, each ring on a separate post. The knot is located in the middle of the slingshot, and the rings are lowered as far as possible. Then an elastic band is put on two columns simultaneously in two turns.
- Using a hook, remove the first double element from the right column and throw it into the middle of the slingshot. On the left there is a single ring, put on first, followed by a double loop.
- At the top of the slingshot there are two double loops on each column and loops that play the role of spider legs. From the right side, the double loop is transferred to the left, and, in turn, from the left, it is removed in the middle. The elastic legs are cut exactly in half with scissors.
- Use a crochet hook to remove the remaining double loop from the loom. She plays the role of the head. Carefully tighten it as tightly as possible. A whole rubber band is put on the finger, and a spider is formed from the remaining elements.
This makes a great Halloween accessory for kids.
Weaving from rubber bands???? on a slingshot, see how and what you can weave a light
It’s easy to understand those who prefer to weave from rubber bands on a slingshot: a universal tool allows you to create a wide variety of crafts from colored rubber rings, in a reasonable amount of time and with a moderate amount of material.
In this material we offer master classes with photos and videos of the most popular and easy to repeat toys. Moreover, it is possible to follow the links to find lessons on easy weaving of bracelets and slingshot figures in other articles.
In addition, a number of videos of the most interesting products made from rubber bands are attached.
What is good about a slingshot for knitting from rubber bands?
Most often, a slingshot has two columns, but there are also four. More complex crafts are woven using such an instrument.
The posts of the tool must have hollows through which it is easy to grab the rubber bands with a hook. The top and bottom of each column are equipped with stops that prevent the rubber bands from slipping off the tool.
A larger slingshot will accommodate more colored rubber rings, which means the craft may be more complex.
While working on the tool, when placing the rubber bands, you do not need to twist them, otherwise the craft will be unsightly.
The work should be done carefully and avoid mistakes that may not be detected immediately, and everything will have to be redone.
When many rings are removed from posts at once, you need to use a thick hook; a thin one may break. To prevent the rings from jumping off when tensioned, the hook must be placed with the open part away from you.
Photo and video lessons of weaving using a slingshot
First we will look at several master classes with photos and descriptions. It’s very easy to work with them: you look at the picture and read the text point with the same number. At first, knitting may seem difficult, but after gaining experience, you will be able to repeat crafts from rings of a different color of your own choice or even come up with a new original toy.
You can even tie a pencil
Of course, you won’t be able to draw with such a pencil, but the black lead will never break. Our pencil is colored and short. It is possible to make it longer, but then it will bend unsightly. The loop at the top allows you to use the craft as a keychain. The mice clearly liked the pencil.
To work, you should prepare black, white, yellow and purple elastic bands, as well as a slingshot, hook and clip of any kind:
- Twist the black rubber band four times and put it on the right side of the slingshot. Add another double-twisted ring to both posts of the tool.
- Using a crochet hook, drop the black elastic underneath between the tabs and add a couple of white ones on the tool.
- Using a hook, drop the black rings from the posts into the space between them.
- Add another pair of white rubber rings.
- Crochet the two elastic bands at the bottom from the pair of posts between them.
- Attach a white rubber band twisted in half to the right protrusion of the slingshot, and then put on a pair of yellow ones.
- First move the white rubber ring twisted in half with your hook, and then the remaining white rings between the protrusions.
- Place a yellow elastic band twisted in half on the right post, then place a pair of yellow ones above the others.
- Using a crochet hook, first throw the twisted yellow elastic band, and then the lower yellow ones on two posts.
- Again, put the double-twisted yellow rubber ring on the right ledge and a couple of yellow ones above the rest.
- Crochet first the twisted elastic band, and then the lower yellow ones.
- Again, twist the yellow ring in half and add it to the right column, place a couple of purple ones above.
- First move the twisted rubber ring with the hook, and then the other lower rings to the center.
- Place a double-twisted purple elastic band on the right ledge, and add two green ones on top.
- Hook all the rings below to the center, hooking the twisted purple one first.
- Take the clip and insert all the rubber bands on the tool into it, removing our pencil from the slingshot. So far it has turned out to be “skinny” and we should build it up.
- Pass the hook through the very first white rings, which come immediately after the black ones, throw a couple of white elastic bands on the hook, pass them through the very first rings and return them to the hook. As a result, you should end up with a pair of elastic bands that goes through the very first white rings, and the loops of the threaded pair should be on the hook. Place these same loops on the left post. While weaving, we twisted the elastic bands in half and put them on the right post. If you look closely, they stand out on our workpiece; then we will need to weave, one by one putting them on the slingshot.
- First of all, you need to pick up the lowest twisted elastic band at the beginning of the pencil; it is white. Stretch it with a hook and put it on the left post. Throw a couple of yellow rings on the slingshot and hook all the white ones between the posts.
- Throw the next twisted pencil eraser over the right ledge, it should be yellow, put two more yellow ones on top.
- Using a hook, throw off all the lower yellow elastic bands between the posts one by one, first the twisted one, and then the rest.
- Place the next twisted pencil eraser on the right column, it is also yellow. Throw a couple of yellow rings on top.
- Hook all the lower yellow elastic bands into the center in the sequence you already know: first the twisted one, then the rest.
- The next twisted elastic band is yellow again. Place it on the right post of the slingshot and throw a couple of purple ones on top.
- Using a hook, transfer the lower yellow rings to the center, first twisted, then the rest.
- Put on the next twisted pencil rubber band, ours is purple. Put a pair of green ones on top.
- Using a hook, drop all the purple rings located below into the center, first the central twisted one, then the rest.
- Remove the clip from the green rubber bands and pull them onto the slingshot so that the pencil does not twist.
- Put on one green elastic band and hook all the green ones located below on both sides of the slingshot into the center of it.
- Remove the resulting figure from the hook; two loops of green elastic should remain on the hook. Pass one through the other to make a knot, tighten it. Our pencil craft is ready! It also happens that not everything is visible in the photo. In this case, the attached video will help.
This lollipop is absolutely harmless
This lollipop is even more beautiful than the real thing. Of course, you can’t eat it, but this candy doesn’t stick and doesn’t spoil. This is why our cat Masya loves to play with crafts made from rubber bands.
For weaving you will need white rubber bands for caramel and sticks, as well as elastic bands of any other colors. We took two-color blue-orange rings and will show the principle of weaving with them. Additionally, you will need a slingshot and any type of hook:
- First, let's weave the candy itself. Take a slingshot and put a white elastic band in a figure eight on both posts. Next, add a two-color elastic band, as usual, and then one white one.
- Using a hook, pick up the white rubber rings located below on the posts and throw them into the center between the protrusions.
- This is the current look of the craft.
- Put on one two-color elastic band in the usual way.
- Hook the bottom two-color elastic band on the protrusions and remove it to the center.
- This is the current look of the craft.
- Add a white ring as usual and hook the bottom white elastic with your hook.
- Move it from both ledges between them.
- Continue braiding, repeating steps 4 to 8 until you reach the required length of the braid, which we will then roll into a lollipop.
- When the desired length is obtained, do not add another elastic band, move the lower ones to the center, leaving one single ring on the slingshot.
- Place the prepared braid on the hook; two loops of the same white elastic band should remain on it. Using the same hook, pass one rubber band through the other and tighten to form a knot.
- Place the remaining long loop on the hook.
- The remaining loop is not long enough, so thread the white elastic through the elastic on the hook.
- Pass one loop through the other again to create a knot.
- Put the resulting blank aside and take the slingshot to start making the wand. To do this, we will only need white elastic bands; all of them will need to be twisted on the fingers twice and then put on. Put on one white elastic band in a figure eight, twisting it twice.
- Put on another white ring as usual, but don't forget to twist it twice.
- Using a hook, throw the bottom twisted elastic band into the center.
- Add another rubber band just like we did before.
- Move the lower twisted rings from the posts to the center with a crochet hook.
- Continue weaving, repeating steps 18 to 19. The stick can be of any length, but it is better to make it not very long.
- When you reach the desired size, without placing another rubber band, you will see that there should be one twisted rubber band left on the slingshot.
- Move all the rings from the slingshot to the hook, you should get four loops of one elastic band.
- Thread the elastic band of the blank we made earlier through all the loops on the hook.
- Twist the first piece with a spiral to get a lollipop shape. Place the hook at the top and pass it through all the rubber bands to get to the place where the stick is attached.
- Grab the protruding ring of the workpiece with your hook and pass it upward, through all the elastic bands into which we wound the hook.
- You can leave the tail sticking out or thread the hook through any elastic bands, grab the protruding ring and pull it through them. Repeat this action until the ponytail becomes invisible.
- This is how our lollipop turned out! The following video corresponds to the master class. With its help, you can clarify the unclear.
Ice cream on a Monster Tail machine
The next master class presents an option for creating ice cream on a stick from silicone rubber bands using a Monster Tail machine. It is necessary to prepare rings of three colors. Machine location: its point is on the left side. The process will be carried out using three columns at the top and bottom.
The work is performed in this order:
- Form an ice cream stick. A light brown ring is placed on the column in the front row, twisting three turns. Then the pair is thrown onto both columns at the same time.
- The triple element is pulled off with a hook and placed in the middle. There are a pair of elastic bands on the machine, with a triple one located exactly in the center.
- Then the couple pounces again. Sequentially, from each column, double loops of the previous pair are dropped into the center of the work. The process is repeated several times.
- Next comes the layer. The white elastic band is placed over the same columns, and the brown ones are removed onto it.
- In the top row of the machine, one white ring is put on three columns. In the lower one, one is put on the outer ones in four turns. Next, one pair of white rings is thrown on the left and right sides. Using a crochet hook, remove the elements in four turns and the top horizontal elastic band and place them in the middle.
- In the bottom row, a pink ring is placed on three pegs. Three pairs of the same color are placed vertically. Use a crochet hook to remove the pink ring and all the white loops. Next, the process is repeated with pink-colored blanks three more times. In the last circle, the middle remains empty, and the horizontal element is thrown in two turns.
- All loops are transferred to the central posts. Then another elastic band is put on them and the remaining loops are removed from it. Tighten the noose.
Angry Birds using a hook
The following instructions will teach you how to weave a cartoon figurine of the hero of the game “Angry Birds” from rubber bands. You need a hook and rings in 4 colors. Feathers will be formed from 2, and the remaining 2 will be for the beak and eyes.
Step-by-step instructions will tell you how to weave figurines of the cartoon characters “Angry birds” from rubber bands.
Step-by-step instruction:
- A white iris is placed on the hook in three turns. Then they take a white ring, fold it in half, hook it on the edge and throw a triple ring onto it. Move it further away onto the hook.
- Similar actions are performed with orange irises. This is the future beak. The orange element is pulled through one white loop and placed in the middle.
- All the loops formed on the hook are thrown onto a pair of red rings. Then they extend another pair.
- The next link begins to form. They put on the white iris in four turns, and on top of it they twist the black one in four turns so that it ends up in the middle of the white one. Then the very first white loop is hooked. Next, the white pair is pulled into the first loop, and then two pairs of red ones are similarly pulled.
- Again, hook the base of the first red pair and weave two more double red elastic bands. Next, an element protruding as an eye is dropped onto a loop located inside the work.
- All the loops are carefully removed from the hook, the work is unrolled and put on again. Another eye is formed in the same way. As a result, 6 loops were formed on the instrument. They are removed with a red pair and the loop is tightened.
All that remains is to straighten the product, position the eyes and beak.
Cherry pendant
To make a small keychain, use a slingshot machine. In addition to this, you will need:
- Hook;
- Rubber bands are red and green.
Wrap three turns of red elastic on the right post of the machine. Place a pair of red elastic bands on both posts. Remove the first rubber band and add two more irises.
Remove the bottom loops from both posts of the machine. Weave another row and move the loops from the left tooth to the right.
Hook up the first elastic band of the weave and transfer it to the left post of the slingshot.
Add the red pair and remove the loops from the left table. Place the top two loops of the right prong on the left one.
Add another pair and slip off all the loops on the left pin.
Article on the topic: Knitting a coat for women: diagram with description
Equalize the number of loops on the machine posts.
Repeat weaving again.
Place the initial elastic band of the weave onto the left post of the slingshot.
It remains to weave one more row and the cherry will be ready.
Slip off all the loops on the green elastic band.
Remove the resulting loops onto a green pair.
By weaving a few more rows, you will make a berry petiole.
The last loops need to be pulled through each other and tightened.
Having weaved the second cherry, you need to create a leaf. To do this, repeat the steps with the photo:
Gather all the parts of the keychain onto the green elastic band and tighten it with a knot.
Light figures on forks
How to weave a figure on forks from rubber bands will become clear using the example of the “Heart” keychain. The plugs should be connected in this way. Two products are placed next to each other and secured in this position. The resulting pairs are fixed with tape so that the back sides of the forks are directed towards each other.
Step-by-step master class:
- On the 4th tooth, screw the first ring 4 turns.
- They put another one on top of it and hook it onto a pair of opposite teeth. The first one is discarded and placed in the center. Place a ring horizontally on top of the three, twisting it in a figure eight. Then one pair is placed on the 3rd, 4th and 5th prongs. Drop the bottom loops and the horizontal loop.
- Throw two pairs of 5 teeth horizontally. They throw on a pair again, and then remove the horizontal ring and the last row.
- The process is repeated twice more in exactly the same way, but 7 teeth are already used.
- Next, they begin to release the teeth in this order. From the fourth cloves they are transferred to the third and fifth. Throw horizontally over three prongs on the left and right sides, and vertically over the opposite ones. Then remove as before.
- Remove elements from the 1st, 7th, 3rd, 5th teeth. Weave on the 2nd and 6th.
- At the end, the loops are removed and hidden inside.
Enderman from Minecraft
You can weave an Enderman from the popular game Minecraft. The figurine is all black with purple eyes, but this is not necessary. You can choose any shades.
If the Enderman will serve as a keychain, then select a ring or chain. The work is performed on a machine consisting of three rows. They are placed so that the middle one is shifted by one column. In the process of work, pairs of rubber bands are used.
All actions are performed according to the instructions:
- Two pairs are thrown alternately onto the middle and right column, and then onto the middle and left. There are 2 pairs for each row. To round the head to the third column of the middle and right, and then the left row.
- They form the eyes. Rings of a different color are wound three times onto the first column of the right and left rows. Then one elastic band of the main color - on the second columns of all rows.
- Transition from head to body. The 3rd and 4th columns are connected along the middle row. And then all 4ths of each row.
- Form a hand. They retreat two columns and begin to throw 7 pairs of the main color. A three-turn ring is placed on the last column. Using a crochet hook through a triple loop, a pair is pulled out and thrown onto the adjacent column. All pairs must be removed in a similar way. The last loops are thrown onto the pencil. The second hand is made in the same way.
- The torso is formed according to the plan in step 1.
- Next they make the legs. The actions are performed in the same way as for the hands, but you do not need to shoot with a pencil. The first pair connects to the body.
- The arms are attached to the upper column of the body.
- Next, remove the rubber bands from the machine. Start from the bottom points of the legs following the example of the arms. The loop from the column of the bases of the hands is thrown onto the middle row. The principle is the same - the lowest loop is pulled out and thrown onto the top column along each row.
- Finally, the figure is removed from the pins of the machine. She's ready.
Owl made of rubber bands
The following master class will show you how to weave an owl figurine from rubber bands for a keychain. To obtain an original effect, striped elastic bands of two colors are used, several white, orange and black.
Instructions:
- One iris is thrown onto the first and second pins of the machine on the left and right. In the middle row, a pair is put on the second and third columns.
- Brows. The pair is worn on the second column of the left and right rows and the third in the middle.
- Continue to form the head. To do this, pairs of irises are thrown onto the 3rd and 4th columns of the middle row. Two pairs on the outer rows, capturing the 2nd and 3rd, 3rd and 4th pins.
- Eyes. Triple black loops are put on the 2nd column of the outer rows.
- Nose. An orange iris is thrown over the 4th and 5th column in the middle. Then they round the head. Connect in pairs the 4th columns of the side rows with the 5th of the middle ones.
- Shoulders. Mirror the rounding of the head.
- Tummy. White irises are put on the middle row - 4 pairs.
- For the body on the left and right, take three pairs.
- Paws. An orange iris is wound onto a hook three turns and thrown onto rings of the main color. Place on the last pins of the outer and middle rows. The second leg is made symmetrically. A triple loop is thrown onto the last column in the middle.
- They begin to remove the loops. From the middle row, through a triple loop, remove the loops of your row one by one. From the outer columns of the upper body, the loops are folded towards the center. The head loops are removed in the same way.
- Finally, a loop is tightened at the top of the head, and the product is removed from the machine.
air feather
A feather keychain woven from rubber bands looks very original on a bunch of keys. Even children can handle it. You can choose any colors of rubber bands to create it. To work you need to take:
- Slingshot machine;
- Multi-colored elastic bands;
- Hook.
Having decided on the color scheme, arrange the elastic bands into six pieces. This is exactly how many of them will be needed to weave one row of a keychain. Place a white elastic band twisted in a figure eight on both prongs of the slingshot. Next, place three elastic bands of the chosen color on each column. Add a white elastic, placing it on both columns of the loom. Using a crochet hook, remove the white loops of the figure-eight elastic band from both posts. They need to be picked up and pulled through the rings of colored rubber bands and thrown through the column into the center between the teeth of the slingshot.
Place the next three elastic bands of a different shade on each loom post. Slip the white loops of the feather base onto the white iris. Continue adding colored elastic bands and removing white loops according to this pattern until you get the keychain of the desired size. To finish the braid, slip the last white stitches onto the single elastic band and tie it with a knot. The feather keychain is ready! See what beautiful feathers you can create using different color combinations.
Related article: Knitted booties without a seam: a master class for beginners with video
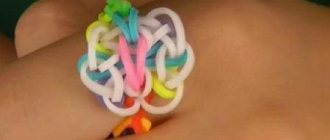
3D decoration for a handle made of rubber bands
Schoolchildren will be delighted with the 3D decoration for a pencil made from rubber bands. This detail resembles bright voluminous flowers. They are made from materials of the same color, and with combined shades. Especially if the material has a pearlescent color.
You need to prepare:
- irises in the amount of 50 pieces;
- clasp;
- hook for weaving with rubber bands.
The process is performed in the following way:
- The rubber bands are placed on the hook. The larger it is, the more voluminous the figure will be.
- They take another iris and pull it through everything on the hook. A loop is formed from it and tightened.
- Remove from the hook and distribute the parts evenly, forming a flower.
- The pencil is inserted into the middle of the part.
The decoration for the pencil, which is woven from rubber bands, is ready. There are many more options. By showing diligence and imagination, you can weave a simple figure or create masterpieces from rubber bands not only according to ready-made patterns, but also according to independently invented patterns.
Article design: Natalie Podolskaya