Required materials and tools
To make baskets, boxes and other small products, it is necessary to choose long and straight shoots so that they do not have knots or other notches. It is advisable to select branches whose thickness is about 1 cm or slightly less, and they should bend well and not break.
Good products are made from willow with orange or red bark.
Specialists collect the material themselves. It is best to harvest in winter or early spring, when buds have not yet formed on the branches. Before weaving willow vines, the branches are soaked in water and then dried.
Two types of willow are used in the work:
- Peeled - more suitable for making decorative items such as trays, flowerpots, baskets. After some time, this material turns from light yellow to a beautiful golden color, and the products become especially attractive.
- Unrefined - large products are woven from such rods - fences, gazebos.
In addition to the basic material, you will need special tools that will be needed during work. Before you start weaving, you need to prepare:
- garden pruner;
- tailor's awl;
- sharp knife;
- pinch;
- columns.
You will also need a large basin or barrel of water where the material will be soaked.
Experienced craftsmen use a spray bottle when weaving willow twigs; for beginners, this process will be difficult, so it is better to process the branches in advance.
Mastering weaving with a master class
Immediately before weaving, it is necessary to soak the willow twigs in hot water, and also during work it will be necessary to moisten them with water - all this to maintain the flexibility of the twigs.
For beginners in wicker weaving, it is better to start with a simple element - from the bottom, this is the basis of many wicker items, using a photo or video master class.
It is better to take rods for weaving with a reserve, because... for beginners, the rods often break during work; soaking or wrapping with a wet cloth for the bottom requires seven or more sticks with a diameter of 4-7 mm, a length of about 20 cm, more is possible, depending on the desired size of the bottom and thin rods (up to 3 mm in diameter) 30 pcs. and more, the length of which must be at least 50 cm. The thicker ones are used to create the skeleton (rays), and the thin ones in the form of a rope braid all the ray sticks.
The first step is to make a cross, around which weaving will then be carried out. You need to take 3 thick sticks (you can take four for each side of the cross), cut off a third of the thickness on them in the middle part and sharpen the ends from the thinner edge, for the convenience of inserting other sticks into the crack. The other three or four sticks must also be split in the middle with a knife or awl.
This should be done carefully so as not to split too much or the entire stick, because this cannot be corrected, and the product will be defective.
Then it all comes together.
Article on the topic: DIY New Year's toys step by step with photos and videos
It is imperative that all the inner sticks, on which part of the thickness was cut off, be turned to one wrong side, and the fit of the outer sticks to the inner ones, in the place of the crack, should be as tight as possible.
Now you should take two thin twigs and begin the braiding process. The ends of the so-called rope must be hidden in the crack of the axial sticks.
Two twigs diverge in directions, one will first go above the axes, an arc will go under the axes, then they change position. The inner guides must be braided first.
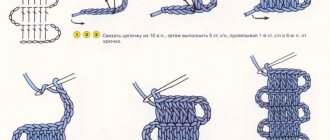
Two rows are braided (you can make three such rows of braiding), then you need to move the axes to the position of the rays, like the sun, in a circle so that the distances between all the rays are equal. The diagram in the photo below:
The braiding begins not of three sticks at once, but of each one separately in the same manner.
When the twig used to braid ends, you need to weave the next twig of similar size and color, as shown in the photo.
We must try to ensure that the ends of the finished twigs come out on the wrong side, then the front side of the bottom will be smooth and beautiful.
The twigs must be taken of different lengths so that the growth occurs evenly in different places. The larger the bottom of the product, the greater the distance between the beams of the cross, so if the product is large, you need to use more beams.
For the oval bottom of a basket or cradle, use a similar cross pattern:
Preparing the vine
Before weaving, the willow needs to be prepared. First, the bark is removed from the branches, and then it is allowed to dry for 5 days. It is best to leave the material outdoors. After the time has passed, when the willow branches are prepared and dry, they begin to work.
It should immediately be noted that when weaving a basket, a special technology is used, namely:
- the bottom and edges are woven with long solid rods;
- for the walls they use vines split into several parts.
For splitting you will need a special cleaver, which is made from hard wood. First, take a twig, at the very tip of which you need to make a small incision. The cleaver is inserted into it. Due to these actions, the branch is split into several parts.
After this, the split part is placed in water for several hours, and when taken out, the brown center is removed from it.
To properly process the split rod, it is recommended to use a plane. During work, the material will have to be constantly moistened; for this you can use a spray bottle or keep the branches in water and, if necessary, remove them.
As soon as enough willow has been prepared, you can proceed directly to weaving from willow twigs. It is better for beginning needlewomen to first familiarize themselves with some master classes.
Harvesting vines
Before you start creating a wicker item, you must first prepare a vine for weaving.
You can, of course, buy ready-made rods to start weaving right away, but it’s better to learn how to prepare the material yourself, this will help later in working on the product.
For weaving, shoots of the first year of growth are used, and they are collected all year round. The branches should be cut at a sharp angle with a knife or pruning shears, so as not to harm the tree; it is more useful to leave 3-4 buds on the branch remaining on the tree. When collecting twigs, it is important to check them for flexibility : the first twig cut from the tree must be bent in the place where the thicker end is; if it is not cracked, then it is suitable for decorative weaving. Spring shoots have a very soft bark, so the bark can be removed without pre-treatment, and if the shoots were collected at another time of the year, then the rods must first be soaked for 1-2 weeks or steamed for 1-2 hours, or boiled for 20 minutes, removed bark After peeling the bark, the shoots must be dried, otherwise the rod in the finished product will delaminate and break. The rods should be sorted to make it convenient during painting and weaving. Before work itself, the vine is again soaked in water to gain flexibility.
Related article: Crochet openwork angel patterns
Painting can be done with aniline dyes, a solution of potassium permanganate or herbal decoctions, immersed in the dye for a while, then the rods are rinsed with clean water and dried on a flat surface, preferably on the floor, so that there are no stains in the color.
Some rods are too thick for weaving small to medium sized items, so you will need some tools to cut the rods into narrower strips.
And a pinch or pinch helps to remove the bark from the twigs.
Making a basket
The simplest product is a basket, so inexperienced people should start learning the craft with this item. There are many methods of weaving, but each of them always uses the basic technique of wicker weaving.
Basket weaving technology
To weave a basket, you can purchase ready-made willow twigs or assemble them yourself.
Freshly cut rods filled with juice must be dried well, and before starting to weave the product, soak for 30-40 minutes in hot water to make them more flexible.
The tools you will need for the job are pruning shears, a sharp pocket knife, scissors and an awl or screwdriver.
The art of basket weaving has its own simple terminology. If you look at the bottom of the basket, you will see thick straight rods that radiate from the center in the form of rays and are called “spokes.”
Once they are folded upward to form the walls of the basket, they become the “racks” (or “box”).
All the sections of thin willow rods that bend between the spokes and posts are called "knit" (or "weave/weft"). Usually baskets begin to be woven from the bottom. Sometimes it is also called the base. Then the walls, bends and, if necessary, handles are woven.
Furniture for skilled hands
Do-it-yourself furniture weaving is done by skilled craftsmen in this craft, because... I had to weave a lot of different bottoms and baskets for these bottoms and gain experience. Also, to make furniture with your own hands using wicker weaving, you will need not only experience, but also a greater variety of materials and tools. Furniture requires strength, because... a greater force of gravity will act on it than, for example, on the bottom of a basket or cradle, so first a frame of sticks (2 cm thick or more) is built. Next, you need to attach racks to the frame, which will later be braided with thinner twigs or strips/ribbons of twigs; during the weaving process, perpendicular racks are regularly added for rigidity. You can braid with different types of weaving.
Related article: DIY scrapbooking paper from wallpaper using a master class
Weaving willow baskets for beginners step by step
Let's consider one of the methods of weaving a basket with a diameter of approximately 28 cm and a height of about 12 cm.
We will need the following materials:
- 6 thick willow branches (future knitting needles);
- 24 rods of medium thickness (for the side parts of the bottom);
- 50 thin branches (25 for racks and 25 for walls);
- 12 rods of medium thickness (for special weaving designed to connect the base and walls).
There are five stages of basket weaving in total.
Stage 1: basic
Using pruning shears, cut 6 rods 35-40 cm long from a thick shoot. They will serve as basic knitting needles.
In the center of each of these three rods, use a knife to make a split 4-5 centimeters long. This split is called a "slit".
Place three split rods together and insert the remaining whole rods into the slots to form a cross.
Now we begin to weave the base itself (bottom).
Select the longest and thinnest rods. Take two rods and insert their thin ends into the slot, as shown in the photo.
Separate the twigs, pass thick knitting needles between them and braid them like this, passing from above and below alternately. In this way, you need to make two circles to make a weave of two thin willow twigs.
Then continue to make the same weaves, only single ones, tightening the rods tightly and bending each of the knitting needles outward in turn. It is necessary to try to ensure that the distance between large branches is uniform, as the result should be a structure reminiscent of the spokes of a bicycle wheel.
The following picture clearly shows what exactly the pattern should be, obtained in the process of weaving around the knitting needles.
In the description of the method of weaving baskets from willow and wicker for beginners, one important detail is often missed, on which the quality of one of the most important elements - the bottom - directly depends.
This is the need to tighten the rods as tightly as possible after each weave of the knitting needle, without moving them up or down!
Using the method described, continue working, moving in a circle, until the twig runs out.
To increase the length, you should not use two new branches at once. Simply insert the twig with the pre-pointed end between the old twigs from the last rows, bend it in the desired direction and continue weaving at least a few more moves forward before changing the second twig.
Carefully trim the remaining ends. As a rule, replacement should be made when there is still about 10 cm left to the end of the branch.
The base of the finished product should be slightly concave so that the basket can stand firmly on the veranda or flowerbed in the courtyard of a private house. The technique for making the bottom clearly demonstrates that when the diameter reaches 7-8 cm, you need to tightly clasp it with your hands and slightly “push” the very center outward with your thumbs.
However, it is important here not to overdo it and not to bend the base too much.
Continue weaving until the bottom reaches a diameter of approximately 22 cm. It is advisable to time it so that this moment coincides with the end of the next twigs, the ends of which should be fixed by tucking them between the branches of the previous row.
Cut the ends of the twigs with pruning shears as close as possible to the wicker base itself, but so that they still rest against the knitting needles.
Here the bottom is ready. For beginners, the result may turn out a little different from the photo, but this is completely normal.
Stage 2: breakdown of the base
At this stage, new branches are added to the weave of the base to each spoke, which will then play the role of racks for the further creation of the basket.
It is important to consider that each wicker rod has a natural curve with an inner and outer part.
For high-quality weaving of our basket you will need 24 such branches. Cut each of them with scissors or pruning shears to create a pointed and long oblique cut, located strictly on the inside or outside of the rod, but not on the side.
Holding the base with the concave side down, press an awl or screwdriver into the weave next to the knitting needle as shown in the photo.
Remove the awl and immediately insert the prepared rod with its inside down and another rod on the other side of the knitting needle. Using the same method, insert two branches near each spoke.
In various descriptions of weaving durable willow baskets for beginners, it is always indicated that the rods must be inserted with the inside down so that the product itself bends beautifully.
If you insert them with the outside facing down instead, the basket will move apart.
On each stand, make a kink at a short distance from the beginning of the base weave (about 5 mm), simply pressing on them with your thumbnail.
Lift all the posts up, secure them with a hoop or tie them, making sure that there is no bending inward or skewing in any one direction.
Trim the bottom of the basic knitting needles at the same level as the edge of the weave, slightly below the bend of the posts.
Stage 3: connecting the bottom to the walls
One of the most important steps in weaving baskets is connecting the finished bottom with uprights to the side. In order for this transition to be uniform and look neat, use the softest light twigs of medium thickness in the amount of three pieces.
Place the basket on your lap with the base facing you - this will make it easiest to work with.
Take three twigs of uniform average thickness and trim their length so that it is the same.
Insert their tips into those weaves on the bottom that are adjacent to the vertical posts. In order for the rods to hold tightly, their tips should go deeper into the base by about 5 cm.
Start creating the braided pattern with the leftmost twig. Hook it and throw it over the first and then through the second rack of the second row. Keep in mind that the weaving should not be on the side, but on the edge.
This will allow you to obtain the most aesthetically pleasing connection.
Take the next twig, moving from left to right, and braid it around the posts in the same way.
Continue weaving around the entire base, always choosing the twigs one at a time and making sure that the branch you are working on is on top of the other twigs.
It is important to always tighten the rods tightly during the process, which will allow the product to obtain a beautiful shape due to good fixation of the racks at the very bottom.
After the first round of weaving, place the basket vertically on a table or any other convenient surface. This will make the further work process easier.
Leave the small end of the twig sticking out, as shown in the photo. Start adding new branches from left to right, simply moving the old twig a little and inserting a new one into the resulting weaving gap.
Make several weaves before adding the next twig.
As a rule, several circular weaves are enough to create a beautiful transition from the base to the walls. Pull the remaining loose ends down through the entire resulting weave, and then cut off with sharp scissors.
Stage 4: weaving walls
There are many patterns made from twigs of varying degrees of complexity, but when weaving a willow basket for beginners, it is better to use the simplest option, the diagram of which is presented below.
With an odd number of racks, it is permissible to use one rod as the basis of the weaving, but we ended up with 24 racks, so the best option is to weave from two branches.
Place the basket blank on a vertical surface, place some weight in it that will prevent the product from falling, and begin weaving. First add one twig, and only after throwing it several times over the posts in front and behind (approximately to the middle of the basket’s diameter) add the second one.
Next, the branches need to be alternated, using one or the other in turn.
When the twig runs out, add a new one as shown in the figure. Always prune a branch before it begins to narrow too much, so that the weave does not have too thin parts.
After making a few circles, remove the hoop supporting the posts. If they begin to move too far apart, return the mount to its place. In total you need to move up about 9 cm.
After completing the main weaving, take three of the same twigs that were used to create the connection between the bottom and the walls. Secure them by simply sliding the ends under the posts.
Make several circles of weaving light-colored rods of medium thickness and secure the ends tightly using the same method as described above at the stage of connecting the base and walls.
Stage 5: weaving the bend
The final stage of making a basket is weaving a fold, to create which you need to bend the vertical posts and continue the pattern with their help.
Take the three light twigs used in the previous weaving, attach them to one post and bend it to the right. Do this for all vertical branches.
Then take one bent post and pass it under the third post, passing through the previous two.
Do the same with all the racks one by one, moving to the right. Make sure each branch is bent down tightly before using the next one.
When only three posts remain in a vertical position, stretch them according to the same pattern, only wrap the ends behind the existing weaves, tightening them tighter.
As a result, there should be long ends sticking out. Cut them off with an oblique cut.
As a finishing touch, carefully examine the product and remove all small ends using sharp scissors or pruners, being careful to make an oblique cut flush with the rest of the walls or bottom.
That's all the technology for weaving different willow baskets for beginners. With its help, both ordinary things and real masterpieces are created.
The original appearance of the products is obtained by using willow twigs of various shades in certain combinations.
Popular crafts made from grapes
The berries are usually connected using strong connecting elements such as toothpicks or pieces of wire. Naturally, in this case you have to pierce the peel, which inevitably shortens the “life” of the craft.
Useful advice! To preserve your little masterpieces not only in your own memory, but also to give others the opportunity to admire them, you should get into the habit of photographing crafts and collecting a creative portfolio album. You can share your photos on social networks, and at the same time learn how to take good photographs.
Very often, grapes as a building material are combined with other fruits or their fragments - pears, apple slices, carrots, etc., using the characteristic features of their shape and color for their own purposes.
Read also Dream Catcher. DIY antique amulet
Funny grape caterpillar
This simple craft is perfect for making a first impression of working with this material. As you can see in the picture, it is very easy to collect the required number of grapes using toothpicks, the protruding sharp tips of which are carefully broken off or cut off with a sharp knife. The eyes are glued on purchased ones, especially for crafts, but you can also make them yourself from suitable materials by gluing them to the surface of the berry using pieces of double-sided tape.
To prevent the craft from falling to one side, small pieces of wire can be inserted from below along the entire length of the body, like the numerous legs of a real caterpillar.
Dog and man made of grapes
The figures presented below have different shapes, but are assembled almost identically - using toothpicks. The eyes are made from cloves (a culinary spice): we pierce the skin of the berry with the tail, leaving a characteristic cross-shaped inflorescence on the outside.
The little man has a cap made of an acorn sitting comfortably on his head, which makes him look somewhat like a house-elf or a goblin.
Typewriter
It's also an extremely simple craft that always makes you want to eat it. To make it you will need an apple slice, two large hard grapes cut in half with a sharp knife, a banana and, of course, toothpicks.
Everything is clearly visible in the picture; from banana slices we make a kind of washer, which we string onto the “axle”-toothpick between the “body”-apple and the “wheels”-berries. If your imagination suggests a good solution, you can modify the shape of the apple “body”.
Hedgehog made from grapes and pears
This is perhaps the most widely replicated model made from grapes, which is not a shame to present at an exhibition or put on a festive table. It is very interesting to do it yourself, including in a group, when children try to make their “favorite” the most similar, and, at the same time, funny.
Read also DIY Santa Claus costume
For the body and face of the hedgehog you need to choose a long pear, as in the picture. Carefully peel the part that will be the “muzzle”. If you manage to keep a solid tail (pears usually have no problems with this), at the end of assembly, put a dark olive on it as a spout. The eyes are the same carnations as those of the man and the dog.
Now carefully, row by row, using toothpicks, attach the hard grapes.
It is better if the grapes are elongated. As you might guess, and can be seen in the picture, the protruding sharp tips of the toothpicks are not removed, but on the contrary, they create the necessary “prickly” image.
As an option, the berries can be laid not in rows, but in a checkerboard pattern.
Peacock
For a half-volume “Peacock” composition, take a small round pear, which you cut lengthwise into two halves. It will look like the body and head of our bird from the front. The beak and legs are well obtained from the peel of a tangerine, the slices of which are then placed in a luxurious “tail”. Eyes - cloves or other suitable material.
One of the options for peacock made from grapes
Next, we form a fluffy peacock tail. It consists of toothpicks stuck into a peacock pear in a circle, as in the picture. Berries of various sizes and varieties of grapes are strung on toothpicks in the same order. Between the “feathers” you can place tangerine slices and banana slices, which create a background, but do not obscure the splendor of the “tail”.
Christmas tree made of grapes
The Christmas tree is another edible craft that requires a little more effort and skill. But don’t let this scare you, because if you have made previous models, the acquired skills will be enough, but it will be very interesting to make.
As you can see in the picture presented, grapes and other berries are arranged in a spiral on a cone-shaped base, strung, as usual, on toothpicks. We recommend taking a large carrot as a base, choosing, if possible, in such a way that the base (from which the tops grow) is as wide as possible - this will make the “Christmas tree” more beautiful and the model more stable (the rounded base should be carefully cut off with a knife in advance). Sticking a toothpick into the hard surface of a raw carrot is not at all difficult; it is more difficult to maintain a uniform spiral and even rows of berries. But the end result is worth the effort!
Read also DIY kite. Models, materials, manufacturing tips, drawings
Turtle
The apotheosis of our today's “master class” will be a model of a turtle.
Despite the fact that this is the largest of today's crafts, it is a pleasure to make! For an eye trained in previous crafts, the design is quite clear from the presented photo illustrations.
Let's just say that the turtle's "shell" is a melon cut in half; head, paws and tail - figuratively carved eggplant; yellow decorative elements on both sides of the eggplant “face” are the peel of the same melon; Well, everything else, incl. eyes - grapes strung on toothpicks.
History of the craft
Willow weaving was common in Rus'.
There was no peasant who could weave baskets. There were also masters - basket makers who were professional weavers. They wove a wide variety of products: round and oval, rectangular and conical, with complex and simple weaving, large and small. In those days it was simply impossible to do without baskets.
Women in them carried clothes to rinse to the river, took food on the road, harvested crops, and went to pick mushrooms and berries.
In the modern world, wicker baskets are also popular. It's hard to imagine a mushroom picker without a basket. The branches of the weeping willow contain tannins, thanks to which the mushrooms do not spoil longer, and the spaces between the twigs promote air ventilation.
If you have even the slightest idea and a little skill, it is not difficult to learn willow weaving. For beginners, step-by-step study and independent repetition of all stages of weaving products will bring a lot of positive emotions.
Selection of materials for weaving
The main advantage of basket weaving is the availability of consumables. Willow is a common unpretentious tree found in many regions of Russia. Usually craftsmen procure raw materials themselves.
Some people grow willow in their garden. And in individual stores you can even buy materials ready for weaving.
Willow twigs growing on sandy and loamy soil are best suited for wicker weaving. The shoots are cut using pruning shears or a sharp knife, choosing the longest ones without branches. Cut at a slight angle, leaving a few buds so as not to harm the plant.
Shoots with a wide and loose core are not suitable for weaving; it should be small in size. Young shoots are usually used.
To check whether the plant is suitable for work, you need to cut the branch and bend it 180 degrees at the butt - if it is cracked, it is not suitable (which means it will break during weaving); if not, then you can safely proceed to further processing.
Time of year for harvesting and processing rods
Rods for willow weaving are harvested all year round, but preferably in early spring and late autumn. The bark of spring shoots can be removed very easily without additional processing.
Twigs collected in another season need to be soaked or evaporated.
To soak, the shoots are dipped into running water - a river or stream, after having been secured to the shore with a rope so that they do not get carried away by the current. You can use it in a trough or barrel, but in this case a daily change of water is required. Tied bunches with shoots are immersed to the bottom, and a load is placed on top (a stone or any other heavy object except iron) and left for 1–2 weeks.
To reduce processing time from several weeks to several hours, instead of soaking, the rods are evaporated in any of two ways:
The shoots are placed in a tank, rolled up around the perimeter, filled with water and put on fire. After boiling, cook for 1–2 hours. Then take it out, let it cool and begin removing the bark.
The vine is no longer poured with cold water, but with boiling water, brought to a boil and boiled for 20–30 minutes. Take it out, cool it and remove the bark. It is better to clean the rods raw, starting from the butt (root part). During cleaning, to prevent the material from drying out, it is better to leave it in water and remove it in small bunches.
After the willow has been debarked, to finish the job, it must be laid out in the sun until completely dry. For ease of use, the rods are sorted and folded into bundles of equal size.
Barked rods are divided into two types - those prepared in the spring and those obtained by digestion. Boiled during use, they acquire a bright, glossy appearance, are easy to clean, and become better each time.
Uncooked ones, on the contrary, darken over time, acquiring a nondescript appearance.
Choosing the right material
The first thing you need to do is select the material. It must be of high quality. The service life of the product depends on this indicator. Usually the vine is cut at the very beginning of spring or autumn. It is believed that at this time it has great strength.
A high-quality vine branch is determined as follows: at the thickest point, bend it all the way. It should not burst or crack. A material that meets these parameters is suitable for weaving. An important nuance - each branch must ripen.
The vine must be processed, because recently cut wood will not be able to hold the shape of the basket. There are two methods for preparing branches: soaking and leveling. In the first case, the rods are treated under running water or placed in a container and the liquid is changed every day. The water should completely cover the wood. To prevent it from floating up, it should be pressed down with a weight. This procedure must be carried out within two weeks.
It is not recommended to use metal objects as cargo. Due to its effect, the vine will take on a different color.
The second method is faster and will take three hours. The rods must be placed in a large container and filled with boiling water. The mixture is boiled for about two hours. You should cool the vine and begin to separate the bark from the twigs. The peculiarity of the second method is that the vine branches will acquire brightness and shine. They are also easy to clean and wash.
Article on the topic: Kisey: thread curtains - how to make it yourself
Handle weaving
To do this, you will need a thick willow shoot, which is cut to size.
- The ends are sharpened and stuck into opposite sides of the product.
- Next, take 4-5 rods and stick them into the weaving at the end of the handle.
- They are braided several times and threaded into the weave from the other end.
- Then they take a few more shoots and do the same.
- They stick another rod nearby and braid the handle at the base, tightening it with a knot.
- The end is cut with a knife.
How much can you earn
One person can weave 5-8 baskets per day, depending on the level of skill and size of the products. In a month you can make 130-200 baskets. If you sell products at a price of 500 rubles. per piece, then per month it turns out from 65 thousand to 100 thousand rubles. without paying taxes and other expenses.
What costs may you incur?
At the initial stage, this means purchasing tools for work (if there is nothing suitable on the farm) and registering an individual entrepreneur. Then you will have to pay taxes, invest in advertising and, possibly, deliver baskets to your customers, for example, to stores - these are transportation costs.
You can weave a huge number of different products from the vine - vases, stands, bread bins, dishes, figurines, boxes, shelves, shelves, chests of drawers, tables, armchairs, sofas, etc.
Weaving wicker baskets can be the start of a serious business project. Having mastered the technique of wicker weaving and learned how to make simple products, you can expand the range of products and ultimately come to the production of wicker furniture, which is very popular as light and environmentally friendly.
It's nice to sit by the window in the evening in a wicker rocking chair, drink tea with currant leaves and inhale the evening aromas of summer. And it is you who can help realize it - as a manufacturer and seller of wicker furniture and other wicker products.
Over time, you can learn to braid braids and ropes in two or three rows with more complex weaving, for example, openwork. Sometimes, for the convenience of making wickerwork, wooden templates of round or square shape are made, which greatly facilitate the work.