Shoes occupy an important place in the wardrobe of any fashionista. For each season, special outfit or event, you need to choose the right pair of shoes, boots, ankle boots, etc. But every needlewoman can make a stylish and unique pair of shoes with her own hands. Summer boots using a crochet hook, knitting pattern and master class will help you knit a beautiful and light pair of shoes for both indoors and outdoors.
For the warm season, openwork boots made of cotton thread are suitable, in which you will be comfortable even in the heat. As decorations, you can choose beads and beads, ribbons and cords, rhinestones and metal buckles. The sole can be taken ready-made from old, no longer needed shoes or simple new slippers if heels are not planned.
Photos of various models of knitted boots
A small selection that will show how rich the master’s imagination is, and what models of such knitted shoes exist.
This adorable model with cute snow-white pom-poms will appeal to platform lovers. You will also have to master sewing, because the knitted parts will need to be sewn to the lining and to the platform.
Neat legs, even with large feet, this model will hide the defect. A loose shank will not only make the model comfortable, but will also show how graceful the legs are.
Ugg boots can also be knitted, if not for cold and frosty winters, then at the beginning of frosts you can walk in insulated models with a pattern of lush English elastic.
Here it is not only the knitting needles that need to be praised, the hook also did a great job. After all, the bottom was created with its help. It is difficult to create a dense and thick pattern with knitting needles; this is easy to do with crochet using single crochets and double threads, as can be seen in the model.
And finally, the model of the season. These are high knitted boots. They could use an accessory such as a handbag created with similar patterns.
Let's try to crochet boots with a step-by-step master class
You can also crochet these boots. The most convenient motif for this is hexagonal. The motifs are knitted separately from each other, then folded according to the pattern and connected to each other with a needle or double crochets. A total of five fragments are needed for each boot.
The sole is connected to the rest of the boot according to the same principle as in the previous description. Make holes, tie with double crochets, and connect with the rest of the boot. If you follow the second pattern and knit the boot together with the insole, then the knitted part will be on the inside, the insole on the outside - the result will be a very warm and wear-resistant product. Or you can do without felt soles, but then it’s better not to walk on the floor in such shoes - such a sole will wear out in just one or two weeks.
Clear and detailed video material will help you understand even better the intricacies of knitting or crocheting boots.
Knitting patterns for boots
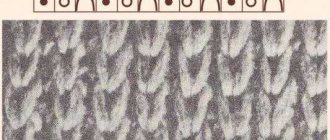
We have already started this topic a little, regarding a suitable pattern. Here is an English elastic band - it will make the boots voluminous. For indoor models, it can be advantageously used for the shank, and the satin stitch can be used to make the toe.
The most common pattern for boots is braids and arans; it is suitable even for beginners. There are so many of them that your eyes simply run wide at all this splendor.
Garter stitch will be less popular, but it can still be used because the fabric is much thicker than regular satin stitch.
Patterns with rhombuses are the trend of the season and, perhaps, it is not so voluminous, but it also deserves attention.
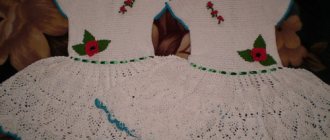
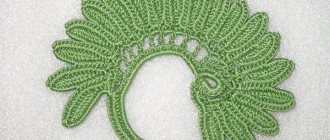
We study the second option in the master class: openwork pink boots
For work you will need: a finished last, insoles, shoe glue, 200 g of cotton threads, hook No. 2. Decorative flowers are used as desired.
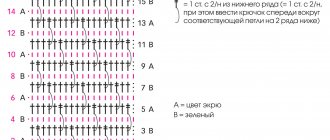
We tie the insole with two rows of single crochets. For the heel: we tie the back half of the sole with 10 rows of half double crochets. For the sock, select 10 loops in the middle, knit 2 rows with single crochets, 10 rows with half double crochets, add 1 loop on each side and knit 2 side stitches together. Then we knit a fantasy pattern up to the heel. We sew the junction of the toe and heel. We knit the upper part of the boot with a fancy pattern for 21 rows, making lifting loops on the inside. At the end we knit 2 rows of single crochets. The pattern is knitted according to this pattern:
In the first row: 3 chain stitches, skip 1 loop, knit into the next stitch (3 double crochets with a common top, 3 chain loops, 3 double crochets with a common top), *skip 3 loops, knit into the next one (3 stitches double crochet with a common top, 3 chain stitches, 3 double crochets with a common top)*, repeat from * to *, skip 1 loop, knit 1 double crochet.
In the second row: 3 chain stitches, 1 chain stitch, 3 double crochets in an arch of 3 chain loops, 1 chain crochet, 3 double crochets in an arch of 3 chain loops - continue to the end of the row and end with 1 double crochet.
Further, in the third row and in all odd rows, knitting is similar to the first row, in each central column of three. In the fourth and all even rows: similar to the second.
For the lace, we collect a chain of air loops and knit 1 row with single crochets. Pass the cord through the holes in the pattern. Glue the knitted part to the finished block. The boot is ready!
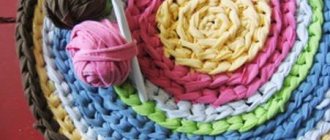
Sole preparation
No knitted boots are complete without soles, be they indoor shoes or outdoor models. Therefore, it is necessary to properly prepare it so that the boots can serve as long as possible.
Let’s consider the option with a felt insole, and then we’ll clarify the nuances for an outdoor sole.
To begin work, you need to make holes in the insole around the entire perimeter. We choose an arbitrary distance between them, depending on the thickness of the thread and the size of the hook. Holes can be punched either with an ordinary awl, which will complicate further work a little, or with a special device, which many craftswomen who work with fabrics and leather have.
We begin to braid our sole. Single crochet is ideal for these purposes. We do everything extremely carefully, since this is how the base for our boots is formed. And the further service life of the product depends on its quality.
If you take a sole for street shoes, then it is better to punch holes in it not from the bottom, but from the side. This will extend the life of the threads, which quickly fray from contact with hard road surfaces.
Knitted red boots description
Red boots with knitting needles description
Published: 08/30/2013.
Knitted red boots
These boots are knitted in two parts. The bottom part is the slipper itself, which is sewn onto the sole. The top part is decorative, it is knitted with braids, and buttons are sewn to it, which serve only as decoration.
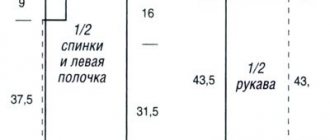
Size: 35/37 - 38/39 - 40/42 Foot length: 22-24-26 cm. You will need: 300 g of DROPS ESKIMO yarn (100% wool, 50 g/50 m.) red color No. 08, 6 decorative buttons, boots are knitted with knitting needles, sharp at both ends 6 mm. Knitting density: 13 p. * 17 r. = 10*10 cm. Scarf pattern (knit back and forth): knit all stitches. Scarf pattern in the round (on double-sided knitting needles): 1 row of knits. loops, 1 row purl. loops Pattern: knit according to the pattern, the pattern is shown on the front side
Bottom part of boots: cast on 36-38-40 sts on double-sided needles, join in a circular row. Knit with a garter pattern - 4 cm. Foot: leave the first 9-11-11 sts on working needles, set aside the remaining 27-27-29 sts .Continue to knit with a garter pattern back and forth over 9-11-11 stitches, at the same time pick up 1 st on each side in the first row = 11-13-13 sts. At a height of 7-8.5-10 cm, close on each side 1 st = 9-11-11 sts. Pick up 12-14-16 sts on each side of the center 9-11-11 sts, then return the sts to the working needles = 60-66-72 sts. Attach contrasting thread, then measure the product from here. Place one mark in the center of the part on the toe side and one in the center on the heel side. Knit in the circle with a garter pattern for another 2 cm. Knit with a garter pattern in the circle, at the same time decrease 1 stitch on each side of the mark. (2 knits together) - 4 loops decreased Repeat such decreases in every second row to a height of 5-5-6 cm. From the contrasting thread, sew together the seam under the foot from mark to mark. Fasten and tear off the thread.
Upper part of the boots: cast on 22 sts. Knit 2 rows of garter pattern back and forth, add 6 stitches in the last row, evenly distributing them along the row = 28 sts. Knit according to the pattern to a height of 32-33-35 cm, decrease in the last row 3 loops over each braid - (2 knits together) – 3 times over each braid = 22 sts. Knit 2 rows of garter pattern. Close the loops. Place the cast-on edge over the closed one, sew on, also sew on 3 decorative buttons
Assembly: put the top piece on 2 cm of the bottom piece, sew on. Knit the second boot in the same way.
Share with us the work you have done! You can see how to upload your work to the site at the very top of the “Your works” section
Add a comment
prjaga.ru
- How to make a bandana with your own hands
- Make an autumn tree with your own hands
- DIY macrame flower pots diagrams
- DIY oriental dance belt
- How to make a house of matches with your own hands using glue
- How to make a house of matches with your own hands using glue
How to decorate a notebook beautifully with your own hands- How to decorate a notebook beautifully with your own hands
- DIY fabric rose master class
- DIY fabric rose master class
- DIY sheep made from cotton swabs master class
Simple summer boots
Here are another easy-to-make knitted boots. The description of working on them is a little similar to the previous model, but there are some nuances.
They are also knitted in single crochets. Only now, initially, shoes are divided into three parts: toe, heel and shaft. First of all, we knit a sock, starting from the edge of the knitted sole. We hook each new row to the previously prepared edge. It is very important here at the beginning of work to add the required number of loops so that the foot fits freely in the shoe.
Having knitted half of the sole, we move on to working on its back part. Here the knitting direction changes. We hook each new row not to the base, because we started knitting from there, but to the front part, as if connecting them together. It is important not to forget to leave an armhole through which your foot will be inserted into the shoe.
And the last stage is knitting in the round, as in indoor boots, until the boot reaches the desired height.
Street ballet shoes
If you want to make a walking version of summer slippers, then stock up on the following set of tools and materials:
- Cotton yarn for knitting ballet shoes.
- Thin Iris threads for tying the top edge.
- The hook recommended for the yarn you have chosen (indicated on the label).
- Thin insoles.
- Rubber sole (either taken from an old pair or purchased from a shoe supply store).
- Super glue.
How to crochet ballet shoes is demonstrated step by step in a master class for beginners with photographs.
To begin, knit the edges of the thin insoles using basic cotton yarn. Maintain a distance between loops of about 5 mm. It is recommended to start working from the middle of the heel.
Next, knit 6 to 7 rows in a circle with single crochets. The thinner the yarn, the more rows you will have to complete. To understand how many rows you need to crochet, you need to try on outdoor ballet shoes on your foot after each row. This way it will become obvious when to start making decreases.
Then perform another 5 to 6 rows with single crochets, decreasing 3 stitches in each row at the toe of the slipper. Do not forget to try on the product after each knitted row.
Once finished, tie the top of the piece in a voluminous crab stitch using thin Iris threads. You will need to perform 1 row using this technology.
Take a detailed look at the video on how to crochet the top of adult ballet slippers with a “crawfish step”:
Use the method described above to make a second slipper.
After the knitting process is completed, apply superglue to the insoles and connect them to the rubber soles. In order to ensure a more reliable result, press the edges of the ballet shoes with clothespins. Leave until completely dry for the period of time indicated on the glue packaging.
To get a more visual lesson on how to crochet ballet shoes for beginners, check out the video and use the recommendations of the masters during the creative process:
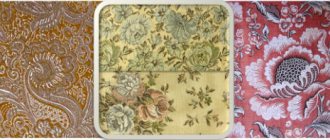
To give your shoes a festive look with romantic notes instead of a casual one, decorate the toe with ribbon bows or crocheted flowers.
Below are the most successful and simple diagrams and photos demonstrating how to crochet flowers on street ballet shoes:
Creative success and inspiration!
0 Comments