Nowadays, polymer clay is a very popular material for creating handmade souvenirs and jewelry. Beautiful handmade polymer clay dolls are at the peak of popularity. In addition, they are considered practically an architectural or pictorial masterpiece.
At first glance, it seems that creating a toy beauty with your own hands is simply unrealistic. However, in reality the process is quite simple and accessible to everyone.
How to make a doll from polymer clay
Such a plastic material as clay is unique, thanks to it you can create a product of any complexity. Each craft made from this material is unique, because the author puts his soul into it. Dolls are considered especially valuable. We will tell you how to make a doll from polymer clay in our article.
Preparation for production
We have already looked at various types of crafts, you have learned how to make animals from plasticine and it is time to think about more serious creativity, for example, creating crafts from polymer clay.
Making a doll based on polymer clay is a lengthy process. Sometimes it can take several months to create this sweet masterpiece. Before you make a doll from polymer clay, you need to understand that this is not easy work.
Before you start you need:
- carefully consider the image of the doll;
- choose the type of product (dolls can be static or articulated);
- draw a drawing (exact parameters are indicated on it and details are drawn);
- prepare all the necessary materials for manufacturing based on well-thought-out details.
It is appropriate to say that there are few people who make dolls based on polymer clay. Thanks to hard work, almost every one of them becomes famous. The works of such people can be found in special magazines.
It is impossible to make completely identical dolls; each one differs in small details. It is this nuance that makes the finished products attractive.
Let's move on to a more detailed look at the topic of how to sculpt a doll from polymer clay.
To learn the basics, we recommend an article about polymer clay modeling for beginners
Polymer clay dolls: master class on dolls with photos and videos
Polymer clay is such a unique material that sometimes you are surprised at what can be made from it. Any decoration is individual and unusual.
Each toy or figurine, molded from polymer clay, carries a piece of the author’s soul. Such things can even be observed among collectors.
But do-it-yourself polymer clay dolls are considered of particular value.
It can take a craftsman more than one month to create one doll. After all, this is quite painstaking work that not every person can withstand.
First, as everywhere else, an idea and an image are thought through, after which the choice of type is determined. After all, a doll can be either static or articulated.
After which, a drawing is necessarily drawn, which describes all the details with exact parameters. And only then can you prepare the material to create an idea.
Works of masters
There are not many people in the world who create dolls from such material. But at the same time they were able to become quite famous. Their works can be found in specialized magazines and websites. Below, for general information, will be presented photos of designer dolls made of polymer clay.
Each doll is good in its own way. They are very different, but that doesn't make them any less attractive. Any experienced collector is willing to pay a good amount of money to have similar toys on his shelf.
We sculpt ourselves
If you are already familiar with polymer clay and know all its intricacies, then you can try making a doll. But get ready for the fact that such an activity will take a lot of time and effort. Don't forget to think through all the details, from what color your character's skin will be, to small details on clothing or additional attributes to complete the look.
Before you start, it's worth preparing. To make a doll you will need:
- polymer clay;
- knives of various designs;
- sandpaper of varying hardness;
- pliers;
- wire;
- primer;
- brushes;
- paint and glue.
For clothes, you can choose absolutely any material. Six, intended for felting, works well for hair.
Well, then everything depends on your imagination. As additional material, we provide you with a master class on polymer clay dolls.
Creating a doll in itself is a very complex process, so we will try to describe the whole mechanism to you as clearly as possible.
Doll making lesson
First, decide whether you want an articulated doll or a static one. There is also a simplified version, when the head, arms and legs are made of polymer clay, and the body of the doll is sewn from fabric. The most difficult option is to make a jointed doll, so we will opt for a static one.
Make a drawing, think over the image of the doll. Think about what size it will be, what features it will have. Make sure you have all the necessary materials.
After you have thought about the details and decided on the size, you can take the wire and make a frame.
Step-by-step production of a polymer doll
If you are already familiar with the technique of making polymer clay at home, then it’s time to start creating a charming doll.
Stock up on strength and patience, you will need a lot of them. Before sculpting a doll from polymer clay, carefully think through all the details, decide on the color of the skin, the shade of the eyes and even the small components of future clothing. Come up with additional attributes for the perfect image. All this preliminary preparation will help you get inspired before starting the creative process.
We select materials for work
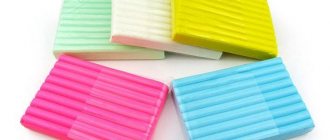
Before you start manufacturing, prepare a number of necessary materials:
- main material – polymer clay;
- special knives with different designs;
- foil;
- sanding paper;
- pliers;
- hard wire;
- tassels;
- glue;
- dye;
- primer.
You can start preparing material for the clothes of the future doll in advance. Don't forget about your hair. For them it is better to use wool, which is used for felting. In the future, everything will depend on the course of your thoughts and imagination.
When you have all the materials ready, make a choice towards a specific model of the doll. They can be:
- Articulated. This is the most difficult manufacturing option. It requires experience and more time.
- From several types of materials. This is the simplest type of pupa. In this case, the body is made of fabric, and the head, arms and legs are made of clay.
- Static. There are no complicated elements here and making such a doll is not that difficult.
Drawing on paper (Step 1)
We will focus on the last variety. Make a drawing of the doll, draw the expected image of the future product. Here you need to pay attention to its size and features. Check if you have all the materials. Let's start work.
Children's fun
Before you start creating, you need to know exactly what you want to have in the end. It is best to find out about all the details of the work. Craftswomen advise starting with a sketch of the future product. And then decide on the parameters.
Firstly, it's appearance. A lot depends on what the needlewoman chooses. Decide on height, gender, appearance. Look at the picture of clothing options to know for sure. Secondly, the design of the figure. It can be movable or immobile. Thirdly, the nature of the future product. You can make a mythical creature, a hero of some book or movie, etc. Whatever your imagination requires.
Then we move on to the implementation of the design. Many people believe that it is easier to make a figurine without joints. This is absolutely not true, do not think that everything is simple. Modeling a monolith on a frame can only be done by an experienced needlewoman. Therefore, we will try to make each element separately, and then combine it into a common doll.
In order to make the soft parts, you need to make patterns. Then sew it and fill it with filling - cotton wool or padding polyester. Usually it is the head that is made with their polymers.
Let's start the master class. We will need the following tools:
- Polymer clay;
- Stack of metal sticks;
- Wire for knitting;
- Glue, preferably “Moment”;
- Pliers;
- Pencil;
- Paper;
- High-quality filler;
- Linen fabric;
- Oven.
Related article: DIY candles from wax crayons at home
Before you start working with the doll, you need to do the most difficult work - the head. For it you will need: foil, polymer, tools and wire.
Step 1 – take a portrait, front and profile. We can say that a work of art is being created, because such a product will be unique.
Step 2 – bend the wire and form a ball of foil on the bend. Its size should be slightly smaller than the diameter of the head. If you are making a princess, it is easy to make her neck and shoulders. But let's get back to the head.
Step 3 – make a simple ball. Approximately 3-5 mm of clay is applied to the foil blank.
Step 4 - to sculpt the face, you need to try hard. This is hard work, it is better to have it done by a master. Try to do it yourself, don't despair if it doesn't work. Bake in the oven.
So let's move on to the body.
Let's make handles. Take two pieces of wire, bend them in half and twist them a little. You need to stick clay on them, forming the limbs themselves. Make a hook at the end of the wire so that you can easily dry the product later.
Now you need to make 8 with your finger and brush. Then we move on to the legs. Make them exactly the same way as the handles. Hang on hooks to dry. After this, remove the excess parts with pliers.
Using sandpaper to create the nails and hands. Don't forget to take measurements of the parts.
Let's move on to the patterns. Having made soft parts for the doll, we use a filler - cotton wool or padding polyester. You need to stitch it well so that nothing breaks or falls apart.
Then we sew the parts together. Glue the head. You can do hair, draw a beautiful face. We put on a dress (you can buy it in a special store or sew it yourself).
We give back the hairs. For them, we take hair or fiber so that the hair is lush and soft; glue and thread.
Related article: Classic openwork crochet jacket
First, let's make holes in the head; you can do this while you were still sculpting the head. We crochet a “wreath” and gradually weave strands into it. So you can get a whole hat, a shock. Apply glue in a circle and glue it to the head. We tie the bundles by dipping them in glue. And after that we’ll fix it in the hole on the head.
Frame making
The frame in the product plays one of the most important roles. Thanks to him, the finished doll will be durable. Before making dolls from polymer clay, prepare a skein of strong wire and a second skein of thin wire.
In the future, work will be carried out in the following order:
- take a thick wire and give it the shape of the “skeleton” of the future doll;
- use thin wire to wrap the “skeleton” to give it density;
- Seal the resulting frame with foil;
- smooth out all the folds, press and compare the result with the drawing.
The frame preparation stage is over. Let's proceed to the basic steps that will tell you how to make a doll from polymer clay.
Materials for work
To make a doll from polymer clay you will need to take:
- polymer clay;
- wooden toothpicks;
- metal wires;
- instant glue;
- paper tape;
- pliers;
- sandpaper;
- drawing sheets, simple pencils;
- linen or cotton fabric for a doll costume;
- knife, threads, needles;
- oven;
- brushes of different thicknesses;
- emulsion for primer;
- acrylic paints;
- wool or foam rubber;
- hair or a ready-made wig for a doll.
Head decoration
It's time to start preparing the blank. To ensure that the process does not cause difficulties, the clay must be kneaded well and heated to a plastic state. Perform the following actions based on the instructions:
(Step 2)
- When the clay becomes plastic, shape the part of the head that is covered with foil. The resulting result should be baked in the microwave or oven. If you used clay that hardens on its own, this is not necessary. It is necessary to bake the material so that in further work it does not lose its shape. Important! If foil was used and it is not covered with polymer clay, then it cannot be placed in the microwave oven. Is it dangerous! It can only be heated in the oven.
(Step 3) - We take out the blank of our doll. Using a knife, carefully add volume to the head. Select the nose, cheeks and lips. We smooth out the unevenness so that the face becomes realistic and resembles a living one.
- We make recesses for the eyes. Watch for symmetry, so the work will turn out neat.
(Step 4)
We've finished the head work. It can be decorated with pastel or aerosol paints to give the face a lively tint. We send the doll to bake again and finish the ears on the head.
(Step 5)
Head sculpting
You will need the following materials:
- Foil;
- Wire;
- Polymer clay, for example, from Deco.
To form a head for a doll, you need to consider this photo master class:
1) Take a piece of wire and bend it into a loop.
2) Then wrap foil around the tip of the wire.
There should be enough foil to make a ball with a diameter slightly smaller than the doll’s head.
3) Then apply clay about 3-5 mm thick to the foil.
Related article: Painting on fabric with acrylic paints: master class with stencils
4) Using plastic stacks, form sockets for the eyes, nose, chin, lips, etc.
5) Then the head blank is baked in the oven.
Body sculpting
We continue to work. Now we will start sculpting the arms and legs. Try to do this work carefully so that there are no unevenness. When the base of the arms and legs is ready, start cutting out the fingers.
(Step 6)
If the small elements are ready, sculpt the torso, back and tummy. If you want to. To give the doll a more sophisticated look, we recommend adding small elements such as collarbones and ribs. But here it’s up to you, each doll is individual. The finished product is sent to bake.
It may take longer to bake than was required when making the head. It is important that the product becomes very durable.
When the material has completely hardened, you can begin grinding. To make the doll without any roughness, use sandpaper with different grain sizes. While sanding, leave a parting on your head.
Now you know how to make a doll from polymer clay. The work is not finished yet. It's time to start styling your face. The following materials can be used here:
- pastel;
- acrylic;
- watercolor pencil.
Pencil is the perfect choice if you need to add freckles to your doll.
When you are finished applying makeup, coat the product with varnish. He will record the result.
Hairstyle for a doll
We figured out how to make the base of a doll from polymer clay. Now she definitely needs to get her hair done. It has already been said that for this purpose it is better to use wool for felting. But you can use:
- silk threads;
- doll wig;
- big wig.
A wig for dolls is not always beneficial, as you can make a mistake with the size. It is better to use a large wig, from which you can make a separate doll hairstyle.
Attaching the hair (Step 
To attach the hair you will need glue. Separate each strand separately and attach it to the head. To make your work more convenient, you can use an awl, hook or other thin metal object.
Lastly, we insert the finished hair into the previously prepared parting. This will give your doll a neat crown.
(Step 9)
The doll is ready, give it the desired hairstyle, decorate it with additional elements and be sure to dress it. The work is long, painstaking, but exciting.
Be sure to try making a doll out of fabric; we discussed this topic in detail in a separate article.
Hairstyle for a doll
To make hair you will need an old wig, tresses or yarn, glue, thread and a hook.
Step-by-step creation of a doll's hairstyle:
1) You need to make a hole on the top of the doll’s head and draw a spiral with a simple pencil.
2) Glue the hair along the drawn lines.
3) Then take a bunch of hair, spread it with glue and glue it to the hole in the head...
Related article: Boleros, shawls and crochet capes
4) Then carefully comb your hair and make a hairstyle, for example, a braid or a bun.
Cute baby made of polymer clay
Above we looked at instructions that showed how to make a large doll from polymer clay. Now let's look at how to make the cutest baby, it will be an ideal gift for new parents or a great addition to your collection of dolls.
The work is not easy, for it you need to prepare:
- Stack. It can be purchased at creativity departments. This tool will come in very handy when you have to make small parts.
Dots manicure - Dots are the smallest size. This tool is used for drawing on nails. We will need it to make small holes, for example, the navel and nose.
- Darning needle. We will use it for cuts on the eyes;
- Gloves. Medical gloves will be required. Buy a size that will completely fit your fingers. Gloves will help maintain sterility when working.
- Polymer clay. You can prepare it yourself or purchase one of the types at a craft store.
Now let's look at how to sculpt a doll from polymer clay step by step.
Let's make a baby doll
Let's start with sculpting the head:
- We tear off a small piece from a common piece of clay. Knead the material until completely pliable. We form an oval or a figurine in the shape of an egg.
- Carefully pull off the clay on the future back of the head. We form a neck, to which we will attach the body with the same clay.
- Take the dots and draw a cross at the bottom of the future head. This way we can figure out where the eyes and nose will be. At the intersection of the lines, add a small piece of clay.
- Carefully coat this part. To prevent cracks from forming on the face after sculpting, soak one finger in warm water and treat the junction of the spout. Remove droplets of water from the product.
(Step 2) - We apply cakes to the places of the eye and forehead. This way the forehead will be textured. We straighten the product to obtain symmetry. Using a needle, cut through the eyelids and mark the eyebrows. Don't press too hard.
- Using dots, we make nostrils on the nose. Gently press the end of the tool inward. We smooth everything out and correct it if any part has changed its shape.
- We shape the cheeks. They need to be made to stand out. To do this, take two cakes and apply them to the desired places. Lubricate the material to eliminate sharp transitions. The cheeks should not be very thick, but do not make them thin either.
(Step 3) - We shape the mouth. To do this, we make a round cake and attach it to the place of the upper lip. Don't be afraid to take excess material, it can be cut off. Use a needle to separate the upper part. Leave a small dimple under the nose. We make the lower lip from a sausage, which should be bent downwards. We apply the material and give it a realistic look.
- We finish making the face with the chin. We make it from a pancake. We apply the part to the desired place, remove the excess and smooth it out.
The face is ready.