Preparing for a wedding consists of many important moments: finding a place for the celebration, choosing a host, trying on wedding dresses. Invitation cards play an important role, because this is the first thing that guests will see. The modern wedding industry provides a huge selection of cards for every taste, but these days you won’t surprise anyone. Invitations made by yourself look much more interesting. The same applies to envelopes for money, which will be an excellent addition to the main gift for newlyweds. How to make envelopes with your own hands will be discussed in this article.
Wedding envelope using scrapbooking technique from a finished blank
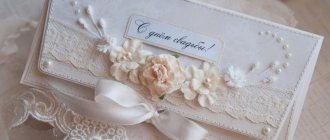
In order to make a beautiful wedding envelope, you don’t have to make it yourself. You can use a ready-made package and decorate it to your liking. The master class below will tell you in detail how to do this.
- Take a ready-made envelope of the desired color.
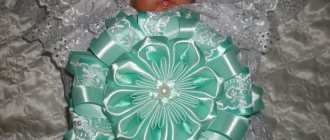
- Place a piece of lace in the center.
- Glue fabric flowers along the edges of the envelope.
- Cut a heart out of fabric and attach it to the lace.
- Sew several small buttons onto the heart.
- Decorate the envelope with rhinestones and sparkles.
This is just one of many options for decorating a wedding envelope using the scrapbooking technique. You can also use other materials at hand: beads, feathers, ribbons, pictures printed on a printer, etc. Young people can make such an envelope to place an invitation to a celebration, and guests can use it as an addition to a cash gift.
Editor's choice: Wedding at the dacha menu for the perfect holiday
DIY money envelope. Master class with step-by-step photos
DIY holiday envelope. Master class with step-by-step photos
Envelope using quilling “Holiday envelope for mom.”
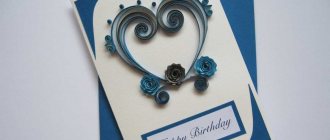
Author: Chernikova Dina Nikolaevna – teacher of MBDOU kindergarten No. 1 in the village of Staroye Melkovo, Tver region, Konakovsky district. Description of the material: this material is designed for school-age children, teachers and parents. Purpose: making gifts, participating in a competition. Goal: creating a CD sleeve using quilling. Objectives: - strengthen the skill of working with paper; -develop children's creative abilities, attention, imagination and fantasy; - develop fine motor skills of the hands and eye; — cultivate perseverance, accuracy, and interest in working with paper. Here you have a beautiful greeting card that you would like to give. And give something original. Make a holiday envelope for your card. I got this envelope.
To complete the work we will need: colored double-sided paper; cardboard; file; rulers (simple and with circles); scissors; PVA glue; a simple pencil; toothpick for rolling paper; hole puncher; ribbon; sequins.
Work order:
1. Let's make an envelope for a holiday card. Let's make a template for the future envelope.
More templates for making envelopes 2. Then we take the cardboard from which the envelope will be made. Place the template on the cardboard and trace it.
3. Cut with scissors. The result was a dark yellow shape.
4. After the base of the envelope is cut out according to the template, you need to “punch” the folds so that they look beautiful on the outside and bend easily. For these purposes I use a knitting needle.
5. Then the product is bent and work continues. We glued the sides of the pocket together using PVA and secured them with paper clips.
6. Use a hole punch to make two holes.
7. Thread a ribbon through the holes and tie it.
8. The envelope itself is ready. Now we need to decorate it. Cut strips of dark green paper 5mm wide and 30cm long. Glue the two together and the length of the resulting strip will be 60cm. Insert the tip of the strip into the slot of the toothpick and begin to wind, making rotations. The rolls of paper should fit snugly against each other. Having reached the end, place a ruler with a diameter of 15 mm in the circle, remove it from the toothpick, and let the spiral unravel. Shape the roll into a drop (4 pcs.)
9. Cut strips of light green paper 5mm wide and 30cm long. Make rolls with a diameter of 15 mm from these strips and shape them into circles with a notch (4 pcs.)
10. Connect these parts using PVA glue.
11. Let's make leaves. To do this, cut strips 5mm wide and 30cm long from dark and light green paper. Glue three together of the same color and the length of the resulting strip will be 90cm. Make rolls with a diameter of 20mm from these strips and shape them into sheets. Let's connect them.
12. Glue the parts together. The result is the flower of the bottom row.
13. For the top row of the flower you need to make curved drops. To do this, cut strips 5mm wide and 30cm long from dark and light green paper. Glue three together of the same color and the length of the resulting strip will be 90cm. Make rolls with a diameter of 23mm from these strips and give them the shape of a curved drop.
14. For the center of the flower, take a dark green strip, 5mm wide, 30cm long, make a roll with a diameter of 8mm.
15. Let’s connect all the details of the flower.
16. Glue it onto the envelope.
17. Let's make a branch of curls.
18. For brightness, to make the envelope festive, add sequins. The envelope for the postcard is ready. I hope that the master class will be useful to you and that you will create beauty around you! Good luck!
We recommend watching:
DIY New Year cards with children DIY birthday card DIY soft cover for a notebook Scrapbooking. Master class surprise box
Similar articles:
Making a composition using quilling and scrapbooking techniques. Master Class
DIY postcard for Teacher's Day using scrapbooking technique
Scrapbooking envelope with ribbon
Using the step-by-step instructions with photos below, you can quickly and easily make a beautiful wedding envelope from scratch.
- Print out the envelope template.
- Cut it out and transfer it to thick paper or cardboard.
- Cut the workpiece along the contour.
- Make deep grooves on the inside of the workpiece corresponding to the dotted lines of the template. This can be done with a needle and ruler.
- Fold each edge of the future envelope towards the center along the line of the grooves.
- Gently press down the edges with a wooden ruler to avoid opening.
- Place money or an invitation into the received envelope and close all sides one by one.
- Take a 1 m long ribbon and tie it around the envelope.
- Tie the ribbon into a beautiful bow.
- Cut off the edges of the ribbon that are too long, and singe the cut so that it does not crumble.
Envelope in the form of a postcard: option 1
This method of creating a wedding envelope is the simplest.
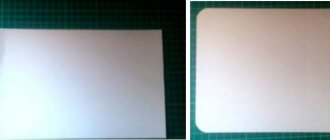
- Cut a rectangle measuring 21 cm by 17 cm from cardboard or thick paper.
- Round the ends of the workpiece using a special hole punch, a simple figured ruler or other round object.
Editor's choice: Wedding jewelry for the groom: how to look perfect
- Mark the bend location. To do this, measure 6 cm on each side and draw lines.
- Run sharp scissors along them and fold each edge towards the middle.
- Make two pieces of tape 15 cm long.
- Glue one piece to each side of the envelope.
- From any beautiful paper, cut out rectangular templates, one measuring 16.6 cm by 8.6 cm, the other two – 16.6 cm by 5.6 cm.
- Paste the resulting blanks onto the future envelope.
- If the envelope is intended for money, then you should take care of a special fastening. Fold a piece of ribbon in thirds and secure it on the inside of the card with glue.
- If the envelope is used as an invitation, then you can simply put a postcard inside it, or you can glue a sheet of paper inside with an original inscription.
- Decorate the envelope in any way you like.
Wedding envelope in the form of a postcard: option 2
This option for making a wedding envelope is more complex. But with the help of the master class described below and the video lesson presented, even a beginner can handle it.
- Cut a rectangle measuring 21 cm by 19 cm from thick paper.
- Mark the fold lines on the sides so that the middle is 8 cm, and the sides are 6 cm and 7 cm.
- Press the lines with a needle or scissors and bend both edges towards the center.
Editor's choice: Which style to choose for a wedding dress? Photo review
- Make a fold for gluing. To do this, place the workpiece with the side 19 cm from the bottom.
- Measure 1 cm strips along the sides of the rectangle.
- Cut them off, but only in two parts (one edge and the middle). There should be a sealing strip on the third part of the envelope. Its inner edge must be cut at an angle.
- Also press the fold line with scissors and roll it up.
- Now you should decorate the inside of the envelope. At the bottom of the blank, you can use a special stapler to make a semicircular hole for more convenient removal of the contents of the envelope.
- The upper part of the workpiece can also be made in the form of a larger semicircle, using any round object as a stencil.
- The edges of the envelope can be processed with a figured hole punch, if available.
- Next, you can move on to the external decoration of the envelope. Cut out templates from beautiful paper that correspond to the dimensions of the sides of the workpiece and glue them to the cardboard;
- Make a mount for the envelope. Cut a strip of paper 21 cm by 2 cm;
- Bend the strip into three parts so that the envelope fits into it;
- Secure the holder using any decorative element: a ribbon bow, a fabric or paper flower, etc.;
- Decorate the envelope to your liking.
How to make an envelope from A4 sheet so that it closes?
The most optimal sizes are obtained from an A4 landscape sheet. You can not only give cash gifts in them, but also send letters. The post office now accepts envelopes of different colors and sizes. The main thing is to indicate the correct address and stick the correct stamp.
To make your craft more beautiful, do not take a regular white sheet; now there is paper of various shades of the same format.
You can roll this option with a wavy edge. All sizes are indicated, I think it will take you no more than five minutes.
I also offer an option from a sheet of the same format, but I would like to pay your attention not so much to the form, but to the interesting idea of closing the envelope. With the help of buttons and loops, it turned out not only very functional, but also elegant. After all, the buttons also acted as decoration.
Another similar option with buttons.
The easiest way to close it is to use a tab that fits into a slot.
Even the simplest versions of already boring forms can be made themed or designed.
The sheet can hold up to eight small pockets. You can put a wish or a small photo in each and give it to your mother, loved one or friend.
You can also close the craft with the side parts, like this option.
It is made of four circles of the same diameter.
Which bend in the middle.
And overlapping each other they form such a blank. The lower part of the parts must be glued. Since you have already rolled each circle, the blanks themselves form a square base. All that remains now is to bend them, hooking the edge of the previous part onto the next one.
A similar idea for square packaging, but with a rope bow.
Here the base that we assembled in the previous version is immediately cut out. And only semicircles are bent.
See how you can fold it step by step.
Now you need to thread a string or floss into a needle with a wide eye and make holes in two places and pull it through.
I also invite you to watch a short video that shows a master class on how to fold a letter wrapper from a landscape sheet.
A letter in this homemade design will also be accepted by any post office.