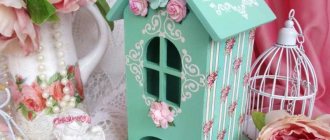
You can make a unique masterpiece yourself using decoupage on plastic
There are a huge number of plastic objects around us. The good thing about plastic is that it is light, quite durable and cheap. Many people think that plastic is a difficult subject to decoupage, but this is not true. The point is the surface, it must be properly prepared. Decoupage on plastic is now a leader among those who are interested in such arts and crafts; it is as popular as decorating wooden surfaces.
Learning decoupage on a plastic surface: master class
Most plastic items have an absolutely featureless and depressing appearance. But the decoupage technique can quite easily turn such despondency into a completely new and unique work.
Before you start decoupage, you need to prepare the materials in advance and carefully familiarize yourself with the sequence of work
Decoupage on plastic has some techniques and rules:
- The surface is carefully prepared. First, the base is degreased with a solution containing alcohol, then sanded with fine-grained sandpaper to give it a slight roughness.
- Primer is applied to the surface; it will help adhere the base to each subsequent coating and prevent the decoupage from peeling off.
- The surface is covered with acrylic paint in two layers; the paint should be light in color. If you use thicker paper, you can color it dark. While the paint is drying, you can cut out the paper pictures that interest you. Typically, three-ply napkins, decoupage cards or rice paper are chosen, but this is not necessary.
- After the paint has dried, one of the most interesting and difficult stages of the work begins - the paper motifs are glued. To do this, take a special glue for decoupage. If you use three-layer napkins, dilute the glue a little with water; For thick paper media, a concentrated composition is needed.
- Another layer of glue is applied, and the resulting composition is left to dry. Excess glue is wiped off with a towel or clean rag.
After drying, the object is coated with varnish. You will need at least two layers, but preferably 3-4, so the composition will be smooth and protected.
A huge advantage of decoupage is that when using the same napkins, you get completely different versions of the finished product.
We consider decoupage on leather and leatherette: master class
Everyone has items made of genuine or artificial leather. They often require updating or decorating, and a purchased new diary or other documents will make a wonderful gift after decorating with your own hands.
There are several nuances of the process itself:
- For primer, it is better to take elastic varnish and primer. For soft leather materials, you need to use a primer like titanium white.
- To decoupage diaries made of leather or leather substitutes, you should not use material with embossed letters or numbers. Putty or texture pastes will fall off from them, and it will be impossible to sand them. You need to choose a smooth surface; if there is a pattern on it, it can be washed off with acetone.
- When choosing motifs for decoupage, you need to take into account that transferring the design through the spine will not be a good idea. The varnish may crack and the image may come off the material completely. It is better to glue two pictures, it will be more durable.
Decoupage on a leather product will look quite unusual and original.
Decoupage on leather is good for beginner craftswomen; it is not difficult to perform and is extremely exciting. With imagination and skillful hands, you can give a second life to any old item.
Step by step decoupage looks like this:
- Sanding occurs;
- The surface is wiped with acetone;
- Leather or leatherette is primed;
- The picture is pasted;
- Painting is being done;
- Finishing work on the surface.
In this way, you can update not only old bags and wallets, but even shoes, which is especially valuable.
Review: decoupage on plastic with napkins
People have always been drawn to creativity even in the most everyday little things. One of these types of creativity is decoupage. Plastic products using the decoupage technique are very popular due to the fact that plastic occupies a significant place among artificial things. Napkins and paper are easily found in various handicraft stores. If you can't find them, even magazine clippings will do.
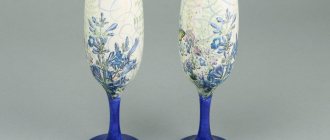
You can make a beautiful design on plastic using high-quality and creative napkins
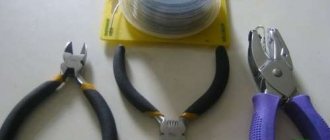
For the technique you will need the following tools:
- Napkins or paper for decoupage;
- Cutter and scissors;
- Acrylic paints;
- Special glue;
- Brush;
- Varnish.
Often the chosen napkin cannot convey the whole idea that the needlewoman would like to put into it. In this case, you can complete the application yourself by painting the necessary elements on top of it with acrylic paints.
Doing decoupage on plastic with your own hands is not very difficult
Decoupage today is considered one of the most popular types of applied art. Many people are interested in it; handicraft lovers often manage to create unusually attractive products that serve as decoration for the interior, giving it special warmth and comfort.
The decoupage technique can be used for various materials. Decorated fabrics, tiles and ceramic surfaces look very attractive; decoupage is traditionally used for finishing and restoration of wooden furniture and glass. Low price, availability and variety of plastic products have made decoupage on plastic one of the most popular today.
Having studied the technique of doing the work, you can transform the most ordinary flower pots, trays, decorative elements, jewelry and accessories beyond recognition. Decoupage on plastic will allow you to turn the most ordinary and faceless consumer goods into unique works of art.
How everything is done
It is very easy to perform decoupage on plastic; even a beginner can cope with such a task, but to perform the finishing flawlessly you will need desire, patience, and accuracy.
The first thing you have to take care of is the preliminary preparation of the plastic surface. It consists of treating the surface of the product with a liquid containing alcohol. If it is too smooth, it should be sanded with zero-grit sandpaper to create some roughness. Then a self-prepared primer (a mixture of gypsum with water and glue) must be applied to the surface in a very thin layer, allowed to dry and sanded. To perform high-quality decoupage with your own hands, the procedure should be repeated several times. The foundation for our future creation must be strong.
Acrylic paint, which will serve as a background for decoupage, is applied to the primer. While it is drying, you can start cutting out pictures that will allow you to make beautiful decoupage on plastic.
The source for the motifs can be three-layer napkins, beautiful wrapping paper, glossy magazines, a picture printed on a printer, you can also purchase special cards for decoupage. The selected pictures are carefully cut out.
Next, you should stick them on the already dry painted surface. To work you will need PVA glue. If the design is cut out of a napkin, then the glue can be diluted with water; for harder materials, it should not be diluted! It should be applied a lot, without leaving dry areas. You need to stick the picture carefully, smoothing it with a brush, starting from the center. It is best to learn how to first stick pictures on a flat surface; a convex surface will require certain work skills. To get a better result, you can glue the picture in parts, this will allow the image to be well aligned. The dried surface is then varnished in 3 or 4 layers.
To make the interior especially attractive, today it is customary to decorate not only small interior items; they often decoupage kitchen furniture, tables, chairs, chests of drawers or cabinets for living rooms and bedrooms.
Various decoupage on metal surfaces
The topic of metal decoupage is very broad and has many subtleties and nuances.
This cute metal decoupage watering can makes a great gift that everyone is sure to love.
The general rules look like this:
- If there is rust, the surface must be treated with a rust converter. More than one treatment may be necessary, otherwise the decor may collapse due to corrosion.
- All metal surfaces are sanded. This does not apply to stainless steel.
- The surface is degreased.
- Priming occurs using a special primer-enamel for rust. This action is repeated three times, sanding in between. The enamel should be white, this will help avoid unnecessary primer.
- Prints are glued onto urethane varnish. The background is drawn and outlined. In this case, you can use enamel primer, mixing it with acrylic paints or gouache.
- Before the final steps, the surface must be sanded so that it becomes as smooth as possible.
Painted metal can also be used as decoupage. Any thermos or tray, jar, or even mailbox will do. In this case, it is necessary to get rid of the old paint; if this step is not completed, later you will have to get rid of the paint along with the decor. Galvanized iron and dishes can also be decoupaged. You can use an iron watering can and decorate it as you please.
Stainless steel, cast iron, and enamel cookware can all be decoupaged. Buckets, coffee pots and cans are decorated easily and simply.
Aerosol + construction paint (art primer)
I prefer to work with clear spray varnishes
: firstly, they are not water-based and therefore provide excellent adhesion to the surface and to subsequent layers of paint. Secondly, they are very inexpensive and last a long time (which cannot be said about artistic primers). And thirdly, colorless varnishes can be used as topcoats (this is especially convenient on textured surfaces).
How I do it:
1. Apply 1-2 thin or medium layers of varnish and dry; 2. Next I prime with regular construction paint until a white surface is obtained. Aerosol paint adheres well to a non-absorbent surface, and acrylic lays well on top. Next comes decor, varnishing - and we get a durable, stable coating.
If we take some white spray paint
and let's try to prime the work
only
with this paint, we will see that:
Plastic bottles: decoupage
Decoupage of plastic bottles is very easy and simple to do. Some people want to design a bottle for liquid soap, others want to design a spray bottle for spraying plants.
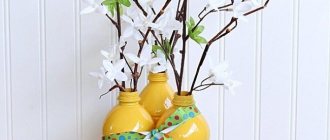
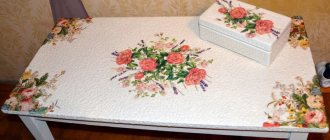
You can make your holiday table unique and inimitable with the help of decoupage bottles
Stages of work:
- First you need to prepare all the necessary materials and remove the label from the bottle. The bottle is thoroughly washed, dried, and degreased using nail polish remover.
- The neck is sealed with electrical tape, and the electrical tape is glued in a vertical stripe to one side of the bottle.
- A piece of foam rubber is pinned together with a clothespin; using this device, it is very convenient to apply acrylic paint to the surface of the bottle. The bottle is held by the neck.
- After the paint has dried, a second layer is applied, and the required motif is cut out of the napkin. Glue is applied to the middle of the picture and distributed. The surface should not be uneven or convex; all imperfections must be smoothed out.
- After the picture has dried, the jar is coated with acrylic varnish in two layers. The insulating tape is removed, and the areas where there is no varnish are wiped with a wet cloth.
Next comes the decorating stage. These can be shells, glitter, and sparkles with rhinestones. Glitter is applied to the clean surface that was under the electrical tape, simulating a dispenser.
You can apply glitter to the finished surface and rub it with your fingers. This way, some flaws will be hidden if the craftsman is a beginner, and the iridescent effect will add mystery to the product.
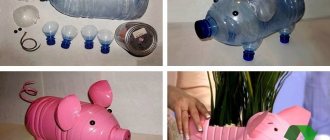
Decoupage can be used to turn mayonnaise buckets or any container into a sugar bowl or vase. Any patterns and decor can easily be applied to the surface of the bucket; such buckets subsequently make excellent flower pots.
LiveInternetLiveInternet
I decoupaged a plastic plant pot. Without thoroughly delving into the theory, without studying the nuances, I made many mistakes and essentially ruined the flowerpot. Having received a slap on the forehead for my haste, I went to Google (why not right away?!) and found this MK. I looked and realized what my mistakes were.Decoupage of a plastic bottle. Master Class
Probably, many people have flowers growing on their windowsills at home, so I like to grow orchids. Somehow my old sprayer for indoor flowers broke, and I bought a new one at a hardware store. It turned out to be very durable and of high quality, but its appearance did not please my eye at all. I decided to transform this sprayer a little: decorate it using the simplest and easiest to perform decoupage technique .
But I’ll give you a little advice right away: do not buy an ordinary plastic spray bottle made of soft transparent plastic for this purpose. It will be very difficult to apply paint to such plastic. But even if you manage to do this, fragments of the napkin and all the layers you applied will simply fall off when used, due to the fact that it will not hold its shape.
For decoration we will need the following consumables: a soft brush, special glue for decoupage, a special decoupage napkin. I bought this napkin several months ago in an online store and it was still waiting for its “finest hour”.
We also need: a piece of sandpaper, a piece of kitchen sponge, a special acrylic primer for decorative work.
Olive and ivory acrylic paints, synthetic brush for applying these paints.
Acrylic glossy varnish for decorative works.
I would like to draw your attention to the fact that better quality consumables for needlework allow you to make your products better. So, initially, from the surface on which we will do decoupage, we need to remove everything unnecessary. Use regular nail polish remover to erase unnecessary inscriptions and drawings so that later they do not interfere with the application of primer.
Then we sand the entire surface of the plastic a little with regular sandpaper (I didn’t do this) so that it is not too smooth. We do this so that the primer layer adheres better, since plastic is considered not a very “grateful” surface for decoupage.
The next step is to apply two layers of acrylic primer to the sanded surface using a piece of washcloth and let it dry thoroughly (I first applied the primer and then washed it off for some reason. As a result, the paint did not adhere, but simply peeled off as a film after drying) . This primer is white and in this case it will perform two functions. The first is the creation of a binding layer between the plastic and subsequent layers of decoration. The second function is to create a white base for our napkin. All napkins have 2-3 layers, the white layer adds brightness to the design. So we need to create a white background so that the pasted napkin is bright and its colors do not get lost against the background of the olive color of the sprayer.
We separate the required fragment from our napkin. We carefully cut off the excess from below with scissors, and from above we make uneven edges - we tear them off by hand. I’ll share one secret with you: in order to ensure that the napkin does not tear when gluing, does not stretch too much and sticks well, you can sprinkle it on top of the drawing with regular hairspray and wait until it dries.
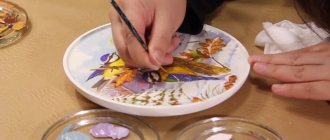
Now let's proceed to the most important stage: gluing the napkin and creating a design using the decoupage technique. Place the napkin on a white primed surface and use a synthetic brush to coat it with decoupage glue from the center to the edges. Since we treated the napkin with hairspray, it sticks perfectly, without any folds or tears.
Let's wait until the napkin dries and begin tinting the picture with acrylic paints. To ensure that the color transition from the napkin to the edge of the sprayer is not noticeable, lightly touch the ground with ivory paint using a brush or washcloth.
In the same way, we apply olive-colored paint at the bottom of the napkin, making the transition from the drawing to the sprayer invisible.
After our paints dry, the spray bottle looks very elegant. When I started decorating the sprayer, I also planned to use two-component craquelure to give this design an antique effect. But after the decoupage glue and acrylic paints dried, I saw that in this case there is no need to “load” the product.
In order to protect the decoupage from water and mechanical stress, we will cover our drawing on top with acrylic varnish in several layers. In this case, I covered it with three layers of varnish.
Each layer must dry very well before applying the next. This is what it means to use quality materials. The napkin stuck very well to the surface of the sprayer, it is bright and colorful. A good varnish gives the product shine and strength (I made what I consider to be the main mistake - I bought a spray varnish, it did not lie smoothly, and in some places there were even smudges) .
This is MK. Why didn’t I properly study the theory right away?!
source
Interesting points: decoupage brushing
Brushing can turn a box into a true work of art. A brushed piece of furniture will look interesting, and the complex process of making it will bring pleasure. The brushing technique is suitable for wood species with good structure. The most suitable tree would be pine.
You can make a beautiful decoupage item with your own hands, the main thing is to decide on the design of the future product and prepare materials and tools for work in advance
Brush will require for itself:
- workpiece;
- Picture;
- Finishing type of varnish;
- Varnish to give an aged look to the product;
- Colored wax;
- Special glue;
- A brush with metal bristles;
- Gas blowtorch.
Glazing is a method of applying a thin transparent layer of paint; it can be used to tint wood.