DIY candy cake: master class
First of all, you need to prepare everything you need:
- foam sheet;
- sheet of corrugated paper;
- two round packages from Raffaello of different sizes;
- scissors;
- adhesive tape;
- hot glue;
- decorative elements - colored ribbons, rhinestones, beads;
- any confectionery products at your discretion;
- beautiful openwork fabric.
You need to cut a round blank from a piece of foam plastic - this is the base of the future cake. It should be slightly larger than the Raffaello boxes. For perfect smoothness, all edges of the base should be carefully sanded. This will be the first layer.
The second tier of the candy cake is a larger Raffaello box. It needs to be decorated with openwork fabric or colorful, patterned paper using glue or tape. The edges of the second tier should be covered with a ribbon of corrugated paper in the shape of a frill. You need to fix the candies on top of it and attach it with a thin strip of tape.
The lower tier of the structure also needs to be decorated with a sheet of corrugated material, cut out in the form of a ribbon and attached with tape. The ends of the ribbon can be slightly pulled - this will make the frill more magnificent.
The top of the paper should be decorated with rhinestones, beads or other decorative elements, attaching them with tape. Candies are attached to the side parts of the base and are also tightly fixed.
To decorate the top tier, a small Raffaello pack should be covered with a wide ribbon of corrugated paper or fabric, decorated with colored laces and bows. To decorate the cake, you can use products at your discretion - decorate the gift with fresh or artificial flowers, for kids - with small funny toys.
Decorating cakes with famous chocolates
High-quality chocolate is always tasty, with good filling. It is chocolate from well-known companies that is best used to decorate a birthday cake.
We recommend: How to make a beautiful inscription on a cake?
We format it as follows:
- Kit Kat sticks can be used on the sides. We make a “fence” out of them. We attach the chocolate to the cream, you can additionally secure it with a ribbon.
- Twix sticks are also suitable for creating a fence around the product. They are longer, so they are designed for a cake with a height of 8-10 centimeters.
- Snickers and Mars bars are delicious on their own. But they will add even more flavor and richness to the dessert. Cut into pieces, they can serve as a layer for cakes or to decorate the side surfaces. You can pour the melted candy bar over the dessert instead of icing, although you won’t get a perfectly even coating.
- High-quality dark chocolate allows you to decorate any baked goods. You can make several decorative options from it: large shavings, “curls”, fine sprinkles, glaze, openwork patterns, figures, flowers, inscriptions.
Cake for children
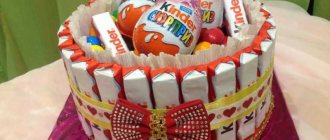
For children's sweet designs, small Kinder Surprise bars or any chocolate bars are most often used. An unusual sweet surprise will delight both the boy and the girl. If desired, the tasty design can be decorated with soft toys, dolls, and figurines of your favorite cartoon characters.
Step-by-step making of a children's candy cake:
Attention! People make good money growing berries during a crisis. All information is here
- From a piece of foam, cut a round base for the sweet design. The size of the tier corresponds to the parameters of the chocolate bars used.
- Cut out two squares from a corrugated sheet (pink or red for girls, blue or light blue for boys) and cover the top and bottom of the base with them, fixing the edges.
- Cover the sides of the tier with a paper frill - the width of the ribbon should be slightly larger than the candies.
- Decorate the edges of the base with chocolate bars using adhesive tape.
- Sweets can be secured with a wide openwork or satin ribbon - this will give the cake a festive look.
On top of the cake you can pour colorful or chocolate “pebbles”, dragees, decorate with sweet Kinder Surprise eggs, small soft toys, dolls or cars.
Step-by-step instructions for creating
When creating a composition, do not forget about the main element - tea. It can be varied and have several different flavors.
Before starting work, remove the original packaging, leaving the drink packets in the foil. From the wrapping paper that was chosen for this arrangement, you need to make individual envelopes for the tea bags.
To decorate the bags, you can use multi-colored ribbons that will be threaded through the holes on each product. These holes must be made in advance using a hole punch.
After which the basket must be filled with tea or coffee in new packages. Empty spaces can be decorated with sisal. The basket will look more beautiful and interesting if you give it volume. To do this, the finished gift composition can be supplemented with beads, sweets or floral decorations. It can be bought in special craft stores. It is best to select decor for florists with special legs.
How to build a sweet “masterpiece” in the shape of a heart
An exquisite heart-shaped candy cake will be an excellent romantic surprise for your loved ones and will bring them a lot of happy emotions. To make a present you will need a heart-shaped cardboard package. If there is none, prepare several cardboard sheets - thick and thin.
Let's make this candy cake with our own hands. We have posted a photo of what it should look like for beginners below. Preparation method:
- To make the lower part, cut out a heart from a thick sheet, and its sides from a thin sheet and secure them with glue or tape.
- Cut out the same shape from soft foam plastic - this will be the basis for securing chocolate bars and other sweets, place it inside the box.
- Cover the box with a red or pink corrugated sheet, tie it with a beautiful satin or lace ribbon, and decorate it with beads or flowers.
Decorate the edges of the box with natural or paper flowers cut from corrugated paper. Pour candies in the center so that they completely cover the box and secure them with glue. Then decorate the top of the product with beautiful valentines, flowers, bows.
Caramel for decorating cakes
Caramel is a universal product for decorating baked goods. You can use it to make glaze or openwork decorations, inscriptions, figures, flowers and leaves. You can use store-bought multi-colored or plain caramel, or you can also make it yourself.
Recipe:
The simplest recipe is to boil 100 grams of sugar with 2 tablespoons of water until thick. Ready-made caramels without filling can be melted in the microwave or in a water bath.
There are several options for decorating a homemade caramel cake:
- You can dip pieces of fruit into liquid caramel. Strawberries, for example, look very nice. It is held on its tail and dipped almost to the top in caramel, the excess mass is allowed to drip off, placed on the cake and placed in the cold to harden.
- Caramel can be poured in the form of openwork patterns onto parchment. After hardening, the workpiece is removed and placed (or placed vertically) on the cake.
- You can write on the opaque caramel by pouring it directly from a spoon or bowl with a spout onto the surface of the cake.
- By adding chocolate, butter, and sugar to caramel, you can make icing for the cake.
- In a recessed container (cup, small bowl), cover the entire surface with liquid caramel. When the mass hardens, remove the workpiece. You will get a vase that can be placed on the cake and filled with berries.
Secrets of working with caramel:
- Melted caramel reaches a temperature of 160 degrees, so you need to work with this material very carefully.
- The melted mass freezes very quickly. If you need a lot of pieces, melt the caramel not all at once, but in parts.
- You can add flavors and dyes to the mixture.
- For cooking, use a saucepan with the thickest bottom and stir the mixture constantly.
We recommend: Video: velor cakes | Master Class
Delicious design of juice and sweets
A delicious design made from juices and various sweets will be an excellent solution for a children's party. It will bring many smiles and happy moments to little ones with a sweet tooth.
Step-by-step production:
- For the cake you will need a round mold - it could be a cardboard or tin pack, or a package of baked goods.
- Cover the bottom of the box and its inner walls with a white sheet, decorate the top with bright paper and secure it with a sketch.
- From a thick cardboard sheet, cut a circle to the size of the pack - this will be the lid. Cover it with colored papers or foil, decorate it with beads, a bow or beautiful flowers.
At the final stage, glue small packages of juice around the perimeter of the container and secure them with tape. Disguise it on top with a beautiful satin or tulle ribbon. Place chocolate bars and other sweets inside the box and close the lid.
