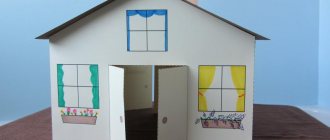
In almost every home there are old and simply unnecessary books that no one will read anymore. But don’t rush to throw them away, because they can be found in other useful uses. A handmade book box can be a wonderful addition to your interior and a good gift for a loved one. And you don’t need any special skills to make it.
Brushing
The sides of the box are made of pine, so let's take this opportunity and start decorating with firing and brushing. After we clean off the fumes with an iron brush, we will have this beautiful wood texture. Thus, we simulate the pages of a “book”.
Working with texture paste
It is convenient to work with adhesive-based stencils on this box, because the “spine” has not a flat surface, but a convex one. Due to the adhesive base, the stencil is temporarily fixed on the plane, which allows you to get clear, neat patterns. But keep in mind, the foundation loses its sticky properties as you use it.
Fix the stencil and apply texture paste. You can use paste purchased at an art store (for example, Sonet, Tair), or you can make it yourself using putty. This is described in more detail in the master class on decoupaging a tray.
After you have applied the pattern to one side with a palette knife or an old plastic card, you need to carefully remove the stencil and remove the excess paste with a cloth. It is advisable to dry the resulting result and only then proceed to the next side of the box.
Lastly, apply the paste to the “spine”.
After complete drying, the dried paste must be lightly sanded, removing loose particles of paste, which may subsequently fall off and spoil the decor.
Master class: creating a box from a book
You can’t even imagine how glad I am to present you this master class! It’s so great that you can share your efforts in detail. Moreover, on such a site where they will understand you, support you, and give you advice. I want to assure you right away that I love and appreciate books very much. There is even a small library at home. But I come across such specimens from which you can make a box. You can store jewelry, documents, postcards, letters in it, or just give it as a gift.
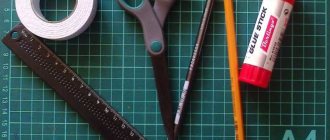
Materials:
- Book.
- Glue stick, glue gun and clear glue (I used Titan from Marbet).
- Glue brush.
- Black fabric, preferably elastic.
- Fabric with floral motifs.
- Iron.
- Black lace (mine is 2 cm wide).
- Black satin ribbon (mine is 6 mm wide).
- Black thread, needle, scissors, tailor's pins.
- Beads are black and yellow (depending on the design).
- Double sided tape.
- A size paper 4.
- Thick cardboard.
- Corners for decoration.
- Ruler.
- Stationery knife.
- Chalk or soap.
- Felt pen.
First, we glue all the pages.
Take 2 landscape sheets. We turn away the first page of the book and insert the first sheet A 4. On the back of the book we separate only the cover from the pages with the second sheet A 4. This way the book will not stick together into a monolith, and the cover will not get dirty. We use liquid transparent glue. You need to run the brush along the edge of the book block so that the glue lays evenly. I leave it to dry overnight. Preferably under pressure.
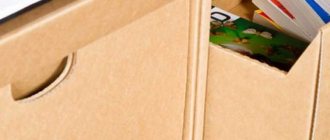
Cut out the leaves.
After complete drying, remove the album sheets. The first one gave way easily, but the second one stuck firmly. We just bend it. The photo shows that the book is quite thick, so there is a lot of work to be done. From 15 to 30 leaves are cut out at a time. It all depends on the condition of the book - older ones are cut easier and faster. We cut that one page that we left at the very beginning with a cross, retreating a centimeter from the corners. We turn it to the side. We see on the next page the cuts from the cross. Apply a ruler to the ends of the cuts and cut out a rectangle. Next we proceed without a ruler. Corners can create problems, here you will have to try. Tweezers can help out.
Once we reached the bottom (I left a couple of pages at the end), we glue the edge from the inside. We also move along.
Now, while the glue is still wet, you can use our first page with a cut out cross. Wrap and press as in the photo. We take measurements. We crumple sheet A 4. Cut out four strips from it, approximately 5 cm wide and the length that we got according to our measurements. We glue them, hiding the irregularities. A glue stick is handy here. At this stage, all that remains is to hide the bottom under the same crumpled sheet.
We create a cover from fabric.
We iron the fabric, apply the book unfolded, as in the photo. We trace along the contour, retreating about 5 cm. Cut it out, not forgetting to make cuts at the spine. We bend it inward and fix it a little with a glue stick. Carefully glue the corners with a gun. And we don’t skimp on glue on the bottom cover (the bottom of our box). Press tightly. You can leave it under pressure for a while if your glue takes a long time to dry.
Let's take care of the remaining trims at the spine of the book. We burn the edges with a lighter so as not to fringe. Wrap the fabric tightly and secure with a glue gun.
So the ribbon came in handy!
We cut double-sided tape into strips the width of our tape and adapt it as in the photo. We cut the tape at an angle and singe it with a lighter. We put it on top of the tape. We stop at each corner of the box, cut it diagonally and singe it. Then the places where the tapes join will be beautiful.
We decorate the inside of the lid.
We measure the lid from the inside and cut out a rectangle of the required size from the same black fabric, not forgetting to leave 1-2 cm for the hem. We bend, in fact, and stitch. For convenience, I use tailor’s pins. We glue the workpiece to the lid with a gun (from the inside, of course) and again apply glue over the seam. Distribute it evenly with a brush and apply lace. I didn’t bend it at the corners, but cut it at an angle.
The bottom of the box.
We measure the bottom along the internal boundaries. On the floral fabric, select a motif and cut it out according to the measurements taken. We trim the edges with lace. Apply glue along the contour of the bottom and spread it with a brush so that it does not accidentally come out. We press the fabric blank.
The most important!
Cut out an oval from durable cardboard. You can first print it out and then trace a paper pattern on cardboard. On colored fabric, select a suitable motif, apply a cardboard oval and trace it with a felt-tip pen, leaving 5 mm for a slight hem. We first fix the fabric to the cardboard with tailor's pins, and then attach the lace. We do it like this: take out one pin - apply lace - stick a pin. And so on one by one. Then we sew along the contour with a regular needle and thread. I decided to sew beads where the dots were located in the pattern. But here there is no limit to imagination. You can embroider the entire design, or use satin stitch embroidery.
All that remains is to attach the corners to our box, decorate it with a blank with a floral motif, and you can admire it!
I used a glue gun. You can secure it with stitches for reliability.
Green, red, gold - how expressive they look on a black background.
Brooch pins can be attached to the inside of the lid
That's all! And the black color does not make the box gloomy at all. It turned out bright, sunny and in Russian Khokhloma - it’s very beautiful, it charges you with energy and good mood! I am already planning to make bags and cosmetic bags with Khokhloma motifs
I hope that you did not regret visiting me. It is very difficult when you have no experience in creating master classes.
Thanks in advance for your understanding!
Decorative things
The lid of the box will be decorated with a frame with a medallion. Before fixing it, a small area for gluing must be cleared of paste.
The frame used in this case is cast liquid plastic. You can use ready-made elements that are sold in art stores or use a metal cabochon. We fix the element using “Crystal” moment glue.
The lid of the box will also be decorated with metal decorative corners, which are glued before painting or after, as in this case.
Master class on decoupage on wood. How to make a book-shaped box
Author: Tatyana Ulakhovich
U. Tatyana
For work we will need:
Materials:
- - wooden blank;
- — universal paint-primer;
- - glue for decoupage;
- – acrylic paints from the Boho-chic series (Pompadour, Viardot, Antique white, Havana)
- — decoupage rice card “Flower Glade”;
- - napkin (lower non-painting layers);
- — universal structural paste;
- - satin varnish;
- — chipboard;
- - lace;
- — paper roses in 2 sizes, white and pink;
- - sisal;
Tools:
- - sandpaper;
- - disposable fork;
- - spatula/palette knife;
- - brushes, sponges;
- -wet wipes (rags);
- - stencil;
So, let's begin!
Before decorating, thoroughly sand the workpiece with sandpaper.
1. First, let's start creating pages. Using a spatula or palette knife, apply a thin layer of structural paste. (By the way, instead of a spatula, you can successfully use an unnecessary plastic discount card or credit card.) Then, using an ordinary plastic fork, we “draw” our future pages.
2. While the pages are drying. Decorating the back cover. We fix the stencil and apply structural paste to the entire surface. Let it dry naturally, because... When drying with a hairdryer, the paste may crack.
3. Let's take care of the spine of the book. To decorate, you will need a white layer of decoupage napkin. Having torn off a piece, we twist a tourniquet out of it. And then glue it to the spine using decoupage glue.
4. Now we prime the entire workpiece. And we glue a rice card onto the front surface of the cover.
5. Paint the spine and back cover with Boho-chic Pompadour acrylic paint, and the pages in Antique White.
6. Now let’s give our little thing a certain touch of time. First, let's age the pages: dilute the Boho-chic Havana color paint with water until it becomes liquid. We apply liquid paint, trying to get into all the recesses. As soon as the paint dries a little, use a damp cloth (cloth) to wipe off the excess from the protruding surfaces. We do this with light movements, without pressure, otherwise the paint will be erased in the recesses.
7. Now it’s the turn of the spine and back surface. We repeat the same steps: apply the diluted paint, dry it a little, and wipe off the excess from the protruding elements with a damp cloth.
8. Using a stencil using pearl paste, place an openwork butterfly on the cover. After this, we cover the entire work with 2 layers of satin varnish with intermediate drying.
9. Decorate the box with 2 strips of lace of different widths, fix it with a hot gun.
10. Using a stamp, apply the inscription to the chipboard. We are preparing a “nest” for the chipboard: we will have lace at the bottom, and on top we will add volume with the help of sisal. We glue them onto a hot gun.
11. Decorate the composition with roses.
12. Spray with Boho-chic paints (Viardot, Havana, Antique white).
We admire the result!
Coloring
We cover the box with black primer, including the spine and brushed part.
After drying, let’s “play” with the paints a little. In this case, we patina the relief with white and then green paint.
Apply paint slightly diluted with water to the entire surface with a brush and wipe off with a dry cloth.
After drying, repeat the step in green.
You can experiment with other colors, imagine, try. The result of color transitions depends on the sequence of paint application. In this work, due to the fact that we patinated with white paint first, the green color looks brighter.
Don't forget about the inside of the box. In this work, Ella covered it with brown paint diluted with water.
We are exploring other options for decorating the box and basic ideas
Relief decor made of paper.
For this decor you will need simple office paper, which you need to crumple by hand. Cover the cover of the book with PVA glue and apply straightened crumpled paper. We bend the edges of the sheet, cutting them off. We glue the book on all sides, including the spine. Let's go to the inside and do the same.
We tint the paper using a sponge with paint.
Lightly touch the paper with a sponge so that only the folds are painted. Now you can complement the composition with any decor of your choice: ribbons, flowers, beads, etc. Decorate the box with felt.
We cut the felt into 4 rectangles, suitable in size for gluing the inner edges of the box, and glue it with transparent instant glue.
We cut out a large rectangle for the cover from felt of a different color. Glue it around the book.
We make cuts in the corners and wrap them inside. We also wrap the edges on the binding and glue it. Place everything under a press and dry.
We cover the inside of the cover with felt and decorate the recess with a felt frame.
On the side of the cut pages we paint with gold paint with the addition of glue. We decorate the corners and sections of felt with the same composition. We decorate the cover with a brooch. Now you can leave it as is, or add artificial flowers, butterflies, ribbons, etc. to the decor.
Decoupage with varnish print
If you are happy with what you have done, let's start working on the medallion.
A flat oval figure, cut to fit the size of a frame made of thick cardboard, will serve as a medallion. We cover it with acrylic primer, dry it and stick the picture.
In this case, a varnish print was used.
How to make a varnish print?
- Apply 4-5 layers of acrylic artistic varnish, such as Olki, to the picture. It is important to choose the right varnish for printing. Artistic varnishes, unlike construction varnishes for furniture, which we often use as a finishing varnish, are more elastic, which allows us to obtain a flexible film. Among construction varnishes, acrylic varnishes for saunas (baths) may be suitable, but not all, try it.
- Cut out the picture and soak for 30-45 minutes. in water.
- Carefully remove the resulting film along with the paint layer. Roll up any excess paper remaining on the back of the film with your finger. This film can be applied to any surface.
Apply a couple of drops of instant glue to the base of the frame and insert a medallion with a picture into it. Now the box can be coated with finishing varnish; 2 thin layers will be enough.
Box-book made of cardboard, postcards...
Master class: book box made of cardboard, postcards, wrapping and holographic paper, as well as other materials.
For a book-shaped box you need:
- 2 postcards as close in size as possible;
- dense but flexible cardboard;
- wrapping and holographic paper;
- transparent mica;
- needle, sewing thread;
- scissors;
- an awl and an old book, which you don’t mind putting under the parts while piercing holes;
- paper clips;
- ruler.
I have a decorated card that will serve as a lid for a future box. Based on its dimensions (18.8 cm x 12.2 cm), I calculate the parameters of the parts. I'm focusing on the height of the finished product being 5 cm. For this size, a postcard is quite enough!
One of the sides, it is the only one of its kind, will be 1 cm shorter than the larger side of the postcard (so that the cover does not fall through), i.e.: 18.8 cm - 1 cm = 17.8 cm.
The other two sides should protrude well beyond the lid on the left. That's why they are longer: 15 cm.
The hardest part is measuring the bottom! Here you need to keep in mind the following nuances: the lid and bottom should protrude 5-6 millimeters beyond the side walls; the bottom, in turn, should tightly wrap around the arched part of the side part and dock with the lid.
Taking into account all the protrusions and indentations, I decide on the size and number of parts*:
- cover (18.8 cm x 12.2 cm) – 1 pc.
- side (17.8 cm x 5 cm) – 1 pc.
- side (15 cm x 5 cm) – 2 pcs.
- bottom (18.8 cm x 21.7 cm) – 1 pc.
Each piece consists of 2 pieces of cardboard, the lid is made of two postcards. I’ll do the design of the lid last: when the box is sewn.
I decorate the details. On the inside there is wrapping paper + mica, on the outside there is only holographic paper. I decorate the bottom externally using a combination of: wrapping and holographic paper + mica.
Three edges on the inside of the bottom, before adding mica, I glue strips of holographic paper 7-8 mm wide. I do this because the edges will protrude slightly beyond the side walls. When the box is sewn, you will understand why these steps are necessary.
After the final design, I assemble the corresponding parts of the parts together and temporarily fix them with paper clips.
Using a ruler and a paper clip (you can take any blunt object that will not scratch the surface), I make marks on the outside at a distance of 5-6 mm from the edge. Using an awl, I pierce holes along these barely noticeable lines at intervals of 4-5 mm.
I start sewing the parts with a looped finishing seam. I carefully hide all the extra threads and knots so that the work looks as attractive as possible.
When the part is half sheathed, I insert additional inserts between the cardboards (their number depends on the density of the cardboard) and continue sheathing the part. These liners should be the same shape as the part, only slightly smaller in size. And they are needed to give additional density - the box will become more resistant to deformation. I fill the bottom only halfway with the liner, since the second part will bend.
I sew the pieces together. To make this easy and, most importantly, high-quality in the rounding area, I temporarily tie the box with tape.
Now that the parts are sewn together, I begin to design the lid. It consists of 2 postcards and an additional insert. Instead of a card on the inside, you can use wrapping paper (this will be a more economical option!).
You can see how I decorated the outer part of the lid here:
Postcard decor (part 1). Roses made of satin ribbons
Postcard decor (part 2). Decoration with beads, sequins, satin ribbon
I do the same manipulations on the lid: putting marks, piercing holes, sewing. Then I sew it to the box itself.
The book box is ready! It can serve as a good gift, a prop for any event... perhaps it will be useful for storing money, jewelry or expensive and sweet little things.
* The described dimensions of the parts are indicated specifically for a postcard measuring 18.8 cm by 12.2 cm!!! I specifically calculated them so as not to trim the finished decorated postcard. Please keep this in mind! Everything is very individual! If you have any difficulties figuring out the sizes of future parts of the box (or any other questions), I recommend watching my video tutorial.
Tatiana Kupriyanova
Final stage
The work is nearing completion. All that remains is to glue the corners, add gold-colored wax paste on the protruding parts and fill the medallion with epoxy resin.
Epoxy resin (jewelry) is used for the manufacture of souvenirs, jewelry, including the application of three-dimensional “lenses” on plastic, decoupage, pendants, earrings, magnets, for the production of jewelry and applied products, imitation stones. After mixing components A and B, the resin, ready for use, is a colorless transparent liquid. When hardened, it is a solid “glassy” mass with a glossy surface.
We prepare the epoxy resin and degas it (“removing bubbles”) for about 1.5 hours. The longer the resin sits, the thicker it will become and the more convex the lens will be. Place the box on a flat surface. It is important to check if there is a tilt in any direction, otherwise the resin may leak before it has time to harden. After making sure that the plane is level, fill the medallion. Cover the product with a lid and leave it to harden according to the specified mode (see the instructions for using the resin from the manufacturer).
Brags
Here the inside of the box is decorated with velvet fabric.
Your product can come out not only in deep dark colors, but also in light pastel colors, like this box from Rina.
Thank you for visiting us. Decoupage extravaganza and new creative ideas for you. May every day be filled with beauty, joy and inspiration. Bye bye!