Material advantages
Cones have a lot of different uses: some use them for kindling, others mulch flower beds and beds, and others make healthy jam. But since childhood, they have been firmly associated with the New Year holidays and a decorated Christmas tree. It is not surprising that they are readily used to decorate the interior, and not only in winter; The advantages of pine cones as decoration are:
- Availability. That rare case when high-quality (and environmentally friendly) natural material is absolutely free, and you can stock up on it by taking a walk in the park or in the forest. Some lucky people have coniferous trees growing near their house (or in their country house), which makes decorating almost inevitable.
Decor from nothing Source xn--80afdb0cbapl
- Rarer species can be purchased in specialized online stores of floristry and decoration, hobbies and creativity, or in flower and gift packaging stores.
- Ease of manufacture. Original crafts are easy to make with your own hands, and they will look no worse than store-bought ones. You will need a little patience and ideas gleaned from the Internet after watching a couple of master classes.
- Durability. Decorations will last for more than one season.
Waiting for the holiday Source cdn.homedit
Step-by-step instructions on how to make a Christmas tree toy from pine cones
- 1. Take the previously prepared cones and place them on the table for further manipulations. Please note that we have chosen those in which the petals are widely spread in different directions and there are no seeds inside. Due to this, we will achieve the required volume of the craft.
- 2. We will use a gun as a gluing tool; if you have another material that can firmly hold the cones together, take it. We apply the solution to the back part, with which they held onto the branches, and then fasten them together in a circle. Take the smallest pine cone that you have prepared and insert it into the middle, using glue in the same way.
- 3. This is approximately what you should get. For us it is a five-pointed star or a snowflake. Your future craft will depend on the size of the cones.
- 4. For the next step we will need acrylic paint and a brush, as well as a jar of water.
- 5. We begin to paint the cones, imitating snow. To make it look more extravagant and colorful, do not cover the inner parts under the petals with a layer.
- 6. As you can see from our photo, we did not cover or try to completely fill all the space given to us. This is a kind of trick that will simulate snowfall. It feels like frost has covered our work.
- 7. Don’t wait for everything to dry, and put glitter in front of you, and then sprinkle it on each cone. More abundantly in the center and leaving scattering them around the edges.
- 8. The further we are from the center, the less sparkles there should be. The photo shows an approximate result. You can choose the color of the source material yourself to match the tone of your Christmas tree. If there is more red color there, then use it.
- 9. Now we need stamens. If you are smart and don’t have them on hand, you can make them yourself. For example, cotton swabs with the edges treated with glue and then painted in the desired color can be used for this.
- 10. Next, we need to arrange them so that the intermediate part is not visible, and the edges are scattered near the core. Focus on what we have presented specifically for this case. Use glue to attach them.
- 11. The final result of the previous operation is shown in this photograph.
- 12. Around the middle cone we glue white stamens, thereby creating an accent on it. All that remains is to glue the tape on the back so that you can hang it on a branch and you're done. Subsequently, experiment with the colors of the stamens and the size of the cones, achieving different results.
0
Varieties
The most accessible types of cones include the following types of natural material:
- Pine and spruce. Medium in size, pine cones are round in shape, spruce cones are oblong. You will most often find them in interior decoration, among table decorations at a special event (wedding, anniversary).
- Fir. They resemble spruce, but with smaller scales.
- Cypress cones. Widely used for floral winter decoration, it has small sizes (20-40 mm) and a bizarre shape. They are great not only for New Year's, but also for wedding decor: decorating glasses, tables, bracelets for bridesmaids.
Candlestick fragment Source cs7.pikabu
- Larch cones. The shape is similar to balls, slightly flattened at the poles; wide figured scales resemble flower petals, size - up to 30 mm. The compositions have the elegant appearance of neat little roses.
- Cedar. A wonderful natural material, which, due to its solid size, is used both in interior and garden decor, but in most regions it is almost exotic. More exotic cones of coniferous trees growing on different continents are not readily available.
Polar rose (larch) Source i.pinimg
Crafts from pine cones for the New Year's table
While mom is busy preparing holiday dishes, the children can start decorating the table. This basket looks quite impressive, and its cost is quite small.
Paint the cones with spray paint, acrylic, or a mixture of gouache and PVA glue.
Then paint the basket. In the data for the basket, the same paint is used as for the cones, but you can use a different color, or even leave it in its original form.
Lay out the cones to form a composition and secure them with hot glue.
The decoration is ready! You can also add a fancy ribbon, a few beads or a cinnamon stick to it. If you are planning not just New Year's family gatherings, but a large party, this is an original way to mark the place of each guest at the table.
Preparation of material
To ensure that crafts and decorations do not lose their shape over time, you need to use only prepared material in your work, which will be helped by knowing the following tricks:
- Collection time. If closed specimens are needed for decoration, raw materials are collected in the fall. From wet cones collected at this time of year, blanks with both closed and open scales are obtained. Spring cones (from last year) do not change shape, but still need to dry.
- Treatment. A cotton swab and alcohol will help remove dried resin from the scales.
Decor ideas Source cdn.mycrafts
- Soak. Helps get rid of small insects. For the procedure, prepare a mixture of water and vinegar (6%) in a 1:1 ratio. The raw materials are soaked for half an hour to an hour, as a result of which the scales may close. After drying, they will return to their original state.
- Keeping the bud closed. To maintain a neat appearance, the future decor is treated with glue before final drying. PVA or carpentry is suitable for the procedure, into which the workpiece is lowered for 30 seconds. Dry it with the scales down (upside down); Thanks to this, the scales stick together and retain the desired shape. Sometimes only half of the cone is soaked in glue, then it becomes like an exotic flower.
Bumps and a little bit of imagination Source architectureartdesigns
- To make original decor from pine cones for your home, you may need to lighten the scales. The material is soaked for 18-20 hours in white, after which it is washed with soap and water and dried. Due to the reaction to moisture, the buds will close, but once dry they will open again. The procedure may need to be repeated.
- Form adjustment. The required specimens are soaked in boiling water until elastic. Then they are bent to the desired shape, which is fixed with a harsh thread; then dry.
Space for creativity Source decoratorist
See also: Catalog of companies that specialize in designing country houses
Figures made from pine cones
You can not limit yourself to single Christmas tree cones, but collect whole figures of different shapes from them. From the inventory described above, everything remains unchanged, only a small amount of steel wire will be added. With its help we will connect the cones with each other.
The best choice is steel wire, which will play the role of a reinforcing material, 0.5 or 1 millimeter thick. Copper wire is too soft. The figurine will begin to deform under its own weight.
Cone star
And now we will make a Christmas tree toy from pine cones, but in the shape of a star. We will need fir cones (5 pieces) of the same size to create symmetry. First you need to create a base from the wire: bend it so that there are five rays (we will string them on them). We pierce the blunt ends of the cones. An awl, a nail or a thick needle. This is necessary to create holes into which the ends of the wire base will go, and they need to be coated with glue. We string the cones and start painting. After everything is dry, make a hole in one of the rays of the star and insert a thread there.
In addition, it is very easy to make the same star, but for the top of the Christmas tree. The manufacturing process is the same, you just need to select and install a small tube so that it fits onto the top branch of the tree. Most often, nozzles are made from the necks of elongated bottles. The nozzle needs to be installed between the rays of our star, in the middle. Then securely fasten.
It's best to paint it silver, red, metallic or gold - it looks great!
Snowflake
Everything is exactly the same, only the wire base must have six ends. We will plant the cones on them not with the blunt part, but with the sharp part. We paint or cover it with glitter, make a loop. You will get a very beautiful Christmas tree toy made from pine cones, as in the photo, in the form of a snowflake.
There are many design options, since even a complex snowflake can be assembled from large and small cones.
Garland
To make a garland you will need more seeds. Moreover, they can be of different sizes - it’s even more beautiful. It is possible to paint it in various colors. After painting the pine cones, take a long awl or needle. There are two options for such crafts:
- the cones hang end down, one after the other;
- they follow each other like a chain (transverse arrangement).
You should not use a thread: there will be a lot of cones, the thread may break from such a load. It's better to take a fishing line.
Drying
The final stage of the preparatory work is drying, due to which the scales completely open, taking up their final position. There are the following methods for drying cones for crafts:
- On air. The slowest method takes 2-3 weeks, depending on the moisture content of the raw materials. The cones are placed in a basket or box lined with newspaper in a layer of 10 cm (half opened - up to 20 cm). Important conditions are dry air and good ventilation.
- Express method. To speed up the process, the cones are boiled for an hour and then dried on a radiator.
Drying in the oven Source img03.rl0
- In a frying pan. Dry in a cast iron frying pan without a lid, keep the heat to minimal. The future decor is laid out in one layer, loosely, and periodically turned over. Drying may take an hour and a half.
- In the oven. It is heated to 250°C. Place the material in one layer on a baking sheet wrapped in foil and dry for 50-60 minutes. The oven door is left ajar to speed up air exchange.
- In the microwave. The raw materials are laid out in one layer on a flat plate and dried at maximum power for one minute. If necessary, turn the cones over and repeat drying.
Simple craft options Source i.ytimg
What you need
In order for the work to progress, you need to prepare for it. To create the decor, in addition to pine and fir cones, you will need the following materials:
- Glue. Carpentry is better, but for simple (and not heavy) crafts, PVA or silicone is suitable. Hot-melt adhesive is very easy to use - the pine cone can be carefully attached to any surface: wire, burlap, tape, glass.
- Gypsy needle, scissors, awl, tongs.
Preparing for work Source thesprucecrafts
- Strong threads, fishing line. You can take threads and cords used in scrapbooking for decorative finishing and as fastening material. They come in different textures and colors.
- Multi-colored glitter powder (sparkles, powder), decorative tape with ornaments - in the departments for creativity.
Hot melt adhesive is especially convenient to work with Source modernplace
- Rhinestones, beads, beads, sequins.
- Velvet and fiber (felt) paper, cardboard, pieces of polystyrene foam (packaging can be used).
- Artificial snow (loose and spray), cotton wool.
- Paints, aerosol and regular (with a brush), varnish with glitter.
- Optionally - wire, burlap, decorative ribbons and cords.
Applying glitter Source driedflowercraft
See also: Catalog of companies that specialize in the installation of fireplaces and stoves
How to paint
For painting, use dried, fully opened cones; The following methods exist:
- Dye. Acrylic or gouache, applied with a sponge or brush. The sponge speeds up the work, but does not affect the entire surface of the scales. A brush allows you to get a better result, especially if several shades are used.
- A tin of paint. At the same time the fastest, easiest and most expensive way. The cone is hung on a fishing line, dipped into a jar of alkyd enamel, and hung to dry.
Painting with a brush
- Paint on a sponge. If there is a large amount of work to be done, the sponge is placed in a container and thoroughly soaked in paint; the cone is pressed against it on all sides.
- Aerosol enamels in the form of a spray. The paint is applied from a distance of 15-20 cm.
- Hairspray and glitter. Treat the surface with strong-hold varnish and immediately sprinkle it with glitter. The excess is shaken off and, if necessary, processed again.
Spray painting Source ariae
- PVA glue and glitter. Mix glue and water in a bowl deep enough to dip the pine cones into. Repeat several times, allow excess to drain, dry. Then apply glue in the right places and sprinkle with glitter.
- Wax. It can be purchased in the craft department (in the form of flakes), or replaced with cheap candles. The wax is melted in a water bath, a dye (food or oil) and aromatic oil are added to the solution. The cones are dipped in wax and dried several times until the desired result is obtained.
After spray painting Source previews.123rf
What can be done
Of all the natural materials, pine cones have perhaps the greatest potential. There are an unimaginable number of ways to use them. It’s especially nice that all family members, young and old, can take part in this exciting work. The result of joint creativity will be a good mood and beautiful jewelry.
Elegant decor Source latestjobs
Express decor
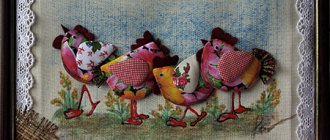
The creative rush begins in the fall, when competitions for the best hand-made autumn toy start in kindergartens and schools. Having mastered simple options, many children (and parents) get a taste for it, and then figurines of various birds, animals, and fairy-tale characters appear. Moms and dads who find out that they need to bring a craft tomorrow morning will appreciate the following simple products:
- Owl toy. One of the simplest options: the base (body) will be an open pine cone. Paws are attached to the wide base, which are most easily made from plasticine. Wings, eyes, nose are made of paper (preferably felt) or cardboard; the main thing is to glue them more securely.
Owl Source i1.wp
- Family of hedgehogs. Several cones of different sizes are mounted horizontally on plasticine feet. A muzzle with a nose and eyes is made from plasticine. You can look up the shape of the muzzle on the Internet, and choose any color of plasticine - it will turn out bright and original.
Hedgehogs Source i0.wp
- Squirrel. You will need three cones: for the body, head and tail. For the head, choose a small bump and make a muzzle from orange plasticine (like a hedgehog), add eyes and ears (we check the shape on the Internet). Secure all the cones with glue and add plasticine paws.
Toy ideas Source i.pinimg mensup
- Dinosaur. Fundamentally no more complicated than previous crafts, but it looks much more impressive. For the body, a pine cone is chosen; the paws, tail and head on a long neck are sculpted from multi-colored plasticine. To complete the picture, the tail and neck can be decorated with separate scales.
Worth the time Source alwaysbusymama
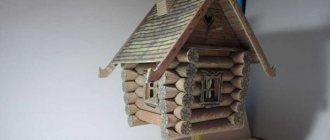
New Year's craft Christmas tree made of pine cones for kindergarten
This option is perfect for a children's competition. After all, you can make not just a Christmas tree, but a beautiful Christmas tree composition.
Consider the principle of creating a Christmas tree below, but you can decorate it in such a way that it will become a bright and original decoration for the New Year holidays.
Necessary materials:
- bumps
- cardboard
- glitter
- decor
- sisal
- glue gun
- white enamel
Make a cone out of cardboard.
To make the tree stable, fill the cone and cover the bottom with cardboard
Attach pine cones and Christmas balls to the cone using a glue gun
Cover the pine cones with heat-resistant enamel
You will get such a snow-covered beauty
You can also decorate the Christmas tree with green branches, inserting them between the cones
Using white primer, add snow to the Christmas tree, attach other decorations - artificial berries, beads and snowflakes.
Make a ring from sisal to decorate the base of your New Year's pine cone craft.
New Year's crafts for the garden made from pine cones amaze with their diversity. If you don’t have a large number of cones and other materials, then even from one cone you can make a beautiful New Year’s craft with your own hands.
It is impossible to imagine the New Year without a beautiful Christmas tree, and such trees can be placed in different rooms. They will give your home comfort and add magic. After all, a festive mood is so necessary on cold winter evenings.
New Year's crafts for kindergarten using pine cones can be a little simpler, so that it would be more interesting for the child to be creative with you.
Video description
About decorating ideas using pine cones in the following video:
Home decor
Decor made from pine cones for the home does not fit into every style, but it will add coziness to many modern trends. Outside of the winter holidays, your home interior can be diversified with interesting designer items:
- Candlestick. Use a glass or small glass vase. The candle is placed in the center, along the edges there are several cones without any decoration. Simple, stylish and all-season.
Grace in simplicity Source 1.bp.blogspot
- Decorative jar. Choose a jar of unusual shape and fill it with pine cones, painted in the color palette of the room - white, black, gray. A container of a more original shape (for example, a vintage candy bowl with a lid) can be filled with pine cones painted in an acid color. Option: the jar is filled to a third with pine cones, a skein of garland is placed on top, which is powered by a battery hidden at the bottom.
For owners of glass containers Source i.pinimg
- If you are lucky enough to get a particularly large specimen of a cone (for example, from a Coulter pine), no additional decor is required. Designers prefer to use such specimens in their natural form - natural motifs are now in trend.
- Frame. Small cones of cypress or larch can be used to frame a photograph or a child’s drawing, and hang the finished composition on a ribbon. The craft is left in its natural form, or painted in a suitable color - it will be cute and original.
Particularly large specimens Source media.angieslist
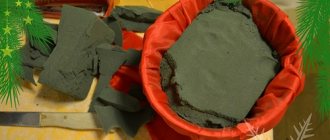
- Decor in a pot. The pot is filled with moss (or, for example, straw). Cones are laid out in rows on top and secured with glue for reliability. The structure can be given any shape - spherical, elongated, cone-shaped.
Simple and elegant Source xn--80afdb0cbapl
Video description
About the New Year's wreath made of natural materials in the following video:
For the New Year holidays
Homemade New Year's decor is a common thing in all countries where family holidays are valued. Cones occupy one of the main places in it; many original decorations are made from them:
- Fairy lights. The main condition for an excellent result: the denser (more crowded) the cones are collected, the more impressive they will look. To collect the garland, use a thread or fishing line; the holes at the base are pierced with an awl or needle. The finished ribbon is decorated with snow. Garlands are used to decorate the upper part of the room (beams, hangers), where they have a solemn appearance and do not disturb others.
Garland at the entrance Source hgtvhome.sndimg
- Christmas decorations. An owl, a hedgehog, a mouse, a gnome and Santa Claus, sprinkled with sparkles and equipped with loops, will take their rightful place among purchased toys. Your children will remember fabulous evenings spent decorating the Christmas tree for the rest of their lives.
For the forest beauty Source modernplace
- Wall decor. The easiest way to organize decor from pine cones in the country is to hang them in clusters of five to ten pieces and decorate them with everything that is at hand: ribbons, serpentine, fabric bows.
It couldn't be simpler Source xn--80afdb0cbapl
- Christmas wreath. A traditional decoration for the front door in Catholic culture, it has also taken root in our country. As a frame, choose strong branches, cardboard or wire twisted into a ring (the base can be purchased at the store). Balls and cones are strung on a fishing line and wound onto a base. Optionally add ribbons, figures, sweets, dried fruits.
Wreath with fir and pine cones Source dizain
- Single decorations. If you don’t have time at all, hang individual cones, painted and covered with artificial snow. To make them look truly festive, coat them with a thin layer of gold or silver spray paint or glitter varnish.
- Candlestick decor. The combination with sprigs of pine needles, beads and glass balls looks festive.
New Year's candlestick Source mirlandshaft
- Three-dimensional star. Five pine cones are placed around the sixth, secured with glue and fishing line. The star can be painted at any stage and hung in a doorway or on a chandelier.
- Holiday table decor. Cones on a ribbon are useful for decorating the back of a chair (from the outside), decorating a napkin, a candlestick, or a small gift (for example, in combination with a candy cane).
Table decoration Source web-studio.pp
- Composition. One of the fastest ways to decorate your interior. The basis will be a tray, box, dish or three-tier candy bowl. An attractive art object is obtained from a combination of candles, balls, tangerines, fir branches and, of course, pine cones.
There is never too much gold Source tapeciarnia
How to make a New Year's wreath from pine cones
An Advent wreath is a traditional decoration, usually hung on the front door. How to make it from cones - see this section.
And such a “floral” wreath will be relevant not only at Christmas.
To make it, paint the pine cones bright colors with acrylic. Try to choose colors that are in harmony with each other, such as blue and pink, red and orange, etc. White color is in harmony with absolutely any other color.
Wait until they dry and use a glue gun to glue them onto a base purchased or woven from twigs. You can also use a circle of cardboard, or the base from an old, already tattered wreath.
All that’s left is to decorate the wreath with artificial foliage, and you’re ready to hang it!