“Pineapple flowers))) a dream!”
Marina Suzdaleva
The participants of "" have already spent the first week with their kids based on the fairy tale "Turnip". And the most creative mothers together with their children made crafts from vegetables and fruits with their own hands. Judging by the reviews, such a creative activity not only served as a good development of imagination, but also had a positive effect on the appetite of the players!
Vegetable machine
Craft materials:
The idea to do it appeared quite quickly. My son loves all kinds of technology! Besides, I wanted to come up with something that he would really be interested in doing. And also something voluminous, not flat, so that you can play with the craft a little, and not hang it on the wall. Everything else was dad's idea.
At first they thought of collecting it for toothpicks, but then they decided - our man is growing! My son enthusiastically hammered in all the nails and glued on the headlights. Then he collected the driver: Cipollino.
As a machine, the craft did not last very long. But after the game, Yura spent a very long time cooking vegetable soup and feeding it to everyone.
Danilova Olga, son Yura, 2.5 years old, St. Petersburg.
Crafts from vegetables: butterfly and racing car
My name is Maria and I have two children, Vasilisa, 6.5 years old, and Mark, 11 months old.
My daughter came up with and performed the craft herself. Vasilisa decided to make a butterfly
. It consisted of the following vegetables:
- carrot - body;
- salad - wings;
- basil - decoration.
The butterfly also had legs and a face.
The second craft is a flower
. Unfortunately, the photo did not survive. consisted of the following vegetables:
- sliced cucumbers – stem;
- lettuce leaves and radishes - flower petals;
- tomato - middle.
Mark helped his dad with the race car
. The wheels were carrots on toothpicks, the body was a cucumber, and in the driver’s seat sat a tomato. Once everything was done, we came up with a fairy tale about new characters. A whirlwind of fantasy took the daughter far, far away. And in the end everything was quickly eaten!
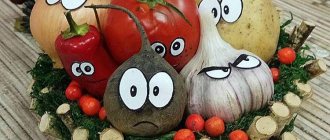
Reproduction of a painting by Giuseppe Arcimboldo
I thought for a long time about what I could do with fruits and vegetables that would be so unusual and interesting to surprise and delight my daughter. I remembered Giuseppe Arcimboldo and his painting “Portrait of Emperor Rudolf II as Vertumnus”! The ancient Italian god of natural abundance and Vertumnus, was considered the god of transformations. And the Italian painter captured the image of the emperor from a variety of vegetables and fruits, for which he was awarded the title of Palatine.
The theme of vegetables and fruits fit perfectly into the scenario of a fabulous week, and we decided to make a reproduction of a picture of their real fruits. At the same time, let’s touch a little bit of beauty by harvesting the granny from “Repka”.
We found aesthetically pleasing products in the refrigerator; there were viburnums, pine cones and chestnuts on the balcony. My daughter was able to lay out some of her hair and beard.
Of course, we don’t pretend to be similar, we got our own colorful character, but, in my opinion, he’s also very cute :)
Svetlana Klichova and Lera, 2 years 4 months, Moscow
I thought for a long time about what we should do. In one of the fairy tales, Vanya especially liked the fox. So we decided to make it from boiled carrots and fasten it with toothpicks.
I boiled 3 carrots of different sizes, peeled them, and made a body and a muzzle from the big one. When they attached the body to the muzzle, Vanya kept trying to tear off the head. Then we also attached the arms and legs to the fox using toothpicks. When Vanya realized what happened, he laughed! In general, she did not live long. Vanya began to take it apart and eat it.
Geido Olga and little son Vanya (1 year 3 months), from Novosibirsk.
The idea of creating an edible car did not come by chance. My son still learns new things through his mouth, and he absolutely raves about cars, especially tractors. So we tried to make an edible car: it’s delicious and you can play with it. Because My son doesn’t have many skills yet, so we decided to focus on something not very complicated. To make the machine we needed:
- Apple;
- Toothpicks;
- Cucumber;
- Grape.
Instead of an apple, you can take a pear, then the silhouette will be even more interesting.
You need to cut the apple in half and then cut it lengthwise into slices. The toothpicks will serve as the axis. But the wheels are cucumbers and grapes. Everything is prepared, you can start...
I assembled the first machine myself, showing and telling my son what to do and why. My son assembled the second car on his own, but with his grandmother’s help. First, I stuck one toothpick into the apple slice, after which I began to string first a cucumber slice on one side of it, and then half a grape. Then he repeated this procedure on the other side. Having made the front wheels, we turned the car over and he stuck a second toothpick into the apple, marking the second axle. On which I first strung cucumber slices, and then grapes.
The most difficult part of the job was to prevent my son from eating all the parts of the car in the process. But the result exceeded all expectations. After finishing work, the son took his typewriter and began to purr, rolling it across the table.
Kosteva Oksana, son Sashenka 1 year 8 months, Dolgoprudny.
Still life "Forest clearing"
To create a still life you need:
- Potatoes - several pieces, depending on how many and what size the mushrooms are;
- Greens for creating grass. In our case: parsley and cabbage leaf;
- The lid of the box is preferably brown, like earth.
Process of creation:
- Together with your child, start tearing cabbage leaves and tearing off parsley leaves to create “greenery” for the bottom of the box lid;
- While the child is fascinated by this process, peel one part of the potato and shape it into a column (this is the mushroom stem), and cut the second part in half (this will be the mushroom cap) and cut out a container inside to hold the cap on the stem;
- Collecting a still life.
The work is ready!
Gavrilova Faina and daughter Taisiya, 1 year old, Arkhangelsk.
Hedgehog made from pear and counting sticks
We created a hedgehog from a pear and needles - counting sticks, which we stuck into this same pear with the baby. I made the hedgehog's paws from apple slices.
Misha took an active part, but only in getting needles :)
Kudryashova Nadezhda and Misha (1.2 years), St. Petersburg.
We made a hedgehog and a chanterelle from fresh potatoes, carrots, matches and beans. While peeling potatoes, I accidentally came across two very curved potatoes that looked like animals. I inserted the eyes from beans and fresh carrots myself, cut out holes for the chanterelle's ears, and Olesya, with my help, inserted ears from fresh carrots there. We inserted needles into the hedgehog, first from toothpicks, then from matches.
Do you want to play with your child easily and with pleasure?
The clearing was sprinkled with green grass (dill), the hedgehog brought apples (pieces of carrots) and pears. Then we painted our animals with brown gouache using cotton swabs.
Olga Antonenko from Yaroslavl and daughter Olesya, 1 year 4 months.
We prepare the necessary materials:
- Potatoes – 1 piece;
- Carrots – 1 piece;
- Plasticine black, white, red, green;
- Spaghetti.
Manufacturing process:
- Mix red and green plasticine until brown;
- We attach brown plasticine to the potato and draw out the face;
- Roll 2 balls out of white plasticine and attach eyes;
- We make 3 balls from black plasticine: 1 larger and 2 smaller. From them we make a nose and pupils;
- Cut 2 circles from carrots. We make longitudinal holes in the “head” of the mouse and insert ears;
- We make a tail and antennae from spaghetti and our mouse is ready.
You can play!
Victoria Pechieva, mother of 2 children: Anastasia (2 years 5 months) and Matvey (8 months). Krasnodar region, Belorechensk.
We needed:
- Pear - 1 piece;
- Grapes – 10 pcs;
- Toothpicks – 10 pieces.
We decided to make a hedgehog. To begin with, we examined the pear - touched, smelled and nibbled a little. They unscrewed its tail (stem), and for strength I put dough under it so that the pear would not roll. Then, the grapes were examined in the same way. We have already learned about toothpicks.
Manufacturing process: Place the pear on the dough. Then I gave my daughter toothpicks, took her hand in mine, and we inserted the toothpicks into the pear. Of course, this didn't happen without pulling the toothpicks back out. We touched and felt everything, the hedgehog’s prickly needles... Similarly, we put grapes on toothpicks, bit them a little in the process, well, that’s okay... And to top it off, they put a bunch of grapes on top. This is the kind of hedgehog we got.
Alla Shuvalova, daughter Lenochka, 10 months. We are from Samara.
For a creative competition of crafts from vegetables, we decided to make characters from the same fairy tale: a dog, a cat, a mouse.
For the craft you will need:
- carrot;
- beet;
- potato;
- toothpicks or matches;
- plasticine;
Wash and dry vegetables. The body parts are attached to each other with toothpicks. The eyes, ears, and tails are plasticine, they need to be attached to a toothpick, because... plasticine does not stick to the peel.
Our dog is made from carrots, our cat is made from potatoes, and our mouse is made from beets. The whole family did it, my daughter chose the colors of plasticine and pinched off pieces. As soon as all the characters were made, they immediately acted out the fairy tale! We haven’t made crafts from vegetables before, and without your competition, we probably wouldn’t have done it either.
Gulnara Gazizova, daughter Leysan (2.3 years old), Chelyabinsk.
Idea for a craft: a horse is carrying the heroes of the fairy tale “Turnip” from the harvest in a cart and stops to smell the flowers on a stump, where a hedgehog is also sitting.
Materials:
- zucchini;
- carrot;
- potato;
- cabbage leaves;
- toothpicks;
- eye stickers.
Creation process: cut out the insides of the zucchini, cut it into a muzzle and body. The part that was not included in the composition became a stump. Indentations (hooves) were cut out of the potatoes. The carrots were cut into 4 rectangles (these are legs), another carrot into circles (cart wheels). We cut out plates (ears) and thin straws (flower stems). All the components of the horse were placed on toothpicks (my daughter stuck them in, I strung them on).
The cabbage leaves were placed around the plate and my daughter stapled them together.
And she attached wheels to the toothpicks. Carving
This option is more suitable for adults and schoolchildren, i.e. for those who can handle a sharp knife well. Squash fruits seem to be ideally suited for carving, because these vegetables are quite elastic and soft, and they are quite easy to cut. Well, the patterns turn out to be unusually attractive due to the contrast between the light flesh of the zucchini and their dark green skin. Of course, to become a real master, you will have to spend a lot of effort and time, but if the next fruit was spoiled due to your slightly unsuccessful actions, then you can always prepare and please the whole family with a delicious dish, which is also quite easy to prepare .
As for the options for crafts, there are countless of them - a variety of vases, figurines, a tea set and even a pair of stylish shoes. We suggest you make small openwork candlesticks. Cut off the bottom of the fruit for stability, determine exactly what height the future candlestick will have, select the core with the seeds with a spoon and cut out beautiful patterns on the walls. Well, now all you have to do is put a round tablet candle inside and light the wick. Using the same principle, you can make lanterns that can create a romantic atmosphere in your home.
You can also use beautiful carved vegetable products to decorate your holiday table. To do this, purchase vegetable cutters at a hardware store that will allow you to cut strips of different thicknesses. Ready-made zucchini strips can be rolled into the shape of various flowers, tinted with food coloring - this is how you get roses, peonies, and daffodils. Ship
To make such a beautiful “handicraft” you should take a large squash fruit (do not peel it, as you usually do when cooking) and cut it so that the cut part is a third, and the remaining part, respectively, is two thirds.
To work, take a large part and leave about a third of the raised deck from one end, make a depression in the remaining part - select the pulp with a spoon or cut it out with a knife.
Peel the carrots and cut them into layers; use them to make an anchor and a couple of flags. Chop another carrot, also peeled, into slices; they will later be useful for making portholes and a steering wheel.
From the remaining third of the vegetable, or rather, using its skin, make a pair of stairs, their length should be equal to the height between decks. Make a steering wheel - stick several broken toothpicks into a large carrot circle. Use the same toothpicks to secure the portholes along the boats and to secure the anchor. If you want to further decorate your boat, you can stick broken matches with sulfur heads along the top side.
Cut a few large whole cabbage leaves to size - secure these sails using long bamboo skewers. Decorate the top of the mast with carrot flags. If you don’t have cabbage leaves, then don’t be upset, because regular colored paper is also suitable for sails. Make a through hole on the bow of the boat and place a whole thin peeled carrot there. You turned out so wonderful!
DIY zucchini craft – photo:
Zucchini crafts for kindergarten
If in the near future there will be an exhibition in the kindergarten in honor of the autumn holiday, then be sure to make crafts from zucchini for the holiday
.
Such cute “homemade products” will undoubtedly appeal to teachers, children, and parents. Torn shoe
Take an oblong-shaped zucchini with a thickening at the end and make a hole in a narrow place, remove the pulp from the hole.
Cut the zucchini lengthwise into about a third to simulate a torn shoe sole. Amuse both cut parts, in this case the “gape mouth” will be more expressive. Cut several paired holes for laces in the top of the peel, insert plastic strips inside (a plastic bottle is suitable for cutting them out), paint them with white nail polish. Using a knife, apply a pattern on the sides that imitates the usual pattern on sneakers; tie regular white laces or a connected chain of air loops to the plastic strip. Stick several matches into the “mouth” of the shoes, which will act as shoe nails. Here's a fun zucchini craft for kids!
kindergarten
Penguin
Take a small fruit with a soft skin. Cut out an oval belly in the center. Cut out the wings on the side, cut them a little from the bottom so that they protrude slightly. Cut holes for the eyes and use matches to secure the plasticine button eyes.
For the beak, a triangular slot should be made, the beak part itself should be cut out of a plastic bottle, painted with white nail polish, and then inserted into the squash pulp.
Cut a small oval-shaped potato in half lengthwise, and use the potato halves as penguin legs.
Here's another one ready in just a couple of tens of minutes. Airplane
The fuselage of the airplane will be made from a medium-sized zucchini - on top make a slightly in-depth environment for the wings. Near the stalk, make an oval cut at an angle.
Cut the longest fruit into 3 parts lengthwise, you won’t need the middle, but in the upper and lower parts you will need to make oval depressions, the fuselage will lie in them.
Cut the smallest zucchini into halves lengthwise, one of the halves will be used to make the tail of the plane, and the other for the propeller. Cut the second half of it lengthwise once, then make a hole in the center of the outer round part and place a small carrot circle there.
The next stage is assembling the aircraft.
Use a pair of toothpicks to secure the tail. Secure the upper wing with the fuselage with three toothpicks. Insert a pair of sharp sticks into each wing from the edge. Attach the bottom wing by inserting two toothpicks at an angle. Well, now attach the screw using half a stick. Helicopter
Take a round vegetable, cut off the skin in front without touching the flesh - this will be the windshield of the cabin. Similarly, cut off the skin on the sides to create side viewing windows. Using matches, fix a couple of carrot circles on the windshield - a kind of peephole.
Use small potatoes for the chassis, make a pinwheel from the cut off top of a small pumpkin, cut as needed.
Crafts from zucchini – photo:
Crafts from zucchini for the autumn holiday
In the fertile autumn, many vegetables and fruits ripen, which is why kindergartens and schools hold themed holidays dedicated to the harvest. An autumn craft made from zucchini
will be right at home at any exhibition of handmade products.
Tractor
This technique is indispensable during harvesting, which is why it is symbolic that this craft is made from zucchini. To work, you will need to take two fruits, and one of them will not need to be cut. Cut the second one into two parts, and the one near the former flower should be smaller in size. This will be the vehicle's cabin. Trim the core slightly so that the cabbage slightly encircles the second zucchini. Be sure to cut through the back and seat in the cabin. The second half of this vegetable is cut in such a way that you get 2 large and medium-sized circles, one small one for the steering wheel.
Lay the untouched fruit horizontally and secure the cabin on it, secure it with a toothpick at the back. Attach the stick at an angle - this will allow your “tinkering” to be more durable. With another one, attach the cabin diagonally across the floor so that you can then attach the steering wheel to it. Attach the large and medium wheels to the base - do not insert the toothpicks to fix them all the way, otherwise the wheels may fly off. Make a pipe from a miniature zucchini, cutting off the excess. Cut this excess into two headlights and also attach to the tractor.
Using the same principle, you can make other transport crafts - cars, locomotives, etc. DIY autumn zucchini craft
The natural cylindrical shape of such vegetables allows you and your children to make a wide variety of animals - crocodiles, bears, hippos, dolphins, whales. The basis for the crocodile will be a long green zucchini, but the short and wide fruits are perfect for making funny piglets.
Bunny
Take a couple of spherical zucchini, different in size - this will be the head and body of the animal. The legs can be made from oblong zucchini, or you can use other vegetables. Children will surely love this vegetable mix, because they are crazy about variety. The nose for the bunny will be a cherry tomato, the eyes - circles of radishes and black olives. The ears can also be squash or eggplant. Rat
The basis for the cute rodent will be an oblong zucchini, a slightly smaller carrot will be used to make the nose. The ears will be carrot circles, the paws will be small carrots, the eyes will be pumpkin seeds. That's all you need for the rat.
As you can see, there are many options for making crafts from this vegetable. In addition, do not forget about the advantages of such natural material - it is quite inexpensive during the season, and in addition, it does not darken when cut, as potatoes do. That's why you can use both whole fruits and cut pieces for work. The pulp of zucchini is not hard, pliable, but at the same time quite dense. This makes the vegetable ideal for creativity. So, quickly choose the optimal master class for yourself, sit down with your child and start tinkering.
Every year, autumn gives us generous harvests of vegetables and fruits, which make such delicious preserves for the winter. However, other uses can be found for the ripe gifts of nature, turning them into original and creative interior decorations. Thus, many children enjoy making crafts from vegetables and fruits for exhibitions and competitions in kindergarten or school. This is where your imagination can run wild! After all, truly fabulous “characters” can be created from an “ordinary” overripe cucumber, potato or multi-colored bell pepper. Of course, in some moments, little “craftsmen” will need the help of adults - to attach or cut out the necessary part of the product. However, the result of such joint creativity will amaze both children and parents. We have selected the most original master classes with step-by-step photos of crafts made from autumn vegetables and fruits. And with the help of the video you can clearly study the exciting process of creating such funny figures. So, you stock up on fruits and vegetables, and from our side - interesting ideas and inspiration!
Craft clock made from squash
Thanks to its interesting shape, the squash can serve as an original dial. Cut the vegetable in half, clean and dry the inside. Using a knife, carefully cut out the numbers along the edge of the squash. If you're getting ready for Halloween, you can take a bright orange vegetable and cut a funny face in the middle. The kids will love this!
A clock mechanism is placed in the center, which can be purchased at any craft store. The funny clock is ready, all that remains is to insert the batteries and set the time.
Here is such a variety of crafts made from squash. We hope you were able to choose something interesting for yourself for an exhibition at school or kindergarten. It would be a good idea to take a break from work or TV and do something with your own hands on a warm autumn day with your children. It is these moments that are remembered most and leave pleasant memories of childhood.
- medium sized squash;
- walnut shell;
- plasticine, rhinestones for decoration.
Box-squash or garden bed.
until I ran to him
And my humble Lying became -
Signerro Blistello and Adored!
This is such a small introduction to my master class (inspiration has come).
On the May weekend, I came to the dacha, and by chance, in the farthest garden bed, I found last year’s squash harvest.
No, it was not rotten, but very dry and light. I took it and cleaned it of dirt.
Then she asked my dad to cut it in half (I honestly don’t remember the name of the tool, I’ll find out tomorrow and tell you).
The dry fruit resembles a tree in quality but is hollow inside, but inside there is a core of the fruit, which is also dry (resembles cotton wool).
We go through the sandpaper inside and on top.
Before and after (right before, left after).
View after sanding inside and out.
Cover the top with acrylic paint, preferably 2-3 thin layers.
Take a napkin and cut out the necessary elements, leaving only one layer with the pattern.
Apply to the surface and carefully spread glue on top (1/1 glue-water).
Let it dry, make 2 holes on the lid.
I think you understand that dad did this, and the hands in the photo are also his.
Cover with varnish and insert a ribbon for the handle through the holes (5 cm + 2-3 cm for the knots).
Let it dry, make 2 holes on the lid.
Christmas wreaths, compositions for decorating windows, window sills, walls or shelves, as well as decorations for the festive table can be bought or... made with your own hands from scrap and cheap materials from Fix Price. We guarantee that the decoration will turn out to be “expensive” in appearance, and most importantly – very sincere!
Wreath and advent calendar
For those who have children, we suggest making a simple and very cute advent calendar wreath. However, without the bags with gifts, the wreath will also look cool.
- A children's plastic hoop (can be bought at Auchan for up to 100 rubles) or a round base cut out of cardboard;
- Jute rope;
- Fir branches (natural or artificial are suitable, for example, from an old Christmas tree or a Christmas tree from the same Fix Price for only 77 rubles);
- Stars from Fix Price (6 pcs./50 rub.)
- Glue gun/any other glue or thin wire;
- Craft or wrapping paper.
Interesting: How to tell if cauliflower has gone bad in the refrigerator
- Wrap the hoop with jute rope;
- Attach spruce branches to the bottom of the wreath;
- Glue the decor - stars, cones, toys;
- Tie a ribbon to the top and hang the wreath on the door or wall. If you want to make an advent calendar, then you can tie bags with gifts to the top of the hoop.
Wreath with garland
Just look at this elegant wreath with birds, mistletoe, pine cones, snow-covered pine needles and lights! You can’t buy this in a store, you can only make it yourself.
- Using tape, attach the garland's power supply to the bottom of the round base;
- Using wire cutters, cut the wreath and attach it to the base by wrapping the wreath around the base or using glue;
- Wrap garland around the wreath and base;
- Attach the birds;
- Light the garland and hang the wreath. Ready! (see also video below)
Compositions with retro cars
You can do nothing at all with these retro cars from Fix Price - they are cool in themselves and look almost like the real thing! For example, their headlights flash and doors open. They are also ideal for creating New Year's compositions in retro style, which can be used to decorate a windowsill, any shelf or table.
- Artificial snow from Fix-Price (for 77 rubles);
- Base made from cut wood (optional). You can buy the base at Leonardo or another craft store (about 200 rubles);
- Miniature Christmas tree. The smallest Christmas tree from the VINTER decorative set from IKEA (for 199 rubles) is perfect. You can also buy decorative spruce trees 15 cm high at Fix Price (199 rubles);
- Cotton wool;
- Garland.
- We put the car on the cut, if desired, glue the Christmas tree onto the hood of the car;
- We form a snowdrift of cotton wool nearby, and put a garland under it;
- We spray snow on the tree and car and try not to touch the composition again. Let's enjoy the beauty!
Here are some more photo ideas using car figures from Fix Price.
Table composition in a box with candles
Using this universal master class, you can make a luxurious Christmas composition to suit your taste and from any materials.
- Decorative box from Fix-Price (for 199 rubles). The box can be replaced with a flower pot or basket;
- Spruce branches from Fix Price (you can gut a Christmas tree for 77 rubles or buy ready-made branches), you can also use natural spruce branches;
- Branches with holly berries and cones from Fix Price 4-5 pcs. (55 rubles);
- Artificial snow from Fix Price (77 rubles, optional);
- Shaped candles 3 pcs.;
- Wire cutters.
- We evenly place the spruce branches in the box, forming a bush;
- Place candles (if necessary, you can use candlesticks to make the candles appear taller);
- We insert decorative branches with berries and cones into the composition (they must first be separated using wire cutters);
- We spray artificial snow on the branches. Hooray! Now the composition can be placed on a window, shelf or table.
Branch pendant
Another very simple and inexpensive way to decorate your apartment is to make a wall panel from a branch and decor from Fix Price.
- Garland-clothespin, powered by AA batteries (199 rubles in Fixed Price);
- Branch (can be taken from the nearest park, washed and dried);
- Any Christmas tree decorations from Fix Price (preferably wooden or straw);
- Jute rope;
- Command hooks (holds well and comes off without leaving marks).
- If the wall is a light shade, then there is no need to paint the branch - the natural texture will look chic. But if it seems to you that an unpainted branch will “get lost” against the background of the wall, then paint it with white paint;
- Hang the garland and other decor on the branch;
- Tie long loops of twine to the ends of the stick;
- Hang the mural on the wall using Command hooks.
Crafts from vegetables and fruits “Helicopter” for an exhibition at school - master class with step-by-step photos
Such an original craft made from vegetables and fruits can be prepared for a school exhibition. As the “main” material, we choose a zucchini or a medium-sized pumpkin - fortunately, in the fall they can be chosen in any shape and to suit every taste. Of course, a schoolchild is quite capable of making a “Helicopter” craft made from fruits and vegetables, but the work process will be more fun with mom or dad. Well, let's fly!
Necessary materials for DIY fruit and vegetable crafts for school
- pumpkin or zucchini of suitable size and shape
- flat box - the basis for the future “helicopter”
- chopsticks – 4 pcs.
- carnations
- white and brown paper
- black cardboard - according to the size of the box
- toothpicks
- ash fruits
- glue
- with an awl
- felt-tip pens or colored markers
Step-by-step master class on children's crafts from vegetables and fruits for an exhibition at school:
- We are preparing a platform for our vegetable helicopter. To do this, take the lid of the box and glue a sheet of cardboard onto it. Then we cut out two strips of white paper along the length of the box and glue them to the lid, parallel to each other.
- Again, take white paper and cut out a circle and glue it onto the strips (as in the photo). We also glue two wooden sticks on the surface of the circle.
- Let's start making the helicopter. For the tail rotor, cut out two circles from brown paper (each 2 cm in diameter). We apply glue to the wrong side of one circle and place ash fruits and a toothpick in a cross shape, with which the screw will be attached to the body of our “aircraft”. Cover the second circle with glue and apply it to the first, on top of the screw.
- Using an awl, we make a couple of holes in the lid of the box (platform), into which we insert a toothpick. Place the pumpkin on toothpicks and attach the tail rotor.
- We will need a nail to secure the main propeller.
- We draw windows. That’s it, the original “Helicopter” craft made from vegetables and fruits is ready!
Caterpillar made from squash
What craft can be made from squash? This interesting vegetable can make a funny caterpillar. To create such a craft, you need to take several small vegetables of different sizes so that they can be arranged in descending order. Also prepare a thick needle, twine and two bright large buttons.
Interesting: How many days after pickling can you eat salted mushrooms?
Take a thick needle, thread the twine and string on the first button. After this, we also string the squash from the smallest size. After the last, largest vegetable has been strung, we fasten the second button. All that remains is to make the caterpillar a smile and eyes. They can be drawn with a felt-tip pen or cut out of colored paper and glued. It is better to use double-sided tape so as not to spoil the squash. This squash craft for kindergarten is very easy to make.
Photos of children's crafts from fruits for kindergarten and school
The autumn abundance of seasonal fruits delights with its amazing taste and inspires creativity. The photo shows the best children's crafts made from fruits - using this sample you can make a craft for a school exhibition or kindergarten. Or just eat this delicious treat right away.
When does a pension arrive on a Sberbank card? Schedule for issuing pensions in November
23.02.2021
Will the pension be paid for January? Will they give 5000
23.02.2021
Pensions for federal civil servants: conditions of assignment, calculation, amount
23.02.2021