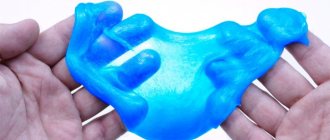
DIY polymer clay decorations. Sausages made of polymer clay
Sausages made of polymer clay
- these are blanks for future jewelry, including beads, from which thin
plates-patterns
.
"Sausages"
are also called
"canes"
or
"canes"
(English
cane
).
We offer you a master class on making a very beautiful black and white sausage
, which can be used to create stylish and very original jewelry.
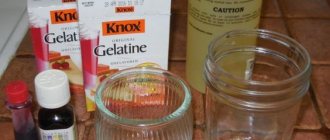
What you will need:
— White and black polymer clay
— Knife or metal plate with blade
- Ruler
— Rolling pin and board for clay
— Rubber gloves to avoid leaving fingerprints
— Extrusion press
Let's get started:
Take two identical pieces of white and black clay and roll them into two squares 8 by 8 centimeters
approximately
0.5 centimeters thick.
Place one layer on top of the other and then divide them into two equal parts. Do this procedure again. You should end up with a striped “sandwich” like this.
Squeeze the resulting rectangle so that you get an elongated round sausage.
Then use your palm to twist the sausage to create a spiral.
. Simply press the sausage onto the table with your palm and roll it in one direction. Do this very carefully so as not to damage the drawing.
If you cut the resulting product in half, there should be a pattern like this
:
Place the sausage inside the clay press
and squeeze out a thin long sausage.
In cross section it will look like this:
Thinly slice the sausage to create a pattern
:
As a result, you can use the drawing for a variety of original decorations:
Polymer clay beads
Multi-colored beads
, which can be used to make a wide variety of jewelry, can be made from multi-colored polymer clay. If you don’t know the specifics of their manufacture, it seems as if the design was applied to these products using paint, but only multi-colored clay was used.
See for yourself.
What you will need:
— Self-hardening polymer clay of 5 colors (in this case white, gray, green, brown and yellow, but any others are possible)
— Knife or metal ruler with blade
— Rolling pin and board for clay
— Rubber gloves to avoid leaving fingerprints
Let's get started:
In order to get a design in the form of a daisy, first you need to “make it up” from clay of different colors. Take white clay and roll it into a sausage about 8 centimeters
and a diameter of
4 centimeters
.
Roll out a plate of gray clay about 2 millimeters
.
Wrap the gray platinum about halfway around the white cylinder, cutting off the excess
knife or ruler.
Take the green clay, roll it into a plate and also wrap the first piece on top of the gray layer
. Trim the resulting sausage, remove excess from the sides.
Using a ruler, make cuts on the white part of the piece as shown in the picture. First in the middle, then two more cuts on the sides so that there is approximately the same distance
.
Then insert the cut out rectangular pieces of the gray plate into the cuts.
Squeeze the resulting sausage, but not too hard, so that all the parts stick together and the air layer between them disappears
.
With your hands you can form the shape of the future petal. The photo shows a petal in the form of a truncated triangle
.
The entire sausage stretched to a length of approximately 30 centimeters
.
The length of the sausage depends on how many petals
you wish to receive.
For example, for this flower the author of the master class is going to make 9 petals, so the length was 32 centimeters
, that is,
3.5 centimeters
per petal. Divide the sausage into 9 parts.
Let's start making the center of the chamomile. Take yellow clay and roll it into a sausage 5 centimeters
and a diameter of
2 centimeters
.
Roll out a plate of brown clay approximately 6 millimeters
and completely wrap it around the yellow sausage.
Then press all the parts so as to maintain the round shape of the sausage.
. After this, start attaching the petals.
You should end up with a daisy
:
Fill the empty spaces between the petals with pieces of green clay:
Completely wrap the daisy with the rolled out green strip
.
Squeeze the daisy sausage
so as to release all the air between the parts.
Then you can start slicing. If you have some of the chamomile sausage left over, store it for future products by wrapping it in film
without air access. Cover the clay ball with daisies cut from the sausage, then smooth it out.
You can make several bead
:
Bead necklace
How to make a bead necklace with your own hands? To create a necklace, prepare beads of any shape, silk thread, and clasps. Attach a tip to one end to prevent the beads from falling apart. Divide the beads into two parts. If the beads are different sizes, then divide everything into two parts. Now we begin to assemble the necklace. First we put small beads on the thread, then larger ones and the largest ones in the center. In the future, the beads are set in the reverse order. We put on the tips. The clasp is put on last. The necklace is ready.
There are no limits to imagination when making jewelry. Everything is possible here. You can sketch and experiment with colors and shapes before making it. Select the desired clay colors. Make beads in the required quantity. Then start assembling when the moment of complete calm and inner satisfaction comes. Good luck!
Hairpins made of polymer clay
Very simple hairpins can be made using bobby pins and polymer clay
. Here's one option:
What you will need:
- Polymer clay of the desired color
— Invisibility pin
- Glue
Let's get to work
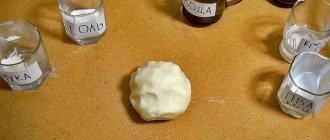
Roll a small ball
, and then crush it into a round disc with your fingers.
Pinch the edges to create a petal
. Make as many petals as you wish.
Connect all the petals together. If you have fire clay, bake the flower to harden the clay. Then you can stick it on the invisible one using a piece of thick fabric.
bobby pins using this simple technique.
:
By the way, hairpins can be made using ready-made flowers and base accessories
. You can use the master classes from the article Flowers made of polymer clay.
Here are some examples:
For newbies
For those who are just trying their hand at needlework and want to learn how to make beads from polymer clay, our master class will show how this can be done. You can make many different products using polymer clay. But before you start making beads, you first need to prepare special tools.
What you need to have to create decoration:
- knife;
- plastic blades;
- special roller;
- modeling board;
- special varnish for clay;
- hooks for beads;
- small glass beads;
- rhinestones;
- the thread is dense;
- ruler;
- extruder to make various shapes.
We take clay of the same color and form a worm out of it, when it works, you need to cut off small pieces, and then roll them into balls. Now we do the same actions with a different color. It is important that the beads are the same size. To ensure that the beads are the same, you need to use a ruler. In the same way we cut pieces from a different color of clay. Before the material dries, you need to carefully insert three rhinestones onto the surface.
While we are attaching the shiny rhinestones to the plastic, we make holes in parallel so that we can then string the beads onto a thread.
We get shiny beads. To make the beads hard, we just need to put them in cold water and bring to a boil, and then cook over low heat for 7 minutes. Next, take them out and put them on a napkin to dry. When they are dry, we open them with varnish, and when completely dry, string them on a thread. Don’t forget that between the large beads there should be small, black, glass ones. At the end we make a special clasp so that the beads can be unfastened. That's it, our product is ready.
Related article: Crochet stool cover for beginners: patterns with photos and videos
Polymer clay pendant
This stylish pinecone pendant
easy to do if you have a mold, which you can make yourself from a piece of metal tube.
What you will need:
— Self-hardening polymer clay (black)
- 2 sheets of aluminum foil (golden and silver)
— Drop shape
— Cutting blade for working with clay
— Shiloh
— Accessories for jewelry (pin with loop, chain)
— Pasta machine or rolling pin with a board for rolling out a thin layer
Let's get to work
Roll the foil into a tight ball
.
This will be the central element of our pendant. This core will allow the product not to be too heavy. You can make the center out of clay, but if you wear such a pendant for a long time, an imprint from the chain will remain on your neck.
Using a pasta machine or by hand, roll out a thin layer of clay
and cut out an even circle. Wrap it around a ball of foil. Remove excess clay.
Once the balloon is ready, pierce it with a jewelry pin.
through.
Roll out a sheet of black clay about 3 millimeters
, cover it with a layer of very thin
gold foil
and press it out using a teardrop mold.
Then start attaching the drops one at a time to the round base.
future big shot. Don't worry if the thin layer of gold cracks, it will give a special stylish look to your product.
Cover the entire bud with drops until the very end
.
If you are using baked clay, bake the product at the recommended temperature
. Once it has cooled, attach the chain.
Polymer clay beads
We invite you to get acquainted with the unusual technique
of creating jewelry using polymer clay, balls and wire using the following example of creating beads.
You can make entire sets in the same way: beads, earrings, bracelets, pendants.
What you will need:
— Self-hardening translucent polymer clay (several shades)
— Small rubber balls
— Thin wire
- Scissors
— Accessories for jewelry (pin with loop, chain)
— Pasta machine or rolling pin with a board for rolling out a thin layer
— Pin
Let's get to work
1. Inflate rubber balloons to desired size
. You can make balls of different sizes, as shown in this master class, or the same ones. The number of balls will determine the size of the product.
2. Twist a few pieces
wire as shown in the photo to make a loop.
3. Place a loop on the ball where it is tied in a knot
.
4. Cover the ball with wire to form a mesh
.
5. You should have a ball covered with a wire mesh.
6. 7. Remove excess wire ends using scissors
.
8. Roll out a very thin sheet
made of translucent polymer clay.
9. Completely wrap the clay sheet around the wire mesh
.
10. 11. Pop the ball inside with a pin and pull it out through the small hole.
12. Press the clay inward to create a slightly wrinkled sphere.
. Do this very carefully so as not to damage the thin layer of clay.
Let the clay harden thoroughly, and then use special paints to apply the desired design.
.
Polymer clay ring
We offer you a master class on making a very simple but original
polymer clay rings in the shape of a bow.
What you will need:
— Polymer clay (desired color)
- Blade
— Pasta machine or rolling pin with a board for rolling out a thin layer
— Sequins
Let's get to work
Knead the clay in your hands to make it more pliable, and roll out a plate about 0.5 centimeters
.
Using a blade or knife, cut out the details for the bow.
: two rectangles (one wider, the other narrower). Fold the edges of the longer one inward, and wrap the other rectangle around the first piece.
You should end up with a bow
:
Make a clay ring
, then attach a bow to it.
In order for the ring to fit you, you first need to wrap it around your own finger
and adjust it to the desired size.
Don't worry if there are fingerprints or imperfections on the ring. With the help of glitter
this problem will be masked.
Cover the ring with glitter
and let it harden.
Fun beads
In the summer, everyone strives to wear something bright, beautiful and unusual. But you don’t have to go shopping and look for something you like if you can do it yourself. Such products have always been and will be in fashion, because with the help of your imagination you can create a masterpiece. In our master class we will learn how to make beads from polymer clay in bright colors.
What you need to create such a decoration:
- polymer clay;
- acrylic paints;
- small and medium sized brushes;
- leather rope;
- fasteners;
- knife;
- needle.
We take clay and make a worm out of it, cut off pieces from which we form balls of different sizes. Next, use a needle to make a special hole; it is better to take a gypsy or even an awl. Afterwards, the beads should dry, just leave them and don’t touch them. To create the same beads, we need to make 4 larger ones, 5 smaller ones and 2 small ones. We choose the color ourselves, to make it more coral, we mix white, crimson and yellow paint. We paint all the beads with the resulting mixture of colors and let them dry.
To get a lighter shade, you need to add more white. Now paint the small circles on the largest beads with a lighter color. For convenience, we can string the beads onto a pencil while coloring. When we draw the circles, take a small brush and begin to outline the contours of these drawings, but with darker paint.
We take the middle beads and color them dark, and the smallest ones light coral. Don't forget that you need to use a needle or awl to make holes in each bead. Let it dry, then string it onto a string, first a small one, then a medium one and a large one. Let's look at the photo to see what order the beads should be on the cord. Then we attach clasps to the ends of our ribbon, and now our original and cheerful beads are ready.
Related article: DIY cardboard castle: master class with photo diagrams
You can use any other colors and use the clay to form a different shape of beads. The main thing is to have desire and patience.