What is rice knitting and what does it look like?
The knitting received its name because bulges are formed on the finished fabric. Depending on the chosen knitting option, the tubercles are either oblong and small, or quite large and voluminous. The finished product, knitted with rice knitting, comes out dense and warm. Most often, this knitting is used for winter clothes.
Even a beginning knitter can master classic rice knitting. It is easy to work with, does not require special skills, special yarn or knitting needles, and goes well with other knitting options.
Knitted rice pattern: diagrams and description
There is a classic way to knit a rice pattern, and its description is given below. However, craftsmen were able to make adjustments to this pattern, and at the moment there are several versions of this design. Let's look at them all.
First option. Classic rice
- Row 1 - knit, purl, and so on until the end of the row.
- Row 2 - purl, knit, repeat until the end of the row.
Second option. Double rice
The double rice pattern with knitting needles involves a set of loops that is a multiple of 2 + chrome. loops.
- Row 1 - knit, purl...
- Row 2 - knit, purl.
- Row 3 - purl. persons
- Row 4 - purl, knit.
- Row 5 is identical to row 1.
Third option. Bulk rice
- 1st row - 1 loop is removed as knit. with double cape, front.
- 2nd row - 1 loop is removed, purl-wise. with 2 double crochets, knit stitch.
- 3rd row - 1 loop is removed as knit. with 3 yarn overs, knit stitch.
Fourth option. Pearl rice
The pearl rice knitting pattern differs from the usual rice pattern in the more rounded shape of the grains of rice obtained on the finished canvas.
- Row 1 - knit, purl, knit.
- Row 2 is identical to row 1.
Fifth option. Half rice
The pattern involves a set of loops, the number of which is odd + edge loops.
- Row 1 - purl, knit, knit.
- Row 2 - all knit stitches.
- Sixth option. Broken rice.
- Row 1 - all stitches are knitted.
- Row 2 - purl, knit, knit.
Seventh option. Large rice
For this pattern, you need to cast on the number of loops, which is divided into 4 + edge loops.
- 1st row - k2, purl 2.
- 2nd row and all even - all loops are knitted according to the pattern.
- Row 3 – purl 2, knit 2.
- Row 5 is identical to row 1.
We considered several options for making the drawing in Fig. In order to determine which one you like best, and which one is most suitable for knitting the product you have chosen, it is worth knitting a preliminary sample. Then you will be able to see with your own eyes these drawings themselves, how they turn out in finished form. In addition, the knitted samples will be useful for you to count the required number of loops for working on a future item.
What is knitted with the pattern Fig. Scheme and differences from the “pearl pattern”
The “Rice” pattern with knitting needles has a number of advantages:
- The knitting pattern is simple;
- the finished canvas has an attractive appearance;
- the product is double-sided;
- high knitting density.
Due to the ease of work, high density and tenderness of the fabric, the “rice” pattern is often used to knit children’s items, blouses, and hats for newborn babies and older children.
Elastic fabric is used as a basis for complex patterns; it fills the voids of knitted geometric shapes. “Rice” knitting is used to make patch pockets, trims, trims, and to knit hats, scarves, snoods, sweaters, blankets, slippers, and cardigans.
Knitting, stitches, rice, moss, pearl pattern - these knitting methods are often confused. All of the listed types of knitting are formed by a simple combination of knit and purl stitches, but there is one difference. It is clearly visible in the knitting patterns presented below.
The pearl pattern involves shifting the repeat in each row by one loop.
The “rice” pattern with knitting needles, the diagram of which is presented below, implies a shift in repeat across the row. All purl (even) rows are performed according to the visible pattern of the fabric.
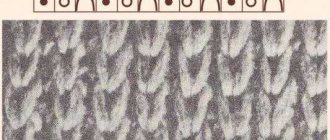
Sample of standard knitting pattern "rice"
How to knit a rice pattern according to the pattern
Knitting such an ornament with knitting needles is quite simple, even for beginner knitters. The end result is very impressive, and even double-sided. For those who want to make a knitted product with their own hands, not only with the front stitch, but also with the back stitch, this pattern is perfect.
The rice pattern is perfect for creating children's clothing and various sweaters and jackets. The pattern of such an ornament is suitable for the background part of other ornaments. Often, such images replace purl stitch or garter stitch in the central part of the diamond. A knitted scarf made of thick threads made with loops of this pattern will look stylish. In men's clothing, this weaving technology is the most popular of all double-sided knitting.
The knitting pattern will be clear if you follow its designations. You just need to alternate knit stitches with purl stitches in each row.
Which yarn is suitable
When choosing a motif for a future product, you need to choose the right thread diameter. “Rice” knitting is most often done with yarn of medium and large diameter. This allows you to get a pattern with a relief outline, reminiscent of convex grains of rice.
Thread parameters are determined by two indicators: the weight of the skein and the length of the thread in the skein. Yarn with a thick thread is indicated by indicators of 120 m/100 g, for a thin thread the indicators are 300 m/100 g. Yarn with average indicators is suitable for knitting “rice”.
For example, 200-250 m/100 g. When knitting a snood, a scarf, or a men's sweater, you can choose a thicker thread to obtain a clear pattern with convex tubercles.
In any case, before starting work, it is recommended to knit a small test sample from the selected yarn. This will allow you to evaluate the pattern and calculate the number of loops to be cast on. Each skein shows the recommended knitting needle or crochet hook size, as well as the suggested knitting density.
How to knit correctly
Any knitting, including rice, begins with a set of loops. They are calculated using a pre-linked test sample.
The blank is applied to the pattern or existing similar product as many times as necessary, from edge to edge. This way the required number of loops is determined. In this case, edge loops are not taken into account.
The “rice” pattern with knitting needles according to the classical knitting pattern is performed by alternating knit and purl stitches. The work begins by removing the edge loop on the right knitting needle when knitting with two knitting needles. Further knitting occurs according to the chosen pattern.
The last stitch is always purled, unless otherwise indicated in the description. When knitting a product on circular knitting needles, the edge loops are not cast on.
Knitting options
Knitting “rice” on knitting needles is basic. Even a beginning knitter can master it. But this pattern has many more complex options that allow you to create beautiful and comfortable things.
Standard pattern
Classic or standard rice knitting involves alternating knit and purl stitches with the repeat shifting by one loop through two rows. The pattern of the “rice” pattern with knitting needles is clearly visible in photo 2. The fabric is elastic, dense, the product is warm and cozy.
Volume "Rice"
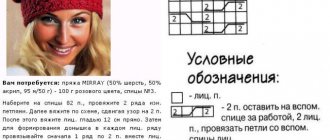
A product knitted with the “Volume Rice” pattern turns out to be more embossed and fluffy. This knitting is perfect for making things for adults: sweaters, jumpers. To the usual alternation of knit and purl stitches, yarn overs are added to the working (right) needle.
The “rice” pattern with knitting needles, the pattern of volumetric knitting, is presented below. In the working row, the first knit stitch is removed without knitting on the right needle with a double crochet, the next one is simply knitted.
In the second row, the first loop is removed with two yarn overs, then the front one. In the third row - with three yarn overs and a knit stitch. The fourth row is completely knitted with facial loops. From the fifth row, the pattern is repeated, but shifted by one loop.
The eighth row is knitted with facial loops. From the ninth row the pattern is repeated.
When choosing this pattern, you must carefully count the rows and yarn overs. This will create a beautiful, eye-catching product.
Double rice
In the “Double Rice” pattern, the alternation of purl and knit stitches is maintained.
The difference from the classic version is that the third row is knitted only with purl loops, in the fourth row the rapport is shifted by one loop. From the fifth row the pattern is repeated. When choosing the “double rice” pattern, you need to cast on the knitting needles an even number of loops + two edge stitches.
Half Rice
“Half rice” is another variation of the classic rice pattern. With this knitting, it is assumed that the number of loops is a multiple of three, + two edge loops. Odd rows are knitted according to the pattern, even rows are knitted with knit stitches.
Broken rice
The Broken Rice knitting pattern is similar in many ways to the Half Rice pattern. With this knitting, odd rows are knitted with facial loops, in even rows the alternation of loops occurs according to the pattern.
The number of stitches cast on is odd. The canvas is one-sided; the patterns on the front and back sides are different.
Figure 3D
The product knitted according to the “Figure 3D” pattern has the most voluminous, effective and textured pattern. This knitting is also called shadow or illusion knitting.
Despite the apparent complexity and unusual nature of the pattern, it is also made using a combination of knit and purl stitches. The 3D effect appears when viewing the product from different angles. This can be achieved by combining several patterns: front and back stitch, rice pattern.
The 3D effect looks good on large items, men's sweaters, blankets, capes.
Two-color rice pattern
A product knitted with a rice pattern using two multi-colored threads looks very impressive. This pattern is suitable for children's blouses, hats or adult holiday items. The pattern will be appreciated by lovers of a bright and effective style.
Description of knitting:
- On the knitting needles, cast on an odd number of loops with thread A. Next, switch to thread B. Knit one loop, remove loop A, leaving thread B behind the fabric. Finish with a knit stitch and close the edge stitch.
- The second row is knitted with thread B: knit, remove thread A, thread B in front of the fabric, finish with knit. Switch to thread A: knit two knit stitches, remove thread B, leave thread A behind the fabric. Knit further, alternating threads A and B in rows.
Jumper with "Rice" pattern
Dimensions: 38/40 (42/44) 46/48
You will need: - Yarn (58% sheep wool, 38% silk, 4% polyester; 150 m/50 g) - 400 (450) 500 g salmon color;
- knitting needles No. 4,5 and 5;
- circular knitting needles No. 4.5.
Do you like the post? And would you like to see more descriptions of jumpers? Let us know! Write about it in the comments!
Patterns and schemes
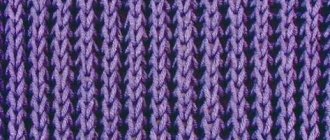
Elastic band Even number of loops. Knit alternately k1, p1.
Pearl pattern Begin and end each row with an edge pattern. Persons p.: alternately 1 front, 1 purl; purl r.: knit the front loops with purls, and the purl loops with the front ones.
Knit stitch Knit rows - knit stitches, purl rows - purl loops.
Emphasized decreases From the right edge: in the front rows after the edge, knit 2 stitches together; in the purl rows in front of the edge, knit 2 stitches together purlwise.
From the left edge: in the front rows in front of the edge, knit 2 stitches with a slant to the left (= slip 1 stitch like a knit stitch, knit 1 stitch, then pull the removed loop through it); in the purl rows: after the edge, knit 2 stitches together, purl crossed.
Knitting density 20.5 p. x 34 p. = 10 x 10 cm, knitted with a pearl pattern; 19.5 p. x 29.5 r. = 10 x 10 cm, knitted in stockinette stitch.
Completing of the work
Back On knitting needles No. 4.5, cast on 100 (108) 116 sts and for the placket, knit 6 cm between the edges with an elastic band. Then switch to needles No. 5 and continue working with the pearl pattern.
For raglan bevels after 31.5 cm = 108 r. (30 cm = 102 r.) 28.5 cm = 96 r., starting from the bar, close 1 x 1 p. on both sides, then 23 (26) 29 times in every 2 r. and cast off 1 stitch 12 times in each row.
After 49.5 cm = 168 r. close off the remaining 28 (30) 32 sts from the bar.
Before Knit the same as the back, but for raglan bevels after 31.5 cm = 108 r. (30 cm = 102 rub.) 28.5 cm = 96 rub. from the bar on both sides, subtract 1 x 1 p., then 21 (24) 27 times in every 2nd p. and decrease 1 stitch 10 times in each row.
After 47.5 cm = 162 r. close off the remaining 36 (38) 40 sts from the bar.
Left sleeve Using knitting needles No. 4.5, cast on 42 (46) 50 sts and perform the bar as on the back. Then switch to needles No. 5 and continue working in stockinette stitch.
At the same time, for bevels of the sleeves, starting from the bar, on both sides 12 times alternately in every 8th and 10th r. (14 times alternately in every 6th and 8th r.) 16 times in every 6th r. add 1 p. = 66 (74) 82 p.
For raglan bevels after 38.5 cm = 114 r. (36.5 cm = 108 r.) 34.5 cm = 102 r., starting from the bar, on both sides, emphasize first 1 x 1 p., and then 26 (29) 32 times in every 2nd r. 1 p. each
After 57 cm = 168 r. from the bar on the right edge, emphasize 1 x 1 p., then in the next 2 p. emphasize, decrease another 1 x 1 p. and to round the neck from the left edge, close 1 x 4 p., then in the next 2 p. close 1 x 3 (4) 5 p.
After 58.5 cm = 172 rubles. close off the remaining 3 (4) 5 sts from the bar.
Right sleeve Knit like the left sleeve, but in a mirror image.
Assembly Sew raglan seams.
For the binding along the edge of the neckline, cast on 92 (100) 108 sts on circular needles and knit with an elastic band. At a binding height of 4 cm, close all loops according to the pattern.
Sew side seams and sleeve seams
The competition for active commentators is in full swing! Read the details of the competition here
Take part in the competition for the best master class and receive a cash prize for your creativity! Details of the competition can be found here
Weaving into other patterns
The simplicity of knitting a rice pattern allows you to harmoniously combine it with other patterns. Volumetric, protruding tubercles of “rice” can themselves become a decoration of a smooth canvas or be woven into other, larger patterns as details.
Rice columns on the surface
The decoration of the fabric knitted with stockinette stitch will be elements of rice knitting. These can be columns, diamonds or other shapes.
Volumetric elements can be placed as decoration on the front of the product or the item can be knitted with a completely selected pattern.
Filling geometric shapes
Knitted large geometric elements look impressive when filled with smaller details. A simple rice pattern works great for this. Framed by braids, crossed stripes and other large elements, small and convex rice looks impressive and appropriate.
Above is the knitting pattern “Filling Geometric Shapes with Rice Stitch.”
Practical application of the pattern
The rice pattern, which is the basic element of knitting, is surprisingly simple to make and practical to use. Using yarn of different thicknesses and textures, a rice pattern can be used to knit a thin baby blouse, a men's sweater, a spectacular women's blouse, a winter hat, or a warm blanket.
Sweater knitting pattern
The simplicity of the rice pattern allows even inexperienced knitters to knit large items quickly and without annoying mistakes. If you lack experience, it is better to start with the classic version of mating.
Before starting work, you should familiarize yourself with the recommendations for knitting density and the choice of knitting needles indicated on the skein of yarn. The same information allows you to approximately determine the required number of skeins.
Having decided on the style of the product and the knitting pattern, you need to knit a test sample. It will allow you to more accurately calculate the required number of loops. The sample is not dissolved until the work is completed.
It is easier for beginner knitters to knit a sweater with raglan sleeves. With this knitting, the number of loops is gradually reduced on the back, front and sleeves, and then the parts are sewn together. The collar area is completed with an elastic band or crocheted.
More experienced craftswomen, showing a little imagination, create amazingly beautiful things by simply alternating knit and purl stitches.
The relatively large parts of the sweater allow you to use a variety of knitting techniques: filling the inside of geometric patterns, a 3D shadow effect, or three-dimensional shapes on the surface.
The combination of patterns, decorative elements, volume and airiness of the fabric will make a sweater knitted with rice knitting a spectacular piece of both men's and women's wardrobe.
Rice knitting is dense and thick, so when sewing together parts knitted from bulky yarn, rough seams may result. To avoid this, you need to knit the two outer loops of each piece using stockinette stitch. In this case, the seams of the product will be elastic and unnoticeable.
Slippers
The density of rice knitting allows you to create not only outerwear, but also warm and light slippers. They can be worn at home or used as socks during a winter walk.
The slippers are knitted quickly and do not require any special knitting skills. You just need to carefully count the loops and rows.
The following is a calculation of loops for shoe sizes 36-37. We start knitting by casting on 59 stitches.
Next we knit according to the pattern:
- row 1 (wrong side): garter stitch to the end, mark the center;
- row 2 (front side): knit, yarn over, knit to the center loop, yarn over, knit to the last loop, yarn over, knit the last one;
- row 3: garter stitch;
- We knit rows 4,6,8,10 with yarn overs, like row 2;
- rows 5,7,9,11 are knitted in garter stitch;
- You should get 79 loops;
- we knit 5 rows in rice stitch, alternating knit and purl stitches with an offset of 1 loop in each subsequent row;
- We begin to decrease the loops: we knit according to the pattern, we knit together 3 purls before and after the central loop, then we knit again according to the pattern;
- repeat the decrease 6 times in each even row;
- odd rows are knitted in garter stitch;
- after 29 rows there should be 51 loops left;
- close all the loops according to the drawing;
- we sew the slippers along the sole with working thread, using a hook or a thick needle.
Plaid
A blanket, cape, blanket on a sofa or chair gives the room a cozy feel. It is extremely difficult to knit a complete blanket on two knitting needles, but you can knit the product in a patchwork style.
Rice knitting is great for creating things like this. The edges of the parts do not curl into a tube when knitting, so in the future it is not difficult to connect them into a single piece. A blanket made from multi-colored squares looks bright and festive.
Snood
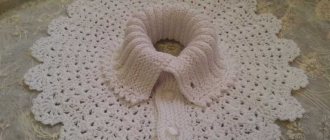
Snood is a comfortable and warm wardrobe item, a fashion accessory. Dense, voluminous and elastic rice knit fabric holds its shape well, the edges of the product do not curl. You can knit a snood on two knitting needles or on circular ones.
The sample will help you correctly calculate the required number of loops. When using circular knitting needles, edge stitches are not cast on. When knitting a product on two knitting needles, the edges of the snood are connected with a hook or a special needle with the yarn used. The start of work is marked with a contrasting thread.
Models of hats associated with the “Rice” pattern
This stylish hat model is knitted with a Rice ornament in combination with a wide braid:
You will need 250 g of mixed wool and acrylic yarn, where a 100 gram skein contains 120 meters. The work is done with needles No. 4, and an auxiliary pin for knitting braids. The headdress is formed by one rectangular piece in the transverse direction. The length of the rectangle is equal to the circumference of the head, and the width of 35 cm corresponds to the height of the cap, which can be increased if desired. We cast on with knitting needles 56 P, which will allow us to obtain the desired height of the hat. We start the first P with the main ornament, knitting 16 P with it. We often knit the middle one with a bias according to the pattern:
We finish the rows with 12 loops. We continue to work with this technique until the length of the rectangle reaches a head circumference of 54 cm. After this, it remains to close all the P of the last R. The second style of the hat is made from pink yarn:
You need to start needlework by knitting 6 cm with a cartridge elastic band:
After this, we move on to the main ornament and knit to the desired length:
Read
Knitting a men's scarf: patterns with patterns for beginners
At the moment when there is 5 cm left until the end of the work, we begin to reduce the number of P until it reaches 35 pieces:
Then we transfer all the P's to the thread, using a large needle for this:
By tightening the thread, we form a beautiful crown of the hat:
We sew the fabric of the hat along the seam and turn it right side out:
Tips for Beginners
The “Rice” pattern with knitting needles, the classic pattern or with crochets chosen by the craftswoman, is most often symmetrical and in order for the resulting product to please and give warmth for many years, it is necessary to follow some rules/
Rules:
- to maintain the symmetry of the pattern, the middle of the part is marked with a thread of a contrasting color;
- for rice knitting, short-pile or smooth yarn is used;
- for larger items, yarn with a larger thread diameter is selected;
- it is necessary to monitor the tension of the working thread so that the loops are the same size;
- the reduction of loops occurs according to the drawing, unless otherwise indicated in the description of the work;
- Closing the loops at the end of the work occurs according to the pattern: the front loops are closed with the front one, and the purl loops are closed with the back one.
A little attention and patience will allow you to combine knit and purl stitches to create a unique and beautiful knitted product with your own hands.
Description of knitting rice pattern
The pattern is knitted with knitting needles. It's very simple - we alternate knit and purl stitches in a row. The number of loops for the sample is a multiple of 2:
1st row:
1 knits. loop, purl 1 loop.
2nd row:
1 knits. loop, purl 1 loop. (that is, according to the drawing)
3rd row:
Purl 1 loop, 1 knit stitch (swap loops)
4th row:
Purl 1 loop, 1 knit loop (knit according to the pattern)
5th row:
repeat the pattern from the first row
The rice pattern is easier to understand when you knit it according to the pattern. Even for those needlewomen who don’t like patterns, in this case everything will be clear:
Often in such simple patterns only knit rows are indicated and therefore the knitting pattern of the rice pattern is sometimes confused with the pearl pattern. Compare, pay attention to the row number:
It would seem that the patterns are the same: the only difference is that in the pattern of the pearl pattern both front and back rows are indicated, and for the rice pattern - only the front ones. But the knitting pattern turns out different.