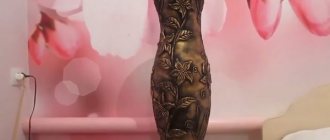
DIY vase painting with transparent paints
Painting a decorative vase at home can be done using masking tape, which protects surface areas from staining. In this case, transparent paints of two colors are used, which are gradually mixed with each other, which gives a lasting tonal effect. It is easy to find glass vases of various shapes in stores; you can also take an old water decanter, a wine storage vessel from which the cork has been lost, or an ordinary jar, as in the exercise
To paint a vase with your own hands you will need:
- Glass vase
- Masking tape
- Knife and cutting board
- Transparent paints for glass (red and yellow)
- White spirit or water
- Palette for mixing paints
- Large brush.
Step-by-step master class on painting a vase:
- Cut the masking tape into strips of varying lengths, place them on a cutting board and use a knife to make the edges wavy. Transfer the blanks to the outer surface of the vase, gluing them vertically at different heights.
- Turn the vase upside down and place it so that its top edge does not touch the table surface. Find a suitable support (for example, a tall enough aerosol can) and make sure it is stable and will support the weight of the vase, which you will rotate during the painting process.
- Using a large brush, apply yellow paint evenly over the entire surface of the vase. While it's still wet, paint the bottom and bottom of the vase red (remember, it's upside down, so the "bottom" is the top as you work). Then mix the already diluted paints of both colors and apply the resulting tone to the side walls in the central part, smoothing the boundaries between the red bottom and the yellow top of the product.
- When you like the tonal effect you've achieved, let the paint dry and then remove the masking tape. After painting on glass, clean the areas of the vase where smudges have formed with the tip of a knife or a cotton swab dipped in water or white spirit.
The areas under the tape will remain unpainted, so try to place the parts not too close to each other: after applying the paint, the pattern should stand out clearly even against a light background. Make sure each strip of tape is firmly adhered to the surface so that paint cannot bleed underneath.
Select the paints you need to paint the vase and squeeze a small amount onto the palette. When trying to get different shades of the same color, the paints will have to be diluted. Therefore, it is important to know whether they are water-based or diluent-based. In the first case, add water to the palette, in the second - white spirit. Both paints used must be the same in composition. Add thinner until the paints become so thin that they can be easily applied to the work surface. At first it can be difficult to achieve the right balance: if the paints are too thin, they will simply flow. Test them on acetate film by holding it vertically over newspaper. If the paint runs off immediately, it is too thin. Thin the paint for painting a vase gradually: it is easier and cheaper to add thinner than paint.
Before washing the vase, carefully read the instructions for handling the paint with which it was painted. As a rule, such products can be wiped with a cloth - dry or slightly moistened with cold water. If you want the product to have a long service life, use crystalline gel: after firing in the oven, the objects covered with them can be washed.
Look at the photo on how to paint a vase:
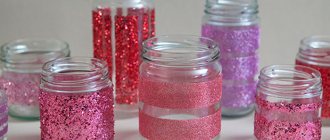
Acrylic painting on glasses
Glass glasses are easy to purchase. They are inexpensive and can be purchased at any kitchen supply store. But usually such things are found in every home. To surprise guests, you can make exclusive masterpieces from glasses, just use your skills and ingenuity. Tools and materials for painting with acrylic paints on glass for beginners:
any solution containing alcohol, for example, cologne or lotion;- scissors;
- acrylic contour;
- glasses, preferably not faceted, but round;
- graphite pencil;
- paints for painting on glass;
- tassels;
- album sheet;
- cloth or napkin.
Important! During the drawing process, bristles from the brush may stick to the image, so the work being done should be inspected from time to time. If the lint dries, it is difficult to remove.
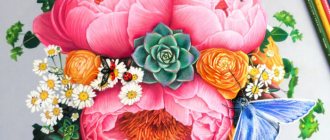
Artistic painting of a vase in the style of Van Gogh's sunflowers
The great painter Van Gogh gave the world many magnificent paintings. They are priceless, they cannot be repeated, but motives can be gleaned. The painting “Sunflowers” was created by a Dutch artist many years ago and was not in demand during his lifetime, but now it is worth millions and is widely copied around the world. Let's imagine ourselves for a moment as great artists and draw a mini-version. Do not try to repeat to the smallest detail what has already been created once! Create your masterpieces, every speck is the highlight of the drawing.
To paint a glass vase, you will need:
- White Spirit
- Cotton pads
- Vase
- Liquid stained glass outline in gold color
- Mini brush set
- Set of paints.
Carrying out the work of hand painting a vase:
- Degrease the glass surface using a disc moistened with white spirit.
- We carefully apply the drawing with an outline. You can remove any mistake with a cotton swab. If you wish, you can first draw a stencil, and then transfer it to the vase and trace it along the glass.
- After the outline has dried, which takes about 20 minutes, paint over the flower petals. Let dry for 15 minutes.
- Now paint over the small details. When performing artistic painting of a vase, you need to paint over the leaves and stamens of the flower. The colors mix well, allowing you to create the desired shade.
Advice: if you are not so good at drawing, do not despair. You can buy an adhesive stencil that sticks to the ceramic or glass and paint is applied.
How to draw a vase for a child?
You should always remember that a child perceives the world a little differently. His spatial imagination and thinking skills are not yet so well developed, so you shouldn’t complicate the image of a vase for him. Therefore, for him the lesson is limited to the following actions:
- Draw a vertical line.
- Similarly, draw a horizontal line for the bottom and neck, dividing symmetrically relative to the vertical.
- Drawing a line of the narrowest part of the neck will help to draw the outline line correctly.
- Draw the side lines of the vase. The lines must be made smooth, without pressing intensely on the pencil. This way the drawing will turn out beautiful and natural.
- If the child is good enough with a pencil, he can draw ovals that will limit the bottom and neck. If the child is small, skip a step.
- Teach the person drawing to periodically move the drawing away from the face in a vertical position and see how symmetrical both sides are.
- Take a watercolor and, collecting enough moisture along with the paint, apply pigment inside the outline. Try to distribute unevenly. Keep in mind that the side exposed to light will be light, while the opposite side requires more paint due to shading. The same technique is used when using gouache.
- If you are planning not just a vase, but a still life, draw one or several flowers, depending on individual preferences.
- If the object is glass, then take into account that the stems of the plant will be visible. If you do this, the image turns out naturalistic.
- It is advisable to foresee in advance whether you plan to depict flowers or not. After all, if there are flowers or fruits in the image, then the neck may not be carefully drawn. And only then restore the line that will be visible between the stems or fruits.
Using these recommendations, you can learn how to draw a vase quite easily and quickly.
https://youtu.be/GFMgVNFIPMkhttps://youtu.be/ifp0cTbFXkE
_
Caring for painted glass objects
Decorative glass objects painted with paints cannot be used in everyday life without following certain rules. Of course, you can coat the products with varnish, which will make them more durable and protect them from scratches (many paints are sold complete with a suitable varnish), but even in this case, adhere to the following care rules:
- Do not place painted glassware in the dishwasher or use detergent.
- Do not soak for a long time, do not wipe with force.
- The best way to clean a painted glass piece is to gently wipe it with a soft cloth dampened in warm water.
- To improve the water and light resistance of the product, apply a thin layer of varnish to the painted surface with a wide brush immediately after the paint has dried.
LiveInternetLiveInternet
Quote from Le_nka's message
Read in full In your quotation book or community!
Stained glass vase painting, MK.
Today I am posting a master class on stained glass painting.
I hope it will be useful and someone will learn at least something from it. Actually, let's start.
Let's take a vase, the subject of our painting, and thoroughly degrease its surface with alcohol, nail polish remover, etc. I use Mr. Muscle. We print out the sketch and put it inside the vase.
Let's apply the contour slowly (and sometimes with bated breath). I use contours from Lefranc and Idea, I think they are one of the best, but Lefranc's black is a little runny, so you need to take this factor into account. Use a napkin to remove excess contour on the nose. I will also note that when drawing a contour, the elbow must have support, otherwise the contour will be drawn crookedly and intermittently. But even if there was a “blunder”, do not rush to correct it immediately, let it dry out. Then you can correct it with a toothpick or a sharp knife.
Well, the outline is drawn on one side. Leave it overnight.
Also, slowly, apply the outline to the other side of the vase.
They examined the work critically, sighed, exhaled and began to chip away at the paint. 4. I used the paints from Idea, they are not very fluid and the white is very “dull” (i.e. opaque). We take white, add 2 drops of cherry 236 to it, we get a dark cherry color. Then separately add a drop of this “nasty” dark cherry to the white one and get a light shade of cherry. I hope I explained it somehow... For the face I used white, yellow and brown, but this is purely a personal composition, it can be different for everyone. My husband actually said that Japanese women painted (or powdered) their faces with white, so they had to make their faces white. But this is not the point.
In short, we paint the face and hands first. I would like to note that I almost never use a brush when filling stained glass; I work with toothpicks or skewers. This is useful when the fill area is very small.
Some details were filled with gold. Then I took cherry blossoms. Applying different shades one by one, I filled the kimono.
Then I realized that I got carried away and my Japanese woman looked like a girl who had escaped from a madhouse. In general, after thinking about what was wrong with her clothes, it dawned on me: the belt should be different.
I painted it on top with brown Lefranch paint, but I want to warn you don’t put solvent on solvent, only solvent on water-based paint, or vice versa. If I had thought about it before, I would have made different shades of brown, but otherwise... We have what we have.
Now the other side of our “coin”. After a week, when the paint has completely dried on our Japanese woman, we move on to painting magnolias, because of which this MK actually appeared. We fill the flowers and buds with three shades of cherry.
Moreover, we fill the petals half with dark, half with light, and use a toothpick to make stains.
I apologize for the quality of the photo, I hope you can see something?
I made the top flower using the same principle, only for the “veins” on the petals, I dipped a toothpick into stained glass cherry paint and quickly painted on the petal that was previously filled with white paint.
At first the vein was thin, barely noticeable, but don’t add more paint, over time it will stretch and be the way you want it.
So our flowers are drawn.
For contrast, I made the bird dark and filled the branches with brown.
I like this side better.
After another couple of days, all the paints have dried, we look, criticize or admire. PS Of course, there are many “blunders” here. “Madame’s” left hand goes a little in the wrong direction, and has shrunk a little, well, we’ll fix that, and the kimono could have been diversified somehow. In other words, fantasy has a lot to work with, but in this MK, I tried to emphasize some of the nuances that are present in stained glass painting. I will be glad if they are useful to you in your work.
That's all. Be patient and careful. Don’t rush and everything will work out. Always yours, Elena-rossko.
——————————————————
Author: Le_nka (Rossko)
——————————————————