There are many options for necklaces. Today we suggest you familiarize yourself with the question of how to make a necklace with your own hands from beads. After all, such a trend has long gained a certain note of popularity and holds its position.
The shapes can be minimalist, massive, and others. We suggest making a necklace in black and gold.
Yes, it will take a lot of time to make such a beautiful thing. But the result will please you for a long time. In general, the weaving technique is not at all complicated, and even a beginner can figure it out.
To make such a product, prepare a drop of agate, approximately 2x4 cm, Swarovski rivoli, Czech beads 6x8 mm, Swarovski beads, Toho and Czech beads (ten), a gold clasp, 2 pieces and also 2 rings, a nylon thread, a scrap of leather, glue , non-woven fabric
Let's take a look at a DIY necklace master class. To make the backing, fold the non-woven fabric in several layers, glue the agate to it, which should dry for 2 hours. You need to press something heavy on top. After drying, the stone should be covered with beads. This is done like this: sew 2 beads, on the wrong side of the stitches back by 1 bead, bring the needle out and go further through the other one.
To ensure that the order in each subsequent row is not disturbed, each row should be finished with 2 beads. Next you need to follow the principle of a mosaic. In this case, the number of rows must be calculated based on the dimensions of your stone (and it is different in each individual case). To tighten the frame, you should weave a couple of rows with small beads.
According to the DIY necklace pattern, the agate is sheathed in a circle. Frame using beads. A technique like “back needle” is performed, that is, you need to sew on 1 bead, return the needle from the back to the very beginning, bring it to the front part and sew on the sewn bead. Next, golden magatams need to be alternated one at a time.
How to make a stencil - master class for beginners (50 photo ideas)
Cut off the unnecessary part of the non-woven fabric, leaving only a millimeter at the edges. There's no need to rush here. The agate must be outlined directly on the skin. Cut using small seam allowances. Glue the skin to the non-woven fabric, then leave it to dry again under the weight.
Manufacturing schemes
To make a necklace, it is better to use a ready-made pattern. The network presents a huge variety of patterns from handicraft lovers. It will be much easier to work according to the scheme. In addition, you will avoid possible mistakes.
In the photo of a hand-made necklace you can clearly see the various options made according to one or another design. You need to choose a pattern based on what kind of necklace you want to make.
There are techniques that involve the use of one or two fishing lines. Jewelry made from two lines, as a rule, is more voluminous and more beautiful, but is somewhat more difficult to manufacture.
You can make a few low ones with beads and then braid them. This is the optimal solution for beginner craftswomen who have no experience in making jewelry.
It is highly recommended to watch a master class on making a beaded necklace with your own hands. This will allow you to understand the techniques of weaving and making jewelry.
Beginners are recommended to try to make the first necklace according to the master class, repeating the making of the jewelry.
A large selection of materials allows you to make an airy necklace that attracts with its lightness and grace. This necklace seems to float in the air, making it look chic with festive outfits.
To make aerial necklaces, a special thin fishing line is used, which is almost invisible in the finished product.
Origin of fabrics
Our ancestors revered nature and created objects for themselves using its gifts. To produce fabric, ancient weavers used plant fibers and animal wool. The created canvases were painted with natural dyes. Ancient Chinese weavers strictly guarded the secret of making silk fabrics. Their painstaking work in unraveling the finest threads of silkworms was highly valued. To this day, Chinese silk is the most valuable.
Cotton and linen fabrics have their roots in Ancient Greece and Ancient Egypt. Only the richest people could afford to wear muslin robes. Fine linen was revered by the pharaohs. Fragments of fabrics found during excavations even retained their color. The Crusades, colonization and maritime trade allowed textiles to penetrate into European territory. There they were highly valued for a long time.
Gradually, each country began to produce fabrics independently, this allowed them to reduce their price and make beautiful fabrics an everyday item.
Materials and tools
You should not choose the cheapest materials. Choose high-quality beads that do not have defects and do not lose their aesthetic properties over time.
It is important to use high-quality fittings that complete the appearance of the product.
Basic materials and tools include:
- beads of various sizes and colors;
- beads, natural stones;
- fishing line 0.2 mm thick;
- hook No. 15;
- pins;
- scissors;
- pliers and round nose pliers;
- thin needle for weaving beads;
- locks, nails, caps and other accessories (depending on the features of the product).
"African Cord"
Do-it-yourself textile jewelry is now at the peak of fashion. A wide range of fabrics allows you to create unique decorations. We suggest you make a necklace in boho style. It is very simple to implement and does not require large expenses. But factory products are quite expensive.
Read this: DIY nest for newborns: making useful things yourself
To create a necklace you will need:
- Thread and needle;
- Glue;
- Accessories with clasp;
- A small piece of fabric;
- Half a meter of thick nylon cord;
- Metal ring for decoration;
- Pliers.
Boho style implies an abundance of color, so you need to choose the fabric as bright as possible with a small and clear pattern.
Cut a strip of your chosen fabric measuring 50 x 6.5 cm.
Now you need to try it on the cord, which should become the frame of the necklace. Determine at what distance you need to lay the seam.
Sew the side of the fabric strip. Turn the fabric cover right side out and pull it over the cord.
Hang a metal ring in the center of the strip.
Carefully gather the ends of the fabric and attach fittings. It can be sewn or glued with glue.
You can make several of these tourniquets and put them around your neck. They will become a bright detail of your wardrobe.
If the resulting fabric case is stuffed with large beads, you can get an original decoration that looks great on the neck of its owner. The inner beads can be “broken” with knots, beads made of wood or glass, or ribbons.
Manufacturing Features
Before you make a necklace with your own hands, you should prepare all the materials and work space. Take a container that allows you to conveniently mix beads of different colors and sizes, in which you can easily put them on the needle.
To make a large airy necklace you need about 5 m of thin fishing line. You need to work with it carefully to avoid fractures and the formation of knots. Therefore, it is advisable to remove unnecessary items from the table.
After putting beads on the entire fishing line, you should not cut it, since it will still be useful during the knitting process. When using a hook, it is necessary to make air loops.
In the video of making a beaded necklace, you can see a tutorial on how to knit with such loops.
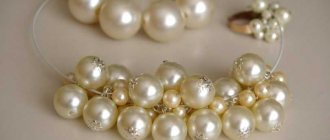
From sparkling beads
A master class will help you make a necklace from beads braided with beads.
To make a necklace you will need beads with a diameter of 18 and 12 mm. Instead of beads, you can use special felt balls or cotton wool. To braid the beads, we select beads of two colors, size 10, and one color, size 8. You will need fishing line, a beading needle, scissors and a sewing pin with a head. We will assemble the necklace using a strong thread.
Let's start braiding beads according to the diagrams above.
Related article: Crochet round yoke: master class with patterns for a children's dress
The center bead will be different. After weaving it, we make “columns” of three beads along its entire surface.
It's very easy to do. We thread the thread through the bead located on the bead. We string three beads. For a beautiful effect, take the third bead of a different color. Now through the last bead of the column we pass the fishing line back into the column. Attach the post to the same bead on the bead. In this way we attach columns to each bead. The result will be a “fluffy” bead.
Let's start assembling the necklace. We string beads onto a thread. At the end we make a mount in the form of a stick. It needs to be made tight. It is best to weave in a checkerboard pattern.
Now we put a bead with a diameter of 12 mm on the thread. Then we string the beads again. Next comes a larger bead of one color, again beads and another bead of a different color. We collect beads again. Into the bead. And then we string the beads and beads in the reverse order.
At the second end of the thread we make a loop.
The bead necklace is ready.
This necklace can be enhanced by adding interesting metallic elements. Instead of beads, you can string beads, pearls or natural stone chips onto the thread.
Shaping the necklace
To form a beaded necklace, you need to use a fairly large pillow. You can use the most ordinary sleeping pillow.
As an alternative, you can use corrugated cardboard. The base should be soft, but retain its shape. Sewing pins will stick into it.
Mark the first thread of the decoration and secure it with pins. Distribute the woven chain between the pins, forming a necklace in layers, in accordance with the chosen pattern.
NOTE!
Wire jewelry - examples of making and options for decorating jewelry with your own hands (115 photos)Wood decorations - the best ideas and tips on how to make a stylish wood decoration (85 photos)
- Dress decoration - modern design and tips for choosing stylish decoration (95 photos)
The number of rows depends on the pattern. There can be either just a few pieces or more than 50. You can put a chain on one row twice.
This will make the necklace look more voluminous. It is recommended to start assembling from the long edge, gradually moving towards the short one. This makes it easier to knit and easier to avoid mistakes.
Today, the Klondike technique is popular. It involves the use of a honeycomb method of weaving threads with beads. Craftswomen make scarves both plain and with smooth shade transitions. You can use fringe for decoration.