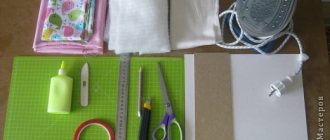
Tools and materials Time: 3 hours • Difficulty: 3/10
Materials
- leather;
- waxed linen thread;
- glue;
- beeswax.
Tools
- knife (preferably a shoemaker);
- metal ruler;
- awl;
- hammer;
- marking wheel;
- two thick needles.
A handmade leather passport cover has long gained great popularity. This item is quite expensive because it is made from genuine leather and only manual labor. We will do it ourselves!
DIY passport cover
I won’t bore you for too long with stories about how a passport is an important document and needs to be taken care of – you know everything perfectly well. Today I’ll just teach you how to make a beautiful cover for it, and more than one and very beautiful one, so don’t be offended if you suddenly lose your passport, return it. But without the original case. They'll pocket such a cutie in no time.
So, the cover, which will be the envy of everyone, will take you more than one hour of work, so prepare yourself mentally, and also go to the store (if necessary) and buy the missing material. Because for a DIY passport cover you will need fabric, paper, acrylic paints, and even bird feathers (as a cat, I will enjoy this).
Master class DIY passport cover No. 1
I would simply call it “Owl”. Moreover, owls are a trend, like mustaches and pandas. By the way, we’ll talk about mustaches later. Making a noble night bird is not at all difficult.
To get started, stock up on:
- Book bound
- Felt of different colors
- Floss and needle
- Scissors and ruler
Print the image of the bird according to the size of your passport (scale if desired), transfer the parts to felt and cut out.
When the pattern is ready, proceed to the cover itself. First you need to cut out a piece of felt that will be the outside of the cover. Leave a margin of about 0.5 cm around the entire perimeter.
Next you need to cut a piece of felt for the inside of the cover. Then you will have three parts to the cover.
Iron the middle of the largest part and decorate it with an owl. To make the bird contrast with the cover, sew it onto two felt squares - brown and green.
Now connect all three parts, pull and put your passport in a beautiful cover.
You are beautiful! You've completed the first cover, now the second one awaits you.
Master class DIY passport cover No. 2
This DIY passport cover “Breakfast at Tiffany’s” is made using the decoupage technique and will require certain skills. But don't despair - you will succeed.
For work we will need:
- Ready-made passport cover made of leatherette
- Acetone;
- Acrylic paint and enamel Poly-R;
- Bitumen;
- Silky varnish Poly-R;
- Napkin and glue for decoupage.
So, if the list of accessories doesn’t scare you, let’s get to work. We degrease the passport cover with acetone and prime it with Poly-R enamel in two layers. The procedure is as follows: once the first layer dries (completely!), immediately apply the second.
While the enamel dries, we cut out the images and put them together into a composition.
Are you tired yet? Be strong - the end is near.
The fold of the cover should be glued with a white napkin to prevent it from cracking. After the paints have dried, draw a frame along the edge of the cover. To give the frame an aged effect, you can lubricate it with cotton wool and bitumen. Then we apply several layers of varnish.
OK it's all over Now. When the varnish dries, you will have a super beautiful cover that will be the envy of everyone.
Master class DIY passport cover No. 3
Remember I talked about the mustache. So, meet me. The cover is made according to the same principle as the felt cover, only from leatherette.
Master class DIY passport cover No. 4
This cover is made of felt and decorated with beads. Very beautiful, but, unfortunately, not durable. Once you snag one thread, the whole bead can fall apart. But for very neat girls, such a cover will be a real decoration.
Master class DIY passport cover No. 5
This denim case will reliably protect your document. I called this DIY passport cover “He and She.” To make it you will need acrylic paints, a drawing template and denim fabric.
The paint is applied to the fabric, and when it dries, sew the parts and please your loved one with a new cover. And just let him try to say it. That he didn't like her.
Master class DIY passport cover No. 6
This cover is so bright that I would call it “Spring mood”.
- Cut out two rectangles. One for the main fabric, and one for the lining.
- Sew the rectangles together from the inside out, leaving a small opening so you can turn the right side right side out.
- Carefully turn it inside out and seal the seam.
- Roll up the sleeves and sew them up neatly. Iron the fabric and feel free to wear your new passport.
DIY passport cover master class
№7
To be honest, I’m already tired of describing everything meticulously, but I couldn’t help but show you another version of a passport cover with my own hands.
I won’t describe it for a long time, everything is clear from the pictures.
Have a great trip.
Your handicraft cat Mavrik
Similar articles:
Step-by-step instruction
So let's get to sewing.
Step 1: select materials and tools
Leather
First you need to choose a good piece of leather without defects (cuts, marks, holes, etc.).
Glue
To glue leather parts, you can use any waterproof plastic adhesives. You can use PVA glue. But the best glue is “Moment”. It is quite flexible and does not crack when the glued areas are bent - in general, it is ideal for gluing parts that are subject to deformation.
A thread
Exclusively waxed.
Knife
Shoemaker is ideal. A disc knife, and don’t forget about a stationery knife - they also cut leather perfectly.