Sewing according to a pattern
An easy-to-make model that is best for beginners to start with, it has a straight cut. First you need to evaluate the fabric: some types of textiles require careful ironing of seams and ironing of seam allowances. You may need to steam the fabric as you work. The work takes place in several stages:
- pattern making;
- parts processing;
- first fitting;
- final processing and finishing.
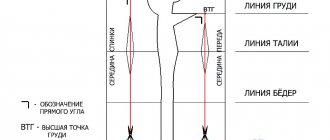
For the pattern drawing you will need measurements. You need to independently determine the circumference of the waist (WT), hips (HC), center of the chest (CG) and chest circumference (CG). The last measurement is taken in two forms. First, all the details are drawn on a piece of whatman paper. You may need more than one sheet, because without experience it is difficult to arrange the elements compactly.
When it is clear that each detail is depicted correctly and in accordance with the real size, it is transferred to transparent film or thick cardboard. Further procedure:
- On the cardboard or film parts of the future product, the lines of the chest and hips are marked, darts are indicated, and key points are applied.
- Check the correct construction of each part using a measuring tape.
- Make sure that the seams match and the pairs are symmetrical, otherwise there will be problems during stitching.
- Eliminate detected deficiencies and inconsistencies. If necessary, correct the drawing, drawing what is missing and cutting off what is superfluous.
- Transfer the pattern details onto the fabric, following the pattern. Don't forget about seam allowances. Beginning craftswomen can make their task easier by drawing out the pattern on paper with allowances included.
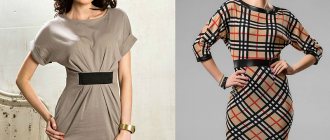
Features of the style
Note! One-piece sleeves are distinguished by the fact that they do not have a connecting seam with the back and front. They form a single whole with these parts. By reducing the number of parts, the procedure for creating a pattern is significantly simplified.
Can be used in different sleeve lengths
This style has been known since ancient times. Probably its most ancient representatives were tunics. Such sleeves were used in Russian shirts, which were worn under sundresses. This cut will not rub the skin and create discomfort.
In the twentieth century, the history of such dresses was further developed. In the fifties, the “O” silhouette was fashionable. One-piece sleeves contributed to the creation of smooth contours of the figure and emphasized the softness of the shoulder lines. Such dresses were used by owners of 46, 48 and other sizes. In the second half, the dolman sleeve style was fashionable. He stipulated that the sleeve would be very wide at the shoulders and narrow at the hands.
Nowadays, one-piece sleeves are used in a variety of models - from everyday and business styles to evening and festive dresses. Their production is accessible to beginning craftswomen.
Typically, such a sleeve consists of two parts - back and front. The first of them is part of the back, the second is the shelves. There is no armhole seam, which contributes to the formation of smooth outlines of the shoulder part of the dress.
For your information! This sleeve lies freely and practically does not limit the movements of the hand. Therefore, a woman wearing clothes of this cut feels more confident.
This style will hide a slight excess of normal weight
Who is this style suitable for?
In order to use clothes with such sleeves, you need to choose them in such a way that they fit your figure. It doesn’t matter what size the woman is – 50, 52 or any other. One-piece sleeves will emphasize advantages in the following cases:
- Since this cut makes the shoulders look more rounded, this style will look beautiful on thin girls. Bony shoulders and very thin arms will not attract attention from the owners of such dresses.
- For those with full arms, models with three-quarter sleeves are suitable. Owners of 46, 48 and other sizes will look impressive in such dresses.
- It will look good on those who are used to being fashionable. This cut does not restrict the movements of the shoulders and arms, and this adds more grace and confidence to beauty.
- If a woman has wide shoulders, then the style in question will hide their transition to the sleeve. Straight cut coats, dresses and short sleeves will make the shoulder line more harmonious.
- For those who have wide hips, a rounded shoulder line will visually balance this quality and make them wider. In such cases, it is recommended to use draperies to decorate the shoulders.
- For those who are a little overweight, this style will help you look slimmer. Owners of 52, 54 or other sizes will look elegant. Wide sleeves and a smooth shoulder line will help visually hide slight imbalances in the figure. This outfit will be more impressive if you wear high heels.
You might be interested in Features of bloomer pants patterns for men, women and children
For your information! An outfit of this type makes the figure more squat, and such shoes successfully correct the image.
It is necessary to cut the sleeve style correctly. So, for example, if a woman has full arms, it is recommended to use a length up to the elbow or three-quarters. A full-length sleeve will emphasize fullness, so it should not be used. This limitation also applies to those with thin arms. A full-length style will look unprofitable. It is better to use an elbow-length or three-quarter sleeve instead. In order to choose a suitable pattern, you can use the materials from the Paukšte website.
Styles for plus size
For those with beautiful hands, a full-length sleeve will suit you. It will highlight the winning sides of the figure. It doesn’t matter what size the owner of the dress is - 54, 56, smaller or larger.
Who does not suit the style?
For some body types, full sleeves may not be a good choice. This happens, for example, in the following cases:
- If a woman has an oval-type figure, smooth shoulder lines will visually round out the figure and make it more massive.
- This style is not suitable for those with a large bust.
- Dresses with full sleeves should not be worn by those with a round face. In this case, the figure will become visually heavier. If a woman is a size 56, 58 or larger, then this will be even more noticeable.
When planning to use the style in question, you need to make sure that it will suit the owner of such a dress. You need to choose the most advantageous type of sleeve for the lady.
Construction order
It’s not difficult to tailor a straight dress, but you need to do everything without mistakes. The simplest style can be ruined if even one detail is cut incorrectly. The universal base pattern is built according to the same principle for 42, 46, 48 and other sizes, up to 52 inclusive.
The difference in construction for different sizes will only be at the initial stage, when they draw a rectangle, inside of which there will be a base pattern. The width of this rectangle is formed by the half-circumference of the chest, to which you need to add 6-7 cm for a loose fit. This is a standard increase for straight-cut products. Next, the base is built in the usual manner. That is, the pattern for a size 52 straight cut dress is not much different from the basic one of the same size.
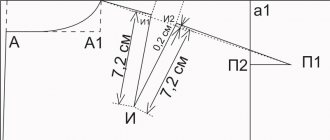
When starting to build, you need to make sure that the pencil draws clear lines and does not break when pressed. Sequence of work:
- On the sides of the front part they put 2 cm up, retreating from the armhole. Mark the points. Draw a smooth line from both to the middle of the front. 8 cm higher, draw another line running parallel to the first.
- Draw a line for the neckline. On the back side it should be deepened by 2 or 4 cm. The necessary markings are made along the shoulder line.
- Leave 3 cm for processing the edge of the neck.
- At the waist, darts are made slightly noticeable, but it is better to do without them completely so that the silhouette is straight.
- Cut the pattern along the lines outlined in advance. Glue the resulting parts together in pairs. Slightly straighten the corners.
A simple model is sewn without sleeves; a more complex version has them. A straight dress with ¾ sleeves is modeled in the usual way, focusing on the chosen style. Then the part is cut horizontally into 4 parts. One part can be made lace, then the dress will turn out more elegant.
A-line dress with sleeves
To cut such a dress, you will need to measure only a few parameters - chest volume, product length, sleeve length.
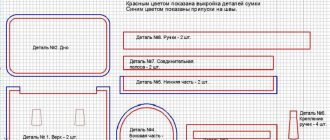
The finished pattern for an a-line dress with sleeves is presented below. You can adjust it if necessary by changing some dimensions.
Layout of parts
For cutting, the fabric is laid out on a flat, hard surface with the wrong side up. Typically a long and wide table is used. One edge is applied to the other. In some cases, the pattern of a straight-cut dress is based on material turned at an angle.
Begin cutting, maintaining the direction of the threads. All necessary increases and allowances are left. Symmetrical parts without seams or fasteners are cut on the bend.
It is better to place the parts compactly so as not to waste fabric. When sewing a straight-cut dress, large pieces remain that can be used for finishing or sewing other things.
First, cut out the front and back, then the sleeves. Gaps are formed in which smaller elements will fit, for example, cuffs, collar, belt. Each pattern is traced twice. The first line indicates the seam locations; it should be clear, smooth and as even as possible. The second line is the edge of the seam allowance; parts are cut along it. For the sleeves and hem of the dress, the allowances are 4.5 cm, for other parts - 2 cm.
Basting and stitching
When all the elements are carefully cut out, they are basted and sewn. This must be done in a certain order. Start from the front. Sequence of work:
- The details of the sleeves and front are first basted, then (after the first fitting) they are stitched. Process the edges and smooth them thoroughly with an iron. If you do not iron at this stage, it will be difficult to work with the product later.
- Next, the side seams and back are worked, as well as the shoulder seam. The sleeves are joined into a single whole, all the details are stitched together, the edges are processed and also ironed.
- The most important stage is attaching the sleeves to the armholes. This is where beginners make the mistake of forgetting to fit the sleeves along the edges. This must be done, otherwise the seam will turn out uneven, because the hem is several centimeters longer than the armhole. This difference is needed precisely to ensure a perfect fit of the sleeve to the main part.
- Turn up the seam allowances on the entire product and finish them with a blind stitch.
When the details are drawn up, you can lay out the dress and make sure that it turned out exactly as intended.
First fitting
Before fitting, pins are pinned where they are needed. Points oriented vertically point downwards, horizontally - to the left. The place of the fastener is chipped off, then the outfit is straightened. Measure the lines of the bust, waist and hips, check all seams. Make sure that the neckline is smooth and has sufficient depth. The darts are also checked.
Particular attention is paid to the armhole and sleeve cap, since most often these are the places that turn out to be skewed. If there are any shortcomings, corrective lines are applied for new seams. They check whether the sleeves and the entire outfit are long enough. During the first fitting, the collar is attached, if provided in this model. When the dress is put on, mark the places where the pockets will be located. After all checks, the dress is removed and the seams are sewn.
Model without cut
Although cutting a straight-cut dress is not difficult, there are girls for whom even this process seems incomprehensible. An even lighter option will suit them - an outfit without a pattern and without any darts. This model will look stylish only if it is made of elastic fabric, for example, elastic knitwear. Color is no less important.
It is better to choose a bright material with a large expressive pattern, but not strict, but chaotic, then the defects will not be noticeable. It’s good if the composition contains cotton fibers, then the fabric will allow moisture to pass through. But it is not recommended to sew a dress from completely natural textiles, because it is synthetic fibers that provide elasticity.
When choosing material, take into account the time of year for which the outfit is intended. In summer it is convenient to wear a thin dress, but for cold seasons it is better to choose thick textiles.
Calculation of the amount of material
The amount of material depends on the girl’s height and her measurements. The width of the fabric remains the same and is 150 cm. Thus, if the girl’s height is not higher than 180 cm, and her size is not more than 48, the cut length will be:
- for a short dress - 110 cm;
- for long - 180 m;
- to the knee - 130 cm.
Dress with bell sleeves
Ready-made fashionable patterns are available in several sizes. You can determine whether your parameters match the chosen size by checking the measurements given above.
Then you need to make a life-size pattern according to the proposed diagrams.