Types of paper
Materials for creativity can be very different. Paper varies in thickness, color, size and purpose. Let's take a closer look at all the main types:
- white (for office equipment, writing or from notebooks and notepads);
- tracing paper (available in A4 sheets or in a roll of 20 or 40 meters);
- corrugated (available in small rolls, different colors);
- perforated (with holes forming a pattern);
- for drawing (available in albums, notebooks, folders);
- craft (interesting material, comes in different densities);
- packaging (varies in color, pattern);
- newspaper (thin, easily wrinkled).
To make a dress, you can use paper napkins, towels and even toilet paper.
Tip: If there are a lot of unnecessary magazines and newspapers accumulated in the house, then you can safely use them to make a dress with your own hands.
Paper Tools
Making a paper dress will be much easier if you use special tools. Let's look at what items we need:
- wooden or metal ruler;
- drawing pencils (simple) with a well-sharpened rod;
- stationery knife or paper scalpel;
- scissors large and small;
- patterns or templates, if you need to cut out several parts with smooth rounded sides; you can use plates of different diameters;
- a set of flat brushes;
- glue pencil or PVA, you can use regular paper glue;
- tape narrow or wide.
Tip: Remember that for children of primary school age there are stationery with rounded tips.
Techniques for working with paper
Paper is a very interesting material for creativity. Thanks to its properties, it is possible to produce objects or clothing parts of various sizes. Let's take a look at some of the most famous handmade techniques:
Crinkling, thanks to which you can get a rich texture. Crumpled paper can take on different shapes.
Folding - this technique allows you to get a variety of folds:
- One-sided (the fold is placed in one direction),
- Counter (the fold of the paper is directed towards butt to another fold)
- Bow folds (fold directed in different directions)
- Corrugation (when paper is folded like an accordion);
- Origami is the folding of various three-dimensional figures from paper, from which you can assemble a large product;
Cutting - is done using a knife or scissors in order to obtain parts of the dress in the form of patterns, and you can also cut out lace details.
Weaving is made from strips of different widths to create an interesting fabric. Used in creativity for adults or together with children in grades 4-6. You can weave according to the principle of weaving, but instead of threads you need to take strips of paper, which you cut in advance. This process is quite painstaking and time-consuming, but unique product options are obtained. Let's look at the main weaving patterns that can be used when working with paper:
- Plain weave (in a checkerboard pattern) is considered the most durable and simplest.
- Satin weave is obtained by alternating strips of paper 3 through 1. Thanks to this pattern, you can get a pattern with diagonal stripes on the front side, especially if you use two colors of paper for weaving.
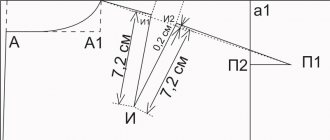
- The twill weave forms a diagonal pattern, with strips of paper alternating 1 through two strips. In order not to make a mistake, you can peek and repeat the alternations, as in the figure.
Tip: If you want to make a woven detail on your dress, then use two colors of paper to get an interesting design.
Tearing, paper can be torn freely, or you can tear it off by placing a ruler on the sheet. In this case, the edge will be thinner and easier to stick to another sheet of paper.
Dress for a doll
Painted paper dolls appeared in the 17th century. Then the girl could receive a whole set as a gift, which included dresses drawn with a thin outline. With the help of their mother or governess, the girls painted the outfits, cut them out, and put them on the dolls, folding special strips of paper so that the dress would stay on the figure. This type of doll remains popular today; they not only bring a lot of joy and pleasure from playing, but also develop taste and fine motor skills.
Creating dresses for dolls is an interesting creative activity that will allow participants to play the role of a real designer, stylist or couturier. A paper dress can be made flat or voluminous:
Planar. This dress may require plain white paper, colored paper, crepe paper, or napkins.
Draw with a simple pencil, according to the size of the doll, color with colored pencils or paints and cut out along the contour;
Fold the origami dress. To do this, you need to take a sheet of paper and fold it as shown in the video instructions step by step. The main thing in this technique is to be slow, so if some step is not clear to you the first time, then watch the video again.
Making a dress for a doll is quite simple. You need to take paper, preferably corrugated, and form a bodice around the body, and then a skirt, securing it with tape, glue or thread. Lastly, you can make small sleeves like a flashlight.
Children's fun
Every little girl from childhood is instilled with the idea that she is the weak half of humanity and decorates this world with her presence. That is why babies are dressed up in adorable clothes. Children transfer this model of behavior to their toys, playing with them as daughters and mothers. It is not surprising that they, just like adults, strive to decorate their charges by making various outfits for them.
Related article: DIY tea table (tray for tea ceremony)
Little ones will really love the idea of making a new voluminous dress for their favorite paper doll. You can help her in this event by choosing as an example a simple pattern for children, with the help of which an origami dress can be made easily and simply.
Consistently following the instructions below, the child will be able to make a wonderful outfit for his favorite doll with minimal guidance from an adult.
When the dress is ready, all you have to do is glue it onto the toy.
Dress for girls
Nowadays, holidays are often held where a dress made of paper would be appropriate. For a child, you can use either plain white printer paper or corrugated paper, newspapers or pages of glossy magazines. Depending on the time available, you can create a designer outfit that will bring a lot of joy to the child.
If you are short on time, then you can’t think of anything better than plain paper and adhesive tape. Form the bodice of the dress on the child, thanks to the creasing nature of the paper. Try to crumple the sheets in one direction, creating the texture and shape of the dress. Then fasten a strip of wide tape on the girl with the sticky side on top, for the details of the skirt.
For a skirt, you can use various techniques of folding with a fan, or one-sided and pleated folds. An original and quick option would be paper sheets rolled into a cone and glued to a tape. Several rows create the effect of a tutu or princess dress.
If you have more time, then the dress can be created using more interesting techniques. To get started, look at the ideas for dress styles on the site’s photos; you can take it as a basis from a character from a cartoon fairy tale or from the works of famous designers. Decide on the style, quality of paper and methods of execution of the product. Now follow in order and perform sequentially:
- Take an unnecessary T-shirt or knitted dress for the base of the bodice.
- Use a pencil to draw shaped lines on the front of the T-shirt.
- Take the girl's shirt off.
- Prepare the paper parts and sew them onto the T-shirt, moving from bottom to top. Details can be sewn on by making two punctures with a needle, as when sewing on buttons. Try to work carefully so that the product looks beautiful.
- Now you need to make the skirt. To do this, first we make a frame from thick paper (whatman paper or wallpaper);
- The frame can be in the form of a crinoline, royal hoops, or be floor-length or short. Only imagination can stop this creative activity, since you can use any of the listed techniques, as well as alternate layers of paper according to color or quality.
We use openwork material
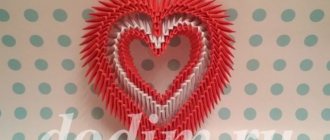
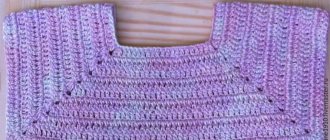
Well, in the second option, we suggest using beautiful openwork napkins to create an incredible romantic dress.
For this look we will need an openwork napkin (as in the photo), glue or double-sided tape, a ribbon and several small beads in the form of pearls.
The first step is to fold the napkin so that the top is slightly higher than the bottom hem.
And then fold the napkin in half.
Using glue or double-sided tape, glue the inside of the napkin together.
Then we move the upper corner of the napkin to the wrong side.
This is what the product looks like from the reverse side:
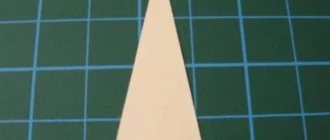
Cut out a heart from white paper, identical on both sides. Here's the template. It needs to be reduced several times in size.
We also cut out exactly the same heart from the second napkin.
Glue the napkin onto the paper and then cut off the rounded edges evenly and equally on both sides. After all, we have the perfect dress for the perfect girl!
Related article: Knitting for newborns: blanket, hat, booties, blouse + photo
We attach the heart to the skirt so that the waist line matches. If everything is fine, then glue both parts together. This is what the dress looks like from the reverse side:
And here is our front part:
Next, take a small ribbon (satin, paper) and glue it to the waistline of the dress.
Then we cut off the second piece and decorate the belt with it. It is worth trimming the edges to make the dress sparkle with new colors.
The last step is to take small beads and decorate the belt and neckline with them. The openwork dress for the postcard is ready!
How to decorate a paper dress
Paper is a very flexible material and allows you to create both simple and complex shapes. It all depends on the desire to spend time creating your outfit. As decoration, you can use voluminous flowers, which can be made soft and voluminous from corrugated paper.
To make them you will need:
- paper of various colors, for petals and leaves;
- PVA glue;
- templates for cutting out rose petals, lilies, daisies or peonies;
- Having cut a sufficient number of petals, collect the inflorescences and glue them together;
- place the finished flowers until the glue is completely dry, it is better if the flowers lie for about two to three hours;
- distribute flower buds and leaves along the hem of the dress, on the shoulders of the product and along the line where the bodice meets the skirt;
Tip: Thanks to flowers and individual leaves, you can hide some areas that are slightly deformed or the joints of sheets of paper.
Volumetric paper flowers can be made using the Japanese origami technique. For manufacturing you will need square sheets, which you can purchase ready-made, or you can cut them yourself. Using the origami technique, roses, orchids, tulips, and daffodils are very interesting. Check out the flower folding patterns and get creative.
Coloring
A paper dress can be colored in two cases:
- if you use colored paper;
- if you color white paper with the children, drawing an ornamental pattern, birds, flowers. You can color with colored pencils or gouache paints;
- The finished white paper dress can be spray painted. In this case, you can highlight some individual details or create a “degrade” effect. This method works if you make a smooth transition from the white area to the painted area gradually, apply paint in several layers to the hem.
Tip: If you decide to paint a dress made of paper, then follow the safety rules when working with paint. Use an apron and sleeves.
Unusual applique
Scrapbooking is a type of separate creativity, thanks to which we can decorate cards, personal and family photo albums, diaries and much more. Thanks to various materials, including newspaper clippings, stickers, satin ribbons, short stories and any pleasant little things, you can decorate the desired item in an unusual way.
In the first master class we want to show you the process of creating a paper dress for a future postcard. It is perfect as a gift for the spring holiday - March 8th. In fact, with such a dress you can decorate not only a postcard, but also a gift bag, box, and you can also come up with a more original purpose for a paper dress made from a napkin, but before that you need to make it.
In order to make such an applique, you need to find the following materials: paper napkin and paper, pencil, tape and scissors, glue and curly scissors.
Take a piece of paper. We will use it as a draft. On a piece of paper we draw the dress we dreamed of. We carefully think through all the details. Decide what kind of dress you want: with or without a large neckline, with long or short sleeves, with or without bust decoration.
After which we take a second sheet of paper, this time for the “finish copy”. The upper part of the dress will be made from this material. We transfer the future pattern onto it. Cut out the dress. Then we take any napkins we found at home. Multi-ply napkins work best, but several single-ply napkins in different colors will also work. If you chose the first option, then we will need to disassemble the napkin into layers.
Related article: DIY paper hat: diagram with step-by-step photos and videos
From them we cut out a couple of rectangles of the same size. We place one piece on the second and bend the edges of the upper piece by one cm on two opposite sides.
We find the center of two napkins and collect them in a shape similar to a bow. We secure the product with tape so that the edges (of the tape) are on the wrong side of the top of the dress.
We also attach the paper dress blank to the wrong side approximately at the waist line.
Then we flip the skirt to one side. And we bend the part.
After that, take a little more paper and use curly scissors to cut out a belt for the future dress. The part must be secured to the back of the workpiece. Regarding the petticoat, you can shorten the dress a little, or you may not.
Then we decorate the dress with a small bow and glue it to the future card. This delicate option is perfect as a holiday card for girls or mom.
Design ideas
To create a unique dress, you can use not only newspapers, magazines or notebook sheets, but also candy wrappers, unnecessary photographs or postcards. There are no limits in the world of creativity, and some designers use paper to create real masterpieces. We invite you to look at the work of several costume designers:
- Annette Mayer has created an interesting collection of historical paper dresses. The paper was selected with a floral print that imitates the design on cotton fabrics of the 19th century;
- Zoe Bradley works with paper like a real architect. She has created a collection of dresses that look like real works of art. These outfits are used for filming in glossy magazines and commercials;
- Jolys Paons creates her dresses from the pages of city telephone directories, which these days are no longer used for their intended purpose.
- Amila Hrustić creates outfits from geometric three-dimensional shapes, which she glues together in advance from plain white paper.
- Jum Nakao makes lace dresses by cutting out designs, just like we cut out snowflakes from paper for the New Year holidays.
Paper is a simple and affordable creative material from which you can create a fancy dress for school or kindergarten. Paper will allow you to show taste, a sense of proportion, and develop fine motor skills and imagination. From this material you can create flowers, cards, a dress and much more, which will delight both the creator and the audience.
Maslenitsa doll
IMPORTANT: Read in this article what crafts you can make from cardboard, paper and other materials for Maslenitsa with your child.
For a scarecrow – Maslenitsa from cardboard, take:
- colored cardboard
- colored paper
- white paper
- simple pencil
- ruler
- colored pencils, felt-tip pens, paints
- glue
Cardboard dolls for Maslenitsa.
- Carefully fold two sheets of colored cardboard, using a ruler, like an accordion, and then in half.
- Connect them together by placing one on top of the other.
- Use colored and white paper to make a face, hairstyle, and headdress for the doll.
- Connect the doll parts.