Principles of pattern construction
Any work begins with the choice of fabric. For dressing gowns in the summer-spring season, it is advisable to take materials that are very light and do not stick to the body. Silk is perfect, but if a person does not have experience in sewing products, then it is better not to work with it. The simplest option is cotton fabrics. For the winter season it is better to choose warm, terry materials. They are much more difficult to sew; you will definitely need a sewing machine and a little experience in needlework.
Silk wrap robe
The hardest thing is to find patterns for large robe sizes. It is important to sew loose garments to fit any figure, since robes should not restrict movement and fit closely to the body.
Note! A good solution for overweight ladies would be to build a basic drawing, which will be used to sew almost any item.
Children's version of the product
By changing the length of the element, moving the dart to the neck line, you can get any product.
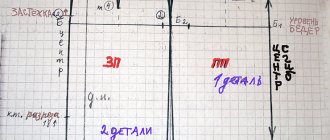
Back
It is necessary to place vertex A, measure from it the calculated value of 1⁄2 (OB + 6 cm). Next, place point B. Measure a line down from point A and place points C and D, thereby completing the rectangle.
For rollout, make AB = 4 cm and AC = 1/4 OSH.
From point B, draw down 4 cm. Make a shoulder line NK. The back pattern is completed, it goes through the ABCDK points.
Sleeve
From vertex B horizontally to the right, measure the line VD. Its sum can be AB, 2/3 AB or 3⁄2 AB. It depends on the person's preference.
From point D down, set aside 1⁄2 AB and indicate mark U. Finish the rectangle and mark O. Increase the arm segment until it intersects with point DU. Place segment G. The shoulder pattern is ready.
Wrap robe pattern
Before
From vertex A, draw down segment DV and mark point P. Make a horizontal line from it to the left. Using it, set aside a value equal to the length of the segment AB and enter the value Zh.
You may be interested in How to sew men's and women's shirts at the seams
Lower 8 cm from it and mark point M. Draw a pattern line for the front rollout. From M, draw a line to R. And measure 4 cm from it. The front of the robe is ready.
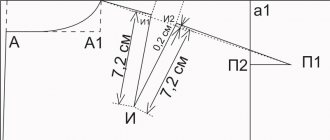
Collar
To sew a shawl style collar, you need to measure the total value of the segments IV and SI.
Measure the resulting length horizontally and put A and B.
Then draw AB = 15 cm; BG = 20 cm; GD = 9 cm.
You can choose to make any collars, such as a shawl or a placket. Here the choice depends on the person’s preferences; you can refuse it altogether.
The drawings of the main elements of the robe are ready.
What measurements need to be taken
Kimono robe
This home clothing is also wrapped, but has a number of features: in particular, it is not sewn fitted and assumes the presence of wide sode sleeves. There should also be a belt of standard width (2-3 cm) or like a Japanese obi - 10-15 cm.
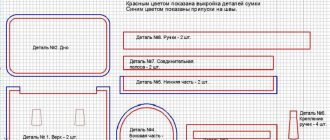
The pattern includes six elements:
- one-piece back;
- left and right shelves;
- sleeves;
- two belt parts.
Even for a novice craftswoman there will be nothing difficult here.
It is recommended to sew this product from silk, as tradition requires it. Although any lightweight fabric will serve as an alternative. The parts are made from rectangles, so it is difficult to make mistakes. The length of the belt is arbitrary and depends on how it is tied.
The length is up to the middle of the shin: this way the silhouette will be elegant and attractive. width is calculated as the “back width” multiplied by 1.2−1.5. The front and back halves are equal in width.
The bevel on the shelves, coming from the neckline, ends at the waist line; the lower points of the side slits for the sleeves should be approximately 15 cm higher.
The parts are sewn together like this: the fronts are sewn to the back with the top seam, and the fabric for the allowances is ironed back. Sleeves are added, and the shelves are connected to the back along the side seams. All that remains is to sew the elements of the belt so that it is tight.
A traditional kimono often has a sign on the back indicating that it belongs to a particular family. You can decorate your robe with something similar. For Europe, house symbols on clothes are not typical, so you can choose any attractive pattern or simply put your initials on it.
A kimono will be an original gift for any occasion. In a kimono, a woman becomes like a porcelain figurine. The young girl in this outfit is sophisticated, graceful and somewhat even mysterious; A woman of mature years commands respect, also for her noble posture and elegance.
The length of the kimono can be different, it all depends on your desire. Instead of buttons, strings and straps are used. The sode sleeve, traditional for a kimono, is much wider than the thickness of the arm. The sleeves are bag-like. The arm hole is smaller than the sleeve height. Thus, traditional Japanese clothing does not restrict movement. A kimono robe can also be made for a man.
We take measurements on the fabric
Step-by-step work process for applying measurements to the material:
- Fold the material in half and make a fold, this will be the center of the back;
- Set aside ½ of the largest volume you have from the bend and make an allowance of 8 cm. Draw a segment parallel to the bend, you get the center of the shelf;
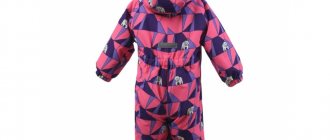
Men's version of the robe
- From the top edge draw a shoulder line. Make a back neckline. Depth 5cm, width 8cm;
- From this cutout make a shoulder measuring 10 cm and with a bevel of 2 cm;
- Take the measurement down from the back to the waist and mark it;
- Increase the waist line by 10 cm and divide the entire width of the drawing in half.
Enlarging the pattern
To enlarge a simple pattern for a wraparound robe, you need to follow the rules:
- Make horizontal lines along the front and back, sleeves, vertical lines along the chest;
- Cut along the lines;
- Add 1 cm to each part;
- Add 0.5 cm to the side elements;
- Trace new pattern lines;
- Trim.
As a result, we got 3 cm extra to the product, you can do more, it depends on the size of the person.
You might be interested in this: How to sew men's boxers: simple patterns for beginners
Sketch of a kimono with a wrap
LiveInternetLiveInternet
Monday, April 17, 2021 15:53 + to quote book Source https://ladyspecial.ru/dom-i-xobbi/svoimi-rukami/vy...te/vykrojka-khalata-s-zapakhom
Lounge clothes should be comfortable and loose, but at the same time you want them to look no less attractive than going out. This is especially true for the most common option for the home: a robe. If you can’t find an attractive model in the store, you can sew it yourself - for example, a wraparound robe: elegant, but spacious, and even though it’s not at all fitted, it emphasizes your figure well. How to sew a wrap robe? A simple pattern for a sleeveless wrap robe. A classic wrap robe can be made without side seams - the top seams, between the shelves and the back, are sufficient. In addition, it often lacks even sleeves and buttons, which are replaced by a belt. However, you can simply make a hidden fastener so that the product does not lose its lightness. For such a robe, it is recommended to take thin and not too smooth fabrics: cotton, chintz, cambric. A pattern for a wraparound robe can be created even without performing complex calculations: its silhouette is free, as a result of which special errors of 2-3 cm do not play a role. In addition, there are no darts, which also simplifies the sewing process. The basis of such a robe is a rectangle. The full width (segment MN multiplied by 2) is equal to the circumference of the hips with the addition of 5-8 cm. The segment NP, which marks the smell, is set to a width of 15 cm, and is relevant for the left and right shelves. The length of the product is chosen arbitrarily, so this value is not indicated on the pattern. The side height (from the waist to the bottom of the sleeve opening) is 17-20 cm, depending on how loose the sleeve should be. The same goes for neck depth. There is no particular problem in combining the parts: first process the sleeve opening with a zigzag or using an overlocker, then sew along the top of the front and back, and then also process the neckline and edges of the product. If you need to make a hidden fastener, it is recommended to place it at the intersection of the waist line and the vertical line from point N. The finished robe can be supplemented with bias tape running along the edge of the shelves and neckline. It is not recommended to process the bottom. For plain robes, the trim is cut out of the same material; for fabric with a pattern, a satin or satin ribbon is used so that it does not conflict with the main pattern. If you want to make sleeves for such a robe, refer to their classic pattern, but do not narrow them to the wrist: the main idea of wrap robes is lightness and freedom, which can be seen in every detail. Robe-kimono: pattern and recommendations for sewing This version of home clothing also refers to products with a smell, but has some features: in particular, the robe-kimono is not sewn fitted - it is always loose clothing, if you turn to traditional oriental clothing, and also involves the presence of wide sode sleeves. In addition, such a robe has a belt, which can be either a standard width (2-3 cm) or closer to the Japanese obi - 10-15 cm. The pattern of a kimono robe consists of 6 parts: a one-piece back, left and right shelf, as well as sleeves and 2 belt parts. Even a novice craftswoman can handle the construction. The recommended material for such a product is silk, as required by traditional rules. But you can replace it with another lightweight fabric.
All parts are built from classic rectangles, so it’s quite difficult to make a mistake here. The length of the belt is chosen arbitrarily, depending on how it should be tied. The most commonly used formula is OT+40(45) cm. The length of a classic kimono robe is up to the middle of the shin: it is with this calculation that the silhouette will look elegant and attractive. The back width is calculated as the “back width” multiplied by 1.2-1.5. In this case, the front half and the back half are equal in width to each other. The bevel on the shelves, coming from the neckline, ends at the waistline, and the lower points of the side slits for the sleeves should be approximately 15 cm higher. The parts are sewn together as follows: first, the shelves are stitched to the back with the top seam, and the fabric left for allowances is ironed back. Then the sleeves are added, and the shelves are connected to the back along the side seams. All that remains is to sew the details of the belt so that it is tight and empty inside, and the kimono robe is ready to move into the wardrobe.
How to sew a robe
The pattern of a robe with wrap sleeves is performed in several stages. Make a snare along the contours of the product drawing, along the center of the thigh, control marks and the contours of the entrance to the pocket, and make a spacer snare in the center of the back.
Next, you need to start sweeping the upper and lower side elements of the front along the contours of the entrance to the pockets. With the outer sides inward, sew the side and central parts of the front of the product along the contour of the relief, so that their points coincide.
Sew the shoulder and waist darts on the back, and then the various collar sections. Sew the side seams and try on the robe.
During the fitting process, you need to check the fit of the collar of the product, trim it if necessary, and hem the hem.
Sewing a pocket
Place the upper and lower elements along the contour of the entrance to the pocket. To process the bottom cut, the facing must be placed with the outer sides facing each other. Sew cut to cut and make a 1 cm seam.
Shawl collar
Fold the facing over to the inside, make a seam to form a border from the bottom element measuring 0.5 cm and iron it well. Next, you need to lay a finishing stitch at a distance of 2 cm from the bend of the element.
Sew the upper and lower side elements of the product along the contours of the pocket entrance.
Grind the middle element of the drawing from the side along the contours of the relief, mark the cut and iron it towards the center of the shelf. Make a finishing seam according to the relief. Sew and overcast all sections of the product. Next you need to process the collar and sides of the product. Using a facing, make sleeves and sew them into the armholes.
Unisex bathrobe
Now you can do a test fitting of the robe.
The hem of the product must be hemmed as desired and buttons must be sewn on.
The robe can have ties or a zipper; it is more convenient to use ties. They can be made from the same fabric or in a contrasting color.
How to make a robe pattern with your own hands?
A simple way to create a pattern for non-fitting items. From the shirt we get a drawing of a robe.
Step - build the outline of the shirt.
- We measure all the dimensions necessary for the drawing.
- Carefully transfer them to a sheet of whatman paper or wallpaper.
- Please note that the lines of the front and back are almost the same, but the lines of the neck are different.
Step - modify the drawing.
- Shift the shoulder line down 1-2 cm.
- Same with the underside of the shoulder.
- Extend the sleeve as needed.
- We shift the line of the neck of the shelf by 3 cm.
- We increase the width of the shelf for the smell.
- Please note that only the sleeve line changes at the back!
- Draw out a pocket of the desired shape.
- The pattern of the robe with one-piece sleeves is finished.
Details: Shelf – 2 pcs., back 1 pc. with fold, pocket 2 pcs.
Wraparound robe (size 54)
Required:
- Terry or corduroy fabric, thick knitwear - 3.5 meters.
- Threads to match.
- Adhesive padding for belt and collar optional.
- A scrap of fabric for the burlap pockets is optional.
It is better to make the collar double. To do this, circle it onto a separate part.
Progress:
- We lay out the patterns on the prepared fabric, chalk it, and do not forget about the allowances. Don't forget to cut out the pocket details separately.
- Cut it out.
- We sew the darts.
- We sew the shoulder seams, preferably with a backstitch.
- Sew the side seams of the sleeves.
- Sew the sleeves into the open armhole.
- We sew the burlap pockets to the shelves.
- Sew the side seams.
- We sew the collar piece to the one-piece collar. First, we trim its sections with trim.
- We process all cuts with binding.
- Fold the bottom of the robe, seam it at a distance of about 3 cm.
- Sew the belt as desired.
- Ironing.
Other models of dressing gowns are made in the same way.
A robe without a pattern made from a terry sheet
From a classic terry sheet you can sew a short bathrobe with a hood. There is no excess fabric left during sewing. Sizes will be limited to a person's hip size.
Building the back
The construction of the back in this product is one of the easiest. Below on the pattern are the locations of the back marks.
Scheme
Pattern of the front part of the robe
Fold the material in half and measure the middle center line. From it in both directions, set aside the measurements of the hip circumference. Measure the length of the robe, the length and width of the sleeves, the sketch shows how to do this correctly.
You might be interested in this All about patterning and sewing a sundress with buttons on the front
Attention! The armholes and shoulder sections need to be cut and two 16×16 squares made - these will be pockets on the shelf, you can make them larger, it all depends on personal preferences.