The question “how to make a choker around the neck with your own hands” is asked by real fashionistas. After all, this decoration, emphasizing the beauty of a woman’s neck, is unlikely to ever go out of fashion. This article will describe in detail the procedure for making tattoo chokers, chokers made of metal, wire, beads, ribbons and velvet.
This short necklace, only 35–40 cm long, can today be seen on both ordinary fashionistas and screen divas.
The choker first appeared in Europe in the Victorian era.
However, it came into particular favor during the time of the English Queen Alexandra, who tried to hide a small scar on her neck with a necklace of pearls and dark velvet.
- Types of chokers
- Materials used
- Tattoo choker
- Accessory from old headphones
- Metal choker
- Ribbon collar
- Choker made of velvet or fabric
- Beaded choker
- Choker tatting
- What to wear with?
A little history
This short necklace, only 35–40 cm long, can today be seen on both ordinary fashionistas and on-screen divas. The choker first appeared in Europe in the Victorian era. However, it came into particular favor during the time of the English Queen Alexandra, who tried to hide a small scar on her neck with a necklace of pearls and dark velvet. Such decoration, emphasizing the whiteness of delicate female skin, undoubtedly appealed to the fashionistas of that time. So, with the light hand of Alexandra, chokers are now firmly established not only in Europe, but also in the USA.
In the 20th century, Coco Chanel gave this decoration a second wind.
Chokers from her collection were made not only of velvet, but also of leather or silk ribbons and trimmed with a planchet (insert) made of precious metals
Today, choker necklaces have firmly settled not only on the catwalks, but also in the wardrobes of many modern women.
In the 20th century, Coco Chanel gave this decoration a second wind. Chokers from her collection were made not only of velvet, but also of leather or silk ribbons and trimmed with a planchet (insert) made of precious metals.
Today, choker necklaces have firmly settled not only on the catwalks, but also in the wardrobes of many modern women. For example, Princess Diana preferred pearl chokers with inserts of large precious stones. The images of Matilda from Luc Besson's film "Leon" or Angelina Jolie from "The Tourist" cannot be imagined without a black ribbon choker that fits tightly to the neck.
Advice! You can wear this necklace with almost any outfit. Thus, couturier John Galliano considers chokers to be a universal decoration that goes well with both jeans and evening wear.
Types of chokers
All chokers can be divided into main groups:
- men's: have a minimum of details and decorations;
- tattoo chokers: made by weaving from elastic threads or fishing lines of any color, stretchable, ideally adjacent to the skin and outwardly indistinguishable from the pattern on the skin; can be supplemented with small decorations: beads, rhinestones, etc.;
Tattoo chokers are made by weaving elastic threads or fishing lines of any color
Choker-leather cord
Ribbon decoration
Leather choker with heart buckle
- chokers on a cord, ribbon or chain with or without a pendant;
- jewelry woven from wire: unlike tattoo chokers, they are made more voluminous and have a larger number of decorations (beads, beads, stones, chains or rhinestones);
- chokers made of beads or beads;
- leather trimmed with buckles or metal decorations;
- made in the form of a small metal rim made of wire or precious metal;
- made in the form of a wide collar of velvet, lace, wool or metal strips;
- products knitted from yarn: soft and cozy, they are not only decoration, but also serve as protection from the cold.
Leather cord choker tied with a bow Wide velvet decoration
You can wear several models at the same time
Massive metal product
Advice! The choker should be the main highlight of the look. You should not complement it with too many other decorations.
Material selection
To weave a choker, you can use various available tools and more. Fishing line decoration is the most popular option. It is best to choose black, as white looks more elegant, especially if there are beads on it.
Small rubber bands are also often chosen as a material . They are sold as a set, in which you can additionally find a hook and instructions with which you can weave a choker around your neck.
If there is no money to buy materials, non-working headphones will be used. Only to create a choker tattoo with your own hands you need to choose not frayed wires.
Chokers made from satin ribbons look simply gorgeous. They can be additionally decorated with pendants.
It is quite difficult to make a choker with your own hands from beads. But if you have the skills to work with this material, then creating it will be quite simple.
The decoration can combine many rows and colors intertwined with each other. Patterns for weaving a beaded choker today are presented in a wide variety.
Many girls who do needlework can make a choker from threads. This type of jewelry will best harmonize with a woolen dress. If the choker is made of lace, then for young girls it is better to choose thin textile products, while older women should give preference to denser material.
Materials used
Today, chokers don't have to be jewelry. For their manufacture and decoration, wood, leather, metal, bone, stone, plastic, beads, beads, rhinestones, pieces of fur, floss threads, lace, fabric, including velvet, etc. are used.
Today, chokers don't have to be jewelry.
For their manufacture and finishing, wood, leather, metal, bone, stone, plastic, beads, beads, rhinestones, pieces of fur, floss threads, lace, fabric, including velvet, etc. are used.
This simple choker is easy to make yourself
The technology of weaving chokers is simple, so even an exquisite, elegant decoration can be made by yourself. They can be made in one or several tiers of any width - be thin and miniature or have the appearance of a fairly wide strip encircling the neck. Decorations can be strung on wire, fishing line, spandex (elastic polyurethane thread), or elastic bands.
Advice! A choker that is too wide will visually shorten your neck. To prevent this from happening, be sure to choose a blouse or dress with a sufficiently long neckline for this decoration.
Tattoo choker
Made from an elastic material (thread or spandex line), the necklace that fits tightly to the skin really resembles a tattoo applied to the skin. That is why this decoration received its name.
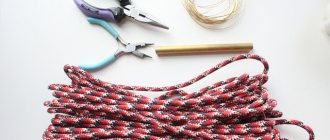
To create such a choker we will need:
- fishing line or elastic thread for weaving 2.5 m long;
- beads for decoration (optional);
- lighter.
A tattoo choker is made from fishing line, elastic thread for weaving, and even wires from old headphones (see section below)
It is necessary to secure the thread and tie loose knots on it one by one
The future decoration will consist of tied knots
Ready-made choker
To begin, the fishing line or thread should be bent in half and secured to a board or book using a stationery clip. Then we begin to knit the necklace, making regular knots alternately with the left and right threads. If desired, beads are periodically strung on the thread in the right places.
When the length of the choker is sufficient and equal to 35–40 cm, the excess threads are cut off. To make a simple clip-clasp on one side of the jewelry, they are fused together into a ring using a lighter.
Double tattoo choker
Advice! From the same material you can make a whole set consisting of a choker, a bracelet and a pair of elegant rings.
Double neck choker made of elastic bands
Now let's figure out how to weave a choker from rubber bands using a more complex method. The decoration turns out to be more voluminous and beautiful; it is called “fishtail”. This will not go unnoticed by others. But we do not recommend wearing it to girls who are too thin with a thin neck, because it may look too bulky.
If you wish, you can master other, more complex weaving techniques and make a choker with your own hands for each outfit. For example, this decoration with a pendant would be perfect for a Halloween costume!
To create a choker, simple available materials are used. A little patience and skill, and your bow will be significantly upgraded!
See a detailed review of chokers 2020. You will be surprised!
Accessory from old headphones
To make a tattoo choker, you can also use a long 1 mm thick wire from a charger or headphones. To get a quality necklace, don't just use headphones that are too worn and scratched. A choker made of flat wires will also look unattractive - it is better to use round ones to make it.
This elegant choker is made from old headphone wires. Do you want the same one?
Prepare wire, glue, nail polish, gold foil and brush
All we need to do is decorate the wire with gold
Transfer the foil to the product
Cover the top with clear varnish
And the choker is ready. You don't even need a clasp - you can tie it with a bow
The most difficult step is making the fastener:
- the simplest option for her is to leave the ends of the threads to tie them in a bow or knot, however, this method is suitable only for those with long hair; if you have a short haircut, protruding wires will be conspicuous;
- You can also make a fastener by twisting the wires; to do this, they are stripped of the winding and tightly intertwined with each other so that there are no small ends left that can catch on clothing;
- You can do it from a microphone; To do this, the ends of the wires are tied into knots, which are inserted into the microphone and snapped into place.
If desired, this decoration can be painted with colored or metallic spray paint. You shouldn’t do this before you start weaving - it may wear off during the process.
You can string any beads onto the wire
You can leave the wire long enough to wrap around your neck several times.
Advice! An interesting version of the necklace can be made from two wires of different colors, for example, black and pink or white.
Metal choker
This original decoration goes perfectly with denim or leather clothing. To make it, you can use fairly strong decorative wire that can hold its shape, metal plates for finishing with holes made in them, or wire rings, rivets, beads, etc.
Metal gold choker looks like expensive jewelry
Products made from precious metals, made to order in a jewelry workshop, can be used as decoration to complement an evening outfit
Jewelry in the form of a plate looks very extravagant
You can make such a choker yourself by simply bending the plate along the diameter of your neck.
Products made from precious metals, made to order in a jewelry workshop, can be used as decoration to complement an evening outfit.
Jewelry in the form of a plate, open necklaces of irregular shape with stones or balls at the end, or twisted metal jewelry look very extravagant.
Advice! Massive metal products can visually shorten the neck. Overweight women with small necks should avoid them.
Ribbon collar
For this type of decoration you need to take:
- satin or velvet ribbon, its length should be selected with allowance for hems;
- ring for attaching jewelry;
- pendant or coins with a hole made in them;
- clasp (carabiner) for jewelry;
- glue;
- scissors.
Let's make such a choker from velvet ribbon
Buy special fasteners in advance
Attach them to the tape
A super stylish choker is ready!
A pendant or coins are threaded into a small ring, which is secured to a ribbon. To fix the decoration, you can gently press it with pliers or secure it with a drop of glue. At the last stage of work, the ends of the tape are bent, a fastener is inserted into them, and then the tape is sewn up.
Advice! You can also secure this choker around your neck with a small bow. To do this, the tape must be purchased with a small margin.
How to make a choker from lace ribbon
This simple necklace combines 2 things: daisies and lace. It is made from black crocheted lace ribbon, but any kind of lace will work great. You can also get creative and include some beads, coins, pearl pendants, etc.
Whatever material you choose, you will need 35 cm. This is the standard length for a choker. Black, white and gold are the most versatile colors, but bright shades also look great.
What you will need:
- floral lace – 35 cm;
- chain – 7.5 cm;
- tape clips – 2 pieces;
- connecting rings – 2 pieces;
- carabiner – 1 pc.;
- 1 small pendant (optional);
- jewelry glue or clear nail polish;
- thin pliers.
Lace choker manufacturing technology
- Cut the floral lace so that there are full flowers on both ends. The tapered edge of the flower is perfect for securing in a clip.
- Place a bead of jewelry glue or clear nail polish on the end of the lace. Using thin pliers, secure the clip to the ribbon. Make sure the lace is held firmly in the clamp.
- Repeat on the other side.
- Insert the carabiner lock into the ring on the clip on one side.
- Insert the chain into the ring on the clip on the other side.
- Attach a small pendant to the end of the chain. This will allow your chain to hang neatly and not catch on your hair. In addition, the decoration will look more interesting from the back.
See how simple it is! You can also make this necklace with a longer ribbon that you can tie around your neck in a bow. Sometimes the simplest solutions are the most elegant!
Choker made of velvet or fabric
Women have long noticed that a dark velvet bandage can favorably emphasize the whiteness and tenderness of the skin. To make this aristocratic decoration you will need:
- a strip of velvet of the required width, about 50 cm long;
- pendant, medallion, brooch or other jewelry for use as a pendant;
- iron;
- sewing machine;
- threads;
- scissors;
- clasp.
Wide choker for the entire neck
Cut the fabric to the required length
Ironed it thoroughly
We sew or glue fasteners, for example, Velcro.
The principle of making such a velvet cloth is similar to the previous one. The only difference is that in order for the fabric not to fray and lie fairly flat, it must be sewn in half. To do this, cut out a strip of the required size, bend it in half with the wrong side out, iron it, stitch it, and then turn it inside out so that the seam is inside the choker. A clasp is attached to the ends of the decoration.
Advice! Velvet goes perfectly with lace. You can decorate such a necklace with a flower made of felt or finishing braid and thin chains to match.
Beaded choker
A stylish tattoo decoration can also be made from beads. For beginners, it is better to choose the simplest weaving pattern.
Beaded choker
You can make such a choker from both large and small beads:
- before starting work, the fishing line is attached to the eye of the lock;
- two needles are threaded through each side of the thread;
- beads are placed on the fishing line using a needle according to the chosen pattern;
- each bead is knotted with the help of a second thread, which is also first passed through the hole; in this way the beads are supported on both sides by two knots;
- after completing the work, the thread is tied in the eye of the carabiner lock;
- if necessary, the second row of the choker is knitted; after inserting the last bead, the thread is again secured in the carabiner.
Advice! You can decorate such a choker with pendants. Threads of beads can also be wrapped into strands, thus forming a more complex necklace.
Let's make a fashionable denim choker with beads
We need a piece of unwanted jeans
We decorate the choker with a denim fringe pendant
How to make a choker “Pigtail”
This elegant and original item is made using a 7-strand braid. The length of the product will allow you to use it as a bracelet in two circles or as a hair tie.
Materials:
- suede cord measuring 3 x 1.4 mm;
- fixing holder strips 20 mm – 2 pieces;
- clasp;
- 1.5 mm cord clips;
- round rings 5 mm;
- universal glue;
- pliers;
- scissors.
Instructions for weaving a choker
- Cut 7 strips of suede cord 50 cm long. Place them end to end. Use glue to secure them together. Wait for the glue to dry.
- Insert the connected pieces of cord to the end into half the circumference of the fixing clamp bar. Press it with pliers carefully so as not to leave marks on the metal. You can also protect the metal with a piece of cloth or paper before pressing it with the tool.
- To start weaving, take the 3rd cord from the left and thread it over the 4th and under the 5th sections. Bring it to the middle of the clamp bar.
- Then take the 6th cord and pass it to the left under the 3rd, over the 5th and under the 4th sections. Push the weave up and straighten it out.
Weaving pattern
Pass the wire on the left above the 2nd, under the 3rd and above the 4th segments on the right. Push the weave upward.
Take the cord on the right and pass it under the 6th, over the 5th and under the 4th segments to the left. Adjust the weave. Repeat the work with the cord on the left and then on the right side, performing the same steps.
Leave aside the outer sections at each end. Start braiding with 5 strands. Pass the cord under the 1st and over the 2nd pieces on the right.
Next, take the cord on the left and thread it under the 1st and over the second pieces on the left. Repeat the same with the cord on the left and right a second time.
Then go back to grab the two threads you left around the edges. Start weaving again with 7 strands. Repeat twice, then weave again with five threads. Repeat in the same sequence 11 times until you get a braid 30 cm long.
Shutdown
Cut off the remaining threads. Place a little glue on the ends and secure them together as you did in the beginning. Using pliers, attach a second clamp bar to the ends of the weaving.
Cut a piece of suede cord 30 cm long. Place one end of the piece in a 1.5 mm clamp. Connect the clamp to the 20 mm strip using a connecting ring. Form a knot at the end of the cord. Repeat the same steps on the other side of the product.
This technique can be used to create other jewelry such as bracelets, belts or headbands.
To make a bracelet, use 7 pieces, each 25 cm long. To close it, use a locking carabiner clasp. For the headband, use elastic bands instead of metal clips. Well, to make a belt, just make the weave longer.
Choker tatting
This technique is based on weaving lace fabrics using knots. The main elements of the pattern are rings and arcs. The technique is somewhat similar to the crocheting method. The only difference is in the way the threads are threaded through the knots.
The simplest method is to tie ready-made rings or arcs made of plastic or metal using two knots - direct and reverse. Those who are more familiar with the tatting technique can use more complex weaving methods.
Step-by-step weaving of a tatting choker
The necklace can be complemented with earrings woven using the tatting technique and elegant openwork rings made to match the main item. You can decorate them with fringe with beads.
Advice! When choosing a choker, you should carefully consider the entire look. An elegant necklace in combination with heavy, massive bracelets looks absolutely ridiculous. Wide chokers don’t look the best next to elegant, weightless brooches and earrings.
Braided thread choker. Hippie style
Another hobby of young needlewomen is weaving jewelry from multi-colored threads.
The work uses:
- floss threads of different colors;
- scissors and pliers;
- silver pendant;
- scotch.
Progress:
- The creative process begins with measuring the volume of the neck, adding 2-3 cm to the resulting figure for the tips of the choker.
- 6 threads of the same color are tied in a knot and secured with tape.
- Threads of other colors are tied to each of the 6 threads using simple knots; the color scheme is selected to the taste of the needlewoman.
- Sticking threads can be cut and hidden in the next weave, or you can leave short ends and get a nice fringe.
- The pendant must be inserted exactly in the middle of the thread, a clip-clasp must be attached with pliers, or the long ends must be left for free tying.
Advice! To prevent the pendant from darkening over time from contact with the skin, it can be pre-coated with colorless varnish.
In conclusion, a short video tutorial that will clearly demonstrate how to make a fashionable choker with your own hands from black floss threads.
What to wear with?
There are only two restrictions when wearing this jewelry:
The choker absolutely does not fit with business style: it will look out of place in the office
This necklace is designed to emphasize the beauty and shape of the neck, so when wearing it, it must be open; a V-shaped neckline in this case will be the most successful
The deeper the cutout, the more weightless and elegant the decoration will appear.
- The choker absolutely does not fit with business style: it will look out of place in the office;
- This necklace is designed to emphasize the beauty and shape of the neck, so when wearing it, it must be open; a V-shaped neckline in this case will be the most successful; the deeper the cutout, the more weightless and elegant the decoration will seem;
- A simple decoration, not burdened with too many details, will be ideally combined with everyday clothes - a T-shirt, a checkered shirt. For lovers of suede or leather clothes, as well as products made from coarse linen, you can choose chokers made of chains, stones or shells as decoration. An elegant choker made of lace or satin, as well as a product with an abundance of chains and studs in the “punk” or “rock” style, will go well with jeans and the same blouse.
- It is better to emphasize the femininity of an elegant dress or blouse with the help of a choker made of fabric, beads or pearls with a contrasting pendant or a tablet insert made of natural or artificial stones. A little black dress or a long floor-length evening dress will be complemented by a short gold or silver necklace or a velvet choker with a precious pendant.
It is better to emphasize the femininity of an elegant dress or blouse with the help of a choker made of fabric, beads or pearls with a contrasting pendant or a tablet insert made of natural or artificial stones
A simple decoration, not burdened with too many details, will be ideally combined with everyday clothes - a T-shirt, a checkered shirt.
Elegant red choker with pendant
Advice! The choker should be the only decoration on the neck. The only exception is long metal chains, which go well with such a shortened necklace.
How to make a choker with ties
Hinges are an original addition to accessories. Large or small, they are versatile and can be used in a variety of projects.
It will only take you 15 minutes to make this craft. Only initially you should get hole-punching pliers and eyelets.
You will need:
- leather cord – 0.5 m;
- a piece of natural or artificial leather;
- small eyelets;
- hole punching pliers;
- scissors/awl;
- flexible measuring tape;
- pen/marker.
Step 1
To get the correct necklace size, measure the circumference of your neck. Subtract 5 cm from this value. This will be the length.
The width of the product depends only on you. We assume that the optimal width should be no more than 2.5-4 cm. This is a dense fabric and can be quite uncomfortable if it is too wide.
With the resulting measurements, mark a rectangle on artificial or natural leather. Cut it out.
Step 2
Apply 1 or 2 eyelet rings evenly to the short edge of the leather fabric. Mark a dot in the middle of each piece with a marker or pen.
Use an awl to poke holes in the marked locations. Carefully insert the eyelet blocks into the holes.
Using hole punching pliers, squeeze the pieces tightly and secure them in place.
Repeat on the other side.
Step 3
All you have to do is thread the leather cord through the holes. Place the jewelry around your neck. Tie the cord in a bow or knot and leave the ends hanging freely.
Ready! It is so easy that you can easily make a couple of such products and give them to your friends.