Many people are interested in the question of how to sew shorts with their own hands. After all, now they have gained particular popularity. In this article you will find a detailed master class on sewing the product.
For hot summers, shorts are an indispensable item in the wardrobe, and not only in children's, women's, but also men's. Thanks to them you will feel comfortable. And they also look very remarkable. Such clothes can be bought at any clothing store, but sewing them will be much more interesting. They will fit your figure perfectly, because you will take into account your individual body features and adjust the pattern to your parameters.
How to sew shorts with your own hands: choosing material, preparing for sewing
When choosing material for this type of clothing, you should consider what season the item will be intended for. For summer, it is better to use light fabrics and preferably natural cotton (linen, light denim). It is also good and comfortable to wear shorts if the material contains elastane. They hug your figure beautifully and are stretchy.
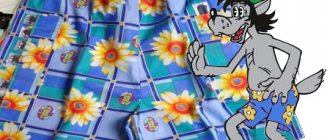
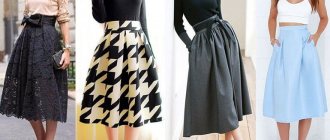
Blue shorts
Sewing does not require as much material as for a dress; it is enough to take a piece thirty centimeters longer than the length of the product. But the width of the fabric can be different, depending on the width of the hips. If the fabric is narrow, sometimes you have to take two lengths of shorts, especially when it is necessary to sew wide shorts, or a person has large hips.
Fabrics with a fine texture are often used to decorate the inside of pockets. When sewing light shorts from calico and linen materials, you can use the main fabric or lining fabric for pockets.
To decorate the belt, you may need a special strip of adhesive tape to add rigidity. It is advisable, if necessary, to prepare the zipper immediately, otherwise you will have to visit the store again to buy it.
IMPORTANT: Consider the characteristics of your figure when sewing shorts. Short models are suitable only for slender, long-legged girls. For women with size XL, sew loose-fitting garments.
How to sew using a paper pattern
To create a pattern in the burda style, just take a ready-made template of classic trousers for a girl and adjust the length, width and details according to it. It is worth pointing out that when using a trouser template, it is necessary to slightly reduce the waist size and lower it by 3 centimeters. Next, you need to narrow the side seams a couple of centimeters and measure the desired length.
You might be interested in “Bat” sleeve patterns for dresses, blouses and sweaters
Sewing the product
How to sew shorts with your own hands: measurements, modeling
There is no way to sew shorts without a pattern. The product must be modeled carefully. Don't skip any details in the diagram. The success of the further process depends on this.
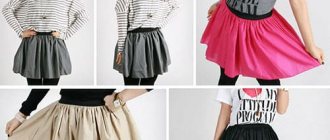
Shorts with belt
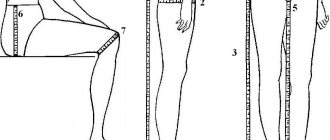
To get a beautiful thing, take the measurements correctly. To do this, measure:
- Half waist circumference - SWEAT
- Length of the item - DI
- Half hip circumference - FOB
- The length of the product along the side seam is DBS
- Waist height from the gluteal muscle.
For a loose fit, you can add 1-2 centimeters at the edges if you like things that are wide. For classic models, five centimeters are added, especially in cases where the material does not stretch.
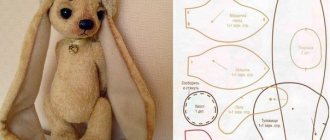
Product pattern diagram
Regular shorts are cut according to the trouser model. Above is a diagram of the pattern of shorts and breeches in one picture. It is perfect for loose items with elastic at the top without additional details.
Below you can see the finished pattern of wide shorts. It’s easy to draw, just insert your measurements on the lines of the waist, hips and make allowances for a loose fit.
Loose shorts drawing
Here are loose Bermuda shorts with mid-knee length. You just need to transfer it to paper in real size and you will get a size L model.
Ready-made shorts pattern
How to take measurements
The shorts pattern can be drawn on graph paper or a regular sheet. It will consist of two parts - front and rear halves. The product is sewn from four elements. To build the template, you will need to determine the dimensions, which are shown in the following diagram.
You need to measure:
- waist and hip circumference;
- bottom width;
- side seam length;
- seat height (distance from the waist to the subgluteal fold).
If you take a ready-made pattern, it is also worth clarifying everything: take measurements, determine their compliance with the workpiece. Modern computer capabilities greatly facilitate the process of selecting patterns. You can print the found template to the required scale, cut out the parts, glue the parts if they do not fit in A4 format, and work with them on the fabric. There are also special programs for creating patterns.
How to sew shorts with your own hands: sewing shorts
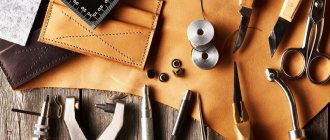
So, after cutting out the diagram on paper, prepare the following materials and tools :
- Fabric - jersey or denim with elastane
- Chalk, scissors, pins, needle, thread, belt tape
- Fabric for pockets, sewing machine, overlock, zipper.
Process steps:
- Transfer the cutting details from the paper to the material. Add two to three centimeters to the seams. For shorts with cuffs at the bottom, you need to add four to five centimeters to these cuffs.
- When all the details are outlined on the canvas, cut them out with scissors. Don't forget about the pockets, the inside of them and the belt.
- Start sewing the product by stitching along the sides. Just fold the cut pieces right sides inward. Make the seams symmetrically on both sides.
- Then sew the inside of the shorts - the legs. And make a stitch on the back, and overlock all the edges with a zigzag. This way the fabric will not fray.
- Sew a zipper in the front, if the snake is designed on the side, you can sew it there too; most often a zipper is sewn in on the side so that it is not noticeable.
- Next, work on the inside of the pockets, stitch them so that when you turn the pocket inside out, no external seams are visible. To prevent the fabric on the pockets from fraying, also overlock the edges of the parts. Now decorate the front part of the pockets neatly, evenly and beautifully.
- If the shorts are made of denim, then you need to do a double stitch with a special needle, make sure that they are even and then the product cannot be distinguished from real denim shorts. It also doesn’t hurt to rivet rivets, which can also be bought at fabric stores. Select the same rivets for the product.
- All that remains is to design the waistband and the bottom of the shorts. For the bottom, just fold the fabric twice, iron it, secure it with pins and make an even seam.
The belt needs to be made rigid to keep its shape. This product is suitable for the classic model of shorts (see picture below). Make the part as follows: fold the material for the part in half, so that the wrong side is on top. The waistband will tie and flare out slightly towards the edges to create a cute bow when you tie the waistband on your shorts.
Women's shorts
- Now, so that the belt does not move from side to side, secure it with pins after ironing it and sewing the seams.
- But that’s not all, you need to insert a tape into the inside of the product so that it resembles the shape of this part of the product and glue it inward with an iron. Then turn the belt inside out and carefully smooth out the seams and corners of the product. It's a good idea to cut off some of the inside folds to prevent the corners from being too thick.
- Now you should make a stitch on the top side of the front side to secure the edges of the belt. But before that, overlock the inner edges of the belt parts. This belt will be a decoration; it is put on top of the shorts, pulled through the loops on the shorts. The loops are sewn on the first belt, which is directly attached to the product.
- Denim shorts are often decorated with a leather accessory; such a belt with a beautiful badge is more suitable for a denim product.
Women's shorts: pattern
To sew the simplest product, it is enough to take as a template the drawing shown in the figure below. Print out the diagram or build it yourself, starting from the sides of the right angle.
To create a pattern yourself, take a sheet of graph paper or newsprint. The size should be slightly larger than the length of the future shorts and wider than the half-circumference of the hips, if you make a template for two elements on one sheet.
To construct the back (as well as the front) part of the shorts, draw a right angle. Vertically set aside the length of the side seam, and horizontally - 1/2 of the waist circumference. Set aside the width along the bottom edge. Mark the level of the seat line. Next, work on the crotch seams. The back waist can be made higher so that the shorts do not slide down if the butt is quite voluminous.
As you can see, you will have to cut out four pieces. The waistband and hem finishing are done using a hem. These shorts can have an elastic band at the top or a zipper at the front. Then you will have to build a place on the front part for the zipper and a one-piece slope. In the simplest version, you can do without a fastener.
Having mastered the basic model, it is easy to modify it at your discretion: sew pockets on the front and back, make a separate belt or belt, decorate it with rivets and zippers. It's actually not difficult to make women's shorts. The pattern can be used the same, but improved for different models.
How to sew shorts with your own hands: ideas
IMPORTANT: If you have learned how to make the basic pattern, you will be able to cut out other models of shorts for a seaside holiday or business ones - under a jacket.
Shorts
Shorts
Shorts
It’s not easy to figure out how to create shorts yourself the first time, using pattern diagrams and step-by-step guides online. However, if you have the desire to learn something new, you will succeed. The main thing is to have perseverance, patience and work for results. This way, in the future, you will be able to sew different models of clothing, and maybe come up with your own exclusive items that will be popular with customers.
Making a belt and decorating the product
Making a belt is easy. To do this, you need to fold the material in half with the wrong side up. Tie and slightly embroider it around the edges to get a cute bow. After constructing the finished model, you need to secure it with pins, iron it and stitch it. You must insert a ribbon inside the belt and glue it with an iron. Afterwards, you need to turn the belt out and carefully smooth out the seams with the corners. Remove internal folds to eliminate corners that are too thick.
Making a belt
Then make the top stitch on the front side to secure the waist edge. Before doing this, overlock the inner edges. The resulting belt will decorate the shorts. It can be put on top of them and tightened with loops. The loops are sewn on the first belt that will be attached to the item. Denim shorts are traditionally decorated with a leather accessory.
To decorate the finished product, you can use ready-made ideas from the Internet. For example, you can decorate shorts with lace ribbon, beads, and sequins. Items with machine embroidery on the pockets or ends of the product look beautiful. Shorts with stripes or knitted inserts look unusual. You can make things in patchwork style or try knitting them. You can decorate shorts with fabric paints, drawing an image of an animal or flower.
Decorating women's shorts with sequins
An original decoration idea is to sew lace fabric or satin to the model. Shorts with satin ribbons and chains, inserts made of fabric of a different color and texture look interesting. Fashionable are models with braid decoration or holes processed along all edges with chains. Things with voluminous details look new.
Decoration with machine embroidery
Today you can make women's high-waisted shorts with your own hands without much effort. To do this, you only need to select materials and fabric, prepare the fabric for sewing, create a pattern and perform the necessary work step by step.
Constructing a pattern
The main element in tailoring is the pattern. With its help they sew the desired product.
Based on matching shorts
You can make one with your own hands using old trousers . You can work directly on the fabric.
Advice . If you are making a pattern for the first time, it is recommended that you first apply the base to paper, cut it out, and then transfer it to the fabric for sewing.
- The trousers must be folded in half, clearly highlighting the seams.
- Before making a stencil, you need to measure a few centimeters from the main outline, on all sides. Thanks to this, the finished product will be free and voluminous.
- You can leave a few free centimeters at the waist. When worn with a rag belt, the accordion belt will look very organic.
- After drawing the drawing, carefully cut it out. The pattern is ready!
- If the workpiece was made on paper, it should be carefully transferred to the fabric prepared for sewing shorts.
Using ready-made drawings
If you are too lazy to prepare patterns, it is not difficult to find ready-made material. Many sewing magazines or specialized websites on the Internet include fully prepared patterns.
To do this, you just need to find the right size, print or cut out the blanks.
And you can start working.