Flat surface
- Start at point A, then pass the needle through point B to point C. Gently pull the thread through the fabric
/www.joxin.club/wp-content/uploads/2017/11/vyshivka-gladyu-dlya-nachinayushhih-poshagovo-1-300×191.jpg" target="_blank">https://www.joxin.club /wp-content/uploads/2017/11/…ushhih-poshagovo-1-300×191.jpg 300w" width="660″ /> - Pass the needle through point D to point E, while placing the stitches close together.
- Continue filling the design with stitches, pulling the threads evenly so that the surface of your embroidery is smooth.
/www.joxin.club/wp-content/uploads/2017/11/vyshivka-gladyu-dlya-nachinayushhih-poshagovo-3-300×119.jpg" target="_blank">https://www.joxin.club /wp-content/uploads/2017/11/…ushhih-poshagovo-3-300×119.jpg 300w" width="660″ />
Artistic surface
- Start at point A, then insert the needle into point B. Then from point C, move the needle to point D. Alternate long and short stitches from left to right vertically.
- Now make only long stitches vertically, filling the desired areas of the fabric with them. The last row will consist of short stitches.
/www.joxin.club/wp-content/uploads/2017/11/vyshivka-gladyu-dlya-nachinayushhih-poshagovo-2-300×131.jpg" target="_blank">https://www.joxin.club /wp-content/uploads/2017/11/…ushhih-poshagovo-2-300×131.jpg 300w" width="660″ />
Shadow surface
- Start at point A and move the needle to point B. Then through point C, move the needle to point D. Work on the first row until you finish it.
- To make the next row of stitches, you need to insert the needle between and just above the bottom points of two adjacent stitches of the previous row. Try to make the stitches even.
/www.joxin.club/wp-content/uploads/2017/11/vyshivka-gladyu-dlya-nachinayushhih-poshagovo-4-300×130.jpg" target="_blank">https://www.joxin.club /wp-content/uploads/2017/11/…ushhih-poshagovo-4-300×130.jpg 300w" width="660″ />
Useful tips and advice for beginners
To make your embroidery high quality and the needlework process enjoyable, pay attention to the following details:
- If you are a beginner, it is better to choose a thin yet dense fabric. Ideally - calico or cotton. But it is better to avoid silk and satin at the initial stages.
- Before starting work, you need to carefully iron the fabric. Thus, the drawing will be neat and even.
- Select needles according to the thickness of the threads. Remember that a very thick needle will leave puncture holes in the fabric.
- Universal threads for satin stitch embroidery are floss. It is better to choose them for a beginner. Depending on the thickness of the fabric, floss embroidery can be made of one, two or more threads. If the fabric is too rough, use wool threads. To decorate very delicate and delicate works, you can use satin or silk threads.
- You can embroider designs of different sizes, but for beginners it is better to choose small pictures or ornaments that can be filled in width with a seam of one stitch
/www.joxin.club/wp-content/uploads/2017/11/Vyshivka-gladyu-7-300×222.jpg" target="_blank">https://www.joxin.club/wp-content/uploads /2017/11/Vyshivka-gladyu-7-300×222.jpg 300w" width="660″ />
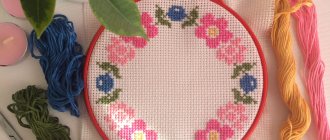
Most of us are introduced to the world of embroidery through cross stitch - it is popular, widespread, easy to do, varied and accessible to everyone without exception. But, despite the fact that cross stitch gives no less joy of creativity than any other type of needlework, it is limited by its own rules, since it is based on a pattern, and the result is always predictable.
Photo: Trish Burr
This is why many needlewomen, who previously only embroidered with cross stitch, are so intrigued by satin stitch embroidery, which promises not only complete freedom of action, but also fantastically beautiful results! But, alas, it is this very “freedom of action” that turns out to be the main obstacle on the path to success - having neither a clear scheme nor a key, many simply do not know what to do, where to start and what to undertake. In the worst case scenario, having tried it once and, due to inexperience, received something tight and unattractive, they give up satin stitch forever, firmly convinced that this type of embroidery is not for them. This is absolutely not true!
In this material we will try to figure out what is needed in order to learn how to embroider with satin stitch and what rules of satin stitch embroidery for beginners must be followed in order for the result to please you!
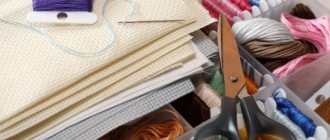
Preparing for satin stitch embroidery
If you have cross-stitched before, then you already have most of the necessary materials. Your most important tool is, of course, a needle. Conventionally, embroidery needles are divided into two groups - with a blunt tip and with a sharp one. Cross stitch uses needles with a blunt point, so first of all you need to choose a comfortable pointed needle for hand embroidery. For embroidery on light silk and cotton fabrics, small sharp needles No. 1-3 are suitable, for fabrics of medium thickness (thin wool, cotton) - No. 4-8, for thick fabrics (cloth, drape) - No. 9-12 .
As for threads, for a beginner in satin stitch embroidery, the floss you use for cross stitch will be quite sufficient. If this is your first experience in needlework, just select the necessary colors from the assortment of such, DMC, PNK im. Kirov, Anchor. Don’t try to buy expensive threads right away - the result won’t be better! At least initially. If this does not convince you, then remember the famous example about beginning photographers who are sure that if you buy an expensive SLR camera, you will immediately start shooting like a professional, although in fact the talent is not in the technique, but in the hands holding it. Absolutely the same is true for embroidery.
Photo: Chloe Giordano
Next we move on to the fabric. If you were going to embroider on a finished product, first make sure that it is not made of stretchy materials - such fabrics are not suitable for a beginner, and you run the risk of disappointment if you start your satin stitch exercises with such a task. It will be easiest to embroider on cotton or thick linen.
The most ordinary hoops will do, but you should remember an important rule - the satin stitch requires strong tension. If you could embroider with a cross even on your hands, then with satin stitch never allow the fabric to sag. If your hoop has a bad plastic fastener, buy one with a reliable metal screw.
Embroidery design
There are no patterns in satin stitch embroidery, since absolutely any design can be embroidered. For the first time, choose something that is not too small, without a lot of details and not very large - you must be sure that you will finish what you started, even if it is difficult.
Transferring a design to fabric for embroidery
You can read about how to transfer a design onto fabric in our detailed guide – How to transfer a design onto fabric for embroidery.
How to secure the thread at the beginning and end of embroidery
In embroidery, as you know, the presence of knots is not welcome, so there are several techniques for securing the thread.
Method 1. On the wrong side, make a stitch so that a small tail remains, then make another stitch across (Fig. 1a), after which the tip of the thread is hidden under the stitch so that the working thread tightens it securely (Fig. 1b).
Method 2. If you embroider with two threads, then, after threading the thread folded in half into the eye, grab 2-3 threads of fabric onto the needle, then pull the thread and thread the needle into the resulting loop (Fig. 2a), tighten, firmly securing the thread (Fig. 2b).
Method 3. If you are finishing the work, then the thread can be secured by making a small broach under the stitches made from the wrong side (Fig. 3a), the tip is trimmed with scissors. In the event that you simply run out of thread while working, you can secure the thread from the face by making a few stitches in a place that will later be covered with embroidery (Fig. 3b).
Main types of satin stitches
The most basic and common type of satin stitch is a simple flat stitch . This is a double-sided (i.e. the back looks the same as the face) stitch in which the threads fit tightly together, leaving no gaps. The satin stitch can be straight (Fig. 4a) or oblique (Fig. 4b), but in any case you place the stitches depending on the shape of the embroidered part: for example, in leaves - from the edge to the middle, in petals - from the edge to the center (Fig. . 5).
Photo: Royce's Hub
Tip: in order not to get confused and forget during the process in which direction and at what angle the stitches should lie, draw guide lines directly on the fabric, as in the photo above.
The next technique you will need is the so-called short and long stitches . Using this type of satin stitch, you can create a smooth transition of color - the main thing is to choose the right shades of thread and with each new row introduce a lighter or darker tone (which is why this type of satin stitch is sometimes called tone satin stitch ).
The satin surface with flooring allows you to create convex, more voluminous details. In order to perform this technique, you need to lay the first layer of stitches (it does not have to be dense and continuous), and then cover it with a second, “front” layer.
It should be noted that in many cases, before filling a piece with satin stitches, craftswomen embroider its outline - this helps make the edges smoother and adds a little volume. To embroider contour lines, use either a split stitch or a chain stitch .
For more confidence in your abilities, be sure to watch training videos on Youtube!
Basic mistakes when embroidering with satin stitch
You have prepared the necessary tools and materials, figured out the sequence of actions, got to work and... the result is not happy!
The reason for this is not your lack of talent for satin stitch embroidery, but technical flaws that can and should be corrected.
If, after completing the embroidery, your fabric is pulled and wrinkled around the embroidery, there may be three reasons for this - 1. you did not tension the fabric on the hoop well enough (it should be taut like a drum!) 2. you pulled the thread too tight during the embroidery process (stitches should be tight close to the fabric, but do not need to tighten them like a knot). 3. This is a feature of the fabric, which is leveled out after washing and ironing (this reason is less common than the first two, but it also occurs).
If the fabric shows through the embroidery, then there is only one explanation for this - you are not laying the stitches tightly enough. In satin stitch, the stitches are so close to each other that there cannot be any gaps between them, so such a defect can only be corrected with perseverance and patience.
Satin embroidery: lessons for beginners
If you are ready to move from theory to practice, practical classes in satin stitch embroidery from scratch will help you master this type of needlework.
Lesson 1. Technique of short and long stitches
This technique allows you to create smooth color transitions, which brings satin stitch embroidery closer to painting. If you are seriously wondering how to learn to embroider, you cannot do without this technique.
Lesson 2. How to embroider a petal using satin stitch
Let's move on to a more complex figure, putting into practice the skills learned in the previous lesson.
In general, satin stitch embroidery for beginners is not the most difficult science, but if you encounter problems during the work, leave your questions in the comments and we will definitely answer them!
Author of the material: Red thread
Step-by-step master class on 3D flower embroidery in satin stitch for beginners
Have you already learned how to embroider with satin stitch, but want to add some zest to your work? Then carefully watch this video, the heroine of which will show how to make a drawing more realistic using the “3-dimensional embroidery technique.”
Now, having mastered the three main types of satin stitch, you can safely get to work. Remember that it is better for beginners to start embroidery with simple patterns, gradually complicating their patterns.
Over time, when you become a professional in your field, you can decorate many things with satin stitch embroidery: carpets, bed linen, clothes and even accessories. And if you combine this type of needlework with some others, for example with rhinestone embroidery, ribbons or beads, you can get an entirely exclusive ornament.
Main types of satin stitches
Before starting work, novice needlewomen need to study what types of stitches exist in the satin stitch technique.
Straight stitch
Straight stitch is mainly used by needlewomen for large details or processing image lines. The size can vary from one millimeter and reach seven to ten millimeters, while the direction of the seam is chosen at the request of the craftsman.
Satin stitch embroidery on clothes
Split stitch
It is used for processing contours and for filling space. The first stitch is embroidered from the front side to the back side. Then, from the wrong side, the needle enters the center of the previous seam, dividing it.
You might be interested in this: How to sew a beautiful doll from threads and fabrics
Loop stitch
It is done from left to right by moving the needle from top to bottom. The thread must be brought to the front part at the bottom stitch mark, and then embroider the stitch with a needle in the direction from top to bottom (the thread should be under the needle) and pull the working thread until a loop appears.
Stem seam
This type of seam is made from stitches that overlap each other every other stitch. This technique is the oldest.
Making a stem seam
It has this name because plants and flowers used to be embroidered using this method. It is practical to make the seam from bottom to top or from right to left. The needle and working thread points back, but comes out onto the face of the fabric approximately in the center of the last stitch.
Holbein seam
Quite often used in the blackwork technique. Embroidery with such a seam can be seen in the paintings of the German artist Hans Holbein, which is why it is called that.
Additional Information! Below you can read about the satin stitch technique and the main nuances of the work.
Interesting mini cross stitch
Mini cross stitch does not have a specific pattern; there can be many of them, and the choice depends on the experience of the artist and desire.
The schematic pattern can be varied. You can make a ring, flowers, fairy, angel, temple, birds and much more. Minimalism embroidery is used in a wide variety of areas. Can be used both for decorations and to make a pattern on clothes.
Mini cross stitch
When embroidering a pattern, you can use any available materials that will give the embroidery a more aesthetic appearance, for example, beads. There are several main types of patterns:
- folk;
- geometric;
- floral.
You can also use children's patterns and small patterns in cross stitch. Typically, such patterns are used when embroidering patterns on curtains, paintings, bed linen and clothes. The pattern can be represented:
- pencils;
- butterflies;
- cars;
- bows;
- hearts;
- nipples;
- with mice.
You may be interested in Cross stitch on fabrics: which material is best suited
Scheme - a gift from a bear
Experienced craftswomen love to embroider bear cubs. Typically, such designs are used for embroidery on children's clothes and scarves. The child will be happy with such a gift.
The circuit is small in size, so a minimum number of threads are used. You need to take the floss threads and fold them 4 times. It is better if monochrome is preserved in such embroidery. A cool little bear gives the pattern a childhood touch.
Scheme of a gift from a bear
Sets for mastering embroidery
For beginners, it is advisable to take small sets. With large drawings, with as few small details as possible. For example, flowers, fruits or simple patterns are perfect. Prices for one small set start from 300 rubles. Therefore, you can find a suitable kit to suit your budget. Ready-made satin stitch embroidery kits have different types of complexity. It is better for beginners to take the first level of work.
An embroidery kit usually includes:
- needles to suit the size of the fabric;
- threads for drawing;
- instructions for use.
Important! Kits for beginners are sold with a ready-made pattern on the canvas. Patterns also often indicate stitch directions to create a smooth pattern. Therefore, this option is great for newly minted craftswomen.