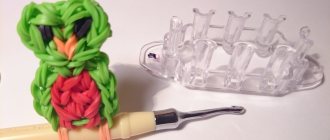
Weaving figures on a slingshot
An easy weaving that you can do in 10-15 minutes is slingshot work.
To weave a bunny, you will need: 58 Rainbow Loom in the main shade, 3 black elastic bands for the eyes and nose, a slingshot, a hook.
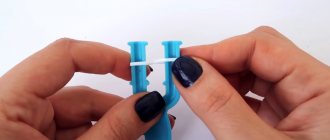
We put the first elastic band on the right side of the pin, wrapping it three times. Next, put on a pair and remove the bottom layer in the middle.
Using this technique, we perform three more rows.
We transfer our work to the right side of the slingshot, and leave the first loop on the left. Then we put on a couple more elastic bands of the main color and throw off our very first triple loop.
We throw on two more elastic bands of the main color, and send the previous ones to the center. We transfer all the loops again to the right pin of the slingshot.
We find three turns and put it on the left side again. We weave our work again four times using the “Fishtail” technique. Then we put on another pair of elastic bands of the main color and throw the entire torso into the center.
In order to weave the head, we put on a pair of yellow elastic bands and remove the previous ones in the middle. Let's move all our work to the right side.
On the left side we put on a black elastic band, wrapping it three times. Then we throw on 2 yellow ones.
We throw off all the rubber bands that are on the slingshot and transfer our work to the left column.
We begin to weave the ear. To do this, screw the yellow rubber band 3 turns on the right column. Then put on a pair.
We lower the turns to the center and weave two more layers using this technique. Throw on a couple more rubber bands. The eyelet should be on the right.
We insert the hook into the very first loop from which weaving of the head began. We put it on the left side of the slingshot.
We throw on a couple of yellow elastic bands and lower everything on the left side. We wind the black elastic band on the right column 4 turns. Throw in a couple of yellow ones.
We throw the two bottom rows into the center.
We put on another pair, and take off the lower ones on the left side in the middle. We send the bunny to the right side.
We insert the hook into the first loop and place it on the opposite pin of the slingshot. Using our technique, we weave 2 rows of yellow elastic bands and begin weaving the eye.
We twist the elastic bands on the right column 4 turns. Next we add yellow ones.
We remove the black and two pairs of yellow rubber bands that are on the left side in the center, and transfer everything to the right pin.
We put on the yellow elastic band by twisting it three times on the left column. Then we throw on two more and remove the revolutions to the center. We make three more rows of elastic bands according to the same pattern, and then connect them by throwing on two more elastic bands.
We throw 2 elastic bands into the middle on the left side and 6 yellow upper elastic bands from the right pin.
We put on a single elastic band, onto which we throw everything off the slingshot.
We transfer the entire product to the hook and form a knot. Next, using a crochet hook, we correct the nose and eyes of our bunny. The figurine is ready! Also watch a great video for inspiration to remember everything much better.
First stage
We take a slingshot and twist an elastic band of the main color onto it 4 turns. We thread the hook inside the formed ring, pick it up and pull it through it. Return the 2nd end to the hook and pull everything through 1 loop. There should be 1 loop left on the hook.
Making the head
We also continue to cast on loops, there should be 6 of them in this row. We find the very 1st loop, thread a hook through it and through the last elastic band. We return the second end to the hook.
We put a clip on 1 loop of each row so that we know where it begins. We thread the second loop in the same way - into the first, making 2 from 1 loop. The next loop goes into the adjacent one - into 2 from the first row. Further according to the scheme:
- 2 elastic bands are knitted into each loop of the 1st row. In total there should be 12 loops in row 2.
- Remove the clip and put it on 1 eyelet of the next row.
- In row 3 there are only 18 loops, and in row 4 there are 24. In rows 6-13 you will get 30 loops each.
- Now 1 elastic band is threaded into each loop. This will be a head lift.
- In row 14 there is already 1 loop, in row 2 we knit 1 elastic band. And through 3 and 4 loops we thread 1 elastic band.
- In the next 3 loops - 1 elastic band. We knit 4 and 5 together and leave them on the hook. Continue using the same principle until the end of the row.
In the 15th row there will be 18 loops, and in the 16,17,18 - 12 loops.
Weaving of the torso
In the 19th row there will be 18 blue loops, in the 20th - 25th - 24 loops each. We weave the 26th row of 18 loops, 27 of 12.
INTERESTING: Toys made from rubber bands on a slingshot
Starting from the 28th row, close the loops evenly. Leave a small hole and stuff the bunny's body. We knit the 29th row, hiding the tail from the loop inside.
We don't use the machine
But you can also weave without a machine. This is not difficult and even a beginner teenager can do it. This weaving will help develop fine motor skills and logic. In this article we are weaving a bunny on a hook using the lumigurumi technique.
We will do the work using a lumigurumi ring. To make it, you need to wind the elastic band on the hook three turns.
We hook one elastic band and pull all the loops through this elastic band.
We draw the far loop under the near one so that only one remains.
Using a hook, we go into 1 elastic band again. We pass it through the first three loops.
Once again we pull the loop under the rest.
We repeat these manipulations until six loops come out.
The last elastic band is on our hook; we secure it with a clasp. Then we work through these loops. Each time you secure a row, put on a clip. We weave the second layer with the addition: we weave two elastic bands through each loop. At the end we will have 12 loops. We weave the next row, like the first, without additions, catching the half-loop with a hook.
What we end up with is a foot.
To increase the height of the part, you need to weave it in this way: 1 elastic band in each loop of the second layer. We make the second figure in this way.
We fill in our details. We insert the hook into the second loops and attach our blanks.
We work according to the same scheme, but now we weave the body. We fasten the parts, and then weave one elastic band into a loop, not clockwise.
Do the next row the same way. Then for the next layer we reduce the number of loops by half: we draw a Rainbow Loom through two loops.
Then we weave the row in the usual way. We weave one layer with a decrease, and then 6 rows without a decrease. Next, we make a complete row after 12 loops remain. Each loop should be decreased.
We make our ring from six loops. We weave the second row with white elastic bands with a decrease in each loop, and 3 through one. Violet weave for another 5 layers. We form the eyes using beads or elastic bands, as well as the nose with two elastic bands.
Then we make one layer with a decrease through a loop, and the next one we decrease in each loop. We stuff it using padding polyester or cotton wool.
To make the ears, we make a ring with three loops. Next we work 2 Rainbow Looms in a loop in the opposite direction. When there are six loops, weave in the opposite direction.
We work until the ears are the desired length. We attach these parts to the head.
We make a chain of 10 loops, but during weaving you need to twist the elastic band twice. Attach the arms and head to the body. A loop remains, we insert it into the figure.
Second phase
Let's start making the ears and paws.
Making ears
We wind the white elastic band onto the machine 3 turns. Cast on 8 stitches for the first row. We put on a clip to differentiate it from the 2nd row. Then we work in the following order:
- In loops 1-4 we knit one elastic band at a time. In loops 5 and 6 we stretch 2 rubber bands. This will make the ear flatter. Then, to the end of the row, one elastic band at a time. There should be 10 loops in total.
- In 3,4,5 and 6 each time we increase the number of loops by 2.
- From rows 7 to 10 we make 18 stitches.
- At 11 and 12 - 16.
- In the 13th and 14th rows - 14 each.
- At 15 and 16 - 12.
- At 17, 18 and 19 - 10.
- From 20 to 23 rows - 8 loops each.
We use the same principle to make the second ear. Be sure to measure them so that they are the same size.
We weave paws
We wind a white elastic band around the slingshot 4 turns. We make 6 loops. Further, the principle of increasing and decreasing loops remains the same as in previous cases. One part of the foot should be white, and the second should be blue.
In the lumigurumi technique there is no front or back side, so there is no need to turn it inside out. Leave a small hole and stuff the paws. The lower legs will be larger than the upper legs.
How to weave a bunny out of rubber bands on a machine with your own hands
The easiest way to weave a rabbit from rubber bands is on a machine. To work you will need:
- special machine;
- 2 hooks for weaving;
- elastic bands of different colors;
- padding material;
- black bead.
To make a bunny with oblong ears from rubber bands, you should start by preparing the machine.
Only 6 side posts are needed to work. Making the body of a hare.
At the beginning of weaving the rabbit, throw elastic bands twisted in the number 8 over the posts around the entire perimeter - there will be 5 of them on all sides. We lower the 1st row on posts and throw on 2 pieces. There is no need to twist the elastic bands - they fit smoothly onto the posts.
The hare can be made one color or spotted, including striped - it’s a magical character, so you can choose any colors you want.
When the 2nd row is completed, you will need to remove the bottom elastic bands with a crochet hook and lower the row again with your fingers.
After that, put 5 lines of rubber bands on the posts using a simple technique. Now the rubber band hare's body is complete. It's time to start making the head. We braid the head.
To weave the head, elastic bands are removed from the edge of the loom and transferred to the adjacent post. On this same column, the lower elastic band is transferred to the adjacent row, and all the lower elastic bands are removed. Do the same on the other last columns.
We continue weaving the figure with elastic bands on the remaining eight columns.
You need to put a row of elastic bands on the pins without twisting them, then remove the lower elastic bands and put on the same row again. We twist the ears and nose.
Next, an entertaining and serious moment begins in weaving a rabbit - creating a muzzle and ears. For the nose, we take a black elastic band and hook it on the hook 4 times, and then we pull these 4 loops through the pink iris. Place a black bead on a black elastic band; this will make the hare’s nose even more beautiful.
Black and pink elastic bands twisted together are put on 2 posts in the middle. Then put another row on all the posts again and discard the bottom elastic bands.
To weave the eyes, throw a black elastic band 4 times on the hook and pass a pink elastic band through it, which must be put on between the last and middle column on both sides. After that, alternately put on 2 rows of elastic bands again and remove the bottom row.
Now the most important thing in weaving a hare from rubber bands is the ears. To make ears, throw the elastic band onto the hook three times and immediately pull 2 elastic bands through it. Then skip 2 more elastic bands. Do this twice and place the finished ears on both sides. To avoid mistakes with weaving ears, follow the video instructions. There you will also find lessons on weaving on a small loom.
When the ears are woven, you need to put on another row of elastic bands and remove the bottom ones.
Then hook any loop and pull it through all the loops. Turn the hare inside out and tighten the elastic bands. We stuff the toy.
All that remains is to stuff the Easter bunny with cotton wool. After that, collect the loops on 2 hooks, add more cotton wool, pull the elastic through all the loops and tighten.
How to weave a bunny from rubber bands?
Let's prepare all the necessary materials and begin) We hold the mini-machine in our hand with the grooves in the pins towards us so that it is comfortable to grab the rubber bands with the hook.
On the right side we wind one yellow elastic band, wrapping it three times, and then we put two on both pins.
We put the first rubber band (3 turns) in the middle and put on the next pair.
Now we lower the previous rubber bands to the center on both sides and throw another third pair on the posts.
We weave, throwing off the bottom ones, and then put on the fourth pair of yellow ones.
Having thrown off the lower ones once again, we transfer the workpiece to the right column, and insert the hook into the triple initial elastic band.
We lower the triple one from the hook onto the left pin, and then put on another pair (this is the first pair of the next piece).
Let's lower the triple elastic band into the center on each side, and then add two more yellow elastic bands.
We send the previous ones to the center on each side, and then we throw on two more yellow elastic bands.
We lower the lower (previous) rubber bands again, and then transfer the second blank to the right side of the slingshot.
We find a triple elastic band and put it again on the left pin.
We make the next blank in the same way, weaving 4 pairs of elastic bands using the fishtail technique.
The bunny's body is almost ready, all that remains is to connect the woven chains. To do this, we’ll put on two more yellow ones and send all the rubber bands on the slingshot to them.
Now let's start weaving the bunny's head. We’ll usually put on two yellow ones, and throw off the previous ones.
Let's throw a couple more yellow ones on the slingshot. We throw off the previous ones, and transfer the elastic bands from the left side to the right.
Making an eye for the bunny. On the left side of the slingshot we wrap one black one three times. And then we’ll put two yellow ones on both columns.
We lower three turns of black on the left and both lower pairs of yellow on the right side, and then transfer the elastic to the left side.
Now we are making a bunny’s ear from yellow rubber bands. We start by winding the rubber band three times on the right column. And then we’ll put the first pair on both posts.
Three turns weave two more pairs of elastic bands.
We connect the elements by throwing on a couple more yellow ones. Let's take off all the lower elastic bands so that the eyelet is on the right.
We continue weaving the head. We insert the hook into the loop from which we started weaving the head and throw this loop over the left side of the slingshot.
And then we throw on a couple of yellow ones.
We lower the loop on the left.
Now we wind the black rubber band 4 turns on the right column.
Let's put a pair of yellow ones on the slingshot.
We lower the black elastic band and the previous yellow ones.
Let's throw on a couple more yellow rubber bands, and send the previous ones on the left to the center.
Let's move the elastic bands to the right side.
We put the hook back into the loop from which we started making the bunny’s head and put it on the left pin.
We weave a couple of yellow fishtails and make a second eye.
We wind the black one on the right column, and then we throw a couple of yellow ones on the slingshot.
We lower the black turns and two pairs of yellow ones on the left side.
We put the left elastic bands on the right side and weave the second eye.
On the left side of the slingshot we wind the yellow rubber band three times, and then weave it in the same way as the first eye. We weave three pairs of elastic bands, and then connect the elements using another pair of yellow ones.
We lower a pair of elastic bands on the left, and 3 pairs of top yellow ones on the right.
We throw on the last single elastic band, onto which we send all the lower elastic bands from the slingshot. We move one of them to the adjacent column, and then lower the bottom one. We tighten the loop and remove the figure from the slingshot.
We straighten the eyes, ears and straighten out the nose.
A rubber band bunny is made using a hook and a slingshot or fork - these are needed at the beginning. You will need 1800 white and 600 blue rubber bands. The whole process is divided into several parts.
We try to make a bunny on a slingshot or on forks ourselves
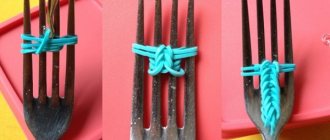
It is also possible to weave a rabbit using forks or a slingshot. It's still easier here than on the machine. Screw an elastic band onto the braiding device 4 turns and pull an elastic band of a similar color through it. Throw on the hook.
You will have 2 weightless loops on your hook. They need to be threaded into each other and braided around the entire fork. Subsequently, the elastic bands are removed from the device, and the rabbit is crocheted, as is done from normal threads.
You can assemble a rubber band bunny using any of the methods listed above. Toys made from this material can also be useful for children. Rubber bands are a fairly tough material, and by playing with a rabbit or other similar toy, the baby develops fine motor skills of his fingers.
And lastly, to make the bunny woven from rubber bands even more elegant, tie a catchy bow from a narrow ribbon around his neck. Place the toy in a wicker basket or gift box with a lid. An hour of work, a little imagination and effort, and an amazing gift for your loved one is ready!
Weaving figures on a slingshot
An easy weaving that you can do in 10-15 minutes is slingshot work.
To weave a bunny, you will need: 58 Rainbow Loom in the main shade, 3 black elastic bands for the eyes and nose, a slingshot, a hook.
We put the first elastic band on the right side of the pin, wrapping it three times. Next, put on a pair and remove the bottom layer in the middle.
Using this technique, we perform three more rows.
We transfer our work to the right side of the slingshot, and leave the first loop on the left. Then we put on a couple more elastic bands of the main color and throw off our very first triple loop.
We throw on two more elastic bands of the main color, and send the previous ones to the center. We transfer all the loops again to the right pin of the slingshot.
We find three turns and put it on the left side again. We weave our work again four times using the “Fishtail” technique. Then we put on another pair of elastic bands of the main color and throw the entire torso into the center.
In order to weave the head, we put on a pair of yellow elastic bands and remove the previous ones in the middle. Let's move all our work to the right side.
On the left side we put on a black elastic band, wrapping it three times. Then we throw on 2 yellow ones.
We throw off all the rubber bands that are on the slingshot and transfer our work to the left column.
We begin to weave the ear. To do this, screw the yellow rubber band 3 turns on the right column. Then put on a pair.
We lower the turns to the center and weave two more layers using this technique. Throw on a couple more rubber bands. The eyelet should be on the right.
We insert the hook into the very first loop from which weaving of the head began. We put it on the left side of the slingshot.
We throw on a couple of yellow elastic bands and lower everything on the left side. We wind the black elastic band on the right column 4 turns. Throw in a couple of yellow ones.
We throw the two bottom rows into the center.
We put on another pair, and take off the lower ones on the left side in the middle. We send the bunny to the right side.
We insert the hook into the first loop and place it on the opposite pin of the slingshot. Using our technique, we weave 2 rows of yellow elastic bands and begin weaving the eye.
We twist the elastic bands on the right column 4 turns. Next we add yellow ones.
We remove the black and two pairs of yellow rubber bands that are on the left side in the center, and transfer everything to the right pin.
We put on the yellow elastic band by twisting it three times on the left column. Then we throw on two more and remove the revolutions to the center. We make three more rows of elastic bands according to the same pattern, and then connect them by throwing on two more elastic bands.
We throw 2 elastic bands into the middle on the left side and 6 yellow upper elastic bands from the right pin.
We put on a single elastic band, onto which we throw everything off the slingshot.
We transfer the entire product to the hook and form a knot. Next, using a crochet hook, we correct the nose and eyes of our bunny. The figurine is ready! Also watch a great video for inspiration to remember everything much better.
Colored rabbit on the machine
We will need:
- elastic bands of the main color (of your choice) - 148 pcs.;
- black elastic bands for nose and eyes - 3 pcs.;
- machine;
We take a machine consisting of two rows of 6 columns. Each elastic band is thrown in a figure eight between two columns 5 times. We get a rectangular structure. We twist the resulting rubber bands together. There should be 6 layers in total.
We remove the structure from the machine, weave into it eyes and a nose, consisting of black elastic bands, twisted around the hook 3 times and strung on one elastic band of the main color.
We don't use the machine
But you can also weave without a machine. This is not difficult and even a beginner teenager can do it. This weaving will help develop fine motor skills and logic. In this article we are weaving a bunny on a hook using the lumigurumi technique.
We will do the work using a lumigurumi ring. To make it, you need to wind the elastic band on the hook three turns.
We hook one elastic band and pull all the loops through this elastic band.
We draw the far loop under the near one so that only one remains.
Using a hook, we go into 1 elastic band again. We pass it through the first three loops.
Once again we pull the loop under the rest.
We repeat these manipulations until six loops come out.
The last elastic band is on our hook; we secure it with a clasp. Then we work through these loops. Each time you secure a row, put on a clip. We weave the second layer with the addition: we weave two elastic bands through each loop. At the end we will have 12 loops. We weave the next row, like the first, without additions, catching the half-loop with a hook.
What we end up with is a foot.
To increase the height of the part, you need to weave it in this way: 1 elastic band in each loop of the second layer. We make the second figure in this way.
We fill in our details. We insert the hook into the second loops and attach our blanks.
We work according to the same scheme, but now we weave the body. We fasten the parts, and then weave one elastic band into a loop, not clockwise.
Do the next row the same way. Then for the next layer we reduce the number of loops by half: we draw a Rainbow Loom through two loops.
Then we weave the row in the usual way. We weave one layer with a decrease, and then 6 rows without a decrease. Next, we make a complete row after 12 loops remain. Each loop should be decreased.
We make our ring from six loops. We weave the second row with white elastic bands with a decrease in each loop, and 3 through one. Violet weave for another 5 layers. We form the eyes using beads or elastic bands, as well as the nose with two elastic bands.
Then we make one layer with a decrease through a loop, and the next one we decrease in each loop. We stuff it using padding polyester or cotton wool.
To make the ears, we make a ring with three loops. Next we work 2 Rainbow Looms in a loop in the opposite direction. When there are six loops, weave in the opposite direction.
We work until the ears are the desired length. We attach these parts to the head.
We make a chain of 10 loops, but during weaving you need to twist the elastic band twice. Attach the arms and head to the body. A loop remains, we insert it into the figure.
The third stage - assembly
To make a beautiful bunny, you need to connect all its parts correctly. This is done as follows:
- Evenly distribute the places where the ears will be. We mark them with an elastic band and a hook.
- We take out this elastic band and thread it through the last loop on the ear. We connect the ear loops to the head. We repeat.
- We try on the handles so that they are at the same distance. Then the legs. The connection principle remains the same as for the ears.
- If you want the bunny to sit, we make a white tail in the same way as we wove the legs and attach it.
INTERESTING: Minecraft heroes made from rubber bands
Adding small details. Using a wire, we thread the elastic through the black bead. We repeat. We attach it to the muzzle. These will be the eyes. We make a nose from a pink rubber band. You can decorate the bunny as you wish.
How to make a creeper on a machine
Minecraft is one of the most popular video games today. Many children want to make figurines of their favorite characters out of rubber bands.
A particularly interesting and memorable character is the creeper. It can also be woven on a machine.
Required tools and materials:
- machine;
- hook;
- 140 green rubber bands;
- 19 black rubber bands.
Many children want to make figurines of their favorite characters out of rubber bands.
Weaving step by step:
- Place the middle row on the machine a little forward, and turn the columns with the empty side to the right.
- You need to start by weaving legs from green and black elastic bands, throwing on a pair of irises at once.
- Fill out the central row, connecting the columns.
- Do the same on the bottom row.
- Throw a pair of black ones on the rightmost rows.
- Screw the black rubber band onto the bottom pin on the right 4 times.
- Twist the green one twice on your fingers and put it on the posts located slightly to the left of the black one.
- Do the same on the next pins.
- Move the twisted black pair to the next column.
- Move the entire bottom row onto the ledges in front.
- Do the same with the middle row.
- The very last loops of the middle row need to be moved to the pins of the first row parallel to them.
- Thread two green irises into the hole on the extreme ledge in the bottom row and grab them, immediately bring them up.
- Return the second loop to the hook.
- Secure the resulting loops with a second hook.
- Starting from the right side, remove the finished leg from the machine.
- Follow the same principle for the other three legs.
- Place a couple of green circles on the front protrusions in the top and middle rows.
- After this, place another pair on the posts in the middle and bottom.
- Put on three more pairs on the bottom and top rows, and four on the center row.
- Put on six pairs on the right and left, making sure to point the rings down.
- There should also be six pairs in the center.
- After this, you need to attach the legs, attach the first pair to the lower left pin on the left.
- After that, direct it deeper.
- Perform similar manipulations with all other legs.
- Compact the body by stringing irises twisted twice on the fingers in the shape of triangles.
- After this, weave the head, starting with the eyes. Take one black circle and screw it onto the hook four turns.
- Take another one and repeat the same manipulations.
- Stretch the green iris at the tip and remove the twisted layers onto it.
- Place one of the loops on the second protrusion on the right side, and the second on the left.
- Move the base row apart to move the eye one protrusion forward.
- Place a triangular loop on the base of the eyes so that it is located only on one side of the face.
- To weave the cheeks, twist the green irises onto the hook four times to place them on the loom.
- Stretch the third one and move the previously twisted layers onto it.
- Transfer all the loops to the outer columns under the eyes.
- Spread your cheeks to the sides, hooking both circles and throwing them forward.
- After this, make a mouth, twist a couple of black irises in the same way as the previous ones and throw them onto the drawn green one.
- Transfer the opposite loops to the third posts from the edge.
- Make a triangle again so that the mouth is clearly defined.
- Move all the lower layers located on the machine to the left, starting with the bottom of the rows and ending with the middle.
- Having reached the creeper’s head, peel off the layers diagonally to the base of the neck.
- Do the same with the other rows.
- Screw the black ring onto the hook again and pull out the last layer of the base of the neck, throw the loops there.
- Move the remaining free loop to the left diagonally.
- Do the same on the right side.
- Remove center layers and move forward.
- Cross the top and bottom rows over your head.
- Direct the latter diagonally towards the center.
- Take one black iris again and wrap it around the mug.
- In the center, from the fourth column, grab a couple of layers and throw black twisted rows onto them.
- Place the remaining free loop on the post in front.
- Finish the central row by moving all layers to the top.
- Pass the hook through all the rows in the outermost row and put on the green circle, pull it out and make a loop.
Remove the finished product from the machine and, where necessary, correct it.
How to weave a hare from rubber bands on a machine
The hours spent weaving this funny bunny will fly by.
. As a result of your efforts, an excellent figurine will appear that you can proudly present to a loved one.
Required materials and tools:
- a pair of hooks;
- machine;
- elastic bands;
- padding polyester;
- black bead.
The hours spent weaving this funny bunny will fly by.
Progress:
- Along the entire perimeter of the machine, place elastic bands in the shape of eights (5 irises on each side) over the protrusions.
- Lower the first row on the pins and immediately put on the second.
- Use a crochet hook to remove the lower irises and lower the row you made with your fingers again.
- After this, put on another 5 rows in the usual way.
- Remove the rubber bands from one of the edges and transfer them to a nearby pin, remove the lower ones.
- Do the same on the remaining outer pins.
- Continue weaving on the remaining eight pins, placing a row of circles on them in the standard way.
- Remove the bottom ones and put the row back on.
- Take a black circle and throw it four times on the hook, pull it through the other iris.
- Place a bead on a black elastic band.
- Place these elastic bands twisted with the iris onto the second post in the center, then put another row on all the pins and remove the bottom ones.
- To make eyes, twist a black elastic band in the same way as last time, throw it on the hook and pull it through the other iris, place it between the middle and outer protrusions.
- Alternately put on a couple more rows of elastic bands and remove the bottom row.
- To make ears, make 3 yarn overs on the hook and pull a pair of irises through these yarn overs.
- Make a couple of these parts and put them on both sides.
- Throw on more elastic bands and remove the bottom ones from the machine.
- Place each of the loops on the hook and pull the elastic through them.
Turn the finished hare inside out and fill with padding polyester.
How to weave a Finn
The Finn keychain is a great gift for any child. Weaving it from rubber bands is quite simple.
Rubber bands you will need:
- 14 black;
- 34 white;
- 35 blue;
- 8 blue;
- 28 orange.
It's quite easy to weave Finn out of rubber bands.
Progress:
- On a slingshot, weave the base of the legs from seven black circles, add a pair of white irises.
- Continue working with orange.
- Use the same principle to make the second leg.
- Connect both legs by weaving eight blue elastic bands.
- Move the workpiece onto the slingshot and weave a body from blue circles.
- Use white to form the base of the head on the hook.
- Form the center in orange.
- Twist the black elastic bands four times and attach them to the orange loop to make eyes.
- Crochet hands with orange irises.
- Attach them to the figure by making a tight loop on the blue irises.
Methods of weaving from rubber bands
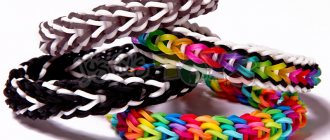
In order to master the technique of weaving from rubber bands, you need to know about all possible methods of making products, including original bracelets, and unusual toys, even decorative elements.
There are several ways to combine individual irises into a whole composition:
- on fingers. To make simple products, no additional tools are required, just rubber bands are enough. All actions are performed on the fingers;
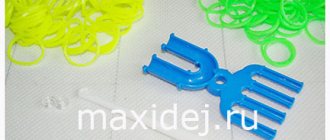
- on a slingshot. There is a special tool - a slingshot for weaving. With its help, it is already possible to make wide bracelets and even small figurines;
- on the machine. A special device helps to make complex, intricate figures.
In order to master the technique of weaving from rubber bands, you need to know about all possible methods of making products
It’s best to start by choosing simple products. Having mastered these simple techniques, working with the machine will no longer be particularly difficult.
Regardless of how simple or complex the chosen product model is, only if you follow the rules you will be able to achieve a positive result and proudly show your creation to others:
- choose only high-quality materials (cheap elastic bands often break even with slight tension);
- follow the instructions exactly, since the slightest deviation will lead to the entire structure falling apart or acquiring an irregular shape;
- periodically stretch the elastic bands so that they acquire the required shape;
- The last of the loops must be tightened as tightly as possible.
A cute and funny keychain in the shape of a little bunny will be a wonderful decoration. Such a cutie can be woven on just two slingshot posts! As the main color, you can use traditional colors for bunnies - white and gray, but yellow, purple or pink bunnies will be much more interesting and unexpected! We'll make yellow today!
So, let's start a photo master class on how to weave a bunny from rubber bands
.