Beaded pine is a wonderful decoration, souvenir or gift for the New Year. For beginners, such a craft will be an excellent start to creativity, as weaving a winter beauty is not at all difficult. Our master class will tell you step by step about all the intricacies of weaving.
You can create fabulous beauty and emphasize the winter look of the tree using certain shades, for example, use green glass beads together with white or use only blue beads.
The view of coniferous trees made of white, pearl bugles, dusted with snow, looks very beautiful and mesmerizing.
Beading offers many options for making a souvenir colorful or truly New Year's.
Today there will be a simple master class for beginners, but during the work you can use your imagination using shades and determine the height of the craft yourself. There are also different types of weaving of twigs, for example, you can weave them in a loop or needle way. Trained craftswomen sometimes decorate the spruce with cones.
Preparing for work
So that during the process of creativity and unexpected imagination everything is at hand, we stock up on the following materials:
- bugles in two shades of green (cutting would also work)
- white beads
- wire 0.3 mm – 0.5 mm
- scissors
- gypsum
- silver acrylic paints
- clear varnish
- tassel
- silver sequins
- small container for the tree (plastic lid or container from a candlestick)
Video master class on weaving pine from beads
We make a small pine tree with our own hands
This master class suggests weaving a pine tree about ten to fifteen centimeters long using the needle weaving technique. Having gained some experience from creativity, you can then safely build a more voluminous coniferous tree.
- On a piece of 80 cm of wire we collect 5 beads of dark green color, 3 pieces of light green and 3 pieces of white. There are 11 pieces in total on the wire.
- It is necessary to pull one white bead to the side in order to pass the long end of the wire in the opposite direction through the rest of the beads (10 pieces).
- We pull the glass to the middle and carefully tighten the loop. As a result, we get the first needle-like branch and two extreme ends, with which we will work alternately.
- We make the second mini-branch and all subsequent ones one smaller bead, only dark green. The actions are repeated - we pass one white one and go back with the tip of the wire through the rest of the glass beads (9 pieces), tighten the loops so that the needles fit tightly to each other.
And remember that with each woven mini twig and their connection tightly, you need to secure it by twisting it two turns.
6. We form the following branches, consisting of 12 - 16 needles. 7. For our fabulous pine tree you will need 19 branches - blanks.
Collection of coniferous tree branches
So, in order to assemble a tree from twigs, you need to sort the blanks into levels.
| Not counting the top, the 1st level consists of three piles of branches, one each. |
| 2nd tier - from three piles of bunches of two blanks each. |
| The 3rd level consists of three piles with three blanks. |
Collecting branches by level
We connect the central top and the 1st level of branches by twisting up to 10 turns and carefully straightening the needles. Next, we twist the branches of the 2nd level in pairs and three branches of the 3rd level. And then we collect all the elements into a whole.
- We carefully place each twisted branch around the top and, while smoothly lowering down, do not forget to straighten the needles to the sides, thereby creating a fluffy look.
- The long ends of the wire at the root of the Christmas tree must be twisted so that you get a small stand that will fit into the lid container.
We decorate the stand beautifully
To make the lid beautiful on the outside, you can decorate it with holographic self-adhesive. Make small cuts around the lid and carefully wrap them inside.
Pour the prepared gypsum solution into the bottom of the lid. Then we insert our winter beauty there and fasten it. As soon as the plaster hardens, you need to paint the surface of the base with silver acrylic paints and secure it on top with acrylic varnish, decorating it a little with sequins.
The height of the Christmas tree is about 10 cm, despite the fact that it took a lot of hard work. Such a small New Year's souvenir will be a wonderful gift or decoration for the holiday table. This winter beauty will look very elegant if you decorate it with decorative, light-weight beads.
We wish you creative fantasies and achievements in your own creations!
For those who want to try making a Christmas tree using the loop method, we bring to your attention a review of easy and simple video material. Only with diligence and the desire to do something new and beautiful for yourself will you be able to create exclusive crafts.
Source: https://podelkiruchkami.ru/sosna-iz-bisera-dlya-nachinayushhix/
Master class on weaving pine beads as a gift for the New Year. Part 1
There are only a few days left until the New Year 2013! Everyone is looking forward to this holiday with great impatience, both adults and children, because we all associate it with something new, better, magical.
With the advent of the New Year, I want to acquire a new life, a better one with new adventures and pleasant events, and also filled with joy and fun.
And what can’t there be a New Year without? I will answer for you - without the New Year Tree! Very soon, every home will have Christmas trees decorated with colorful balls, tinsel, and garlands on them.
In this article I would like to invite you to make a pine tree with your own hands; you can also decorate your house or apartment with it, and you can also use it as a New Year’s gift for your family and friends. The pine tree will be created using the bead weaving technique.
You can get acquainted with the weaving process thanks to two parts in which a master class will be shown. Today I will tell you how to weave pine branches - this will be part 1, in part 2 I will tell you a master class on weaving pine tiers from beads.
This wonderful master class on bead weaving techniques was provided to our site by an amazing master, a wonderful woman, thanks to her skillful hands we can learn such beauty ourselves, her name is Marina Litovchenko. On our website you can also see articles with Marina’s works, for example, here.
Now I recommend getting acquainted with a master class on weaving pine branches from beads.
So let's get started!
Materials used to create pine branches
- The wire is thin for beads;
- Bugle beads – green color;
- Wire - thicker for forming a branch.
Master class on weaving pine branches from beads as a gift for the New Year. Part 1
Step 1
First you need to cut the wire, the length of which will be 1 meter. Then you should put 6 pieces of bugle beads on the wire - this is the top of the branch, consisting of the first loop.
Step 2
Now we are trying to create the first loop from 6 pieces of glass beads. In this case, we need to make an indent of 10 centimeters from the left edge - this is done so that we can leave a little wire for the “tail”.
Step 3
Twist the loop as shown in the photo below.
Step 4
This is the “tail” you should get; it should be located on the left side of the loop that was created first. Now, up to half the wire, you will need to collect a whole row of bugles on the right side of the “tail”.
Step 5
Here you see the first loop and the glass beads cast on the right side. At the end, the wire should be twisted so as not to scatter the glass beads when we work.
Step 6
Now you need to separate 4 pieces of bugles - this is what each needle-loop will look like, and each top of a branch will have to consist of 6 pieces of bugles.
MASTER CLASS FOR BEGINNERS WITH STEP-BY-STEP PHOTOS AND VIDEO LESSONS
The art of bonsai originated in Japan several centuries ago and has gained incredible popularity among connoisseurs of beauty. To grow a miniature copy of a real tree, you need to make a huge effort and spend several decades. However, even a novice needlewoman can make an unusual plant from scrap materials literally in one evening. So let's conduct a master class on pine beads!
MATERIALS AND EQUIPMENT REQUIRED
- dark green glass beads;
- thin wire for stringing beads;
- thick dark brown wire for weaving tree branches;
- container for planting;
- plasticine, moss, pebbles.
OPERATING PROCEDURE
We cut off about 1 meter of thin wire and string six beads onto it. We move the beads to the left, leaving a tail of the wire about 10 cm long and bend the wire so that there are three beads on both sides of the bend. We twist the loop, making several tight turns of the wire, as shown in the photo below.
On the long tail of the wire on the right side we collect glass beads up to about half the length of the wire. We twist the end of the wire slightly so that the glass beads do not fall apart. Next to the first loop we form a second pine needle. To do this, move four beads to the left and bend the wire so that there are two beads on either side of the bend. Twist the wire again. You should end up with two branches with needle-loops.
We continue to form loops of four beads on the right until the very end. The result should be a fan of short branches with needles. There should be wire tails approximately 10 cm long to the left and right of the workpiece.
We begin to thicken the branches of the future pine. To do this, take a piece of brown wire (you can use copper transformer wire) 20-25 cm long, fold it in half and put the resulting loop on the leftmost branch of the fan. Using one side of the copper wire, we braid a short tail of thin wire on the left side of the workpiece. Then we weave both parts of the copper wire together, getting a long, strong rod for the future branch. The weaving pattern is shown in the photo below.
We braid the needle fan around the rod clockwise. It is necessary to ensure that the winding is very tight. The bugle bead needles will be slightly deformed in this case, we do not pay attention to this. When all the needles are wrapped to the end, we attach a tail of thin wire on the right side to the resulting branch.
Carefully straighten all the needles on the branch, giving them the correct shape. Using the same principle, we make several more branches, and the number of needles in them may differ. We begin to collect pine. We take a twig, which will be the top of the tree, and slightly smooth the needles on it, making them sharper and more elongated. Attach another branch just below the top, wrapping the wire around the first branch. Moving in a circle, we attach all the other branches, forming the crown of the tree. You can make a compact or more spreading pine tree if you wish.
A tree with several trunks looks very impressive. To do this, you need to weave the main trunk and attach to it 2-3 looser side ones, made from a smaller number of branches. You should not strive for symmetry; it is better to give the craft a more natural look.
When the pine is completely ready, we “plant” it in a pot. For these purposes, you can use a regular flower pot, a special bonsai pot, or any other suitable container. To secure the tree in a pot, it is best to use plasticine. To do this, we line the bottom and sides of the container we are using with film, compact plasticine in it, forming a relief at your discretion, and immerse the main and auxiliary tree trunks in it. At the same time, they can be bent to give the required shape. Cover the plasticine with moss, stones, thin twigs or decorative artificial grass.
If desired, you can continue to decorate the bonsai. For example, weave pine cones from dark brown curly beads using thin wire and randomly fasten them on the branches. You can decorate the pine tree and the soil under it with miniature figurines of animals or birds, and if you want to make a New Year’s tree, you should decorate it with multi-colored glass or plastic balls.
The beaded pine is ready. This is not only an unusual interior decoration, but also an excellent gift. And if you have little space in your apartment, a glass bead tree can be used as a Christmas tree.
VIDEO ON THE TOPIC OF THE ARTICLE
If you are interested in the topic of weaving miniature coniferous and deciduous trees, we suggest watching other master classes in video format on their production.
Beaded pine: DIY needle tree (photo)
One of the easiest trees for beading is pine. Weaving a lot of bead needles with your own hands will not be difficult. All you need is your diligence, attention and a supply of green beads.
Master class on weaving pine from beads
Necessary materials:
- green beads;
- wire for beading - 0.3 millimeters;
- brown threads.
The entire process of weaving pine consists of monotonously weaving branches with needles, using the same-named “needle” beading technique.
On a piece of wire thirty centimeters long, string eight green beads. We retreat ten centimeters from one tip of the wire and, bypassing the last of the collected beads, thread the second tip of the wire (the one that is longer) in the opposite direction, as in the photo and tighten the wire, thus forming the first needle.
We continue working with the long tip of the wire. We string the next eight green beads onto it. Next, bypassing the last bead, we pass the wire through seven beads in the opposite direction.
We form the next 3 needles in this way. Now the ends of the wires need to be twisted together and we will get the first beaded pine branch.
The wire base under the beaded branch needs to be wrapped a couple of centimeters down using brown threads. This base will serve as a trunk for the branch.
The more similar branches you make, the more magnificent your pine tree will be. In this version, the master class is based on weaving a small pine tree, for which you need to weave about 130 branches from green beads. For a larger tree, increase the number of components several times.
Let's move on to creating large branches for the pine tree from beads. To do this, take two blanks from small branches and connect them to each other. Next, we attach the next one to these two branches at a short distance from the top.
In this way we continue to gradually attach subsequent branches. This way we get a central branch consisting of twenty small branches.
Now, you need to wrap the entire wire base with brown threads.
The following branches are formed in a similar way, but contain a different number of small branches. So, in addition to the main branch we do:
- two branches consisting of fifteen small branches;
- three branches consisting of ten small branches;
- six branches - five branches each;
- four branches - three small branches respectively.
From the remainder of the small branches we form larger branches. Don’t forget to wrap the entire wire base tightly with brown threads.
We connect the resulting branches into five large branches.
Let's start assembling the pine tree from beads. To do this, we attach two branches to the main branch using an auxiliary piece of wire. At the same time, it is necessary to wrap the trunk with threads. Next we attach the last 3 large branches, winding the remaining surface of the wire base.
This completes the creation of the beaded pine tree. Select a suitable container, place the tree in it and strengthen the base with gypsum mortar or alabaster.
Video: A selection of ideas for weaving pine from beads
Source: https://vishivashka.ru/tree-bisera/sosna.php
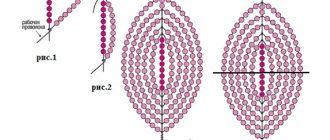
Creation algorithm
The pattern for weaving pine with beads is quite simple. A novice craftswoman who has never done beadwork before will be able to create such beauty. Below are step-by-step instructions with photos to make the material easier to understand.
To begin with, one meter of wire of a smaller diameter is cut off, and six beads are strung on it. Next, the wire is bent so that there are three beads on each side, and the wire on one side is 10 cm long. The result should be a loop. At the bottom of the loop the wire is twisted several times.
Related article: “Elephant” cake made from mastic. Photo master class
Beads are strung on the long end of the wire, approximately to the middle. It is better to bend the end of the wire so that the beads do not fall off during the creative process. Next, it is taken with wires with beads and folded in half after the first two beads, then twisted into a loop again. This must be repeated until the glass beads on the wire run out.
The third step will be to compact the pine branches. To do this, take a wire of larger diameter and braid it around each branch (thin wire).
It is important to ensure that the winding density is very high, so our tree will look more noble and realistic. During the winding process, the branches may become deformed, but there is nothing to worry about, since all these points will be corrected in the next stages of work.
At the fourth stage, we create the required number of branches. The more branches there are, the fluffier and more luxurious the pine will look. Keep in mind that the number of needles on the branches may vary. Such slight asymmetry and carelessness will add naturalness to the tree.
The beginning on the path to completing the work will be weaving the branches together and forming the trunk. The needles on the branches need to be straightened and fluffed. The branches are woven together, moving in a circle, starting from the crown and going down.
Pines with several trunks look more interesting. In some ways they resemble bonsai trees.
To create such a tree, you need to weave branches into several trunks. One of them will be the main one, the most massive, and the others will be thinner, with fewer branches. Then they are woven together into one powerful, mysteriously curved trunk. It is better to place branches and trunks randomly, this is the only way the tree will look as realistic as possible.
When the process of creating a pine tree is completed, you can proceed to planting it. The container prepared for planting must be filled with plasticine and the pine tree secured in it. It is better to take plasticine in black or dark brown. This way you can very naturally recreate the soil of a coniferous forest. However, just a tree planted in a pot will look lumpy. You need to decorate the soil with something. Natural materials are ideal for this. The surface of the soil can be strewn with small stones, covered with a layer of moss, or one large stone can be placed to imitate rocky terrain. You can make artificial grass or bushes from beads using the same principle, or you can plant a fungus made from bugles under a tree.
Related article: Jewelry for a guipure dress
You can place cones on the pine tree itself - natural or artificial, purchased in stores for needlewomen, or you can make the cones directly from brown beads, so the entire product will be created in the same style.
It is important not to forget about the potty. It is also better to stylize it to resemble natural materials, for example, cover it with decorative plaster and paint it with paint to create the effect of an aged clay pot.
How to make a tree from beads. Step by step lesson
- Today we decided to present to your attention another DIY craft - a tree made of beads. To make a tree from beads, which we will call “lilac magic”, we will need the following materials:
- a) White, purple, pink, yellow and green beads; b) Green wire 0.3 mm thick; c) Brown tape; d) Acrylic paints of several colors (brown, bronze, black, green); e) Construction gypsum; e) A piece of polystyrene foam;
- g) Masking tape.
Beaded pine: master class and weaving pattern
Dear bead lovers, today we will tell you how to assemble a pine tree from beads using our master class and weaving pattern, which is suitable for beginners.
Tools and materials Time: 2 hours • Difficulty: 2/10
- green beads;
- white beads (optional);
- wire for working with beads;
- wire cutters;
- brown floral ribbon.
On the eve of the New Year, I would like to post a master class that will be useful for the upcoming holiday.
For example, everyone knows what a price this celebration entails for the Christmas trees, so even collecting branches in the nearest park can damage the trees.
Pine bead master class, needle weaving
Origin of beads
Beads are small glass beads of different sizes and colors. Its appearance in ancient times is associated with the discovery of recipes for creating glass. Previously, these small beads were sewn individually onto the robes of noble people.
And the emergence of the netting technique helped in the development of the production of small crafts from beads. It was after this that beading became a separate part of the craft.
The first patterns for weaving began to appear, many of them are still used today.
In the Middle Ages, Venice became the main center for the creation of beads. The largest glass factory very carefully guarded the secrets of its production, so much so that it even took it to a separate island. For a long time, Venetian beads had no competitors.
It was so valuable that they even used it to pay for it. And later Bohemia began to create beads. The Czechs were quite smart and used ash instead of soda. This type of glass had to be cut due to its refractoriness.
Nowadays, Czech and Japanese beads are of the highest quality.
How to choose material?
When selecting material for work, it is worth remembering a couple of simple rules :
- The larger the number on the package of beads, the smaller their size.
- Good beads have a smooth surface and shape without any inclusions, a bright color and identical holes.
- All the things we use (threads, fishing line, wire, needles) are selected according to the size of the beads.
Craftswomen from all over the world highly value bead products for their beauty and quality.
Gallery: beaded pine (25 photos)
Weaving techniques
There are only a couple of types of needle bead weaving techniques:
- Needle type of weaving.
- French type of weaving.
- Parallel type of weaving.
The needle technique is in most cases used to make stamens, branches and needles . To learn this weaving method, you need to string six beads onto a piece of wire. Taking one of the ends of the wire, we pass the 6th bead and go in a different direction after the remaining five beads. You will get an ordinary “needle”.
French weaving is the arc weaving technique . This type of beading helps to make realistic floral items. The parallel weaving technique is mostly used to make leaves . We pass one tip of the wire in the forward direction, and the second tip parallel to it in the opposite direction.
Forest beauty master class
A fluffy Christmas tree can be made from beads using the needle weaving technique. This technique is perfect for beginner craftswomen, as it is distinguished by its ease. We do all the work on creating the spruce according to the scheme.
Materials and tools that will be required for work:
- Small beaded wire.
- Big wire.
- Good nippers.
- Green yarn.
- Green beads.
- Wooden stick for the trunk.
- Small flower pot.
- Special gypsum for construction.
You can take any beads for the Christmas tree, even Chinese (poor quality). Christmas trees made from sparkling wood look especially great.
Full description of the master class.
First, cut off 50 centimeters of thin wire with pliers. Let's make the first needle of seven beads in the center. Next, we weave first from the central part, then from its other side. Let's make ten needles along the central part of each wire.
You will need quite a lot of such blanks, about 300 pieces. Let's prepare a thick wire for creating branches. We make the upper legs of the Christmas tree from a single wire, and the lower legs from wire twisted in half.
Bead blanks must be secured to a thick wire using spiral winding. The bottom particle of the wire is masked with our yarn. Remember that the branches must be of different sizes.
The tree trunk can be made from a piece of plastic tube or from just a wooden rod. Slowly wrap it with tape and screw on our legs. All that remains is to strengthen the forest beauty in the pot with plaster and decorate everything.
Master class on creating pine from beads.
Materials required for work:
- Green beads.
- Procrastination.
- Brown threads.
- Scheme.
Complete master class.
The whole process of creating a pine tree consists of a long weaving of branches with needles, using our “needle” technique.
On a piece of wire 30 cm long, string 8 beads. Let's step back 10 cm from one end of the wire and, bypassing the end of the collected beads, thread the second end of the material in the other direction, then tighten the wire, making the first needle in this way.
We continue the process of working with the long tip of the material. We string new eight green beads onto it. Next, bypassing the final bead, we thread the material through seven beads in the other direction.
Thus creating the next three needles. Now the ends of the wires need to be twisted together, and we will get our first beaded pine branch. Such a pine twig is a preparation for a future pine tree. We need to make a lot of these, and then connect them into a crown and form a trunk.
The wire base under this branch should be wrapped 2 cm downwards using cinnamon-colored threads. This base will serve as a trunk for the branch.
Let's move on to making large branches for our pine tree. To do this, take two blanks from small branches and connect them to each other.
From the remainder of the small branches we create more branches. Do not forget to wrap the entire wire base tightly with threads. We will connect the created branches into 5 large branches.
Let's start assembling the pine.
We attach two branches to the main branch, taking an additional piece of wire for this. At the same time, you need to wrap the barrel with thread. We attach the last three branches with new ones, making a winding of the remaining surface of the wire base.
A winter pine tree dusted with snow looks very beautiful. To make it, green beads need to be combined with white, placing the white beads on the tip of a pine needle.
Necessary materials
You need to move on to learning the needle bead weaving technique when everything you need is already at hand . From the materials you need to take:
- green glass beads;
- thin wire;
- thick wire for forming branches;
- tree container;
- gypsum, PVC;
- acrylic paints;
- scissors.
This type of weaving is also called Greek bead weaving; its peculiarity is that it is not necessary to use very high-quality expensive beads. You can also use Chinese material, which is not particularly smooth. This way each branch will look even more natural.
The wire can be either silver or golden - this does not play a special role. But to weave branches, although it must be thin, it must be strong enough to make the product reliable.