Halloween is a scary and fun holiday where everyone can show their creative imagination. For example, make a bat with your own hands using the simplest and most affordable materials - cardboard, paper, fabric, balls, plastic containers and other available materials. Intrigued? Then read new holiday material from Joy-pup! We are starting a series of articles on preparing for Halloween, which is celebrated annually on October 31st.
DIY bat for Halloween: what to make it from?
A bat for Halloween is like snowflakes for New Year. It creates a festive atmosphere, gives a feeling of mystery, mysticism and joy. Making a bat with your own hands is not at all difficult. Use the following supplies and materials for this cool Halloween craft:
- colored paper;
- cardboard;
- paper towel and toilet paper rolls;
- clothespins;
- wine corks;
- air balloons;
- tulle;
- felt;
- plastic plates and cups;
- thread pompoms;
- pumpkin
Next, we will tell you how to make a bat with your own hands to create a mystical atmosphere for Halloween.
DIY paper bat: how to make it step by step
The easiest way to make a paper bat is to print and cut out a template. You can also draw the mouse silhouette yourself or trace the picture on your computer screen.
A cool idea for decoration is to cut out several paper bat templates of different sizes. Thread the cutouts through thread or thin rope to make a fancy Halloween Bat garland .
Snack bar design
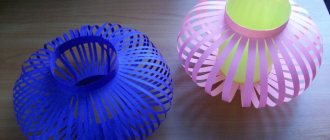
The Halloween table should also be decorated. Instead of regular dishes, you can use themed ones. For example, bat-shaped snack jars.
Treat jars
You will need:
- bushings of different sizes;
- black paper;
- scissors, glue;
- plastic eyes.
First you need to cover the bushings with paper. Then cut out the wings according to the template or according to your own sketches and attach to the sleeve. On the front side you need to make big eyes. If there are no special eyes, you can cut them out of paper. Fill the jars with cookies, marmalade, and chips.
Such dishes will become the center of the table and attract the attention of guests.
You can also decorate drink bottles with bats.
Halloween Bottle Decor
DIY origami bat step by step
Another spectacular way is to make a bat made of paper using the origami technique. For this craft you will need a square sheet of thick black paper, scissors and watercolor paints.
Step-by-step instruction
- Bend the square diagonally so that a triangle emerges.
- Fold the base of the triangle down as shown in photo 3.
- Fold the resulting “wings” towards the center, as in photo 4.
- Spread the “wings” and bend them, as in photos 5 and 6.
- Use scissors to trim the top edge of the figurine to create bat ears (see Photo 8).
- Use watercolors to paint funny or scary faces for the bats.
Watch also video tutorials on how to make an origami bat with your own hands.
And this is an incredibly cool origami bat flapping its wings .
Here's an idea for the holiday: how to make a paper bat that flies.
Paper figurine of a bat step by step
A very simple and quick technique that you can do together with your child.
Required accessories:
- A square piece of dark-colored paper.
- Scissors.
- Paints, brushes, water.
The manufacturing sequence is shown in the pictures.
You might be interested in How to make slime with silicate glue - recipe options
Take a piece of paper and make several folds: on 2 sides diagonally and on 2 sides
Unfold the paper and bend it to class=”aligncenter” width=”600″ height=”470″[/img] Bend the wings inward and form the body. Bend the nose and make small cuts
Draw eyes, nose and fangs
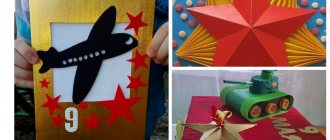
Paper bat hat - a simple DIY costume
A chic craft for children is a bat hat, which can be used at Halloween celebrations as an element of a costume.
You will need:
- bat template;
- cardboard;
- scissors;
- stapler;
- glue.
Step-by-step instruction
1. Make a template out of paper. Lay out each piece of the craft on black cardstock, trace and cut out.
2. Use white paper to make the fangs, mouth and eyes of the bat. Glue it to the face.
3. Try on a long strip around your head, then select the required size and attach it to the mouse muzzle element using a stapler.
4. Glue or staple paper bat wings to the sides of the hat.
You have created a wonderful DIY Halloween bat craft.
How to make a fabric bat: photos and videos
The bat can be made from felt, tulle, cotton or other dark-colored fabric. In the photo you see 2 ways to make a bat from felt.
See the photo for another template for cutting out a bat for Halloween.
And this is a magical video on how to make a bat headband with your own hands. A bow in the shape of a bat's wings can be attached to a hoop, an elastic band, worn around the neck instead of a butterfly, or used to decorate a Halloween costume.
Do-it-yourself bat from improvised means
The bat that you decide to make with your own hands for Halloween will be made from any, even the simplest materials at hand. The main thing is to show your imagination.
For example, try making a bat out of paper plates . Or make a cute mouse on a stick from cardboard and colored paper.
Plastic plates, spoons and paper cups are great materials for making your own bat.
Think pumpkins can only be used to make the proverbial Jack-O-Lantern? This tasty fall fruit also makes a great paper bat holder. And if you paint a pumpkin black, it can turn into a cute bat itself. Make your own bat wings from paper.
A bat made from cardboard tubes and colored paper is a quick and easy way to make an unusual Halloween decor from scrap materials.
To create a cute handmade fluttering mouse, you can use clothespins, fluffy pom-poms, wine corks and even cans of drinks.
A creative idea is to make bats from egg cups.
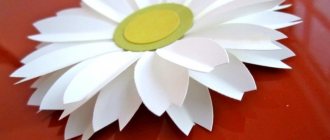
What do you think of voluminous paper crafts?
Cute mouse
The idea of creating a cute bat with your own hands from paper can be traced through the example of a master class.
For work you will need the following materials: black and colored paper (preferably double-sided), scissors, glue, pencil and ready-made eyes.
Such cute mice can be used as a room decor item or as an attribute for a party, or used as a gift if you make a bouquet of mice on sticks.
Using a compass, plate or saucer, you need to draw two identical circles on paper.
Then cut them out.
Fold the circles in half and cut them. We don't need one part.
Now take one half, bend it in half, draw a fold line, and then make a couple more folds, as shown in the photo.
Take one half of the circle and turn the rounded side towards you. We bend it in half, make two more folds, as indicated in the photo, so that in the end the letter V is formed from the folds.
We bend the V-shaped lines and glue their edges together.
Now let's take a couple of blanks that are left. On one we draw the lower part of the wings with a white pencil, fold both halves and cut them out.
The resulting wings should be glued to the body.
The next step is to start making a muzzle for the mouse. In this master class we will use ready-made eyes, but you can make them yourself, and we will also need some red and white paper. You can also use markers, pencils, paints, etc.
Related article: Learning to knit on a knitting machine
This cute bat is ready. You can also make a lot of mice.
Invasion of bats: how to decorate your house for Halloween with your own hands
Bats made from paper, cardboard and other materials are great for decorating your home for Halloween, both inside and outside. Stylish bats are hung on walls, on mirrors, on the ceiling, and used to decorate windows and entrance doors.
Hang paper bats on a branch to create a mysterious and slightly scary Halloween atmosphere.
Make themed treats for your holiday party - Oreo bats. You can also make small handmade gifts - packaging for candies in the shape of a bat, or decorate a snack bar with paper “Batmen” with your own hands.
Paper Bats: Halloween Crafts
In recent years, the holiday of All Saints has become increasingly popular in Russia. People decorate their homes, prepare special treats, and throw parties. For budget-friendly Halloween decor, you can use crafts in the shape of bats.
Cardboard bats
The fastest way to give a room a festive atmosphere is to create a composition on the wall from a flock of winged animals:
- Prepare 10-20 sheets of black cardboard or thick paper and fold them in half. On each sheet, draw halves of bats or print ready-made templates.
- Cut out the silhouettes along the contour and unfold the figures. Attach to the wall using single-sided tape.
A flock of “vampires” on the wallpaper
If you don’t want to spoil the wallpaper, you can thread threads of different lengths through the mouse figures and hang them on the chandelier. The result is an unusual garland that is very easy to remove after the end of the holiday.
Original garland
To implement another idea, you will need branches and a vase (a regular jar will also work):
- Cover the paper figures with glitter: nail gel, rubbing or rhinestones.
- Prepare dry branches in advance; they should not have leaves. Using hot glue, attach the figures to the branches and place the composition in a vase.
Unusual composition in a vase
How to make candy packaging
Mouse template
Sweets wrapped in the arms of a cute monster will delight both children and adults:
- Print out the template presented above and transfer it to black paper.
- Bend the mouse in half and make a couple of cuts on the body.
- Decorate the face with white markers or watercolors.
You might be interested in Making your own sodium tetraborate at home
Step-by-step production of packaging for candies
Note! The bag of candies or nuts should be threaded through the central hole. You can write the name of the recipient in the middle, then the gift will become even nicer.
Volumetric bats for Halloween
Sequencing:
- Cut 4 strips of black paper 28 cm long and 2 cm wide for 1 figure.
- Lay out the strips in the shape of a snowflake and fasten them in the center. Form into a ball by lifting the strips up. Glue them in the center.
- Make wings out of paper and attach to the balls. Add eyes and a smile. The craft is ready.
Volume mice