For many centuries, bright paper lanterns decorated festive processions in China. This tradition has become widespread, and now all over the world almost no holiday is complete without colorful lanterns, be it a birthday or a wedding and, of course, the New Year.
You can make such a decoration yourself, and preparing the holiday with your children will make it even more joyful and unforgettable.
The options for making and using Chinese lanterns are varied. You can use colored, corrugated or foil paper. Finished products can be placed in the interior individually or made into a spectacular colorful garland.
Lesson #1: Flashlight on a string
They will decorate any room. They can be hung on a Christmas tree, made into an openwork garland, or used as a cover for a miniature electric candle.
- Take a rectangular piece of construction paper and cut a strip about 1cm wide along one of its narrow sides. Set this strip aside; you will need it later.
- Fold the remaining paper in half lengthwise so that the right side is on the inside.
- Measure 2 cm from the edge of the resulting rectangle, along the long side opposite the fold line. Draw a line parallel to the edge with a pencil.
- Cut the fringe along the other edge of the rectangle, along the fold line, without going beyond the pencil line.
- Unfold the rectangle and fold it in half again along the fold line, only in the opposite direction (turn it right side out).
- Roll the sheet into a tube and secure the top and bottom with tape. Glue a “handle” to the top rim from a strip of paper cut from the sheet at the beginning of the work.
Another option is to make small holes in the headbands and thread a cord through them, as shown in the photo. By moving the top rim along the cord, you can adjust the curvature of the central part of the flashlight.
Another use case:
Attention! Paper can only be attached to garlands with LED bulbs that do not heat up when lit!
Lantern house
The considered craft options are quite simple, so we offer you another master class where you will learn how to make a more original product, stylized as a real lantern. This type of flashlight is also often called a gnome flashlight.
Lantern house for a gnome.
To do this, you can search on the Internet, draw your own, or use the proposed house template:
For production you will need:
- thick cardboard;
- breadboard knife;
- thin translucent fabric or paper;
- a board or special cutting board;
- glue.
To decorate the house, you can use any materials: paints, sparkles and rhinestones, fringe, various inserts. But even without decoration, such products look wonderful if you use LED lighting inside:
Illuminated flashlights.
You need to cut out a blank from cardboard, use a breadboard knife to carefully cut out the design. Next, along the fold lines, you need to carefully bend the cardboard. On the inside of the house, all edges need to be covered with thin fabric or paper - these are stylized windows. In addition, if there is a light source inside, the veil will soften and diffuse it. Finally, the house needs to be glued together and, if necessary, a loop attached.
A couple more templates for cutting out a house:
Original heart house with 6 sides:
House with square windows and gable roof:
We looked at 6 options of varying complexity on how to make a Chinese lantern with your own hands from paper. With such crafts, your home will surely be transformed for the New Year!
Video: how to make a paper lantern.
New Year's garland made of paper
Paper Christmas tree toys
Volumetric paper snowflakes
How to grout bathroom tiles
What you really need to do with cucumber mustaches
Cucumbers are crooked or grow crooked - what to do
The material was prepared by the editors of the website mainavi.ru
Did you like the article? Show it to your friends:
New Year's garland made of paper
Paper Christmas tree toys
Volumetric paper snowflakes
How to grout bathroom tiles
What you really need to do with cucumber mustaches
Master class No. 2: Diamond-shaped tissue paper lanterns
Light and elegant - that's what we can say about these flashlights. They may take a little longer to make than others, but the results are worth it. They will look especially impressive if you place a small battery-powered candle inside.
1. Place two sheets of tissue paper on top of each other and fold them in half lengthwise. Iron the fold.
2. Next, unfold the paper and gather it, without separating the sheets, into an accordion of folds approximately 1.5 cm deep
3. To make a smaller lantern, trim the edges of the accordion at an equal distance from the center. Then unfold the paper and turn it over so that the convex side of the center line faces the table.
4. Take a needle with a thick thread threaded into it. Gather one side of the sheet into an accordion again and pull the thread through the paper. Tie the ends together to make a closed circle.
5. Do the same on the other side of the sheet
6. Distribute the folds evenly around the entire circumference and connect the edges of the sheet using double-sided tape.
Another option is flashlights with a loop that is not fully tightened.
Making a decorative lantern-candlestick from cardboard
Difficulty: low
Working time: 2 hours
Pattern or template:
Materials: binding cardboard, watercolor paper, acrylic paint, craquelure paste, moment glue, box handle, split ring, beer cardboard, pencil, ruler, stationery knife, cutting mat
According to the author. Do you want to learn how to make a lantern-candlestick at a minimum cost from cardboard? Today I will tell you how to do this. It is perfect for a New Year's photo shoot or will be an addition to your interior. I always look at all sorts of lanterns in stores, but sometimes the price on them is very steep, and I came up with the idea of making it myself. Moreover, the cost of such a lantern is very small, you just need to spend a little of your time.
You can print it out and make a pattern, but in this case I prefer to cut it myself rather than trace the template. Because there will still be errors, and the details will not be the same, the flashlight may turn out to be crooked. The template tells you how to calculate it. The template also shows the dimensions of the small lantern.
On beer cardboard (you can use binding paper) we draw our details of the lantern and cut them out with a stationery knife.
Cut out four parts.
We cut out 8 strips of 20*1.5 cm from binding cardboard, apply them to our workpiece and mark the cut angle. The top one is different from the bottom one, if you are afraid of mixing it up, it is better to mark the top side.
Glue the side strips, at this stage I glued a pencil to the glue. Mark the cutting angle at the top and bottom strips.
From watercolor paper we cut out connecting strips: 4 side pieces measuring 18.5*2 cm, 4 bottom pieces 10.3*2 cm, 4 top pieces 6.5*2 cm, crease them in the middle, bend them and cut off the corners at an angle of 45 degrees. .
First we glue the upper and lower connecting strips, now and in the future we glue them with Moment-Crystal glue.
Then glue the side connecting strips. Let them dry a little.
In the meantime, cut out the bottom measuring 10.8*10.8 cm, make legs from four layers of cardboard measuring 2*2 cm. Glue the layers of legs together and glue them to the bottom.
We connect the side parts of the lantern.
Apply glue to the connecting strips and glue the bottom.
We cut out the top of the lantern measuring 7*7 cm and glue it, then cut out three squares measuring 6*6 cm and glue them together. Now we glue it to the top of the lantern.
We cut out four parts for the lantern dome from binding cardboard and connecting strips measuring 9*2 cm, 4*2 cm, 5*2 cm, 4 pieces each.
We glue the connecting strips in the same order as in the lantern. Let the glue dry so that it’s easier to glue later and everything doesn’t fall apart in your hands.
Glue the dome parts together, cut out the bottom measuring 9*9 cm.
Glue the bottom of the dome and cut out the top of the dome measuring 5*5 cm, do not glue it yet. We glue the dome to the lantern.
We cut out strips 20*1 cm long from binding cardboard (I don’t recommend beer paper for strips), for a small lantern strips measuring 15*0.7 cm.
Glue the strips crosswise in the lantern openings.
We make sure that the strips come out strictly from the corner, as in the photo, so that there are no distortions.
You can paint the lantern as you want. I needed a lantern to imitate wood. To make an imitation of wood, take a texture paste, dilute it a little with water to the consistency of sour cream and paint the lantern with a brush with stiff bristles.
Apply the paste in waves to imitate wood.
Using craquelure paste we will add an aged look to the lantern.
Apply the paste randomly and leave to dry.
I placed a flashlight near the radiator to help it dry faster. After drying, the paste cracks, looking like old paint that is already peeling off from the surface.
Now we’ll make a handle for the lantern, I took the handle from the box and replaced the small ring with a split ring for albums. We make a hole in the middle of the top of the dome and insert a handle. In the small lantern I used a part of a furniture handle, so it can be made from any available materials
We unbend the antennae from the wrong side and glue them so that the ring does not jump out when we carry the lantern.
Now you can glue the top of the dome.
All that remains is to paint the lantern, paint it carefully, painting all hard-to-reach places. We also paint everything inside...
When the paint was dry, I went over it with a dry brush with black paint just to highlight the texture and cracks.
Only artificial candles should be placed inside the lantern, real ones are not allowed!!! it may catch fire.
I am very, very pleased that you take the time to come and visit me! I hope my master class is useful to you! Happy New Year!
Source
Instruction No. 3: Round lanterns made from strips of paper
They look like Christmas tree balls and can be of any size: from very small to huge. A definite plus is that they are quite easy and quick to make.
1.Cut 15 strips of paper 1 cm wide
2. Make holes at both ends of all strips along the hole, retreating about 3 mm from the edge
3. Stack the strips so that the holes line up and insert a rivet into each end (you can buy these at a craft store)
4. Starting with the lowest strip, remove them from the stack one at a time and distribute them in a circle until you have a ball in your hands.
You can attach a loop for hanging to the top rivet, and a tassel made of paper, beads or thread to the bottom one. In addition, such lanterns make excellent garlands!
Other options for decorations made from strips of paper:
The latest model is assembled from strips of different lengths, pre-glued into circles, diamonds and drops. They can be fastened together using double-sided tape or, if the material is thick enough, hot-melt adhesive.
Safe holiday
Paper is most often used as decoration materials, because, as you know, it will endure anything. For example, you can make a paper lantern or a beautiful toy as origami. But whatever you choose, remember that paper products are highly flammable. Therefore, if you decide to focus on this particular material, to illuminate the lanterns, use those lamps that do not heat up when illuminated and refuse candles. The holidays should be beautiful, stuttering and safe!
You can’t cope at night without a flashlight - the main electrical device designed for vision. Without this object, it is generally impossible for a person to see anything in the dark. The reason for this lies in the fact that a person in the dark is not able to distinguish colors from each other.
Every year more and more photos of homemade flashlights appear on the Internet, which is quite logical, since thanks to such an invented device you can see absolutely everything in the dark.
Today there are several types of flashlights. You can find not only the classic options, known to everyone, but also lanterns that provide for independent regulation of the beam of light if necessary. In this article, we will look in detail at how to make a flashlight with your own hands, using only prepared materials and step-by-step instructions.
Option #4: Lantern made of paper or cardboard circles
This type of lantern is also perfect for interior decoration and for the Christmas tree. If you make them from thick multi-colored paper, you will get a toy for children. And if you decorate them with various decorative elements or draw something on the finished product, you will get an absolutely unique thing.
1. Cut out 10 identical circles from thin cardboard
2. Fold all the circles in half, right sides inward
3. Glue the circles together in pairs, side to side, until the circle is complete.
4. Before gluing the last two halves together, insert a straightened paper clip into the center of the sphere and secure it with a drop of hot glue. Bend the outer end of the paper clip with a hook - you will use it to hang the flashlight
5. Decorate the lantern with ribbons, tassels or other decorative elements.
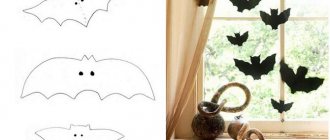
Christmas stars
Why not decorate your home with stars? Making your own Christmas lanterns in the shape of stars is a great idea.
Take suitable paper, scissors and glue. Cut out several templates according to the pattern shown in the photo above, glue the corners. Now all that remains is to assemble the tips of the star together. Place several garland bulbs in the middle of the paper lantern. This craft can also be used as a New Year's toy. You can get a little creative and cut out fancy curls, snowflakes or small stars on paper for the future star - they will look impressive when backlit.
Lesson #5: Flashlight “Drop”
This is another type of flashlight assembled from the same parts, but in this case you will need a template. You can download it here.
As in the previous case, you need to cut, fold and glue a number of parts in a circle. The ones in the photo consist of 16 “drops”.
As a component of such decoration, you can use almost any figure, including openwork. Other options for New Year's lanterns of this type:
All of them are glued together according to the same principle as the model described above.
Drop flashlight
Another super easy option for making paper lanterns.
The manufacturing principle is extremely simple - according to the template (see below), you need to cut out a lot of blanks, glue them in halves to each other, thread a thread in the center and make a loop on it.
This is what the product looks like during the manufacturing process:
Flashlight in the making.
The products themselves look very simple, even boring. Therefore, diversify their design to your taste - make openwork cutouts, add a tassel at the bottom, choose printed paper, sprinkle the finished drops with glitter. For example, blanks of this shape can easily be styled as fruits.
Master class No. 6: Indian lantern
This simple-to-make decoration looks quite unusual and pleasant. Choose beautiful colors, decorate ready-made lanterns, and give free rein to your imagination!
The flashlight consists of two sheets of paper in contrasting colors.
Outer layer (fringe):
- Take a sheet measuring 12.5x25cm and make a fold about 5cm wide on both short sides. Smooth out the fold line and unfold the paper.
- Using a ruler and a paper cutter, make parallel cuts with 1cm intervals between the two fold lines.
Inner layer (tube):
- Take a 15x19cm piece of paper and place a strip of double-sided tape along each of the 15cm edges.
- Roll the sheet into a tube and glue the two sides overlapping so that they overlap each other by about 5 cm.
Connection of parts:
- Attach a strip of double-sided tape to the short sides of the outer layer of paper.
- Glue one of the edges along the top edge of the tube, then, without creasing the fringe, glue the bottom edge.
- Punch holes on opposite sides of the tube at the top of the lantern and thread ribbon or string through them for hanging.
How to make pompoms from crepe paper
All paper pompoms are made according to the same principle. Let's look at this method in more detail. We will need corrugated or crepe paper. Today, crumpled paper is actively used to create crafts, although previously its purpose was somewhat different - corrugated paper was used to line hat linings. Crepe is a type of corrugated material with a finer degree of compression. Crepe paper pompoms are soft and airy, while corrugated products hold their shape better. Previously, crumpled paper was used to make children's crafts and elements for carnival costumes, but today they are used mainly to create stylish decorative items: flowers, garlands, interior toys.
Making paper pompoms with your own hands is very simple, because in addition to the crepe or corrugated paper itself, you only need scissors and thread. If you are going to hang finished paper balls to decorate a wall or ceiling, replace the threads with ribbon or long cord. Remember that for work you choose durable, evenly colored and bright crumpled paper that does not leave colored streaks on your hands.
Lush paper pompoms: detailed instructions
So, if all the materials at hand are ready, let's begin the creative part of the process. To create an original and eye-catching decorative element, it is best to use multi-colored sheets of paper, first placing them one on top of the other. Although some masters claim that plain pom-poms look much more impressive, so choose colors based on your personal beliefs.
First, decide on the size of the finished product. The more magnificent the pom-pom seems to you, the larger the sheets of corrugated paper. At the same time, take note that the width of the paper sheet should approximately correspond to the diameter of the finished ball. Next, paper pompoms are assembled step by step like this:
- Fold the sheets of paper collected in a stack into a transverse “accordion”;
- tie the paper folded several times firmly strictly in the middle with threads or the dressing material that you have prepared (wire or tape, for example);
- Now the most creative part of the process is the design of the edges of the paper package. Use scissors to shape them as you wish: round the edges, make them wavy or jagged, cut them into fringes;
- let's move on to the most interesting part - let's “dissolve” our paper bud. First, we folded sheets of crumpled paper in layers. Now carefully remove one layer at a time, crumple it a little and pull it towards the core tied with thread. Admire your creation!
Take your time and make several of these pompoms at once. One paper ball is, of course, good, but it will not be able to produce the amazing effect that several copies can. Ready-made paper pompoms can be easily assembled into a garland, hung from the ceiling one at a time, or used to decorate an entire wall.
Experienced paper craftsmen went further. Look what wonderful flower-shaped pom-poms you can make from crumpled paper!
Step-by-step instructions No. 7: Flashlight made from strips of paper and tube
Another project using two or more sheets of paper in contrasting colors.
1. Glue a tube from a shorter sheet.
2. Place a strip of double-sided tape along the top and bottom edges of the tube.
3. Cut long thin strips of contrasting colored paper.
4. Start gluing the strips one at a time, slightly overlapping, strictly parallel to the tube or slightly at an angle.
This is what the strips look like, glued at different angles.
5. Mask the gluing areas with a horizontal strip of paper or tape glued to hot glue or double-sided tape.
6. Attach a hanging loop to the top of the flashlight. Its ends can be glued under a horizontal tape or secured to the inner walls of the tube.
Origami paper lantern
The amazingly elegant and intricate art of making paper jewelry came to us from China and Japan. For example, this original flashlight model. It looks extremely catchy and textured due to its unusual shape. A bizarre play of light and shadow is created by intricate curves on the paper. However, it is not at all difficult to do. Like previous models, the toy is made using the origami technique, but, interestingly, without the use of scissors. The volume effect is achieved solely by folding the paper at different angles. Prepare paper of different colors, a protractor, a pencil, a ruler and glue. You can clearly see how to make a Chinese paper lantern with your own hands in the figure.
The ratio of length to width of a sheet of paper should be approximately 2:1, that is, the length is twice the width. We draw transverse parallel lines every 1.5 cm and one longitudinal line - strictly in the middle of the sheet. We apply a protractor to it at the intersection of two straight lines. We draw a diagonal passing through 45°, and at the next intersection through 135°. We repeat this operation until the end of the sheet. The result should be a longitudinal line like a snake. Now you can start bending - the markings are ready. We bend the sheet like an accordion, immediately forming the middle. The photo shows how to make a paper lantern of the desired shape.
We glue the finished flashlight on the side, top and bottom. You need to insert a loop into the top slot. You can go further: make a lot of small multi-colored lanterns and put a regular LED garland inside.