To escape from everyday problems, each person chooses an activity to his liking. Today, knitting is especially popular among lovers of needlework. The designation of loops for this type of needlework is considered almost generally accepted, with some only minor clarifications. However, if you master the basic options for graphically depicting loops, reading diagrams will no longer be difficult. All that remains is to keep the number of working loops under control and periodically check the pattern.
Finding a pattern - starting to knit
Finding a knitting pattern for a pattern of any complexity will not be difficult. Experienced and not so experienced knitters are almost always ready to share their secrets. For their communication, there are separate websites, special forums are organized, various magazines are published, where you can find not only diagrams, but also photographs of finished products, and also give advice and recommendations. But in order to repeat the pattern with your own hands, you need to understand the designation of the loops. Only three main loops are knitted with knitting needles, and we will look at their designations in this article.
For knitting, patterns are of decisive importance, however, as for other types of knitting. They ensure accurate repetition of a specific pattern. Few people will be able to accurately reproduce without a graphic design. To do this you need to have sufficient experience and a good imagination. And besides, for this purpose, it will almost certainly be necessary to disband the existing sample. But this eliminates the possibility of making a mistake. Because if something goes wrong, it will be quite difficult to correct the situation. That is why using knitting patterns is the simplest and most preferable option.
It can be argued that, regardless of what source the pattern was found in, anyone who knows the symbols of the loops will be able to complete the pattern. Even if a foreign resource was used, it is not possible to read the comments on the knitting task (due to the language barrier).
Choosing graphics
At the same time, the graphical display method has significant advantages:
- compactness of the image. Even a fairly complex motif takes up limited space on paper. Conventional symbols replace entire sentences;
- clarity and visibility. The ability to capture the whole picture at once saves time and the ability to trace the relationship P;
- practicality and convenience. Working with a graphic image is much easier than working with a text entry. You can easily correct a mistake or find an inaccuracy in a knitted fragment;
- the ability to use conventional signs for craftswomen of any nationality. The symbols are easy to read and remember in any language.
However, despite the significant list of advantages, there are also disadvantages of the method:
- At present, there are no uniform standards that describe the symbols of P combinations. This inconvenience requires that the image be accompanied by a decoding of the symbols or a table with their list;
- Some combinations or methods of knitting stitches cannot be displayed graphically. Therefore, additional explanations in text format are necessary;
- Quick reading and understanding of diagrams requires practical skill of the performer. Conventions have to be learned.
Read
Step-by-step knitting of warm pants for a baby
These shortcomings are not a reason to refuse to use symbols graphically. Beginning craftswomen are often afraid of incorrect interpretation of symbols or difficulties when making new patterns. With a little patience and experience, reading diagrams will not be difficult at all.
Main types of loops
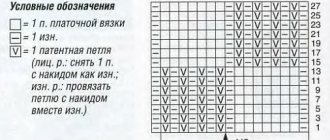
In order to understand the basics of knitting, you need to master only three types of basic loops: knit, purl and yarn over. All the variety of patterns is made from them in different combinations and designs. Let's look at the generally accepted notation using the table below as an example.
Each type of loop, despite the fact that there are only three of them, has its own main purpose. If the purl stitch is used mainly for making the reverse side of the product, or highlighting certain elements, the front loop is the basis for knitting. Variations of this loop are considered to be crossed, two or three loops knitted simultaneously, lowered, extended. They can be inclined to the right or left, it all depends on the complexity and symmetry of the pattern. And finally, the yarn over - it is used when you need to add a certain number of loops, as well as for making openwork patterns.
Conventions in knitting
To understand the pattern, you need to remember the symbols for knitting. There are not many basic icons: an empty square, triangles to the right and left, filled or not, a circle, vertical and horizontal lines, diamonds, filled or not, slanted lines to the right or left with an additional line to the right or left.
List of types of loops:
- facial;
- purl;
- yarn over;
- two together face left;
- two together facing right;
- two together purl to the left;
- two together purl to the right;
- facial crossed;
- purl crossed;
- edge;
- three together facial;
- purl three together;
- cross to the right;
- cross to the left;
- remove on an auxiliary knitting needle before work;
- remove on an auxiliary knitting needle at work.
Facial
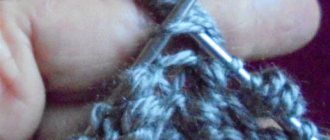
The simplest loop is the front one. The symbol is an empty square or a vertical line. To knit, you need to insert the right knitting needle into the loop on the left knitting needle from left to right, hook the working thread, which should be behind the work on the index finger. Next, pull the thread through the loop and throw it onto the right knitting needle.
Two together with an inclination. Knit in the same way as a single one, only the right knitting needle is inserted into two loops on the left knitting needle at once. The symbol is a black triangle or an inclined line to the left/right and a dash perpendicular to it to the right or left.
The tilt can be to the right or left, this is done to decrease it in the desired direction. To tilt to the right, the right needle is inserted into the loops from left to right.
With a tilt to the left - the first loop is removed on the needle on the right, the next one is knitted with the front one, and the removed one is thrown onto the knitted one.
Crossed - indicated by the image of a loop. To perform this, the right knitting needle is inserted into the loop on the left needle from right to left, the working thread is hooked, and pulled through. The symbol is a black diamond.
Shifted - formed after knitting a decrease or two loops together. Their location is moved compared to the original one. The icon is an inclined line to the right or left.
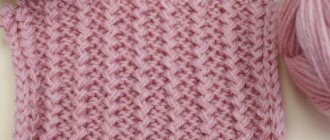
Purl
When knitting this type of element, the working thread should be in front of the work. The right knitting needle must be inserted into the loop on the left knitting needle from right to left, wrapped with a working thread and pulled through. The symbol is a horizontal line.
To knit two together, you need to transfer first one loop from the left knitting needle to the right one, then the other. Then remove them again with the left knitting needle so that they change places, knit by inserting the right knitting needle into both at once from right to left. Designation – an open triangle with the lower corner to the left. This is a left-leaning option.
- Scar cream
- The most in-demand professions in Russia in 2021 for women and men
- How to pickle garlic arrows for the winter
Two together with a tilt to the right - we knit two elements in one step with a purl stitch, insert the right knitting needle from right to left. Designation – an open triangle with the lower corner to the right.
Crossed ones are obtained by inserting the right knitting needle from left to right from the back side of the loop, then we hook the working thread and pull it through. Designation is an open diamond.
Shifted ones are formed when two or three loops are knitted together; there are fewer of them on the knitting needle, so the remaining ones are shifted to the left or right. There is no specific symbol because they are formed by knitting two or three together, knit or purl.
Yarn over
The yarn over symbol is a circle. There are capes for yourself and for yourself. We are talking about moving a knitting needle. Which type should be knitted is indicated in the description. With the help of this element, increases are made and an openwork knit is created. There are double and triple yarn overs.
A straight yarn over on the front side is made by throwing the working thread over the right needle towards you. Reverse - from yourself. Next - knitting according to the pattern. In the purl row it is knitted in a purl stitch. Double and triple yarn overs are made by throwing the working thread onto the right knitting needle the required number of times (two or three). When working with yarn overs, you need to count the loops so as not to make a mistake.
Face loop
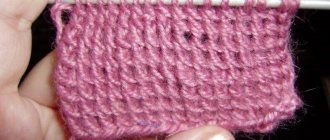
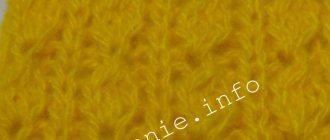
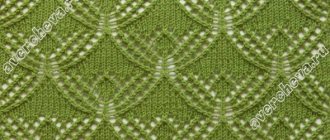
Let's start by looking at the simplest and most popular type of loops - facial ones. This type is considered the most common, because it is with facial loops that a huge number of options are made, which make it possible to obtain such a variety of patterns. They are used for the simplest options: for stocking or garter knitting, as well as for creating particularly complex patterns.
No matter how complex the pattern may seem at first glance, by repeating it several times in a row, further work can be carried out literally on an intuitive level. Although almost everywhere the designation of loops when knitting is the same, some nuances are still worth remembering.
When starting to knit a new, unfamiliar pattern, the knitter performs a small sample. It will help you calculate the required number of loops for the product, and will also allow you to understand the technique of making the pattern. The front loop is usually indicated by a vertical dash or an empty cell.
Rules for reading graphic descriptions
To master an important skill, you should remember the principles of reading conventional images. The main element of the circuits is the cell. This is where the symbols are located. Each cell represents only one P.
The numbers located on the sides of the image indicate the R. numbers and the direction of their knitting. The front side of the product is shown with odd numbers, and the back side with even numbers. In some cases, in order to create good clarity of the drawing, the purl R. are not indicated. But, they must indicate in the explanations that knitting P. in purl R. must be done “according to the drawing.” With this clarification, all P. of the facial R. are performed with the front ones, and in the purl ones - with the wrong ones.
In the diagrams, in general, edge P. are not indicated. But, if the designation is provided, then most often it is a plus sign (+). In any case, they are not included in the calculation of P. pattern repeat. You can knit the edges in a convenient or familiar way. The most famous is to remove the first one unknitted, and perform the last one behind the bottom wall of the front one.
Rapport refers to fragments of a pattern that are repeated either horizontally or vertically. They are marked with a square or arrows indicating the beginning and end of the rapport. Often, the entire image consists only of such a repeating fragment. For a harmonious arrangement of the pattern on the parts, the P. is calculated and the repeat is distributed strictly symmetrically. In some cases, to maintain symmetry, a set of additional stitches will be required. As soon as the last stitch of the fragment is knitted, repeat the pattern from the beginning. But this is only if the diagram does not indicate a special R. for starting a new repetition.
Read
Detailed description of knitting raglan sleeves from the bottom and top with knitting needles
Ideally, for a better understanding of the image, a photo of the pattern is attached. Some graphics are difficult to represent in the finished product. In order not to make a mistake in choosing a pattern, you need to knit a small sample from the selected yarn and determine the knitting density.
Yarn over
And the third type of loops in knitting is considered to be a yarn over. Actually, it can be called a loop quite conditionally. This is just a thread thrown onto a knitting needle for the purpose of further knitting a loop from it. On the diagrams it is simply indicated by a circle. When making a complex product, techniques of both narrowing and expanding the product are often used. And in this case, the yarn over comes to the rescue.
Yarn over is also used for knitting openwork patterns. Due to the fact that it appears where there was no loop before, it gives a certain airiness and looseness to the pattern. And if the correct combination of thread thickness and knitting needle diameter is observed, you can achieve incredibly beautiful, literally weightless products.
Options for knitting facial loops
As noted above, there are various options for combining basic stitches when knitting. Pattern diagrams sometimes contain symbols different from those listed above.
For example, if the pattern involves tilting the loops to the right or left, then the main loops are knitted according to certain rules. The technique of knitting them will vary slightly.
To tilt the knit stitch to the left, you must first remove one unknitted needle onto a working needle, and then, having knitted the next one, pull it through the removed one. And in order to achieve the inclination of the loops to the right, you need to insert the knitting needle under the second loop, and, grabbing it and the previous one, knit them at the same time. It should be noted that performing such a combination of tilts, especially for an insufficiently experienced master, is not at all easy. You have to constantly check the pattern diagram. And the fact that the designation of loops when knitting is universal greatly simplifies the process of perceiving the pattern.
The same techniques can be used not with one, but for knitting pairs of loops.
In the diagram, such options are indicated by corresponding tilts in the direction in which they should be performed. Much less commonly, such tilts are indicated by a triangle indicating the direction of the tilt.
Carpet embroidery and creative needlework
English knitting symbols
. Translating to Russian language.
Be careful when reading, pay attention to the headings.
SPOKES English knitting designations translation:
yarn to back of work
– YB, ytb – thread at work
3-needle joining technique
– tying two fabrics together with a third knitting needle. Fold the fabrics inside out, the top fabric on the bottom, the ends of the knitting needles are directed in one direction, insert the third knitting needle into the first loops of each of the fabrics and knit together, continue until the end of the row
back loop only – BLO
– purl loop only
bind off – BO
– close the loops
Bobble I
– small bump: knit from one knit 6 1 knit, 1 pn, 1 knit, turn, 4 purl, turn, 4 knits, turn, 2 together purl 2 times, 2 knits together.
Bobble II
– large bump: cast on one loop, knit 5 loops from it (knit alternately on the front and back walls), turn, knit 4 rows of knitting stitches, with the left knitting needle, throw 2,3,4,5 loops on the first, close the loop, cut the thread, sew the bump on the canvas
cable
– braid
cable needle – cn
– loop holder for braid loops
cast on – CO
- cast on loops
Central double increase – CDI
– increase of 2 loops: knit one purl from one loop, cross and purl, then insert the left knitting needle under the thread between these loops and knit another purl: you get 3 stitches from one
Double decrease – DD
– decrease of 2 loops: slip 2 loops onto the left needle, as in knitting, knit 1, pull it through 2 removed
double-pointed needle – DP
or dpn – knitting needle sharp on both sides
edge stitch – edge st
– edge loop
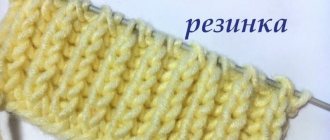
elastic
- rubber
garter stitch – garter st
– rib knitting – purl row, knit row, garter stitch
knit–K
– front (loop)
knit one, purl one – k1p1
– one knit, one purl
knit two (2) stitches together – K2tog
– knit two stitches together as a knit stitch
knitwise-kwise
- like a facial
left hand needle – LH
– left knitting needle
make loop – ML
– K1, wrap the thread around the knitting needle, then wrap the thread around 1-2 fingers of the left hand and again around the knitting needle, pull both threads on the knitting needle through the loop, transfer them to the e-knitting needle and knit together behind the back wall
make tassel – MT
– fur – insert the left knitting needle into the loop, as in knitting, wind the thread around 2 fingers of the left hand 5 times, pull all the threads through the loop, transfer to the left knitting needle and knit together the knitting needle behind the back wall
pass slip stitch over – psso
– place the removed loop over the knitted one
pick up and knit
– cast on knit stitches along the edge of the knitting
pick up and purl
– pick up purl stitches along the edge of the knitting
purl–P
– purl (loop)
purl two (2) stitches together – P2tog
– knit two stitches together as a purl
purl-wise – as though to purl – p-wise
– like a purl
reverse stockinette stitch – rev st st
– purl stitch
right hand needle – RH
– right spoke
seed stitch – seed st
– pearl knitting (k1, p1, knit in the next row against the direction of the stitches)
single-pointed needles – SP or spn
– knitting needles with locks on one side
slip-sl
– remove the loop unknitted
slip bead – SB1
– tie a bead
Slip, slip, knit – ssk
– decreasing stitches – slip one as a knit stitch on the right needle, slip one as a knit stitch on the right needle, thread the left needle into the two removed needles and slip them off, knit both stitches together as knit stitches behind the back arches of the loops
Slip, slip, purl – ssp
– decreasing stitches – slip one as a knit stitch on the right needle, slip one as a knit stitch on the right needle, thread the left needle into the two removed stitches and slip them off, knit both stitches together as purls on the back arcs of the loops
stockinette stitch – St st
– stockinette stitch, stockinette stitch
wrap
– wrapped loops
yarn forward – Yfwd
– thread before work
yarn round needle – YRN
- thread around the needle
ytf – yarn to front of work – YF
– thread before work
cont
- continue
p2sso
– throw 2 slipped loops onto the knitted one
SKP
– slip one loop, knit the next loop, throw the removed loop over the knitted one
SK2P
– remove one loop, next. Knit 2 loops, throw the removed loop over the knitted ones
wyif
– (remove the loop unknitted), thread before work
wyib
– (remove the loop unknitted), thread at work
Yfrn
– move the thread to “before work”
1\1 LPC
– leave 1 p. for auxiliary. knitting needle before work, purl 1, then knit a knit stitch with an auxiliary stitch. knitting needles
1\1 RPC
– leave 1 p. for auxiliary. knitting needle at work, knit 1, then purl a loop with an auxiliary stitch. knitting needles
1\2 LC
– leave 1 p. for auxiliary. knitting needle before work, knit 2, then knit a knit stitch with an auxiliary stitch. knitting needles
1\2 RC
– leave 1 p. for auxiliary. knitting needle at work, k2, then knit a knit stitch with an auxiliary stitch. knitting needles
1\2 RPC
– leave 1 p. for auxiliary. knitting needle at work, k2, then purl a loop with an auxiliary stitch. knitting needles
1\3 RPC
– leave 1 p. for auxiliary. knitting needle at work, k3, then purl a loop with an auxiliary stitch. knitting needles
2\1LC
– leave 2 p. for auxiliary. knitting needle before work, knit 1, then knit 2 stitches with aux. knitting needles
2\1 LPC
– leave 2 p. for auxiliary. knitting needle before work, purl 1, then knit 2 stitches with aux. knitting needles
2\1 RC
– leave 2 p. for auxiliary. knitting needle at work, knit 1, then knit 2 stitches with aux. knitting needles
2\1 RPC
– leave 2 p. for auxiliary. knitting needle at work, knit 1, then purl 2 stitches with aux. knitting needles
2\2 LPC
– leave 2 p. for auxiliary. knitting needle before work, purl 2, then knit 2 stitches with aux. knitting needles
2\2 RPC
– leave 2 p. for auxiliary. knitting needle at work, knit 2, then purl 2 sts with aux. knitting needles
2\3 LPC
– leave 2 p. for auxiliary. knitting needle before work, purl 3, then knit 2 stitches with aux. knitting needles
2\3 RPC
– leave 2 p. for auxiliary. knitting needle at work, knit 3, then purl 2 stitches with aux. knitting needles
2-st LC
– leave 1 p. for auxiliary. knitting needle before work, knit 1, then knit a knit stitch with an auxiliary stitch. knitting needles
2-st LPC
– leave 1 p. for auxiliary. knitting needle before work, purl 1, then knit a purl loop with an auxiliary stitch. knitting needles
2-st RC
– leave 1 p. for auxiliary. knitting needle at work, knit 1, then knit a knit stitch with an auxiliary stitch. knitting needles
2nd RPC
– leave 1 p. for auxiliary. knitting needle at work, purl 1, then purl a loop with an auxiliary stitch. knitting needles
3\1 LPC
– leave 3 p. for auxiliary. knitting needle before work, purl 1, then knit 3 stitches with aux. knitting needles
3\1 RPC
– leave 1 p. for auxiliary. knitting needle at work, k3, then purl a loop with an auxiliary stitch. knitting needles
3\2 LPC
– leave 3 p. for auxiliary. knitting needle before work, purl 2, then knit 3 stitches with aux. knitting needles
3\2 RPC
– leave 3 p. for auxiliary. knitting needle at work, knit 2, then purl 3 stitches with aux. knitting needles
3\2 RTC
– 3 back, 2 k, after the loop from the additional needle, transfer to the left knitting needle and knit and then dc - k.
3\3LPC
– leave 3 p. for auxiliary. knitting needle before work, purl 3, then knit 3 stitches with aux. knitting needles
3\3RPC
– leave 3 p. for auxiliary. knitting needle at work, knit 3, then purl 3 stitches with aux. knitting needles
4\1 LPC
– leave 4 p. for auxiliary. knitting needle before work, purl 1, then knit 4 stitches with aux. knitting needles
4\1 RPC
– leave 1 p. for auxiliary. knitting needle at work, knit 4, then purl a loop with an auxiliary stitch. knitting needles
4-st LC
– leave 2 p. for auxiliary. knitting needle before work, knit 2, then knit 2 stitches with aux. knitting needles
4-st RC
– leave 2 p. for auxiliary. knitting needle at work, knit 2, then knit 2 stitches with aux. knitting needles
4-st RPC
– leave 2 p. for auxiliary. knitting needle at work, knit 2, then purl 2 sts with aux. knitting needles
5-st LPC
– 2 forward, 1 back, 2l, 1dc – i, 2 dc – l
5-st RLC
– 1 forward, 3 back, 1l, 3dn – i, 1dn – l
5-st RPC
– 3 back, 2 k, after the loop from the additional needle, transfer to the left knitting needle and knit and then dc - k.
6-st LC
– leave 3 p. for auxiliary. knitting needle before work, knit 3, then knit 3 stitches with aux. knitting needles
6-st RC
– leave 3 p. for auxiliary. knitting needle at work, knit 3, then knit 3 stitches with aux. knitting needles
6-st RPC
– leave 3 p. for auxiliary. knitting needle at work, knit 3, then purl 3 stitches with aux. knitting needles
7-st LC
– leave 4 p. for auxiliary. knitting needle before work, knit 3, then knit 4 stitches with aux. knitting needles
7-st RC
– leave 3 p. for auxiliary. knitting needle at work, knit 4, then knit 3 stitches with aux. knitting needles
3-Bobble Cluster
– cast on 1 loop. 1st row: knit 5 from 1 loop (1l, 1i, 1l, 1i, 1l). 2nd and all even rows: slip 1, purl 4. Rows 3,5,7: slip 1, knit 4. Row 9: knit 2 together, knit 2 together = 3 stitches, row 10: purl 3 together. Fold the bump in half, wrong side in, insert a single needle into the first cast-on loop and knit it together with the last loop. Repeat rows 1-10 2 more times, leaving the last stitch on the needle.
RT
– from 2 loops, knit 2-2 vm, without removing them from the left knitting needle, knit the 1st knit loop
LT
– knit the 2nd stitch with a knit cross, then the 1st stitch and remove them from the left needle.
inc 1
– add one knit loop: knit a loop behind the front and back walls
inc 2
– add 2 loops: from one loop knit 1l, 1i, 1l
inc 1 p-st
– ext. Purl 1: knit the pellet from the front and back walls
M1 p-st
– knit one purl loop from the broach
K1B
– knit a loop from the loop of the previous row
SP2P
– remove the loop on the right needle, as in knitting, purl 2 together and pull through the removed loop
s2kp
– slip 2 stitches on the right needle, k1, pull it through the slipped stitches
Dec 4
– 2 purl together, 3 purl together, throw the first one over the second = decrease 4 loops
C3R
– slip 1 stitch on the extra needle back, p1, k1, k1 from the extra needle
In this article: English knitting symbols - translation into Russian
. Learn to craft with us!
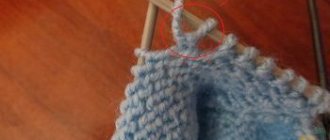
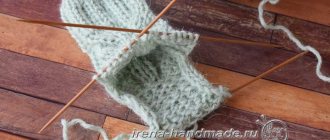
Using auxiliary needles
There is also a very important point for understanding how loops are designated when knitting. Not all types of loops can be made with knitting needles. Sometimes additional working knitting needles, a hook or pins are used for this purpose. They help not to lose the loops that should be knitted after those that are further on the auxiliary needle.
Three lines that have a common vertex indicate that the three loops are also knitted in a special way. Similar to the bends, one loop is removed unknitted. Then, two loops are knitted together and pulled through the removed one. Thus, we get a pyramid with a single vertex, which is similar to the symbol in the diagram.
Schema meaning
Thus, we came to the conclusion that each loop plays a certain role in the knitting process. Therefore, the designation of loops when knitting is of particular importance. After all, only strict adherence to the diagram can ensure that a certain pattern is obtained on the finished product.
Knitting is not just making various things with your own hands, it is also a creative process. It is difficult to imagine that obtaining such a huge number of different patterns is possible by using different options for making just three main loops. Every knitter can come up with her own special version of the pattern (after practicing on existing ones). And then, perhaps, it is your execution scheme that handicraft lovers will recommend to each other.