Greetings, dear knitting fans!
I’ll tell you a “terrible” secret: I still don’t understand why the patent elastic band with knitting needles is called that?!! And you?
Either its inventor thus decided to test his right to it (patent), or the process of knitting this elastic band was at first under the strictest ban, and then suddenly broke free and became patentis - “open, accessible”...
But be that as it may, today we will talk about it, about patent gum and its varieties.
Patent elastic knitting and rules for knitting it
Patent stitches are the basis of many relief patterns, so as a rule, even beginning knitters are very familiar with their knitting patterns.
There are two ways to tie patent loops:
In the first case, the working needle is inserted not into the loop on the left needle, but into the loop of the previous row located under it. Then the overlying loop is dropped from the working needle unknitted and unraveled to the height of one row.
In the second case, an unknitted loop with a crochet is removed from the left knitting needle. After the end of the row, the removed loop is knitted together with the yarn over in the next row.
Knitting a patent elastic band has its own subtleties that must be taken into account in order for the pattern to turn out lush and attractive.
Since many patent elastic bands stretch very strongly in width, before starting work you must make a test sample. Its size should be approximately 15 cm * 15 cm. The sample will allow you to accurately determine the number of loops for the cast-on edge and understand how the pattern will behave in the future.
To make the patent elastic look more voluminous and airy, it is better to choose fluffy yarn and thick knitting needles.
If you knit the loops more freely and do not pull the thread, the pattern will look more attractive.
You need to be extremely careful while knitting. Since it will be almost impossible to correct errors made during operation. In most cases, you have to unravel the canvas to the place where the mistake was made. And only after that continue working.
Patent rubber bands have a purely decorative purpose. You should not use them to decorate the bottom of sleeves or knit stripes, as the pattern does not hold its shape well and is subject to stretching.
Variety of patterns
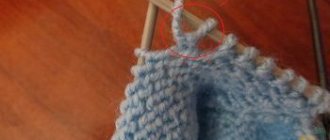
The complex name should not mislead you. The technology itself is quite simple, even beginners can handle it. The product will be beautiful, practical and convenient. In addition, there are many variations of patterns for patent knitting. The process of knitting a patent pattern involves constant repetition of manipulations.
Craftsmen who have already mastered their skills can use more than one element in an ornament, but three elements - the maximum number for making a product. For convenience, it is better to use the video tutorials given at the end of the article. You should start working by alternating the removed loop with the cape and front stitch. The first loop should be an edge loop, each row ends with it. Guided by the product diagram, it is quite difficult to get confused.
The whole process consists of turning the work cloth from the back to the front. We turn the fabric over and use the front loop removed from the loop with a yarn over. Next, we turn the future product over again and knit an edge loop, remove it and yarn over.
We continue to work on the second and third rows - repeats, repeating elements of the pattern. The knitting process must be repeated until the required length of the product is obtained.
Article on the topic: Crochet mitts for beginners: diagrams with descriptions and photos
The technology of knitting a patent pattern using the underlying row is also not complicated. For each element, knitting is used; you should start again from the edge. But then it is necessary, turning the fabric over, to alternate the loops between the adjacent bottom row and those located directly on the knitting needles. And so on until you get the required size.
The main thing is to be extremely careful, otherwise the slightest confusion with the loops will ruin all your work.
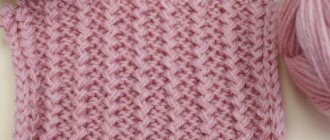
Pearl elastic knitting pattern
Pearl gum is a semi-patent pattern because it has two sides. The reverse side is visually practically no different from the classic English elastic band.
The front side of the elastic band resembles pearls. This must be taken into account before you start knitting.
Scheme:
The number of loops should be a multiple of 2 + 1 + 1 edge loop on each edge.
1st row (front side of work):
2nd row: 1 edge loop, 1 purl loop, *1 knit stitch (the working needle is inserted into the loop one row below), 1 patent loop*. Repeat from * to * and end with 1 edge stitch.
Repeat the repeat of 2 rows. In this case, on the wrong side you should get an English elastic band.
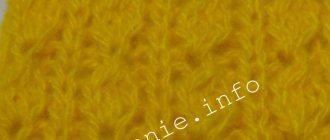
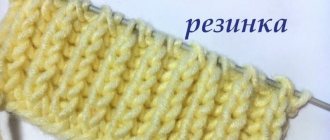
Method of knitting semi-patent elastic
The most important difference between a semi-patent rubber band and a patent one is that it is not double-sided, and its front part has a completely different appearance. To make it clearer to you how to distinguish between these rubber bands, look at one side, which will be similar to the patent one, and the second is more reminiscent of pearls. You will need much less yarn for work, and you can also reduce your free time. In the photo you can see what a semi-patent elastic band looks like. We invite you to study a detailed video lesson of her knitting.
Video: Learning to knit semi-patent elastic
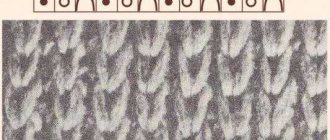
Norwegian elastic knitting pattern
The Norwegian elastic band looks similar to the English one, but has a completely different technique. Purl stitches are knitted purl. The knit stitches that follow are knitted from the knit stitch on the bottom row.
Cast on an even number of stitches + 2 edge stitches.
Row 1 – knit with rib 1*1
2 and all subsequent rows - front loops should always be knitted not from the loop lying on the left knitting needle, but from the loop located under it from the bottom row. Purl stitches in the classic way.
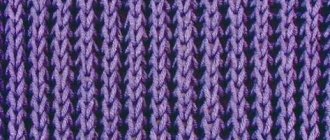
Patent English elastic knitting
The classic English rib is knitted with knit stitches and stitches cast with a bias yarn over. In order for the elastic to look right, the front loops must be tied behind the front wall. But you need to take into account that for knitting you always cast on an odd number of loops.
Row 1 (preparatory) – *knit 1. Thread before work. Slip 1 undone stitch with double crochet. To form a yarn over, simultaneously throw the thread over the right knitting needle behind the work in the form of a free oblique broach. Repeat from * to last stitch, thread before work. Slip off the last stitch undone and without a single crochet.
2 and all subsequent rows – knit 1. * Thread before work. Slip 1 undone stitch with double crochet. Knit the next stitch together with the yarn over from the previous row. Repeat from * to last stitch, thread before work. The last loop must be removed undone and without a single crochet.
Circular English elastic band
To knit an English rib in the round, you need to cast on an even number of stitches on circular knitting needles.
Row 1: *knit 1, slip 1 double crochet stitch not knitted*. Repeat *–* until the end of the row.
Row 2: *Slip 1 person. p. with a yarn over not knitted, purl the removed loop and yarn over*. Repeat *–* until the end of the row.
Row 3: *Knit the slip stitch and yarn over together. Remove 1 purl. p. with a double crochet, not knitted*. Repeat *–* until the end of the row.
Repeat rows 2 and 3.
Pullover with beveled front
An interesting pullover in a sporty style is knitted with a large semi-patent elastic band from two types of yarn.
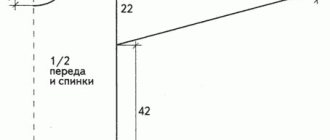
DIMENSIONS 36/38 (40/42) 44/46
YOU WILL NEED
- Yarn 1 (100% extra-fine sheep wool; approx. 105 m/50 g) – 400 (450) 500 g blue;
- yarn 2 (75% mohair, 25% silk; approx. 225 m/25 g) – 100 (125) 125 g white;
- knitting needles No. 7;
- short circular needles No. 7.
PATTERNS AND DIAGRAMS
BASIC PATTERN Knit with semi-patent elastic with elongated loops in 2 threads (1 wool and 1 mohair thread): 1st r. (purl row): 1 chrome, * 1 front, 1 purl *, finish: 1 front, 1 chrome.
2nd r. (front row): 1 chrome, * 1 purl, 1 knit *, finish: 1 purl, 1 chrome.
3rd row: 1 chrome, * 1 knit, 1 purl*, finish: 1 knit, 1 chrome.
4th r: 1 chrome, 1 purl, insert the knitting needle into the loop of the underlying row and knit 1 knit*, finish: 1 purl, 1 chrome.
In width, constantly repeat from * to *. Perform rows 1–4 once in height, then constantly repeat rows 3 and 4.
INCREASES ON SEMI-PATENT RIBBIN Before 5 middle loops from the broach, knit 1 purl and 1 knit crossed = 2 loops added; after 5 middle loops from the broach, knit 1 knit stitch and 1 purl stitch crossed = 2 loops added.
DECREASES ON SEMI-PATENT RIBBING Right working edge: 1 edge, 1 purl, 1 knit, 1 purl, remove 1 loop, as in knitting, knit 2 loops together, pull the removed loop through the knitted one = 2 loops decreased; left working edge: knit 3 stitches together, purl 1, knit 1, purl 1, edge 1. = 2 loops decreased.
KNITTING DENSITY 14 p. x 24 r. = 10 x 10 cm, knitted with the main pattern using knitting needles No. 7.
COMPLETING OF THE WORK
BACK On knitting needles No. 7, cast on 71 (79) 87 loops with double thread and knit with the main pattern; in the front rows, the middle loop should be 1 purl.
After 62 cm from the initial row, close on both sides for shoulder bevels 3 (3) 5 p. and then in each next 2 r. close on both sides 6 x 3 p. (2 x 3 p. and 4 x 4 p.) 6 x 4 p.
After 68 cm from the initial row, bind off the remaining 29 loops.
BEFORE On needles No. 7, cast on 71 (79) 87 loops with double thread and knit with the main pattern. Mark the middle 5 sts. Before and after these 5 sts in each next 6th row. add 2 stitches at a time, as described above for semi-patent elastic.
At the same time, decrease on the sides in every next 6th row. 2 p. each, as described above for semi-patent elastic. Thus, the number of loops in the row remains unchanged.
Fold the front and back to measure. Due to increases and decreases, the bottom edge is beveled!
After 35 cm = 84 rows from the starting row, measure along the line of the middle front, for the neckline put the middle 5 stitches on a safety pin and divide the work. Finish both sides separately.
Along the front neckline, knit in a straight line (no increases). On the sides in every next 6th row. perform decreases 7 more times.
After 62 cm from the beginning row, measure along the side, bind off the remaining 21 (25) 29 shoulder loops.
The shoulder bevel is formed automatically due to decreases along the side.
SLEEVES On needles No. 7, using double thread, cast on 35 stitches for each sleeve and knit with the main pattern.
For side bevels in every next 16th row. add 3 x 1 stitches on both sides, then in each next 14th p. add another 3 x 1 p. on both sides (in each next 12th r. add 7 x 1 p. on both sides), in each next 10th r. add 2 x 1 p. on both sides and then in each next 8 p. – another 8 x 1 p. Include added loops in the main pattern = 47 (49) 55 p.
After 43 (41) 39 cm from the initial row, close on both sides for the sleeve roll 2 p. and then close in each next 2 r. another 4 x 1 p. and 6 x 2 p.
After 51 (49) 47 cm from the initial row, close off the remaining 11 (13) 19 sts.
ASSEMBLY Lightly moisten the parts, stretch them according to the dimensions indicated in the pattern and leave until completely dry.
Use a mattress stitch to sew the shoulder seams.
On both sides, starting from the outer edge of the shoulder seam, measure 18 (19) 22 cm and put a mark. Sew sleeves between the marks, while slightly stretching the sleeve cap so that it “fits” evenly into the armhole.
Using a mattress stitch, sew the side seams and the remaining open sleeve seams.
For the neck strap, cast on loops on circular needles No. 7 as follows: along the edge of the back neck, 29 sts, along the edges of the front neck, on each edge, cast on 1 st and add the remaining loops. Knit 1 round. knit stitches and close the loops.
This video contains another master class on knitting a pattern. Another craftswoman can better reveal some incomprehensible nuances.
Return to content
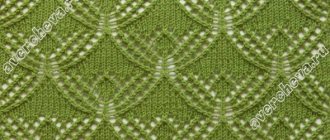
Elastic cutwork knitting
In order to knit a cutwork ribbed pattern, you need to separate the garter stitches at an equal distance from each other with knit stitches.
Cutwork elastic band No. 1
Cutwork elastic band No. 1 (knitting pattern)
To knit a classic cutwork rib, you need to knit five loops in garter stitch between the tracks of knit stitches.
Cutwork elastic band No. 2
Cutwork elastic band No. 2 (knitting pattern)
In this article I told you how to knit a patent elastic band. Because it is considered one of the most popular patterns for knitting scarves and hats.
The uniqueness of the article is recorded