Put the delayed stitches of the 2nd and 3rd needles back into work.
On the 4th needle, cast on the right side edge of the heel wall from every 2nd row. 1 p. each
5. In every 2nd round row, knit the third stitch from the end and the penultimate stitch together on the 1st knitting needle; on the 4th knitting needle, knit the 2nd and 3rd stitches together with a broach.
Repeat these decreases until the 1st and 4th knitting needles again have the original number of stitches that were on the knitting needles before the heel stitch. Tie the foot according to the appropriate instructions.
6. Ribbon toe: on the 1st and 3rd knitting needles, knit the third and penultimate stitch from the end together, knitting on the 2nd and 4th knitting needles.
Perform these decreases in every 2nd round until the number of stitches is halved.
Then decrease stitches in each round. Pull the last 8-12 stitches tightly with double thread. Fasten the threads.
Stepped heel
Thanks to the rounded shape, the stepped heel fits the foot well.
1. Transfer the loops of the 1st and 4th needles to one needle and knit the heel in straight and reverse rows using stockinette stitch (knit stitch - knit stitch, purl stitch - purl stitch) or a pattern with removed loops .
Set aside the stitches of the 2nd and 3rd needles.
2. At the same time, knit 2 sts on both sides of the heel in garter stitch (knit and purl sts), this makes it easier to count the rows and creates a more textured shape.
Knit the number of rows indicated in the table for the 1st step.
Z. At the end of the next person. R. set aside the specified number of loops.
Rotate the work.
At the end of the next purl. R. set aside the same number of loops.
On the remaining loops, knit the 2nd step (the number of rows is indicated in the table) in stockinette stitch or in a pattern with removed loops, while again knitting 2 stitches on both sides in garter stitch.
4. In the following persons. R. remove 1 stitch as knit., at the end of this row along the left edge of the 2nd step, knit loops from the edges (see the number in the table), while knitting the last loop knitted from the edge and the first set aside loop of the 1st step together with a broach ( Slip 1 p. knit 1 and pull it through the removed loop).
Turn work to purl. R. remove 1st stitch as purl. and knit stitches purl.
After this, along the right edge of the 2nd step, knit the same number of loops from the edge stitches, while knitting the last loop knitted from the edge and the first set aside loop of the 1st step together.
Rotate the work.
Knit in stockinette stitch or slip stitch pattern in this manner until all the reserved stitches of the 1st step are used.
Then knit the loops of the first half of the heel.
5. Distribute stitches onto 4 double needles.
Knit the loops of the second half of the heel with the 1st knitting needle, knit loops along the left edge of the 1st step from the edge stitches.
Put the delayed stitches of the 2nd and 3rd needles back into work.
Using the 4th knitting needle, on the right edge of the 1st step, knit the same number of loops from the edge stitches as on the left edge, and knit the loops of the first half of the heel.
6. Knit the instep wedge in circular rows, with every 2nd r. knit the third stitch from the end and the penultimate stitch together on the 1st needle, knit the 2nd stitch on the 4th needle, knit the 3rd stitch. and pull it through the removed loop.
Repeat these decreases until there are as many stitches left on the 1st and 4th needles as on the 2nd and 3rd needles.
Then knit the foot according to the instructions (see the table for foot length).
Boomerang heel
For the boomerang heel, the principle of knitting in short rows is used. This heel is shorter than the traditional one.
into 3 parts. Set aside the stitches of the 2nd and 3rd needles.
2. First part of the heel: 1st p. (front row) knit faces. and turn the work around. 2nd r. (purl row) start by making a double loop: place the thread in front of the work, insert the knitting needle into the 1st stitch on the right, remove the loop and pull the thread back tightly (so that holes do not form later).
The loop scrolls over the knitting needle and becomes double.
Place the thread again before work, knit the remaining loops purl. and turn the work around.
3. Next knit in short rows. At 3 p.m. At the beginning of the row, perform a double loop, then knit. p. to the double loop at the end of the row and turn the work.
Do not knit a double loop!
At 4 p.m. At the beginning of the row, perform a double loop, then knit. p. to the double loop at the end of the row and turn the work.
4. Repeat the 3rd and 4th rows until only the middle third loops remain between the “t” double loops.
Then knit 2 circular rows on all loops of the sock. persons p., knitting in the 1st r. each double loop as one loop.
If the upper part of the foot is knitted with a decorative pattern, then continue it according to the pattern.
After this, put the loops of the upper foot aside again.
5. Second part of the heel:
1st r. (knits. row): knit the right and middle loops. and turn the work around.
2nd r. (purl): perform a double loop, knit the remaining loops of the middle third purl. and turn the work around.
3rd row: perform a double loop, knit. p. to a double loop, knit it as one knit loop., knit the 1st p. of the left third. and turn the work around.
4th row: perform a double loop, knit purl. p. to a double loop, knit it as one purl loop, knit the 1st p. of the right third purl. and turn the work around.
6. Repeat the 3rd and 4th rows until all the heel loops are included in the work again. Then knit in circular rows on all stitches of the sock.
Types of toes for classic socks
Toe - star
1.For a star toe, the number of stitches on each needle must be even. Excess loops are evenly decreased in the previous circular rows.
When knitting a star toe, two decreases are made on each needle.
They depend on the toe-star number given in the size table: it indicates how many rows are knitted before the first round with decreases.
In a circular row with decreases, it denotes loops that are knitted together with the previous loop.
2. If the number of toe-stars is 7, then you should knit 6 more circular rows. no deductions.
In the first round row, every 6th and 7th sts are knitted together with decreases.
The number of stitches on the needle between decreases indicates the number of subsequent circular rows without decreases.
In this example it is 5 p., therefore 5 circular r. no deductions.
Then the second circular row is knitted with decreases, in which every 5th and 6th sts are knitted together.
Now there are 4 stitches between decreases on the needle, i.e. then 4 circular rows are performed. no deductions.
3. Continue in this way until only 2 stitches remain on each needle, i.e. 8 stitches in total.
Pull these loops tightly with double thread and secure the thread. The star toe looks symmetrical and does not pinch.
Toe - propeller
1.This toe is very easy to knit, so it is recommended for beginners. In every 2nd circular r. knit the 1st and 2nd sts of each knitting needle together. When only a third of the original number of stitches remains on the knitting needles, decrease in each round.
2. Continue in this way until only 2 stitches remain on each knitting needle, i.e. 8 stitches in total. Pull these loops tightly with double thread and fasten the thread to the inside of the sock.
3.The decreases form the shape of a propeller, which gives this type of toe its name. It is suitable for pointed feet.
Toe - snail
1. A beautiful version of the classic toe is the snail toe.
It is easy to perform and very wear-resistant.
In every 2nd circular r. knit the 2nd and 3rd stitches together with a broach, to do this, remove the 2nd stitch, knit the 3rd stitch. and pull it through the removed loop.
2. Continue in this way until only 2 stitches remain on each knitting needle, i.e. 8 stitches in total. Pull these loops tightly with double thread and fasten the thread to the inside of the sock.
3. The spiral of the cochlea, formed by such decreases, is clearly visible from the front. This toe is comfortable for socks worn in shoes.
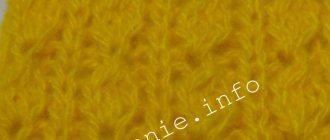
Rubber
The elastic pattern is one of the simplest. This knitting has increased elasticity, which is why it got its name. The relief pattern resembles an accordion.
The elastic band is knitted according to the pattern:
- Some of the loops are knitted purl, some knitted. The number of loops in the parts should be the same. The parts alternate with each other.
- On the reverse row, the loops are also knitted in a mirror manner, purl and knit.
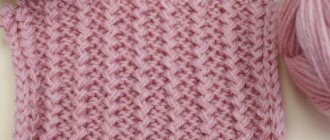
A variant of the elastic band pattern is a voluminous English elastic band. It is knitted according to the pattern: 1 knit stitch, 1 purl loop, then the rapport is repeated. The reverse row is knitted in a mirror image.
Reinforced heel for knitted socks
Facial surface: faces. R. – persons p., out. R. - purl p., in circular rows knit only faces. P.
Pattern with removed loops: 1st row: * Remove 1 st as purl, thread at work, k1, repeat from *. Rows 2 and 4: purl. p. 3rd row: * knit 1, slip 1 st as purl, repeat from *.
Repeat from 1st to 4th row.
The foot is knitted on 48-56-64-72-80 sts, which are evenly distributed on 4 double needles (= 12-14-16-18-20 sts on each needle).
Knit the heel with the heel wall and the heel cup in straight and reverse rows only on 24-28-32-36-40 stitches of the 1st and 4th needles, set aside the stitches of the 2nd and 3rd needles.
For the heel wall in the last circular row of the leg, knit up to the loops of the 4th knitting needle, then knit in straight and reverse rows on the loops of the 4th and 1st knitting needles in a pattern with removed loops.
In 24-28-32-36-40 r. From the beginning of the heel wall, knit the heel cup in short rows of knits. satin stitch
1st r. (= knit, r.): knit 14, pull 1 (slip 1 st as knit, knit 1 and pull it through the removed loop), knit 1, remaining 7-9-11-13-15 sts Leave unknitted and turn the work.
2nd r. (= purl): remove 1 stitch as purl, thread before work, purl 5, knit 2 stitches together purl, purl 1, leave remaining 7-9-11-13-15 stitches unknitted , turn the work.
3rd row: slip 1 st as purl, knit at work, knit 6, stretch 1, knit 1, leave remaining stitches unknitted, turn work.
4th row: remove 1 st as purl, thread before work, purl 7, knit 2 sts together purl, purl 1, leave remaining loops unknitted, turn work. 5th row: remove 1 st as purl, thread at work, knit. p., until there is 1 p. left on the knitting needle before the unknitted loops, 1 broach, 1 knit., leave the remaining loops unknitted, turn the work.
6th row: remove 1 st as purl, thread before work, knit purl. p., until 1 p. remains on the knitting needle before the unknitted loops, knit 2 p. together purl, 1 p., leave the remaining loops unknitted, turn the work.
Repeat the 5th and 6th rows until all the side unknitted loops are used, while in each row after turning, 1 more stitch is knitted.
The penultimate row ends with 2 sts knitted together, the last row ends with 2 sts knitted together purl. = 14-16-18-20-22 p.
Distribute these stitches evenly onto the 1st and 4th needles = 7-8-9-10-11 stitches on each needle.
Then knit the loops of the 4th knitting needle and the loops of the 1st knitting needle, along the edge of the heel with the 1st knitting needle, knit 13-15-17-19-21 p., knit 24-28-32-36-40 p. 2- 1st and 3rd knitting needles, with a new knitting needle on the other edge of the heel, cast on 13-15-17-19-21 sts, knit the remaining 7-8-9-10-11 sts. = 64-74-84-94-104 sts (= 20-23-26-29-32 sts on 1st and 4th needles, 12-14-16-18-20 sts on 2nd needles 1st and 3rd knitting needles).
Before the beginning of the toe, knit on all stitches of the faces. satin stitch
At the same time, for the instep wedge in the next circular row, decrease 2 sts like this: knit the loops of the 1st knitting needle until 3 sts remain on the knitting needle, knit 2 sts together, knit 1, loops of the 2nd and knit the 3rd knitting needle, knit the 1st stitch of the 4th knitting needle, knit 1 stitch, knit the remaining knit stitches.
Repeat these decreases in every 2nd circular row until 12-14-16-18-20 stitches remain on the 1st and 4th needles = 48-56-64-72-80 stitches in total.
After 14-16.5-19-21.5-23 cm from the beginning of knitting the foot, perform a ribbon toe knit. stitch, while in the 1st circular row. on the 1st and 3rd knitting needles, knit until there are 3 sts left on the knitting needle, knit 2 sts together, knit 1, on the 2nd and 4th knitting needles, knit the 1st st ., 1 broach (slip 1 st as knit, 1 knit and pull it through the removed loop), knit the remaining loops.
Repeat these decreases in every 2nd circular row. 6-6-7-8-9 times and in each round 3-5-6-7-8 times = 8 sts.
Tighten the remaining loops with a double thread or connect 4 sts of the side ribbons with a knitted seam.
Knitting lessons for beginners: video
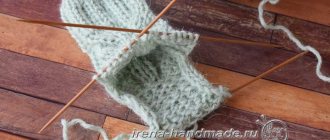
Knitting socks on 5 knitting needles is a difficult task, but can be done if you follow the presented pattern. It is recommended to choose multiple colors to make the product colorful.
Patchwork socks are another project that is recommended to be started after knitting plain socks and a few scarves.
Slippers - little footprints - are a stylish gift that can be knitted with knitting needles already in lesson 2-3, after the loops have been sharpened and basic knitting patterns have been sorted out.
You don't need any special skills to tie a beret. All you have to do is choose a model and start implementing it.
A blouse for a baby requires painstaking work, so it’s worth taking on such work after at least a month of actively learning to knit.
Simple knitted vests are very popular this year. If you can make one yourself, don’t put it off for too long. Treat yourself and your baby in style.
A down stole can be knitted using a standard pattern, which is suitable for a blanket, scarf, or scarf.
A rug with elongated loops is a product that is absolutely easy to learn to knit. And such a rug looks no worse than a store-bought one.
Share with your friends!
- 3
- 8
- 11
Shared
Subscribe to our Yandex.Zen channel or Yandex.Messenger
Simple and universal patterns
The easiest way to knit is to create a stockinette stitch. All knitting goes from left to right.
It is knitted according to the scheme:
- The first row is knitted with knit stitches. The right needle picks up a stitch from the front and pulls the yarn through it to form the next stitch.
- Then the product is turned over. Knitting also goes from left to right, but from the other side. In this case, the purl loops are knitted. To do this, the loop on the left knitting needle is pryed from the reverse side and the thread is also pulled through it.
- The rest of the fabric is knitted alternating these two rows. At the same time, a beautiful herringbone pattern is obtained on the front side.
By alternating purl and knit stitches you can create a wide variety of patterns. Such patterns will look embossed and cozy on any product. Therefore, having mastered only two types of loops, you can quickly understand how to knit simply and beautifully. This means you can create interesting patterns yourself.
Simple Crochet
Those who are afraid of not being able to handle knitting needles at first can try their hand at simple crochet. This will also require yarn and a hook. In this case, it is better to choose a long tool, this will make it more convenient to hold it in your hands.
Before knitting, it is also better to create a control sample, from which you can calculate the knitting density and the number of loops.
You can crochet the same things as knitting: a scarf, a hat or a vest. In this case, it is more convenient to crochet in the round.
The principle of crocheting is even simpler than creating a fabric with knitting needles. To do this you need:
- Create a simple loop and knit another one into it and tighten. Next, lower the hook into the loop and knit the next one from it. This creates a braid - the basis of any crochet.
- After this, the second and subsequent rows are knitted. In this case, the thread is not threaded into the previous loop, but along the chain in the opposite direction.
- Next, the product is turned over again and knitted in the opposite direction.
- You can not turn the product over, but loop the chain. Then it is knitted in the round. This makes it so convenient to knit a hat or vest.
In this way, a dense knitting is created that resembles cells. Crochet is denser and less elastic than knitting.
These simple techniques will allow you to master both knitting techniques and create simple things yourself.
Simple things to knit
The best way to start any knitting project is with a creative idea and planning the pattern of the item. The simplest things to knit:
- Scarf
- A cap
- Beret
- Mittens
- Vest
The simplest thing to knit is a scarf. It has the simplest knitting pattern in the form of a long flap. Knitting such a pattern does not require special skills: just cast on the loops on the knitting needles and knit the fabric of the required length.
The hat is also knitted using the same geometric pattern. First, knit a long and wide rectangle, and then sew it into a hat.
Mittens are knitted using a more complex pattern, since at the end of the product it will be necessary to close the loops gradually. Also in the mittens, the thumb is knitted separately in a circle.
A simple vest for a child is created using the same principle: two rectangles are knitted, which are then sewn together.