Product description.
Greetings to all needlewomen and friends who have visited the site!
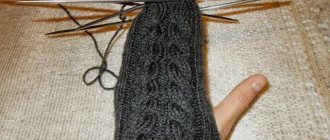
Today I am pleased to show you the process of creating these wonderful socks for babies.
I used Trinity yarn "Khutoryanka". This is 100% sheep wool. The thread is very warm and uniform, so baby’s heels will be warm and cozy.
The socks are knitted using a false braid pattern. It looks very attractive and at the same time is surprisingly simple to implement.
If you cannot get into the proposed density of work, you can easily increase or, conversely, decrease the size of the product due to the number of repeats of the pattern.
Description of work.
Cuff and leg.
Using any convenient method, cast on 32 loops, 8 for each, on needles No. 2.75. Mark the beginning of the circular row with a marker. I cast on 1 more stitch so that I can use it to close the work into the round.
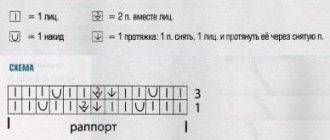
- 1-10 row. Scheme No. 4 elastic band 2×2. 1 out, (K2, 2 out) - repeat until the end of the row, 1 out.
The repeat of the false braid pattern for children's socks is 16 loops wide and 6 rows high. We will repeat it in width twice, in height I also knitted two repeats of the pattern.
- 11-22 row. Scheme No. 2 “false” braid pattern.
Reinforced heel wall.
At this stage, we do not use the loops of 2 and 3 knitting needles (the upper panel of the toe) in the work, and for convenience we transfer the loops of 1 and 4 knitting needles to one. Using pattern No. 3, pattern with removed loops, on half of the total number of loops (16), knit the reinforced heel wall in straight and reverse rows. The height will be 16 rows.
- 23 row. 8 persons. Unfold the knitting.
- 24 row. 1 edge, 15 purl.
- 25-38 row. Scheme No. 3 pattern with removed loops.
Then we knit the so-called straight heel . To do this, 16 loops of the heel wall need to be divided by 3. As a result, we get 6 loops in the center and 5 loops on the sides. We will gradually decrease the side loops to create a rounded heel.
The principle is this: when knitting on the front side , remove the edge, knit the loops of the side part and the middle part, except for the last loop, it is knitted together with the adjacent loop of the first side part of the front part behind the back wall. We unroll the knitting again.
On the wrong side of the fabric we purl the loops of the middle part, except for the last one, we knit it with a purl loop together with the adjacent loop of the second side part. We unroll the knitting again.
And so on until there are 6 central loops left on the knitting needle ( row 39-46 ).
Lifting wedge.
Using a knitting needle with heel stitches (6), pick up and knit 8 stitches along the side edge of the heel wall (knitting needle 1).
Using a free knitting needle, knit the first row of pattern No. 2 with the “false” braid pattern of the front panel on the set aside 16 stitches (distribute them over two knitting needles, these will now be knitting needles 2 and 3).
With the fourth needle, pick up and knit 8 stitches along the second side edge of the heel wall, then knit the first 3 stitches from needle 1.
There are 38 loops on the knitting needles in total: 11 loops on knitting needles 1 and 4, 16 on knitting needles 2 and 3. Next we knit in circular rows.
We create a lifting wedge. To do this, we knit in circular rows ( row 47-48) and make 3 decreases of 2 loops per row.
Needle 1 - knit stitches to the last three stitches, knit 2 stitches together with a knit stitch tilted to the right, 1 knit stitch; knitting needles 2 and 3 - continue knitting the front panel pattern according to pattern No. 2, “false” braid pattern; knitting needle 4 - 1 knit stitch, knit 2 knit stitches together with a slant to the left, “pulling”, knit stitches to the end of the row.
- 46-52 row. Pattern No. 2 “false” braid pattern (corresponds to rows 1-6 of the pattern).
The number of stitches on the knitting needles should be equal to the original cast (32).
Foot.
We continue to knit in circular rows, making a “false” braid pattern on the top panel of the sock, and on the bottom - according to pattern No. 1, stockinette stitch to the required length.
- Row 53-70. Scheme No. 2 “false” braid pattern (three pattern repeats).
Ribbon toe.
To get a neat toe, we then knit with stockinette stitch ( 71-80 rows ), making decreases as follows: in every second circular row on the first and third knitting needles, knit the third and second stitch from the end together, and on the second and fourth knitting needles - the second and the third along with a tilt to the left until their total number is halved.
Further decreases of loops are performed in each row.
When there are 4 loops left on the knitting needles, they need to be pulled together, the threads secured and disguised.
How to calculate the number of loops for knitting a sock
In order not to start work over and over again, before knitting children's socks with knitting needles, we will calculate the required number of loops. In order for the socks to fit the child perfectly, you need to take into account the height of the leg, the size of the shin and the size of the foot itself.
- There are circumstances when trying on a sock is impossible - then use the formula: X: 3 x 2 = Y, in which X means the shoe size, and Y is the length of the foot. X: 3 x 2 = Y where X is the shoe size and Y is the foot size in centimeters. For children's socks with knitting needles you will need 50 g. yarn.
- If this seems difficult to you, there are tables that indicate how many stitches to cast on according to the knitting density. It is necessary to knit a “tester” - 10/10 cm in order to calculate the required number of loops.
- Another option for determining the number of loops. It is necessary to take 2 measurements of the baby’s legs: the 1st measurement is the circumference of the instep, it is measured with a centimeter at the widest point of the instep. 2nd measurement - leg circumference, measured above the bone. Next, we find the average circumference: plus the circumference of the volume and the circumference of the leg and divide by 2. See so much and do the calculation for the set of p.
- And the last option. Everyone knows that the anatomy of the leg has its own proportions. Look at the size ratio of the leg. You can't go wrong if you cast on the number of stitches on your knitting needles that correspond to the size: (top of the foot + sole = 100%). This is the size you need for the correct set of loops. Next we will knit beautiful socks with a step-by-step master class.
A set of loops in accordance with the anatomy of the leg.
Size chart for different knitting densities.
Socks with a cat pattern
We will knit these original socks step by step with knitting needles for a child aged 3-4 years. We will knit on five needles in the simplest “grandmother’s” way. Knitting children's socks is something that is suitable for beginners who are just starting to knit. This simple way to knit baby socks will also come in handy for those who knew but forgot this technique.
Abbreviations: p. - loop, r. - row, l. - front, from. - purl, sp. - knitting needles, inm. - together.
To work you will need:
- 5 double needles, 3 mm thick.
- Yarn - wool with polyamide (150 m./50 g.) - 1 skein of gray and 1 skein of blue.
- Black and red thread for the cat's face.
- An eraser at the end of each knitting needle is to prevent the yarn from slipping off the knitting needles.
- Pins or markers.
Table number 1, which helps to knit children's socks.
A 3-4 year old child’s foot corresponds to shoe size 26/27 and the foot size is 16-17 cm. We cast on 44 stitches with gray yarn. We focus on table number 1. We distribute all 44 stitches onto 4 knitting needles - on each knitting needle you will get 11 stitches. We will knit an elastic band first, and then circular rows. Mark the place of transition from one river to another. (between the 1st and 4th sp.) - with a marker.
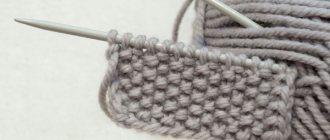
An elastic band can be knitted as in the photo (1 knit/1 knit), but, as a rule, such an elastic band stretches out quickly. Therefore, it is better to tie a 2/2 elastic band. Knitted 10 rubles. with an elastic band and move on to the faces. smooth surface We knit as many r., how high you want to make the socks. In this model there are only 6 r., usually 10 cm. In this place, patterns and patterns with jacquard are usually knitted.
Next, we will knit the heel wall. We will do this on the 1st and 4th sp. facial stitch. We are not touching the 2nd and 3rd spokes yet. We look at table 1: heel wall - 22 rubles. (44 : 2), heel wall height - 14 r. (4 cm). If you knit the first and last stitches in garter stitch, this will make it easier for you to count p.
Next, you need to tie the bottom of the heel. Divide 22 sts into 3 parts (7;8;7). Mark with markers. We got 7 stitches on both sides, and 8 stitches in the middle. We start with the knit row: knit 14. n., 2 persons together.
, turn the work over (we don’t knit the remaining 6 stitches, leave it like that. 2nd row: 8 p., 2 v. purl., turn over (leave 5 stitches unknitted). 3rd row: 8 knits., 2 vm., turn knitting. 4th r.: 8 p., 2 v. l.
, turn the knitting over.
And so on until there are 8 loops left on the knitting needle.
Now we have 8 stitches left. Next, we need to cast on as many stitches from the edges onto the knitting needles on both sides as we have in table number 1 (the number of loops for casting on the side edges of the heel is 11, but we will take a little less - 9 stitches. ).
In the place where the tail of the thread sticks out, we pick up 9 sts on the knitting needle and knit them, then we have 11 sts, another 11 sts, and again we pick up 9 sts on the knitting needle, knitting their faces. And here we have circular knitting again.
There are currently 48 stitches on the needles.
And in this place it would be good to try on the sock on your foot. If it is too wide, reduce it. If the number of sts suits you, we knit further in the circle, distributing the sts: 12 sts on each knitting needle. The beginning of the circular row is in the middle of the bottom of the heel (mark with a marker). We have 48 stitches on our needles.
We knit through a row of 2 persons together. Let's focus on the marker. Knitted 8 r. and decreased 4 p. 44 p. left, on each sp. - 11 points each. Next, we begin to make the cat’s ears. Our pattern is 32 stitches, which means we add 12 stitches to the pattern, 6 on each side, and start knitting from the ears, from the 30th row.
:
To ensure that the long blue thread on the inside doesn’t bother you, make 2 blue balls. Gray yarn: 14 knits. p. gray, 1 person. p. blue, 14 p. gray, 1 p. blue, 14 l. n. gray. 29th r.: 13 l. p. gray, 3 l. n. blue, 12 l. p. gray, 3 l. P.
blue, 13 l. n. gray. 28th r.: 12 l. p. gray, 5 l. n. blue, 10 l. p. gray, 5 blue, 12 l. n. gray. 27th r.: 11 l. p. gray, 7 l. n. blue, 8 l. p. gray, 7 l. n. blue, 11 l. n. gray. 26th r.: 10 l. P.
grey, 9 blue, 6 grey, 9 blue, 10 grey.
25th r.: 44 l. n. blue.
Then we continue to knit according to the pattern, not forgetting to add 6 stitches on each side.
The length of the foot to the toe is 13.5 cm (see table). We knit according to the pattern up to this point. We reach the little toe. Next we begin to make the toe. We make decreases at the end of every 11 stitches (2 stitches together). So we decrease until 2 stitches remain on the knitting needles. We cut the thread. We pull the end of the thread through these loops. We remove the tail.
- The second sock is knitted in the same way, only it starts with blue yarn, with an elastic band.
- In the video: how to knit children's socks on 5 knitting needles.
KNITTING! HOW TO KNIT SIMPLE CHILDREN'S SOCKS FOR BEGINNERS!knitting
Children's socks on two knitting needles - this master class will be useful for those who do not like to knit on 5 knitting needles. We knit socks on 2 knitting needles, three more knitting needles are auxiliary. Then we sew the product with a needle and native thread. The product corresponds to size 22/23, foot length - 15 cm. Socks are knitted for ages 3 years.
To work you will need:
- Yarn - wool or wool mixture - 1 skein 50 g.
- Stocking knitting needles 3.5 mm thick.
- The needle is thick.
We knit the upper part of the sock. We cast on 39 sts and plus 2 edge stitches, total - 41 sts. 1st row: edge, k1. p., 1 p., and so on until the end of the r., at the end - the edge. 2nd r.: chrome, 1 p. p., 1 l. etc., and so on until the end, at the end - chrome. And so continue with an elastic band for 28 rows.
Next, we make a “tongue”: we knit it at 13 sts, and don’t touch the remaining sts!
1st row: chrome, 26 persons. etc., turn the work around. 2nd row: 13 persons. etc., turn the work around.
3rd row: k13, turn.
And so we knit garter stitch (knit stitches alone) for 34 rows. We got it: 14 stitches on the first needle, 13 for the tongue, 14 stitches on the second needle.
Next comes the rounding of the heel.
35th r. already without chrome. p.: knit 2 together, knit 9, knit 2 together. 36th r.: all facial. 37th r: 2 vm. persons., 7 persons., 2 vm. persons 38th r: all persons. 39th r: 2 vm. persons., 5 persons., 2 vm. l.
- Next, we knit the circumference of the sock.
We tied the tongue to the end. We have left on the joint. 7 p.