Making a round yoke
For craftswomen who have little experience, knitting a yoke in the round at the top seems like quite a difficult job. But don’t panic, you just need to sit down and understand the process carefully. If you watch master classes and listen to the advice of experienced craftswomen, the work will not seem so difficult.
First you need to try to knit a sample product from old threads. It may take a lot of time, but the algorithm will become clear. Having understood all the nuances, you will be able to avoid mistakes when knitting a product.
Knitting a yoke in the round at the top is a popular method used for sweaters, jumpers and bibs. It has a lot of advantages over others, but in order to get a product of a certain size, you need to correctly calculate the number of loops.
Openwork yoke
The yoke can be made either in simple knitting or with a pattern. In this master class we will learn how to knit an openwork yoke from top to bottom. The pattern is not very complicated, but those who are just learning to knit need to get acquainted with the pattern that will be presented below. This pattern will be a decorative element in our product, which will emphasize the line of the chest and neck. After all, every girl strives to be romantic and feminine. Such things can be worn both for every day and for special occasions.
The openwork, which will decorate the product, should expand downwards. The jacket will be without seams, one-piece.
Related article: DIY paper pencil cup with video
What do we need for knitting?
- 200 grams of acrylic yarn;
- circular knitting needles number 2.5.
We start working from the neckline and gradually expand taking into account the pattern. The diagram shows additions in the seventh, thirteenth, twenty-first, and thirty-first rows. Before you begin, you need to calculate the number of loops and repeats. For the neck, there will be six loops according to the pattern repeat; we need to cast on 144 loops for the neck, and this is 24 repeats. Now we connect it into a ring and use an elastic band to knit two centimeters one after another. Now we begin expansion taking into account the size of the product. We knit the yoke in height from the beginning of knitting to the armpit line. At the bottom, the girth will be equal to the girth of the chest along with the arms.
When the yoke is knitted, you need to move on to knitting the main part of the product. But first we distribute the fabric to the front of the product, sleeves and back. It turns out that we will have nine rapports in the front, three on the sleeves, and the remaining six on the back. There should be more loops in the front, taking into account the chest and the depth of the neckline.
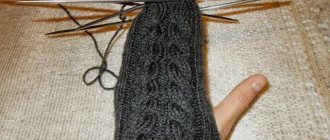
We transfer the loops that will be in place of the sleeves to an auxiliary knitting needle. While knitting the lower part of the blouse, in the back we take a few buttonholes to form an armhole. This will be approximately 15 to 20 buttonholes, the width of the armhole can be from five to seven centimeters - it depends on the size and density of the knitting. From the armhole we need to knit 33 centimeters in stockinette stitch. When we have knitted the required length, we knit it with an elastic band one after another to a height of three centimeters - we close all the loops. Now let's move on to knitting the sleeves. We transfer the loops to circular knitting needles and attach the thread, we begin to knit in stockinette stitch, but in the first row we need to add loops. So we knit two centimeters in knit stitch, and then one centimeter in garter stitch. That is, we knit one row purl and then knit. After five rows we close the knitting. We knit the second sleeve in the same way. Our jacket is ready. This description is quite detailed and will help you cope with this work. It is important to follow the diagram and instructions that describe each step.
Related article: DIY box for small items: master class on cardboard products
Advice! Sweaters and any other products with a round yoke can be knitted for children. This neckline is always more comfortable to wear and is classic. These sweaters are easy to put on small children; children will not feel any discomfort while changing clothes.
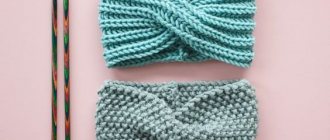
Varieties of patterns and ornaments
The yoke can be knitted with an openwork pattern, braids or a jacquard pattern, for which it is necessary to select yarn of the same type and thickness. This will allow you to avoid inconsistencies in knitting density in the future.
This part of the product is not knitted separately, and then not connected to the main fabric. Clothing with a yoke is knitted in one piece from the bottom up or in the opposite direction. If the product is knitted from the bottom up, then when making the yoke, the stitches are sequentially shortened. Starting knitting from the neckline, to create a yoke, on the contrary, you need to evenly add loops.
What you need to know when knitting this element with knitting needles on top:
- It is not necessary to make a pattern. It will be enough to know the size of the product, height and chest circumference.
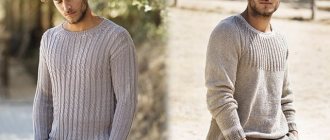
- A yoke knitted in the circle at the top would be appropriate in sweaters, dresses, tunics, pullovers, jumpers, jackets, and cardigans.
- A product with such a detail can be worn by men, women and children.
- As a result of the product expanding from the neckline, the shoulders become visually wider. For men, this option would be ideal. But for women with an athletic build, it is better to choose a different model.
- In children's clothes, a round yoke is indispensable and very beneficial: the product grows with the child.
- During knitting, you can try on at any stage. This is very important, so you can avoid major rework.
- Knitting a product in the round with knitting needles or crochet is a pleasure. This work can be combined with watching your favorite TV series.
- Examples of finished products with detailed descriptions and diagrams can be found in any craft blog or in popular knitting magazines.
- You need to choose a pattern for the yoke carefully, since the number of loops will change during the knitting process. It will be easy to knit a pattern with corners like triangles or leaves. A yoke that is too lacy will show through, so you will need an additional layer of clothing underneath.
- When making jacquard, you need to remember that the fabric during knitting can turn out to be very tight and inelastic. Be sure to choose the right yarn.
- A round yoke is fundamentally different from raglan in the pattern of adding or subtracting loops to form the desired volume. In raglan there are four clearly defined lines, and in a yoke the addition of loops occurs imperceptibly and gradually.
- When knitting a yoke, a sprout is needed on top, which provides a comfortable neck line, and the product does not ride up in the front.
How to choose yarn and knitting needles?
What yarn is suitable for the dress? In fact, everything will primarily depend on the season. You should choose based on the warmth of the threads. That is, first look at the wool content in the thread. Next, you should think about the thickness. For example, more openwork patterns look good in a thin thread and with a smooth yarn texture. If this is a braid pattern, then you shouldn’t waste time on trifles and choose very thin threads.
It is better to take a medium thickness or thick one, so the braid will stand out well and at the same time you will get a rather fashionable product. Color is a personal preference, but some patterns, like braids, are perfect in light colors and really stand out against a gray background.
To create a beautiful dress, you need to choose round knitting needles, since a round yoke is often knitted in a circle and they simply haven’t come up with a better choice than a circular tool.
The rest of the part can also be knitted in the round and circular patterns can also be used, but ordinary even knitting needles are not excluded if the products will be knitted separately along the fronts and sleeves with even fabrics.
Knitting a sprout
First of all, you need to determine the knitting density. To do this, you need to knit a sample from the selected threads, steam it through a wet cloth or wash it and steam it. It is used to calculate the loops in one centimeter. For example, one square centimeter is 2 loops and 3 rows.
It will be difficult for a novice craftswoman to determine the depth of the gate. To do this, you can take any T-shirt with a comfortable neckline, lay it out on the table, and then use it as a pattern. The difference between the depth of the front and back neckline is the value called the sprout.
As an example, let's take a value of 5 cm. Knowing the knitting density, it will not be difficult to determine that the back should be 15 rows longer than the front. This is such complex mathematics . To knit the back longer, you can use several options:
- Knit the sprout immediately, and then the main fabric. To do this, a quarter of the required loops are cast on the knitting needles and 15 rows are made with the main pattern. During this work, you need to add 2 loops at the end of each row. After the 15th row, you need to cast on the missing number of loops on the knitting needles and continue knitting in the round.
- While knitting the back, knit short rows.
- The sprout is knitted already upon reaching the armhole. When the work on the yoke is completed and the workpiece is divided into front, back panels and sleeves, then an additional 15 rows are knitted on the back. In the process of knitting a sprout, one undercut loop is added at the end of every second knitted row.
The undercut is used in knitting a product from the top in the round. It is formed from several assembled loops between the back and the shelf, which provide freedom of movement of the hand. Round yokes with knitting needles, diagrams and descriptions of which can be found in many sources, practically do not differ from each other except for the chosen pattern.