Home » Crafts » Bright beaded peacock
Crafts
Irina Vyshivaikina 06/25/2019
2
The peacock is truly a royal bird, which was previously found only in the magnificent gardens of nobles and other rich people. Majestic birds are still considered popular not only among fauna lovers, but also among needlewomen. A beaded peacock is a craft that will decorate any interior or make a wonderful gift.
Preparation of necessary materials and tools
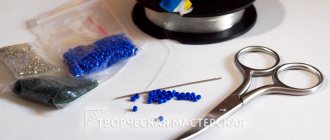
To create a royal bird, you must have the following materials:
- beads in white, blue, yellow, green, red, orange, black (if the craftsman wishes, you can use other shades in accordance with your idea of the future hand-made product);
- blue beads;
- thin fishing line or wire.
Additionally, you can use glass beads or various pebbles if you decide to show your imagination when decorating. Among the tools that will make the work easier are wire cutters and pliers.
Beaded feather brooch
In order to make such a feather, we need attention, concentration, and some materials.
Accessories and materials for needlework
- Pen template
- Scissors
- Felt
- Leather
- Clasp
- Needle and thread
- Beads coral, green, yellow, gold and white
- Blue crystal
- Glue and tweezers
We draw the feather on a regular A4 sheet. Then we cut it out, apply it to the felt, and cut it out again. Using a white pencil or a piece of soap, draw out all the details that you had on the template.
Next, we sew on the crystal and place pebbles on the glue around the crystal. The next circle of sheathing is coral. Sew two circles
The third circle is white. Don't forget to align the sewn beads as well. Pass the thread and needle through all the beads, bringing the needle down the embroidery, thereby securing the work done. If it is all the same size, then in rows it will look like a purchased brooch.
Fill the remaining empty space with golden and yellow colors. We alternate to create the effect of a feather overflow.
Next, we frame the feather with various shades of green.
Hanging feather hairs
We make them this way: we attach the thread to the wrong side of the embroidery, then we string 6 beads and cover them with a bead. Make 9 more pendants in the same way.
We also sew the fastener on the wrong side. Cover it with a piece of leather, pre-cut according to the template. Glue it. We sew the edges of the finished product with a “back needle” seam.
Weaving the main parts
Peacock made of beads: the master class step by step consists of the following stages.
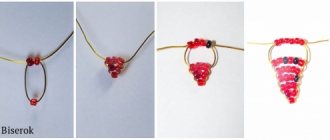
How to make a peacock beak from beads? For this, red beads are used, two identical pieces of wire about three centimeters long. First, two pieces of wire should be threaded through the beads. Form the upper part on one part, the lower part on the other using parallel weaving.
Beads in the amount of two pieces should be strung on one end of the workpiece, the second edge should be strung on the reverse side. Similarly, three rows should be woven so that each row contains one more bead than the previous one. In total we get five rows.
For the lower part of the beak, the weaving pattern is the same. Having made it, we attach it to the top part. The beak must be made especially carefully so that this element does not look rough.
- The eyes will be created using the French weaving technique. To begin with, you should string from two to four pieces of blue beads, then in the middle - one bead, which must be secured with a loop. This way we get the pupil.
Depending on the size of the pupil, we string a certain amount of black beads and create a semicircle, fixing it. We form the second semicircle in the same way as the first, securing it on the same side.
After this, we collect the beads in the following order: first white, then blue and again white, forming a semicircle on the reverse side and fixing it. The result will be two arcs (the top of the eye) on one side, and one on the other (the bottom, respectively).
We string ten blue beads and ten white ones, forming another semicircle at the top of the eye.
We form a black edging of the eye on both sides. The second eye follows the same pattern, but in a mirror order.
When making a peacock from beads, a master class with a weaving pattern will help.
2. To connect the beak and eyes, you should thread one of the pieces of wire through the last of the rows of the beak, as well as into one end of the rim of the bird's right eye. Similarly, we connect the beak to the left eye.
3. Peacock made of beads: step-by-step weaving patterns. The neck is formed in the same way as the beak, increasing the number at the bottom by three to four beads. This element can be made in different sizes, depending on the wishes of the master, but so that it is also proportional.
4. How to make a peacock with beads: diagram for creating the body. To form the body, blue beads are used. Step-by-step weaving of a peacock from beads is similar to creating a neck. The number of beads at the top of the body should increase by several pieces in each row. The other half should be narrowed downwards, removing the same number of beads that were added before. Thus, we get a bottom that is slightly wider than the top.
Making a peacock out of beads according to the pattern will not be at all difficult when all the stages of the master class are followed.
5. The paws weave the same way. To create them, take six brown beads, using three for each of the tiers. Then we string two brown beads again, then two orange ones, thus creating the second row. The third and fourth rows will consist of two orange beads. The fifth row will also be made of two orange beads.
We string four beads onto the longer edge, passing the wire through only three of them. Having formed the two missing claws using a similar method, we tighten the paws.
6. For a peacock made of beads with your own hands, you will also need to create wings. In this case, the French beading method is used. To form the base, you need to collect up to ten beads, multi-colored arcs - feathers are woven depending on the imagination of the needlewoman. You can use not only beads of different colors, but also various decorative elements - glass beads, stones, beautiful beads.
7. Beaded peacock: master class on creating a tail as the main element of the craft, which is created using a variety of techniques. We form the end of the feather according to the French pattern. The main row contains one bead and two seed beads. After this, you need to form four or five rows.
The “beaded peacock feather” pattern is completed by the use of a needle weaving technique, which is distinguished by its simplicity. For the tail, it will be necessary to build a rigid frame that will pass through the center so that the peacock feather does not fall. Copper wire is suitable for this purpose. The tail of the majestic bird should be approximately 14-16 cm.
Photo source: https://vnitkah.ru/podelki-biserom/pavlin-bisera.php
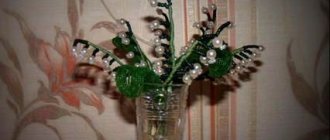
The process of assembling the product is complete, all that remains is to place the peacock on a beautiful stand and admire the creation of your hands.
How to hide the ends of a wire
Sometimes you may encounter a problem when, when weaving, the required length of wire is not enough, especially if we are dealing with large volumetric figures, as is the case with weaving according to the peacock bead pattern.
To replace the wire, proceed in the following sequence:
- the last of the rows must be formed from larger beads that have large holes;
- It is better not to tighten the row too much: you should stretch a new piece of wire through it and align the ends, after which we tighten the row;
- At first, the new piece of wire will interfere and shift, so it needs to be aligned by weaving two new rows - the material will be firmly fixed.
If we are dealing with a three-dimensional figure, the ends of the wire can be hidden inside. In addition, the products have a strong frame, due to which the row will not bend. The old part of the wire can be twisted into a spiral without over-tightening the row. The spiral should be about one centimeter long; you can easily hide it inside the figure.
Stand design
The stand can be made from various materials, using wood, plastic, or even decorating an old CD. First, you need to glue decorative elements onto the surface - pebbles or multi-colored beads, which will serve as a disguise for the peacock's beaded legs. The texture can be created using silicone sealant or putty.
[Total votes: 0 Average: 0/5]
Irina Vyshivaikina
Professional skills: Clothing designer; Artist
Brief biography and personal achievements: “I am inspired by the things that are around us.” Since childhood, I was interested in art and crafts, so I decided to devote my life to it. She received a higher education in design and released a collection of designer jewelry made from simple materials that can be found at home from any needlewoman. Afterwards, I decided to conduct master classes on creating similar accessories for everyone. She became a blogger and the author of the website domigolki.ru.
Painstaking swallow embroidered from beads
The swallow symbolizes the arrival of the much-anticipated spring after a long winter. She is the personification of speed in achieving her goals. The swallow is a symbol of rebirth. It is she who sings for all nature so that it wakes up and puts on its green outfits. She is the embodiment of all that is good and peaceful. If a swallow has built its nest under the roof of your house, this is a sign that good news is already on the doorstep. Jewelry in the shape of a swallow will give you intelligence and talents.