Home » Jewelry » Chic DIY beaded tiara for a real queen
Decorations
Irina Vyshivaikina 08/29/2019
2
A DIY tiara made of beads and wire will become an original and elegant decoration for important events that will attract the attention of others. By taking advantage of the master class and showing your imagination, you will be able to make a tiara even without much experience in beading.
How to make a tiara from beads?
A tiara is an accessory in the form of a hoop or crown. A similar hair decoration is the tiara, which differs in its manufacturing style.
How to make a tiara from beads and beads? Such an accessory can be constructed in different sizes and shapes using various decorative materials.
Required tools and materials
To create a beaded tiara you will need the following materials:
- beads of different sizes (you can choose the color at your discretion);
- headband (it is better to use one with teeth so that the future tiara stays firmly on the hair);
- copper wire with a diameter of 0.3-0.5 mm;
- glue (it is better to use transparent “Crystal” glue).
Wire cutters are used as tools; you can also take pliers. Give preference to high-quality materials so that the future product looks aesthetically pleasing - most often tiaras or tiaras are worn for significant events.
Preparatory stage
To make the creation process easy and quick, first make twenty wire segments, the length of which will be eight centimeters. Use wire cutters to cut copper wire. Determine the bead color scheme for your product.
Step-by-step master class for beginners
If you do not have enough experience in creating hair accessories, you can make a tiara with your own hands from beads, following the informative master class:
- Thread a bead onto each piece of wire and twist a knot to secure it well. It is necessary to make two or three branches, at one end of which several beads will be located. A product in which the beads are located at different heights will look beautiful.
- Place the finished branches on the rim, securing them with wire. The excess can be easily cut off with wire cutters.
- Carefully straighten the wire branches so that they look aesthetically pleasing, and secure the joints with transparent super glue.
An elegant tiara made of beads is ready. If desired, the wire can be decorated with a satin ribbon, securing it with transparent glue.
Hair decoration made of beads and seed beads
Professional craftswomen skillfully make unique hair decorations using beads, beads, headbands or wire of different diameters. To frame the bride's head, tiaras are created, consisting of intertwined branches and lace leaves, based on centuries-old traditions.
The photos below show examples of homemade ornate decorations. A variety of models are made with different types of fastenings: side, comb-shaped, rims, etc.
It’s not difficult to weave a simple decoration, so let’s try to create a unique work of art.
Video tiara made of beads and seed beads
Preparatory stage
To weave an unusual elegant crown we will need working material:
- hoop base
- pliers
- thick and thin wire
- four types of beads: large beads, 4x6 mm beads, five large beads and five large drops
Master class on creating a simple tiara from beads and seed beads
The proposed master class will help beginning needlewomen learn the basics of French weaving techniques and learn how to create any desired decorations.
The extraordinary tiara consists of five similar elements of three sizes: one large, two medium and two small. Let's start weaving from a large fragment.
We cut a thick wire, twenty centimeters in size, and string a bead onto it. We move the assembled element to the center of the segment and twist the wire.
Having made six turns, we connect the ends of the wire and string a drop-shaped bead on them.
We do several twists.
Next, cut a piece of thin wire and screw it to the base.
We string eight large beads onto a length, moving them towards the base.
We make a couple of turns of wire over the droplet.
We collect eight more beads and make curls under the drop.
Thus, the first row was formed.
The next row is formed from twenty-four beads by winding the rod. There are twelve elements for each half.
The next tier is created in a similar way. For it we string thirty-six pieces of beads - eighteen fragments on each side.
To weave the last row, 6x4 millimeter beads are used. For the entire row we collect thirty-four pieces: seventeen on each side. We wrap the prepared set around the rod, carefully fix it and cut off the thin wire. The first part of the crown is ready.
The second part of the product is made identically to the first. Only this element is formed from three rows: the first two, as in the previous description, and the third - from beads six by four millimeters, in the amount of twenty-four pieces. We make two such parts.
Similarly, the following fragments of the product are weaved, consisting of two rows: the first - beaded (sixteen units), and the second - from 6x4 mm beads in the same quantity.
Having finished creating all the elements of the tiara, attach them to the headband. Carefully screw the parts together, starting from the central part of the product.
With a little effort, we get an unfinished decoration. We cut off the excess ends of the wire.
To make your jewelry sparkle, you need to hide the unsightly protruding wire well. This can be done using a silver thread, simply wrapping it around the rim.
But a bezel entwined with beads will look more beautiful. To decorate a product with beads, you need to string beads onto a fishing line, as shown in the photo below.
Next, we tie one end of the fishing line to the base and wrap the beaded thread around the rim in a spiral, carefully hiding the unsightly gaps.
As a result of interesting, painstaking work, we get beautiful hair jewelry.
An elegant headband will beautifully decorate a girl’s head at a gala evening, emphasizing the beauty and majesty of its owner. Homemade jewelry will suit any evening outfit. Such products will be the best birthday present for a close friend who will be delighted with such a unique present. After all, in homemade things there remains the positive energy and warmth of the hands of the person who creates fantasy objects.
We invite you to watch a video tutorial on how to make a crown with your own hands. You will learn how to create such an amazing head decoration and make your daughter happy. The process is simple and will be a pleasure. For a little lady, this will be the best gift for any holiday or celebration. And all you need is a hoop, wire, a brooch with crystals, droplet beads of different sizes and a little time. Good luck!
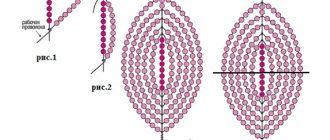
Patterns for beading tiaras
"Floral"
The “Floral” tiara is woven from beads with your own hands according to the following pattern:
- Take a wire 0.8 m long, string a bead onto one end and secure it. Next, twist the wire spiral over the bead.
- We create five identical petals from wire; when they are ready, we connect them into a flower and attach a bead inside. We strengthen the base of the workpiece with wire.
- We make two more smaller flowers by stringing low beads onto the petals so that they completely cover the wire.
- We attach smaller flowers to the rim, and a large flower in the middle.
You can create a whole flower arrangement from beads to make the decoration more vibrant and original.
The “floral” tiara, created from beads and seed beads, is ready.
Graceful tiara
To make a delicate crown tiara, use a beading pattern.
Greek style decoration
Greek-style tiaras can be used not only for special events, but also become an accessory that will decorate a woman’s hair at any time of the year and for any occasion.
It won't be difficult to create. The easiest option is to sew various beads, seed beads or cabochons onto a base of elastic fabric; you can also use a hair hoop. The headband will look beautiful and elegant if it is covered with rhinestones, sequins or Swarovski crystals.
Making a comb tiara
Stages of making a beaded tiara:
- To make the branches, take a 0.5 m long wire and put a large bead on it, moving it towards the center. Add three beads of the same color to both edges. We retreat five centimeters and intertwine the edges of the wire to form a twig. We retreat another ten centimeters on the main wire and form two more branches in the same way.
- Take a piece of wire fifteen centimeters long, thread a flower-shaped bead onto it, and place it in the middle. On both sides of the flower we string two beads of the same color onto the wire. The ends of the wire should be twisted together.
- We lay out the blanks on the work surface: first a twig, a flower on top of it. The ends of the wire should be intertwined, adding new branches.
- We take a tape that matches the color of the materials used; it should be tightly wrapped around the ends of the wire to make the product look aesthetically pleasing.
All that remains is to attach the workpiece to the base of the ridge. This must be done so that the ends of the wire do not cling to the hair. It is best to use a metal comb. The beaded comb tiara is ready.
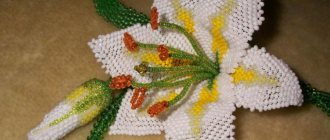
Master class on making a tiara with a flower
As you can see from the picture, the tiara looks original and simple. This is where its beauty lies. Therefore, it fits perfectly with a little princess’s ball gown.
For a tiara with a flower we will need:
- thin metal hair hoop;
- wire 1 mm and 0.4 mm thick;
- golden and silver beads;
- beads of different sizes;
- pliers.
Let's start weaving the tiara by forming the flower itself. Cut a piece of wire approximately 0.8 m long. At the end we attach a beautiful bead and secure it with a loop. Under the bead we twist a small spiral from the wire and begin the formation of flower petals. There will be five of them in total. Try to make them the same size and shape.
We twist the remaining wire and decorate it with a large bright bead. We begin to braid the petals of the flower. We string beads mixed with glass beads and small beads onto a thin wire. We wrap it tightly around the flower petals. You also need to make two more flowers, the same in shape, but smaller in size.
Let's start decorating the hair hoop. First, small flowers are screwed to it, then we attach a large flower.
To make the structure more durable. The flowers are first straightened and then braided with wire strung with large beads. The photo shows what it looks like. How it will be for you - your imagination will tell you.
The beaded flower tiara for the girl is ready. Believe me, beading will take very little time, but will bring you a lot of pleasure.
Do it yourself
A handmade tiara is an original decoration. This accessory will suit any little princess. So, how is a tiara made for girls? Now we'll tell you. To make a children's tiara you need: wire (4 mm thick), multi-colored beads, a metal hoop, wire cutters.
You need to cut 80 centimeters of wire. A large bead should be attached to it and a loop should be tightened. Then you should make a spiral of wire, and secure slightly elongated petals around it. At the end, twist the wire a little and attach a large bead in the form of a tamer. All the petals must be braided with a thin wire, on which small and medium beads have been pre-strung. In the same way, you need to weave two more small flowers
Now you need to decorate the hoop. The first step is to screw on the small flowers.
Now you need to carefully secure all the elements and wrap them with thin wire. Then all that remains is to straighten the flowers, and the wire tiara is ready.
Video lesson on the topic
As you can see, there are many ideas and each of them deserves a number of praiseworthy epithets. Each woman decides for herself what to choose from this variety of accessories. We can only note that beads, coupled with wire, form an excellent basis for making thousands of beautiful jewelry. Therefore, feel free to use them in your work if you are a handmade master. Well, if you are just starting to try your hand at creating creative hair accessories, know that bead weaving is one of the simplest and at the same time original methods that can be used to create amazing hoops, hairpins and tiaras.
Share