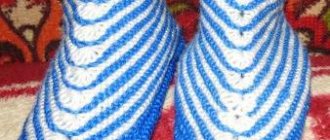
Openwork knitting for a scarf
To knit an openwork scarf, you will need 125 grams of yarn and number 5 knitting needles. When finished, the scarf will be 1.9 meters long and 0.5 meters wide. In type, this pattern resembles zigzags.
The process of making the pattern
We collect loops from 58 pieces. The ornament itself takes up eight loops, plus two edge loops. All yarn overs during the knitting process are made from purl loops, and the pattern itself is repeated about twenty times. In total, from 400 to 430 rows are performed.
Initially, there is an edge loop, purl, 5 knit, yarn over, 2 purl, 1 loop is removed and pulled into the adjacent loop, knit, 4 knit, yarn over, purl and the edge loop completes the row. This is how five rows are performed, with the removed loop shifted one forward, and then the same is done, but in the opposite direction.
As a result, you will make a wonderful accessory that can decorate any look. The scarf is worn wrapped around the neck or draped over the shoulders.
Video lessons
A knitted sweater is a very feminine wardrobe item, emphasizing the warmth and softness of character, creating a distinctive image of the fair sex. Ladies buy fashion magazines with knitting instructions or take out old instructions, finding in them those things that are likely to become relevant today. As true masters of their craft, they post video tutorials, telling in detail how to knit this or that sweater with knitting needles. Easy-to-make patterns will help beginning knitters create their first item with their own hands. It will be easier for ladies experienced in knitting to understand new patterns, aran weaving, and master techniques that were previously unknown.
Also worthy of attention are small video tutorials that talk about individual details:
- collars of different styles;
- cuffs;
- buttonholes;
- shelves, etc.
No less useful are explanations with videos about the techniques used for:
- connecting finished parts to each other;
- processing of free edges of the product;
- performing sleeve fitting under armholes, etc.
Knitted jackets
A jacket is a knitted jacket with knitting needles that has a fastener. Usually contains at least five parts, knitted separately. To correctly knit a jacket and connect the parts so that the product does not drag, it is worth watching all the tricks shown by knitters in video tutorials.
For example, how to make a thing fitted:
- decrease loops;
- insert a 2 x 2 elastic band along the waist line into the pattern;
- separately tie a belt to the jacket.
Attention has also been paid to the various collars characteristic of models with a clasp:
- asymmetrical;
- turn-down;
- shawls, etc.
The complexity of a product with shelves lies not only in knitting the collar and attaching the sleeve. It is important to knit the sweater with knitting needles so that the fronts are absolutely symmetrical and the same in height.
Raglan sweater
The easiest sweater to make with knitting needles is a sweater, a product worn over the head. Often the difficulty is the armhole, but the raglan style is quite simple for beginners, and such a thing fits perfectly on the shoulders. Models knitted with raglan are different. Some are knitted traditionally, from the bottom up. Others start at the neckline as a single piece and then branch out into four different panels - front, sleeve, back and second sleeve. The advantage of this model is that you can try it on yourself during the knitting process and adjust the length of the armhole without unraveling or re-tying anything. A sweater like this can be knitted easily and quickly. The sleeves require only reductions to accommodate the natural narrowing of the arm towards the hand. There is no need to add loops, which would represent a certain trick, in such styles. Raglan fabric, even if made with stockinette stitch, will not look as if it is upside down. Each piece ends with an elastic band, but before knitting it, you need to correctly sew each sleeve, as well as the back and front, which can be seen in the video.
Long sleeve sweater
Short sleeves of sweaters are often knitted as a single unit with front and back panels. It is enough to make a low armhole - you get a small cap sleeve. It is somewhat more difficult to knit a sweater with long sleeves. The same low armhole will help out. The product, made on knitting needles, stretches well and fits the figure. Such an armhole will not puff up.
A sleeve with a characteristic “sine wave” head can be easily made with knitting needles by using decreases. It’s better to knit it according to the pattern, and experienced knitters will show you how to plant it in their video instructions.
You can also find out from videos on the Internet how simple and convenient it is to knit a sweater with knitting needles with sleeves ending in a bell or flounce. Sometimes such a sleeve, if you look in the direction of knitting, just begins, and does not end with expansion, so it can be knitted by decreasing rather than complex increases.
Openwork pattern for baby's things
As for children's knitted items, you should choose patterns that are not very transparent. You can combine regular knitting with elements of openwork patterns, then things become elegant and practical to use.
If desired, you can make a pattern on the front of the product, sleeves or neck. This choice of pattern arrangement will add elegance, but at the same time, the item will have high wear resistance.
Pattern for a summer blouse
The main thing in knitted summer clothes is the choice of thread. For hot weather, it should be thin with the addition of cotton.
This season, leaf patterns or geometric patterns are popular. The choice of patterns is huge and once you have it, you can start knitting. Be sure that such a thing will be an excellent addition to your wardrobe. At the same time, such a sleeveless vest can be worn in the fall, under a thin golf shirt.
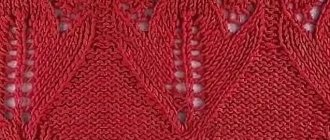
Simple openwork patterns for beginners in knitting
When beginners look at openwork knitting, it seems to them that it is very difficult to do, but this is not so. There are a lot of options that anyone can handle, even without prior experience.
The pattern described below goes well with other types of knitting and is often used as a basis.
Execution of the pattern - step-by-step diagram
- The ornament consists of eight loops (2 edge loops). The height of the pattern is 8 rows.
- First row: knit 4, yarn over, knit 2 stitches, slant to the left.
- Second row: purl 4, knit 2 loops in one purl, tilt to the right side. Then we continue to perform the first and second rows in turn.
Photo master class on knitting sweaters with buttons
This master class will help beginning needlewomen understand how to knit a sweater with buttons. The work will be done using 650 g of mixed yarn (wool with acrylic), as well as knitting needles No. 2.5 and No. 3.5:
For the back, we cast on 123 P with knitting needles No. 2.5, and knit 4 cm with a 1x1 elastic band. Next, transfer the fabric to needles No. 3.5, and knit 43 cm with any chosen pattern. Now we begin to form the armhole, closing 6 P along the edges. Then we decrease 1 P in the front R.:
We make armhole decreases for the first 20 R, and then up to 43 R we perform an even fabric. At this stage, we close all the stitches. We knit the front, starting from 58 stitches with an elastic band, then transfer the work to knitting needles No. 3.5, and perform 43 cm with the main pattern. :
At the beginning of the armhole, close 7 P at one end. After this, we continue to work, decreasing 1 P in all facial R. We continue this technique for 20 R, and then continue straight 6 R, after which we begin to make the shape of the neck. For her, on the other side of the armhole we close 9 P. Then we continue, decreasing 1 P only in the front P of the neck. We perform such decreases in 9 R, after which we perform straight 8 R, and close the last P.:
And here is the second shelf, made absolutely mirror-like. :
You will need to dial 55 P on the sleeve and tie 4 cm with an elastic band. Then we move on to the main pattern, and make 40 cm with this pattern. We perform the first 12 cm of the main pattern straight, and in the next 28 cm we add P on both sides, 1 P in each 7th R. Next, forming an armhole, we close the last 8 P on both sides. Then we will decrease 1 P in all facial Ps, from two edges. We make 38 R, and then close 1 P in all R, also at the ends. After 5 R, you need to close all the last P. We make the strips for the jacket with an elastic band, and bring them to the length of the shelves. In this case, holes for buttons must be made on the right placket. We cast on the neck with knitting needles No. 2.5 P, and make 10 R elastic bands:
At the end of the work, we sew all the parts together and sew on the buttons.
Read
We knit modern sweater models with a braid pattern
Knitting openwork mesh for beginners
Performance:
- the first row is done in purl stitch;
- second – 1 purl, knit 2 loops in 1 purl 2 times;
- the third one is done purlwise with pulling out an additional loop;
- fourth - two loops are knitted in one purl and after each one a yarn over is made.
Vertical pattern
Such patterns make the figure slimmer. Therefore, they are often used by clothing designers and fashion designers. But the needlewomen themselves can associate a thing with such an effect.
The main part of the vertical openwork is made in 4 rows of 4 loops. And for even edges, if desired, you can add two additional loops along the edges.
Performance:
- first row – 1 purl and 3 knit stitches;
- second - 1 front and 3 purl loops;
- third – purl 1, yarn over, knit 3 loops into one knit stitch and yarn over;
- fourth - 1 front and 3 purl loops.
Next, the rows are repeated to the length required.
Cozy jumper for baby
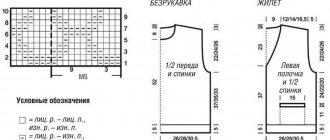
To update your girly wardrobe, knit a lightweight summer cotton jumper. The sizes of the jumper for girls shown on the pattern correspond to heights of 98-104 cm, 110-116 cm and 134-140 cm. The following pattern is used to create the model:
You will need:
- 200 g yarn;
- short circular and straight needles No. 3.5.
Perform the openwork pattern according to the pattern, where the number of yarn overs should always correspond to the number of decreases made.
To knit the back, cast on 81/93/105 stitches and perform the first purl row with knit stitches. Between the edge loops, make the main pattern according to the diagram. When the fabric reaches a length of 30/36/42 cm, bind off all the loops.
Article on the topic: Origami shuriken made of paper: diagram from Naruto with photos and videos
The front is knitted like the back, but at a height of 26/32/38 cm, 23/31/35 loops are closed in the middle. To bevel the neckline, make decreases every 2 rows: 1 time for 3 loops, 1 time for 2 loops and 3 times for 1 loop. When the fabric reaches the same length as the back, finish knitting by casting off the shoulder loops. To knit sleeves, cast on 45 stitches. Knit the purl row with knit stitches. Knit the rest of the fabric in an openwork pattern (except for the edge loops). Increase on both sides every fourth row, adding one stitch 11/12/12 times. Then make increases every 2 rows. Add 7 (11) 17 times 1 loop. When the length reaches 16/19/22 cm, finish knitting.
After moistening and stretching, leave the fabric to dry. Sew side and shoulder seams. Tie the edge of the neckline using circular knitting needles, casting on 104/116/128 stitches. Knit 1 round row with knit stitches, bind off all stitches with knit stitches.
A summer openwork blouse for a girl is ready!
Various stripes
These patterns can decorate any item and make it less strict. At the same time, the choice of different openwork lines is very large. But what makes this knitting especially popular is the ease of its execution. After all, the whole process of work consists of knitting loops and yarn overs. Therefore, even without experience, everyone will be able to make openwork tracks on their product and make it original.
Diamonds are openwork knitted
Openwork diamonds, as a pattern, can be found on any knitted items. These can be scarves, dresses or sweaters for any family member. There are a lot of varieties of rhombuses, and therefore there are also types of such knitting. The difference between this pattern is its density, which does not hide the elements of openwork knitting.
There are many types of openwork knitting. But any needlewoman can create her own pattern by adding a little imagination while knitting. The whole knitting process is quite simple and even a beginner can do it. Don’t be afraid and create, you will definitely succeed.
The main thing when making openwork patterns is to complete the work in accordance with the pattern of the selected pattern. If you are careful and do not make mistakes, then you will definitely succeed in any pattern. But initially, it won’t hurt to practice on simple patterns and then start openwork knitting, which requires experience in this type of needlework.
The origin and development of handicrafts
In almost every modern family, someone has the skill of knitting or crocheting. Meanwhile, knitting arose in ancient times. Already the ancient Greeks and Romans could boast of the ability to work with tools to create simple knitted fabrics. Excavations uncovered small fragments of knitted items, as well as frescoes and wall paintings depicting noble people wearing knitted clothing.
The skill reached its greatest flourishing during the Middle Ages. Expeditions and Crusades brought the basics of knitting to Europe, where ladies enjoyed needlework. For a long time, only the nobility could afford to tap their knitting needles rhythmically, because the prices for yarn exceeded all imaginable limits. Processing materials to create thread required exorbitant costs, but this all changed with the advent of spinning machinery. When ordinary people had the opportunity to knit, many patterns arose, most of which are used in modern models.
What allowed handicrafts to go such a long way and not lose popularity even after the advent of special mechanisms that facilitate painstaking work? The art of knitting was passed on to the next generation so that children could teach their grandchildren in the future. Knitting especially often attracts girls who watch their mother or grandmother work. The older generation, trying to satisfy the curiosity of the kids, teaches them ancient handicrafts.
Knitting has found wide application in the fashion world. Each collection includes a model line of knitted products.
Related article: DIY bear mask on your head made of paper and felt