Models of knitted tunics with knitting needles
How to knit a tunic with knitting needles for beginners in detail?
A tunic is a loose-fitting garment that covers the body up to the hips. They are made fitted, straight cut and flared; with a variety of necklines and collars - there can be countless ideas. It all depends on the imagination of the needlewomen.
Creating a tunic can be divided into several stages:
- Model selection. At this stage, take into account your experience in knitting, and if you have recently mastered knitting needles, it is better to start with simple tunics. Samples and instructions for implementation can be found in specialized publications, or by reading this article to the end.
- Purchase yarn and knitting needles based on recommendations. You can find useful tips on selecting yarn and knitting needles in the article on how to knit a vest with knitting needles.
- After you have chosen a model, draw up a pattern for the future tunic on paper and then check the details of the product for compliance. We recommend always making a pattern to avoid inaccuracy. You can make a pattern in the following ways: • by tracing the contour of an existing tunic; • by constructing a pattern according to measurements. The second method is preferable, as it is accurate and the product will be knitted according to your parameters. To create a pattern, take the following measurements: product length (DI), chest circumference (CG), hip circumference (HC), shoulder length (HL), neck circumference (OH), waist circumference (WT). If the tunic has sleeves, then you will need the width of the wrist and forearm, and the length of the sleeve.
- Start working according to the given scheme.
- After all the parts are ready, the product is sewn together.
If desired, the tunic can be embroidered with beads or decorated with embroidery. As an accessory to some types of tunics, a leather belt or ribbon tied at the waist is suitable.
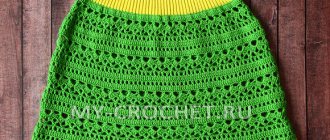
Summer option
Knitting a tunic for a 10-year-old girl with knitting needles will not differ much from the previous version, except that significantly more yarn will be required. In order to knit a tunic you will need:
- 300 g of yarn of any yellow or similar shade;
- knitting needles of the third or fourth size;
- three-piece hook.
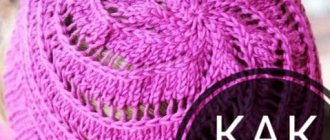
The main leaf ornament is executed in accordance with the diagram.
From one row, the main loops are knitted in the front way, and in the next - purl. So they alternate throughout the pattern repeat, which in this case is 16 rows. The final density of the pattern: 20 loops and 30 rows will make a square of 10/10 cm.
To knit a tunic for a 10-year-old girl with knitting needles, you first need to make the back of the product. To begin, cast on 83 stitches, make several rows of selvedge, and then knit the part 25 cm according to the schematic pattern. After this, cut the piece by 29 loops and continue knitting using the front side - back side technology.
After 4 cm, begin to reduce the width of the product according to the given algorithm: 1 time for 3 loops, and then once for 2 knots and 3 times for 1. After 10 cm from the start of decreasing the loops, make a cutout in the center of the product for the collar. To do this, close 18 loops in the middle, in the next row reduce the number of loops by another 4. Knit the part from the beginning of the neck another 12 cm on both sides.
Dress-tunic knitting pattern with description
Traditionally, the tunic is mid-thigh length and is worn as a long blouse. If it reaches the knee or below, then it becomes a tunic-dress, and is worn as an independent type of clothing. When the length reaches the ankles, the tunic becomes a maxi dress. The tunic dress is characterized by a loose cut that does not restrict movement and at the same time slims the figure. The dress model below, which we suggest knitting, can be worn separately or combined with skinny jeans or leather leggings.
How to knit a boho tunic with knitting diagrams and descriptions
The boho style originated at the end of the 19th century. in the creative environment of artists and musicians. It is characterized by the combination of seemingly incompatible things, for example, different patterns on the upper and lower parts of the ensemble. Boho style is often used in clothing by people of creative professions, because... it helps you stand out and be remembered. Characteristic features of boho-style tunics made with knitting needles are:
- Cut: often A-shaped or straight;
- The asymmetrical bottom of the product is popular;
- Use of natural threads;
- Ethnic patterns.
You can try knitting a boho tunic with an openwork chainmail pattern.
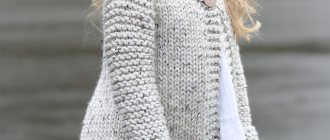
Tunic with golf collar
This tunic is designed for a ten year old girl. You need to prepare yarn with a wool fiber content of at least 50%, number 2 knitting needles and number 2 sock needles.
The product is knitted with such patterns. The first of them is a 2 by 2 elastic band. Then two relief patterns according to the pattern and an openwork elastic band in which the number of buttonholes should be even. Since you have already read the detailed description of knitting a tunic above, we will not repeat ourselves, but will invite you to study the pattern diagram and patterns used, so that based on them you can knit an original item for your fashionista.
Read
We knit a stylish women's vest without any problems
How to knit an openwork tunic with knitting diagrams and descriptions?
Openwork tunics look elegant and noble. Such models knitted from cotton yarn are especially relevant in the summer, because they are not hot.
Openwork tunics, models from the Internet
P
Black openwork crochet tunic for plus size
Size S-XXL. A spectacular tunic made of small squares will make you feel comfortable even on the hottest day, and the black color will hide figure imperfections.
Finished tunic dimensions:
- chest circumference 104(118)132 cm
- tunic length 79(75)80 cm
You will need: Novita Bambu yarn (68% bamboo, 32% cotton, 132 m/50 g) - 400 (450) 500 g black (099), hook No. 3.
Tunic “Lacy hyacinth”
Size: 46-48.
Materials: 450 g yarn (100% acrylic) bright blue and 2 buttons for covering. Hook No. 3.
Fantasy pattern: according to pattern 1. Knitting density: 10 cm = 23 loops.
Description of the work on knitting a tunic Back: Cast on a chain of 113 chain stitches and knit in a pattern according to pattern 1
. At a height of 51 cm, use a thread of a contrasting color to mark the armholes on both sides and knit straight. At a total height of 72 cm, taking into account that the last row should be knitted with single crochets, having received 20 loops for each shoulder and 73 loops for the neckline, finish knitting.
Before: Knit as a back.
Assembly. Pin the pieces onto the pattern, moisten them and let them dry. Sew shoulder and side seams. For the belt, cast on a chain of air loops about 130 cm long and tie it with 2 rows of double crochets. Knit 2 buttons as follows: according to pattern 2, knit from the 1st to the 4th row, then insert the button and complete the remaining 3 rows. Thread the belt through the loops of the pattern along the waist line and sew 1 button on each end of the belt.
Tunic with openwork shoulders and flounce
A loose tunic with openwork shoulders and a flounce is very good for the summer heat.
Sizes: 36/38 (40/42) 44/46.
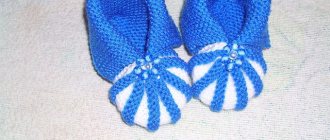
Pink tunic
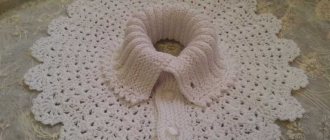
Children's openwork tunic “Strawberry”
Diagram of the central part of the tunic:
Scheme of the “scales” pattern for knitting the upper part of the tunic:
Openwork tunic for girls
Tunic pattern for girls:
Openwork tunic for mother and daughter
Using one pattern, you can knit both an adult and a children's tunic for the summer.
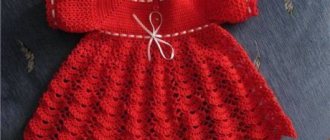
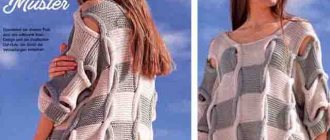
Tunic with sleeves, knitting pattern with description
Once you have mastered simple tunics, try creating tunics with sleeves and complex geometric details. For example, you can knit a red tunic with a yoke on the chest. In such a thing you are unlikely to go unnoticed!
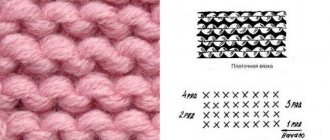
Fashionable tunic with braids
The product model is designed for an eight-year-old girl. Prepare threads from mixed fibers for the working process, but make sure that the wool content is at least 30%. You also need number 3 knitting needles.
A children's tunic knitted will consist of several patterns. The first is a one-on-one elastic band. Then comes the stockinette stitch, which is knitted in the faces. rows with the same loops, and in purl rows only purl. p. The purl stitch is knitted like this: in the front stripes, purl. loops, and in purl. R. only persons. p. The diagram of the main pattern of their braids will be shown in the article.
The knitted density of the product is twenty stitches per thirty rows equal to 10 by 10 cm.
Let's take a look at the following knitting description. We start from the back of the tunic. Cast on one hundred and forty-three stitches on the knitting needles. Knit an elastic band, and then proceed to knitting the main pattern according to the schematic pattern. Knit from the seventh to the twenty-first stitch, then six times from the first to the twenty-first stitch, ending with two. Make thirty-six rows, and then repeat three times from thirty-one to fifty-six. Knit eight more stripes. Knit the remaining loops that remain on the knitting needle in stockinette stitch. When the height of the product is thirty-five centimeters from the elastic, you need to close the sides under the armholes in even rows: 1 row of three loops, the second of two stitches, and in another row of one stitch. Next, knit a straight tunic fabric. At fifty centimeters for rolling out, close the eighteen central loops, and then knit each part separately. To make a smooth transition along the inside of the tunic, close first five buttonholes in even stripes, then four. When you reach 52 cm, you should close the shoulder on the side to even. in rows, first four sts, then five sts. Repeat the same steps with the second half of the tunic.
Read
Self-knitting mitts with knitting needles
In front of the children's tunic, perform by analogy. The only difference is the deeper cut. For it you need to close ten central links at the forty-first centimeter, and then knit each side separately with knitting needles. We are not finished with the description of knitting yet. To smoothly round off you need to even. lanes on the inside. close the edge first by three sts, then by two sts and by one st. It is necessary after this in each 4 r. close off 1 stitch at a time. Knit the second shoulder of the girl’s tunic in the same way, only in a mirror image.
Knitting a tunic for a girl with a description continues. Now let's move on to the sleeves. Cast on fifty stitches and knit an elastic band one on one, 1 cm long. Next, move to the stockinette stitch. To form an okat on both sides in even rows, you need to close it in 1 p. three stitches each, then in the next one 2 stitches each and in another one 1 stitch each. Make three stripes in a straight line with knitting needles, and in the fourth close 1 stitch each, then also 1 stitch each, two and 3 stitches each. The remaining links must be closed all at once.
All that remains is to assemble a tunic for the girl. Stitch your shoulders. To decorate the neckline, lift one hundred and thirty links along the rollout and tie 3 cm with a 1 by 1 elastic band. After this, complete all the remaining seams. We are done with the description of knitting a tunic for a girl.
Summer tunics with knitting needles (10 models) diagrams with descriptions
Earlier in the article, we already gave a knitting pattern for an openwork tunic for the summer. Below we present 10 more models of summer tunics.
A tunic made of pink silk yarn is perfect for both hot summer days and cool evenings in combination with a turtleneck or long-sleeve T-shirt, as in the photo. The pattern and cut are simple, so even an inexperienced knitter can cope with the work.
Product in “spikelet”
Every woman wants to look beautiful, regardless of her body size. Below is a description and knitting pattern for an openwork tunic for both slender and overweight women.
This item is made with a spikelet pattern and an elastic band for the yoke. Product size: from S-XXl.
You need to take 300-450 g of Navita Bambu yarn 50% bamboo, 50% cotton, knitting needles 3, 5 and circular knitting needles 3, 5.
The knitting should be of the following density: 24 stitches - 33 rows, 10-10 pattern, taking into account the pattern.
Related article: DIY plywood Christmas tree
The back of the product. We cast on 111, 123, 135, 147, 159 loops depending on the size. Knitting with an elastic band - front, purl from the 3rd row. Next you need to knit the spikelet pattern according to the pattern. We knit 8 loops before the pattern, repeat this example report of 12 loops -8, 9, 10, 11, 12 times and knit 7 loops after the pattern. We repeat this for rows 1-20 - 6, 7, 8, 9 times.
Rows 21-36 are knitted according to the pattern - 75, 83, 91, 99, 107 stitches.
The front is knitted in the same way as the back. Yoke of this tunic: knit 75, 83, 91, 99, 107 stitches for the front and cast on another 33, 35, 35, 37, 37 stitches for the armhole. We knit 75, 83, 91, 99, 107 back stitches and cast on another 33, 35, 35, 37, 37 for the next armhole -216, 236, 252, 271, 288 stitches. Next, we knit with an elastic band, repeating 3 rows. We continue knitting with an elastic band for another 10, 10, 11, 11, 12 cm.
On the next row, knit 2 together, repeat from 108, 118, 126, 136, 144 stitches. Knit a row in stockinette stitch. But it is worth paying attention that for sizes from L-XXL we decrease 6 (10) stitches exactly along the next row with stockinette stitch - 108, 118, 126, 130, 134 stitches. And we close. Afterwards we connect all the parts together.
Tunic for plus size knitting pattern with description
The tunic will decorate any woman, and for Rubens’ ladies it is perfect, because visually the extra pounds will be hidden, and the silhouette will look slimmer.
4. Pattern 2: see diagram 2;
5. Pattern 3: see pattern 3;
6. Pattern 4: see pattern 4.
TUNIC FOR GIRL KNITTED
Knitted tunic for girls
Knitted tunic, model description in Russian.
Age: a) 2 years – b) 4 years – c) 6 years – e) 8 years – f) 10 years. You will need: 200 (250, 300, 350, 350) g of yarn (50% wool, 20% alpaca, 20% polyamide, 10% acrylic) knitting needles No. 4.5. Types of knitting: rib 2×2, purl stitch, pearl pattern: 1st r.: 1 edge. p., *k1, purl 1*, rep. between **, finish 1 edge.p. Rows 2 and 4: knit according to pattern. 3rd r.: 1 edge p., *1 p., 1 knit.*, repeat. between **, finish 1 edge.p. Repeat these 4 rows. Fantasy pattern and “braids” Density of work. 10 cm elastic band 2×2, knitting needles No. 4.5 = 24 sts × 25 r. 38 p. fantasy pattern, knitting needles No. 4.5 = 17 cm, 28 r. = 10 cm. Back. For all sizes. x → Cast on 78 sts (84, 92, 96, 104) using knitting needles No. 4.5 and knit with a fantasy pattern and “braids” (according to the pattern); distributing the loops as follows: 8 (9, 11, 12, 14) p. purl stitch, 6 p. “braid” No. 1, 6 (8, 10, 11, 13) p. purl stitch, 38 p. fantasy pattern, 6 (8, 10, 11, 13) stitches purl stitch, 6 stitches “braid” No. 2 and 8 (9, 11, 12, 14) stitches purl stitch. On the 13th (15th, 13th, 13th, 15th) r. perform 4 decreases as follows: 1 p., 2 p. together purl., 5 (6, 8, 9, 11) p., 6 p. “braid” No. 1, 2 p. together purl., 4 (6, 8, 9, 11) purl, 38 p. fantasy pattern, 4 (6, 8, 9, 11) purl, 2 p. together purl, 6 p. “braid” No. 2, 5 (6, 8, 9, 11) purl, 2 p. together purl, 1 purl. = 74 (80, 88, 92, 100) p. After 12 (14, 12, 12, 14) p. perform 4 more decreases: 1 p., 2 p. together purl., 4 (5, 7, 8, 10) p., 6 p. “braid” No. 1, 2 p. together p., 3 (5, 7 , 8, 10) purl, 38 p. fantasy pattern, 3 (5, 7, 8, 10) purl, 2 p. together purl, 6 p. “braid” No. 2, 4 (5, 7, 8 , 10) purl, 2 p. together purl, 1 purl. = 70 (76, 84, 88, 96) p. After 12 (14, 12, 14, 14) p. perform 4 more decreases: 1 p., 2 p. together purl., 3 (4, 6, 7, 9) p., 6 p. “braid” No. 1, 2 p. together purl., 2 (4, 6 , 7, 9) purl., 38 sts. pattern, 2 (4, 6, 7, 9) purl, 2 sts together purl, 6 sts “braid” No. 2, 3 (4, 6, 7, 9) purl, 2 sts together purl, 1 purl. = 66 (72, 80, 84, 92) p. After 14 (14, 12, 14, 14) p. perform 4 more decreases: 1 p., 2 p. together purl., 2 (3, 5, 6, p., 6 p. “braid” No. 1, 2 p. together purl., 1 (3, 5, 6 , purl, 38 p. fanny pattern. 1 (3, 5, 6, p., 2 p. together purl., 6 p. “braid” No. 2, 2 (3, 5, 6, p., 2 stitches together purl, 1 purl = 62 (68, 76, 80, 88) stitches After 14 (14, 14, 14, 16) rows, perform 4 more decreases: 1 purl, 2 stitches together purl. , 1 (2, 4, 5, 7) p., 6 p. “braid” No. 1, 2 p. together p., 0 (2, 4, 5, 7) p., 38 p. fanny pattern, 0 (2, 4, 5, 7) purl, 2 sts together purl, 6 sts “braid” No. 2, 1 (2, 4, 5, 7) purl, 2 sts together purl, 1 purl = 58 (64, 72, 76, 84) stitches Only for sizes c), e), f): After 14 (14, 16) stitches, perform 2 decreases as follows: P1, 2 stitches together purl, 3 (4, 6) purl, 6 stitches “braid” No. 1, 5 (6, purl, 38 stitches fancy pattern, 5 (6, purl, 6 stitches “braid” No. 2 , 3 (4, 6) p., 2 p. together purl., 1 p. = 70 (74, 82) p. For all sizes. After 28 (30, 32, 34, 37) cm = 78 (84, 90, 94, 104) rubles from the beginning of work, perform 6 rows with a pearl pattern. → After 30 (32, 34, 36, 39) cm = 84 (90, 96, 100, 110) rubles. from the beginning of work for the raglan line, close 3 stitches on both sides, go to the 2×2 elastic band, starting and finishing the 1st row with 1 purl. p. (from 2 knits, from 2 knits, from 2 p., from 2 p. p.), make sure that you get 2 knits. n. in the middle of the product. Then close every 4th r. 0(0, 1, 1, 0) times 1 p., in every 2nd p. 14 (16, 17, 18, for size e) 2 times 2 stitches and 19) times 1 stitch on both sides. After 42 (46, 50, 53, 57) cm = 114 (124, 136, 142, 154) r. from the beginning of work, close the remaining 24 (26, 28, 30, 30) p. Before. × → Knit like a back. → After 30 (32, 34, 36, 39) cm = 84 (90, 96, 100, 110) r. from the beginning of work for the raglan line, close 3 stitches on both sides, proceed to perform the 2×2 elastic band, starting and finishing the 1st row. with 1 purl. p. (from 2 knits., from 2 knits., from 2 p., from 2 p. p.), making sure that 2 knit stitches pass through the middle of the product. Then close for sizes: a), b) - in every 2nd r. 10 (13) times 1 p. c), d) - in every 4th p. 1 time for 1 p., and in every 2nd r. 13 (14) times 1 p. e) - in every 2nd p. 1 time for 2 points and 15 times for 1 point. After 36 (40, 43, 46, 50) cm = 98 (110, 118, 126, 138) r. from the beginning of work for the neck, close off the middle 10 (10, 12, 12, 12) stitches and finish both sides separately. To round the neckline, close in every 2nd r. for sizes: a), b) -1 time 4 p., 1 time 3 p. and 1 time 2 p. c) – 1 time 4 p., 1 time 3 p., 1 time 2 p. and 1 time 1 p. e), f) - 1 time 4 p., 1 time 3 p. and 2 times 2 p. After 39 (43, 47, 50, 54) cm = 106 (118, 128, 136, 148) p. . from the beginning of work, close the remaining 2 sts. Close the second side symmetrically. Right sleeve. × → Cast on 54 (62, 70, 74, 82) sts using knitting needles No. 4.5 and knit with a 2x2 rib, starting and ending the row with k2 sts. → After 1 cm = 2 r. from the beginning of work for the raglan line, close 3 stitches on both sides, then close in every 2nd row. for size: a) *1 time 2 p. and 2 times 1 p.*, repeat. between ** 3 times, 1 time 2 p. and 1 time 1 p. b) *1 time 2 p. and 1 time 1 p.*, repeat. between ** 6 times, then 1 time 1 p. c) *1 time 2 p. and 1 time 1 p.*, repeat. between ** 7 times, 2 times 1 p. e) *1 time 2 p. and 1 time 1 p.*, repeat. between ** 8 times, 1 time 1 p. e) * 2 times 2 p. and 1 time 1 p. *, repeat. between ** 5 times, 1 time 2 p. and 2 times 1 p. After 10.5 (12.5, 14.5, 15.5, 16.5) cm = 26 (30, 36, 38, 40) r. from the beginning of work, knit as follows: on the right: in every 2nd r. close 1 time 5 p., 1 time 4 p. and 1 time 3 p.; left: close every 2nd row. 3 times 1 p. Close the remaining 3 p. Make the left sleeve symmetrically. Neck trim. Cast on 102 (106, 114, 118, 118) sts using knitting needles No. 4.5 and knit with 2×2 rib, starting and ending the 1st row and all odd rows with k2. p. and knit 3 cm = 8 r. After that 1 r. persons and several rows of thread of a different color. After attaching the binding to the neckline of the product, unravel and remove these rows of contrasting color. End of work. Moisten the pieces, arrange them according to the pattern and let them dry. Sew the sleeves along the raglan line. Sew side seams and sleeve seams. Pin (sew) the binding to the neckline. Sew the back seam along the binding along short sections.
Beach tunic knitting pattern
Tunics are indispensable on vacation in the summer: they are not hot, they protect your shoulders and back from sunburn, after swimming you can throw them over a wet swimsuit with shorts and move around in populated areas like this. Having spent several evenings on this representative of beach fashion, throughout the summer you will attract the attention of others on vacation with your outfit.
Long tunic knitting pattern
Original tunic knitting pattern
The next proposed tunic option can be worn over a colored turtleneck, worn with jeans or as a sundress - there are many ideas. In any case, you will not go unnoticed. And tying it is quite simple, following the instructions below.
Tunic knitting patterns (10 patterns) diagrams
1. Lace-up pattern. It is preferable to use the strap under the bust, separating the upper and lower parts of the product.
2. The Diamond pattern will look good on the sleeves and main parts of the tunic.
3. The “Leaves” pattern can be used to make the entire tunic or its individual parts.
4. The long sleeves of a warm tunic made with the “Honeycomb” pattern will look impressive.
5. For thin girls, an A-shaped tunic will visually add volume if its lower part is made with a “Wave” pattern.
6. Another interesting pattern is “Beetles”, which can be used to knit the sleeves, lower or upper parts of the tunic.
7. The Diamonds in Stripes pattern can divide the piece into two halves, or alternate with other patterns, for example, with braids.
8. The Braided pattern can decorate the placket under the bust, as well as the sleeves and upper part of the tunic.
9. The recommendations for the previous one also apply to this “Braid”.
10. Another option “Leaves” will decorate the entire tunic.
Lace outfit
Size of this product: 110-116; 134-140.
To knit such a children's tunic, you need to purchase yarn 200, 300 g Miro 4fach - 50% cotton and 50% polyacrylic 140 m 50 g of the desired color. We take knitting needles number 4.
Knitting the pattern: you need to cast on 10 loops and 1-2 edge stitches. It is necessary to knit according to the provided pattern, where the knitting of the front rows is indicated, and in the purl rows all loops and yarn overs must be knitted in purl rows. We start with the edge loop and the loop before the repeat, repeat the loops from the repeat and end with the edge loop. We do this from the first to the eighth row.
Related article: DIY dragon mask made of paper and cardboard with photos and videos
Garter stitch: knit and purl rows - knit stitches. Schemes and descriptions of this model are given below.
The leaf pattern itself: the number of loops you need to dial is 8 -1-2 edge stitches. You need to knit according to the pattern where the front rows are indicated, and in the purl row, all the loops and yarn overs must be knitted purlwise. You need to knit from the first edge and loops before the pattern, then repeat the repeat loops, ending with the loops after the report and the edge loop. This is how you knit from the first to the twelfth row.
Knitting density: this pattern and openwork pattern: 22 loops and 30 rows - 10 by 10 centimeters.
We knit the back part
It is necessary to make 83, 103 loops and knit the purl row of the front one - this row is not taken into account in subsequent calculations - then we knit it with openwork knitting. After 2.5 cm - 8 rows from the edge, you need to remove one loop on both sides for fitting. Next, in every sixth row there are 11 - 1 (12-1, and in the fourth row 1-1), and at the beginning of the row after the edge you need to knit one broach and at the end of the row in front of the edge we knit two stitches together - 59 (75) stitches. When decreasing, it is necessary to ensure that the yarn overs when knitting correspond to the number of stitches knitted together.
When 26.5 cm - 80 rows (88 rows) are knitted, then you need to knit 1 cm from the edge - 4 rows of tight knitting. Then a pattern with leaves is knitted. When 24 rows of garter stitch are knitted, you need to close the eyelets for the armholes on both sides with 1-2 loops, then in the second row 1-2 loops - 51 (67) loops. After 20 cm, you get 60 rows (24 cm - 72 rows) and from the garter stitch you need to close 1-3 and 1-2 loops along the edge of the neckline in every second row. When 66 rows (78) are formed, you need to close 12 (18) loops from the shoulders from tight knitting.
Related article: Japanese magazine “Lets knit series 80561”. Autumn-winter 2019
Before the product
You need to knit two parts. For the left part, cast on 45 (53) stitches, knit one purl row of the front row, knitting an openwork pattern. And on the right side the fitting is done, as was done on the back. After 64 rows (72) from the edge of 33 (42) loops and on the right you need to pull the previous loop through the edge, and those that remain 32 (41) need to be put aside. We knit the second part (right) symmetrically to the left.
We do it on all the loops, and in the first row, tie the last loop of the left part with the first loop of the right part (2 middle loops), knit 63 (81) loops together. We reduce the loops for fitting 59 (75), after 80 rows (88) from the edge we do the same as the back, but after 42 (54) rows from the garter stitch it is necessary to close the loops to form the neckline, the middle 11 (15) loops. Next, everything is knitted separately, while on every second row we close off 1-3, 1-2, 2-1 loops, and in the next fourth row we close off 1-1 loops. Now we cover the remaining loops 12 (18).
Sleeves
You need to cast on 43 (63) stitches, knit one purl row of the front row - in an openwork pattern. To form sleeve bevels, you need to add 4-1 (in every second row 4-1) stitches in stockinette stitch -51 (71) stitches. After 8 rows (16) from the edge, it is necessary to close 1-2 loops on both sides to form a rollback, as well as in every second row 3-2, 12-1.
When 40 rows (48) from the edge are formed, it is necessary to close the remaining 11 loops (31). Afterwards we connect all the parts together.
Knitted tunics for girls (10 models by age) diagrams with descriptions
The tunic can be knitted for girls of all ages. This new thing will decorate, warm the baby and not restrict movement.