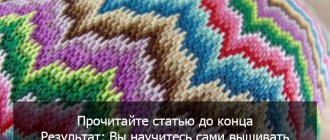
Since ancient times, people have made jewelry from beads, decorated clothes and other items. This type of art is still developing, using new technologies and tools. Today, needlewomen know how to glue beads onto paper, wood and glass. Working with beads trains fine motor skills, develops artistic taste and imagination, and calms the nerves.
Basic ways to use beads on glue
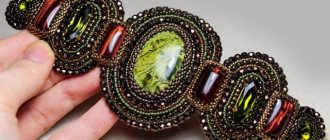
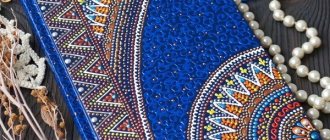
Designers use this material to create patterns on clothes, shoes, and accessories. Bright, voluminous bead paintings add special elegance and charm to the interior. Using beads and glue, you can make jewelry, decorate souvenirs, dishes, furniture, photo frames and mirrors.
The advantages of this type of creativity:
- Simplicity. Even children can make applications with simple flowers and cute inscriptions.
- Availability. The materials are sold in craft stores and on the Internet, the prices are quite reasonable.
- Diversity. Variants of textures and shapes of beads, gluing methods, an abundance of colors and shades allow you to create compositions of any complexity.
Bead panel master class
In the manufacture of such a product as a panel of beads, MK should be studied clearly and correctly, since following the instructions directly determines whether the desired object will be obtained or not.
In order for the process of embroidering a picture with your own hands to be competent, you should initially prepare every detail. If we are talking about a panel with flowers, then each flower should be embroidered separately and only then attached to the general background.
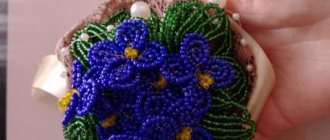
In order for the panel to look impressive, you should create large flowers
It is important to remember that the technique for making each flower is completely different, and requires labor, patience and painstakingness, since it will not be possible to create a gorgeous panel in a couple of days.
There are certain instructions and diagrams for wall panels that must be followed as strictly as possible.
A master class on making panels with flowers from beads includes many gradually completed stages:
- In order for beaded roses to be more natural and attractive, it is worth not only making the bud itself separately from the overall picture, but also finishing each petal with special care. To get a luxurious flower, you need to string 9 beads onto a 60-centimeter wire to twist it into a drop. To secure it, you need to wrap the wire twice along the axis.
- After this, another 18 beads are collected and winding is repeated. Since beads in most cases can have different sizes, it is worth paying attention to ensure that each subsequent row is twice as wide as the previous one. For greater accuracy, you can measure it with a wire. Each petal requires 60 beads.
- After each petal has formed, you can begin collecting the bud. You can choose the number of petals according to your own preference, but it is important to get three large flowers. The petals should be bent outward, which will be easy, since the frame on which the beads are strung is a wire. The petals are connected to each other by threads, but so that they are not visible.
- The next stage is the preparation of sheets for decorating the panel. It is made from green beads. To make it, you need to put 7 beads on a 60-centimeter wire, then wrap the tip around the axis and wrap it 4 times.
- Ideally, you will need 24 leaves, after which they are connected in threes in one place. If you wish, you can dilute the design of the panel with sepals in the form of a clover flower.
Materials and tools
Beaded applique does not require much investment. To work you will need beads. The abundance of textures, colors and shades allows you to realize any artistic fantasy.
Beads are distinguished according to several characteristics:
- According to the form. The most popular and affordable are cylindrical (with rounded edges, triangular, hexagonal) and glass beads (tubes up to 5 mm long).
- By material - glass, plastic, ceramics, wood, metal, precious and semi-precious stones.
- To size. As a rule, the size of the beads is not indicated on the packages. Some manufacturers determine the size by numbers in reverse order from No. 1 (6.5 mm) to No. 10 (2.0–2.03 mm).
According to the method of coloring, beads are:
- transparent;
- colored - completely painted with matte or glossy paint;
- transparent colored - painted from the inside;
- mother-of-pearl - coated with paint on the outside;
- brocade, or “light” - the hole is painted with bronze, gold or silver paint.
Interesting video on the topic:
Characteristics largely depend on the country of production. Japanese calibrated beads are distinguished by the same size of beads, smooth surface, and a wide selection of colors. It's the most expensive. Next, according to the same criteria, comes Czech (high-quality, but sometimes there are defects), then Chinese (heterogeneous in texture and diameter, cheap).
The glue is chosen taking into account the surface to which the beads will be attached.
The following compositions can be used:
- PVA glue - suitable for cardboard and paper. Does not smell, is easy to clean, and can be used for children's creativity. But when drying it can make the picture cloudy.
- "Moment Crystal". It can be used on any surface, but the composition has a serious drawback - a strong chemical smell.
- Epoxy adhesive. May be transparent or honey-colored. Gives a very strong grip, suitable for frequently used items.
- Wax is an environmentally friendly, transparent material. It is better to coat the finished product with varnish to give additional strength and durability to the design.
- Plasticine. Can be used to work with children. But it will show through between the beads, so you need to carefully select the color.
Tools that may be needed for work:
- needle, pin or toothpick for laying patterns;
- wire or thread to mark contours;
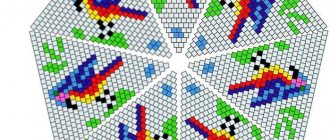
- drawing diagram;
- surface or object to be glued.
Choosing bead color
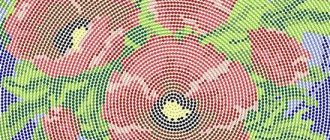
The panel usually uses fewer shades than the original image. Choose primary colors and several similar ones, the result is a clearer and clearer picture. It is advisable to arrange the beads in separate containers in advance and number them by color. Similar numbers are indicated on the diagram.
The fragments between the contours are filled sequentially. To provide a gradient effect between fill areas, a gradual blending technique is used. A smooth transition is achieved when 2–5 beads are glued first, then 10, in the next row 20 and so on.
Anyone can make a panel of beaded flowers
The essence of beading is that beads are strung according to a specific pattern on threads or fishing lines.
The highest quality beads are made in the Czech Republic
In order to master the technique of such work, you must have:
- Patience;
- The desire to receive a beautiful and chic product;
- Beads;
- Lock for the product;
- Use a needle corresponding to the size of the bead connector;
- You may also need scissors, matches and a thimble.
You need to work in a well-lit place, and lay the beads on a fine-lined cloth so that the beads do not scatter on the table. At first, you should start weaving small accessories such as pendants, flowers and leaves. They can be used to hone the most basic principles of work and get results much faster than from making a wall panel of flowers.
Beadwork or embroidery with beads will appeal to both adults and children, in particular both men and women, and therefore you can visit the workshop to work with such material with the whole family.
The opinion that only women can engage in such work is considered erroneous. In fact, working with beads requires special precision and maximum concentration, which both representatives of the stronger half of humanity and women have. It is worth noting that beadwork or the formation of mosaics from beads is useful for relaxation and stress relief, as well as for developing motor skills fingers in children.
You can use a regular wooden picture frame as a frame for the panel.
The development of motor skills primarily affects the mind, and therefore it is worth taking care of this from childhood. You can practice beads with children from the age of five, since this is the very age when the child becomes serious, responsible and can really understand what is required of him.
In order to make, for example, a New Year's panel with your own hands, you need to prepare:
- Several types of beads;
- Wire;
- Floral tape to disguise the wire;
- Panel frame for bead embroidery.
In addition, you will need a tool to cut the wire and burn it. Often, special lamps are used when beading, which help to concentrate on work.
Progress
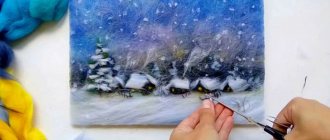
First you need to prepare the base, materials and tools. You can practice on a small piece. This will allow you to choose the most suitable adhesive composition and see how it will look after drying.
Useful video on the topic:
Circuit drawing
For those who know how to draw, preparing a diagram of the future decor is easy. If you don’t have visual skills, you can download the picture on the Internet. You need to print it in the original size.
Preparing the frame
They use ready-made frames or make them from colored cardboard or wood. If the base is glass, then decor is first applied and then secured in a frame.
Outlining
The outlines can be marked with threads, wire, drawn, and then laid out with contrasting beads or in the color of the fragment. The threads are attached using PVA. It is more difficult to work with wire; you will need Moment glue.
If you do not want the outlines to be visible on the finished work, draw them with a simple pencil.
Bead inlay
Sequencing:
- Using a thin brush or syringe, apply glue to individual areas of the contour. Using tweezers or a needle, place the beads on the line. It is advisable for each bead to lie on its side - this way the holes will not be visible and the image will be uniform.
- After the outlines have dried, apply glue sequentially to each fragment of the drawing. Don't go over the edges.
- Fill in the beads, distribute them so that there are no empty spaces left.
- You can lay out the beads with a needle, a toothpick, or turn them over to one side.
- After filling out the entire diagram, cover the painting with a press and leave until completely dry.
- Insert the base into the frame.
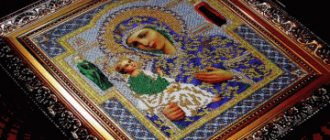
To decorate an icon, beads are placed on an adhesive base applied to the frame, or individual elements are laid out with beads.
Interesting video on the topic:
Bead panels: master class (video)
The panel is assembled by screwing a thick wire in the form of a base onto the frame. Fastening can be done using various methods, as some use tape, others use wire knots. Before fastening, you need to assemble all the products together. A good option for preliminary fitting would be to place each element in its rightful place and only after that should you gradually sew on the blanks. Flowers can be placed in any order as you wish, since there is no specific rule for this action. In those places where the wire will be visible, it is worth laying masking tape. As soon as the work is completed, the panel is hung on the wall. It is not recommended to place such paintings under glass, as you will not get a smooth and beautiful panel.
Errors when gluing
When starting to decorate, you need to organize your workspace and provide good lighting. This type of creativity does not require special skills, but without careful attention to detail, the result will not be accurate.
Main mistakes when gluing:
- Work without a diagram or sketch. You need to clearly imagine the finished product or keep a sample before your eyes.
- Wrong choice of glue. In order not to spoil the appearance of the future painting or souvenir, it is worth testing the composition in advance to determine its strength and transparency.
- Choosing too high a difficulty level. It’s better to start with simple crafts so as not to be disappointed and not quit at the very beginning.
Video with embroidery lessons for beginners
- How to choose a pattern, choose threads and needle. How to figure out which beads to choose, and many other tips for beginners in the video presented.
- You will find a detailed master class for beginners in this video. How to start a row and end it by securing the thread.
- Even beginners can embroider icons. Watch the master class in this video and feel free to get to work.
We learned how to make the “first stitches” in bead embroidery. Don't be afraid to start, because the main thing is practice. You can try simple patterns - embroider them on clothes - and you will have an exclusive homemade robe with bead embroidery. And with time and experience, you will be able to make large-sized paintings with full stitching, embroidered with beads, which will adequately decorate the interior and delight all your friends. Get started and share your achievements with us.