It seems that we can no longer imagine our life without cones. As children, we love to collect pine cones and make crafts from them. In schools and kindergartens, every autumn should be celebrated with original crafts made from natural materials.
In this case, cones become our salvation. What beautiful works can be made from pine cones. These can be complex compositions, small details and decorative elements.
Go to the nearest forest and collect beautiful cones. Rinse and dry them so you don't have to worry about giving them to children for crafts. If you want the open pine cones, they need to be put in a warm place or in the oven for a few minutes.
To keep the cone closed, put it in water for a while and cover it with varnish. Then it won't open.
DIY deer made from pine cones: master class with step-by-step photos
A deer made from pine cones is a craft that anyone can easily make! Arm yourself with some old plasticine, grab an acorn, a couple of fir cones and a few thin branches, and get to work! So, how to make a deer with your own hands from pine cones?
DIY deer made from pine cones: master class with step-by-step photos
Using plasticine, we fasten a pair of fir cones at a slightly pointed angle. Using plasticine greatly simplifies the process, so this craft becomes accessible even to kids. At the same time, well-fixed parts will hold quite firmly, which opens up the possibility of participation in various exhibitions and competitions.
We fasten the fir cones
From the bottom of one cone we make plasticine fastenings for the legs. We just roll small plasticine lumps and stick them where the legs should be - two lumps in the front of the cone, opposite each other, and two lumps behind.
We attach plasticine fasteners
We insert pieces of a thin branch into these fastenings. It is advisable to saw the branch or cut it with a knife into equal fragments so that the cut is even. Then the deer will stand well on a solid surface.
You can fix the figure on a solid base - for example, a piece of thick cardboard, using the same plasticine.
Please note that the legs should not be too short or long; it is important to find the optimal proportion.
Attaching the leg
So, the legs have taken their rightful place, and we already have the silhouette of a deer drawn!
Attach all the legs
Using the same plasticine, we attach the head – an acorn – to the top cone. In the absence of an acorn, you can make a head from a small spruce cone, if you can find one, or sculpt it from plasticine. There are many other options - for example, find a pebble of a similar shape, a physalis nut and other natural materials. You can use a wooden bead or a small cut from a branch.
Attach the acorn head
We decorate the head with beautiful branchy horns. You will have to work hard to find a suitable twig, but the result is worth it. You can assemble horns from several thin branches, fastening them with thread or the same plasticine.
Attaching the horns
We fix the horns with plasticine, and our forest prince is almost ready!
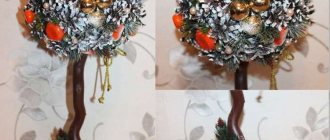
Deer made of cones and twigs
All that remains is to correct all the details and think about the design in which the craft will be presented. If desired, you can decorate the deer's chest with pieces of moss or a dry leaf to emphasize its nobility and beauty.
Deer made from natural materials
That's all! You learned how to make a deer from fir cones, building your work step by step. Using pine cones of different sizes, you can make a whole family of deer, or you can create a beautiful arrangement in which the deer play a key role.
Source: https://montessoriself.ru/olen-iz-shishek-svoimi-rukami-master-klass-s-poshagovym-foto/
Replacing parts
Most master classes on making deer from cones contain variations on how to design one or another part of the crafts.
The deer's head is made from both a pine cone and an acorn, and sometimes from knitted threads in the form of a fluffy bubo. For deer ears, you can use the wings of maple seeds or scales from a pine cone.
Related article: DIY wax candles: master class with video
For the horns, you can use any branchy twigs, even from bunches of grapes, but without berries, as well as modeling from plasticine.
The eyes are also made from beads on pins or without them, fragments of cotton swabs with a black marker placed on the pupil.
The muzzle can be an acorn cap, colored and dried cotton wool, twisted into a ball, or a ball of copper wire.
The legs, tail, and neck can be made from ordinary matches.
Connecting cones using plasticine can also be done with a glue gun.
The created deer are placed on a cardboard base, a board made of pressed sawdust, or a cut of a branch or tree.
Jewelry is made both from natural materials and through paper applications and artificial additions.
A full-length deer made of pine cones is no longer a craft, but a sculpture, but also brought to life.
For one Christmas tree decoration in the shape of a deer's face you will need no more than one cone.
Deer made of cones and plasticine: master class with photos and videos
Needle-shaped forest trees delight people not only with their appearance and air filled with phytoncides, but also with other gifts. Such gifts include cones, common to the Russian eye, which are the basis for many excellent crafts. One of these simple but cute crafts is a deer made from pine cones.
Good old craft
A small figurine of a deer made from scrap materials can be created even by children. For such a deer you will need:
- spruce cone;
- five straight branches;
- two branches with branches;
- fluffy willow flower;
- two peppercorns;
- one rowan berry;
- one acorn with a cap;
- two sunflower seeds;
- brown plasticine;
- glue;
- awl;
- stationery knife.
The fir cone will play the role of the body. To one of its sides you need to glue four small balls of plasticine in a rectangular projection to attach the legs and one ball closer to the base of the cone, on the opposite side from the previous fastenings.
The legs and neck will be played by five straight branches, which are attached to plasticine balls on the pine cone. The tail - a willow flower - is attached with glue to the top of the cone.
In the acorn cap you need to make two holes for the horns in the front and one in the acorn itself on the opposite side for the neck.
The horns are made from two gnarled branches, and their bases are sharpened with a knife so that they fit freely into the holes in the acorn. They can be attached using glue or plasticine.
We glue ears from sunflower seeds, eyes from peppercorns and a nose from rowan berries, finally forming the head of a deer.
After the head is attached to the neck, the craft is ready.
Cute little deer
From the cones you can make a deer that looks like a good old cartoon character. For such a deer you will need the following materials and tools:
- closed cone;
- an open lump;
- bunch of rowan;
- plasticine brown, white and black;
- leaf of any tree;
- ruler;
- scissors.
The closed cone should be smaller than the open one; it plays the role of the head. The opened cone is the torso. From a bunch of rowan berries, it will not be the berries that will be used in the craft, but the branches to which they are attached, these will be the horns and legs. Plasticine will be used to connect the details of the craft, and you will also need to make the hooves, muzzle and eyes of the deer from it. Leaf - eyelashes.
First you need to sculpt the eyes by rolling out two balls of white plasticine, flattening them into small cakes, then rolling out two smaller balls from black plasticine and attaching them to the white parts.
Drops of leaf cut out with scissors are attached to the back of the eye parts, forming eyelashes. The muzzle is rolled out with a ball of brown plasticine and crushed to an oval shape.
On it, the outlines of the mouth and nostrils are pressed with a ruler.
The resulting details are located on the unopened cone: the eyes are on the sides, the muzzle is on the top of the cone.
We remove the berries from the rowan bunch, cut off two branchy branches for the horns, they can be trimmed with scissors to make them more similar in shape and size to each other. Two pieces of twigs from a bunch should be thick with one bend.
The horns are attached with the branches up to one ball of plasticine, which is located on the head above the eyes.
Cardboard craft
Let's consider possible options for making a deer figurine from scrap materials. To work you will need:
- cardboard and scissors;
- glue stick;
- plasticine;
- paints.
Paper version
The simplest application is prepared in the most elementary way. You should find a beautiful image of a deer on the Internet and print out the pictures.
The next step is to cut out the images. While the adult is busy searching and cutting out pictures, the child can be assigned to color the base of the future application.
The cut out figures are also painted by the child.
The last step is to glue the “herd” of reindeer onto the painted cardboard.
Plasticine figurine
An excellent option is sculpting a figurine. Having the necessary material at hand, an adult should find a suitable image of a deer and explain to the child that they should first sculpt the individual parts of the animal, and then connect them together. Your beloved child will be busy with creative activities for quite a long time.
Deer made from cones: DIY craft with photos step by step, master class
With the arrival of autumn, schools and kindergartens actively begin to hold various competitions and exhibitions of crafts made from natural materials. At the same time, works made from cones are almost the most popular at these events. And all because this is a fairly common raw material, from which very unusual figures come out. An example would be the original deer made from pine cones.
This is a good craft not only for autumn competitions, but also for winter ones
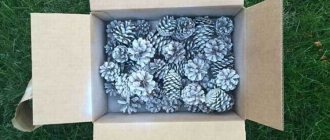
How to prepare natural material
Cones are a very common and accessible natural material, but they require preliminary preparation, especially if children will work with them.
Attention! If specimens with unopened scales are needed, then it is advisable to collect them in September-October.
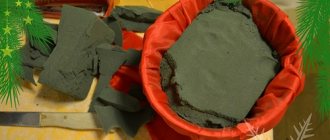
After removing the cones from the tree, they are soaked in water, slightly dried and varnished.
In any other case, the collected natural material is soaked in a vinegar solution (take 2 tablespoons of acid per 1 liter of water) for approximately 20 minutes.
Then dry in the oven at a temperature of 95-105 degrees for 30-40 minutes. Afterwards they are coated with varnish or molar glue.
If the weather and time permit, you can dry the raw materials in natural conditions outside, but this will take from three to five days.
Step-by-step instructions for making a deer from pine cones
An autumn craft in the form of a deer from pine cones can be made in several ways, using only this natural material or, in addition, using acorns, plasticine, and cardboard. And, in order not to think about the idea for a long time, you can rely on already existing options, the step-by-step execution of which is presented below.
Deer made from cones and acorns step by step
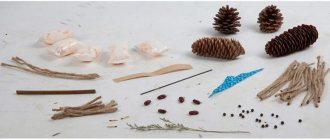
The simplest craft that you can make with your own hands for kindergarten or school is a deer made from pine cones and acorns. For manufacturing, you need to prepare the following materials:
- fir cone;
- acorn;
- linden seeds;
- grape branches;
- toothpicks;
- universal glue or PVA.
Manufacturing stages:
- First they perform the deer's head. To do this, make two holes in the acorn at the base and insert grape branches into them. Add a toothpick to the back side.
For reliability, each element should be fixed with glue.
- Next, legs are made from toothpicks and linden seeds by stringing them onto the ends on one side.
If there are no linden seeds, they can be replaced with plasticine balls
- The resulting elements are connected to a bump, which will serve as the body. They complete the figure by making a muzzle and adding ears and a tail.
For this craft, it is advisable to use an elongated spruce cone.
- Below are original photos of deer made from cones and acorns, which can be made based on this master class.
If the neck is also made from a fir cone, then the deer will be more believable
It is not necessary to remove the plus of the acorn
Chenille wire can be an excellent alternative to twigs
Little deer made from pine cones
In addition to a large deer with branched antlers, you can also make a fawn from pine cones. For this you will need:
- spruce and pine cones;
- spruce branches;
- pistachio shell;
- birch bark;
- peppercorn;
- scissors;
- hot melt adhesive.
Step by step execution:
- A fir cone is used as the body. Four branches are inserted into the side between the scales (they should be the same length) - these will be the legs. They also add another branch at an angle on the opposite side, a little shorter, it will act as a neck.
Everything must be fixed with hot glue
- Next, they begin to make the head. To do this, a pistachio shell is glued to the place of the stalk. And in the center, birch bark is fixed horizontally with glue. A nose is made from peppercorns.
If there is no birch bark, this element can be made of thick cardboard
- Then the eyes are made, they are also made from birch bark (thick cardboard), rolling small pieces into rolls. A little black plasticine is inserted inside. The resulting elements are fixed over the improvised nose. Ears are made from pistachios.
Eyes can be made from plasticine
- The figurine is completed by gluing a tail from a piece of birch bark and horns from thin twigs.
The finished craft is placed on a stand
Deer made of cones and plasticine
Children often make their own crafts on an autumn theme in the form of a deer from pine cones, but in this case they use plasticine as a fastening element. And to do similar work, you can resort to the following master class:
- They start the craft by sculpting the neck of the future deer, and use it to connect both cones.
- Circles of different sizes made of white and black plasticine are glued as eyes.
- Then they insert two branches into the upper cone, and mold flagella from brown plasticine on them, thereby making the horns branch. The ears are also made from the same plastic mass, additionally fixing the branches.
- Four branches are inserted into the body below - these will be the legs. Hooves are formed from pieces of black plasticine.
- The figurine is completed by gluing a tail made of brown plastic mass.
Advice! To keep the branches firmly, they should also be fixed between the scales on plasticine.
Final result and materials for crafts
Recommendations from experienced professionals
When making crafts in the form of a deer from pine cones, it is better to adhere to the following recommendations:
- It is better to collect natural material in dry, warm weather;
- Preference should be given to the cleanest specimens possible, since contaminated material may contain resin, which greatly stains hands and clothes;
- if closed specimens are required to make the figurine, then they should be collected in the fall, you can also resort to soaking them and then fixing the scales with glue;
- To make the craft more colorful, the base can be painted any color you wish.
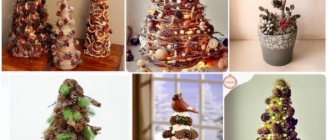
Interesting ideas with photos
In addition to the presented master classes, there are still many ideas for creating deer from this forest material. And for inspiration, you can check out the following photos of successful works.
Little deer covered in gold paint
Craft using half a walnut shell
Beautiful white deer for the New Year
A simple craft using plasticine
Deer made from one pine cone and chenille wire
Conclusion
A deer made from cones is a great craft idea for an autumn competition for school or kindergarten, or as a decoration for the New Year. Such a homemade figurine will delight not only with its appearance, but also with a pleasant aroma.
Source: https://mimiledi.ru/rukodelie/podelki/kak-sdelat-olenya-iz-elovyh-shishek-master-klass-poshagovo.html
Deer made of pine cones
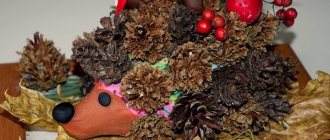
Each of us has seen cones in the forest - the fruits of coniferous plants. Diverse in shape and color, fragrant and beautiful, they excite the imagination of craftsmen.
There are so many great crafts you can make from pine cones! But they have found the widest application in children's creativity, because children of all ages can work with cones. This gift of nature develops fine motor skills in very little ones and encourages imagination in older children.
And what do true masters not come up with? In general, there is huge scope for imagination. In this article we will make a real forest dweller - a deer from pine cones.