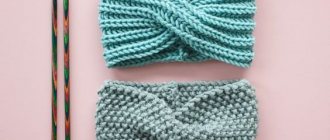
Knitted sweater for girls with a pleat on the back. Poncho with buttons and knitted hood. Knitting sweaters, sweaters and cardigans - detailed master classes and simple patterns. How to knit a counter pleat on knitting needles - mk. Cardigan based on the works of an author from Canada.
A large knit sweater is the most fashionable this season! Hurry up to knit your princess a children's sweater with a counter pleat on the back. A poncho with buttons in a simple knit is also a rather interesting model with a hood for a girl with knitting needles. A comfortable, warm cardigan with a hood and a button fastening for a girl from 4 to 12 years old will not leave a child or teenager indifferent. All blouses with descriptions and diagrams.
Stylish flared cardigan
An interesting cut cardigan for girls has an unusual back, decorated with a counter pleat. Performed on 2 knitting needles 7 mm thick. thick yarn. We must warn you: despite the apparent simplicity of the model, it will not be so easy for a novice master to understand all the intricacies of the master class.
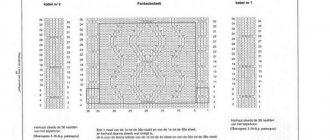
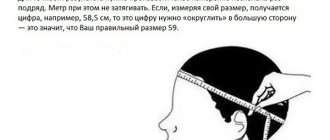
If you do not know how to make folds when working with products, then there will be patterns for such knitting. Just in case, here is a table with the height and age of the child, but keep in mind that many children do not fit into the standard framework. Therefore, if possible, it is better to measure the expected data in advance and write it down in a notebook. If it is not possible to take measurements of the princess, stick to the standard.
The jacket for girls is suitable for ages from 4 to 12 years. The knitting pattern is the simplest - stockinette stitch and garter stitch are used. This model features long sleeves, a placket with button closure, a stand-up collar and a pleat at the back. Knit the fold using purl stitch. We knit all the details from the bottom up and then sew them together. We will analyze all the technology in detail.
The blouse looks equally good on a girl 3 years old, 5 years old, 7 years old, 9 years old, 10 and 12 years old. The model will appeal to both kids and teenagers.
In the original, the sweater is knitted from Hometown USA Solids & Neons yarn (acrylic) of this thickness, but we took another yarn with polyamide of the same thickness. If your yarn is not thick enough, knit in 2 threads, or add a thread of a different type. It is important that after you have knitted a 10/10 cm “tester”, you have a knitting density of 7 mm on knitting needles. – 11 p./20 rows = 10/10 cm.
For this work we need:
- Yarn Phil Rapido (50% half-d, 25% wool, 25% acrylic, 40 m/50 g) consumption - from 8 to 16 skeins.
- Regular knitting needles 7 mm. For a stand-up collar, ideally it is better to use 7 mm circular needles.
- 6 buttons diameter. 25 mm.
- Thick needle, centimeter, scissors.
- Additional knitting needles.
Knitting density: 10/10 cm – 11 p./20 r. Patterns: stockinette stitch, garter stitch and purl stitch.
Size for age: a) 3-4 years, b) 5-6, c) 7-8, d) 9-10, e) 11-12 years . Be guided by the girl’s height and the table above.
Patterns: Garter stitch - knit. and out. knit rows only with facial rows.
Front stitch – 1st row: knit. loops, 2nd row: purl. p., repeat 1st row.
Purl stitch – 1st row: purl. loops, 2nd row: knit stitches, repeat 1st row.
Abbreviations: facial loop - knits. p., purl loop - purl. p., edge p. - chrome. p., * – repeat, row – p.
Right shelf
Dial to 7 mm. knitting needles 21-23-23-25-29 stitches and knit 6 rows in garter stitch (knit only). Then go to faces. smooth surface This is what the face looks like. blouse side:
Row 7: edge stitch, purl 5. p. (side trim), to the end of the river. – facial, chrome. we don’t knit. 8th row: edge, purl to the end of the row, edge. Row 9: edge, purl 5, knit. to the end of the river, chrome. 10th row: cr., purl. to the end of the river, chrome. 11th: same as 7th and 9th.
This way we will have visible trim along the edge of the shelf.
You need to knit 22-24-26-29-31 cm from the beginning of the faces. smooth
before starting to bevel the armhole. Then we close it for the armhole at the beginning and end of the river. 1 p each (knit 2 together). 19-21-21-23-27 stitches on our needle .
Then reduce for size:
- decrease 12 stitches on the raglan bevel, distributing them at a height of 12 cm.
- decrease 13 sts, distributing them at a height of 14 cm.
- decrease 11 sts, spreading at a height of 15 cm.
- decrease 12 p. distribution by 16 cm.
- decrease 16 p., spread. by 18 cm.
Closing the gate:
- at a height of 36 cm from the beginning of knitting, close 3 stitches for the collar and next. R. another 4 p.
- at a height of 40 cm from the beginning of the elm, close 5 sts and 3 sts.
- at a height of 42 cm. from the beginning of the elm, we close 3-2-2-3 sts.
- at a height of 46 cm from the beginning of the close. 3-2-2-4 p.
- at a height of 50 cm from the beginning of the close. 4-2-2-3 p.
Make the left shelf symmetrically with the right one.
Back
In order to make a counter fold on the back, we need to add 10 cm (10 loops) on each side of the back. We cast on knitting needles 7 mm thick. a) 60, b) 64, c) 64, d) 68, e) 72 sts and knit 6 rows (3 cm) in garter stitch. Next, we divide the number of back loops in half, and from the middle point (red stripe in the diagram) we will knit 10 stitches in both directions in purl stitch, the rest in knit stitch. satin stitch That is, the next person. R. knit like this: a) knit 20, purl 20, knit 20, b) knit 22, purl 20, knit 22. c) k22, p20, k22. d) k24, p20, k24. e) 26 persons. 20 purl, 26 knit. Turn. We continue to work as the knitting looks.
22-24-26-29-31 in this way . Next, we will make a counter fold.
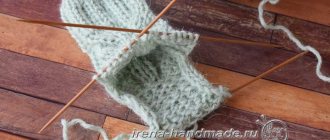
How to make a counter pleat with knitting needles
For example, for size a) the design of the fold on the back looks like this:
a) 15 knits, 5 knits, accordion (20 p.), 5 knits, 15 knits.
To do this, from the front side 20 purl. divide in half and make an accordion like this (slip 5 knit stitches onto an additional sp., slip the second 5 purl stitches onto an additional sp., slip 5 purl stitches onto an additional sp., that is, fold 15 stitches. “accordion” and knit them all together so that in the end there are only 5 knit stitches left on the first needle.)
Further, for other sizes: from 20 p. We take 5 people in one direction and the other. This will be the counter fold. The next row is purl: a) 60, b) 64, c) 64, d) 68, e) 72 sts on one needle.
If you want to beautifully design a raglan line, read this information:
Next, from the beginning of the raglan, close 2 stitches together on both sides. We get 58-62-62-66-70 sts. Then we begin to decrease for raglan; you need to calculate the decreases yourself.
For size:
- subtract 46 sts from one and the other side of the raglan (23 sts from one and 23 sts from the other at a distance of 13 cm. That is, remove 23 sts, distributing them at a height of 13 cm.
- decrease 48 stitches on both sides (24+24) at a height of 15 cm.
- decrease 48 stitches on both sides at a height of 16 cm.
- decrease on both sides 52 p. (26+26) at a height of 17 cm.
- decrease on both sides 54 p. (27+27) at a height of 19 cm.
At a height of 38-42-45-49-53 cm from the beginning of knitting, close off the remaining 12-14-14-14-16 stitches for the collar.
Right sleeve
For knitting needles 7 mm thick. cast on a) 24 p. b), c) d) – 26 p., e) 29 p. and knit 6 cm (12 p.) in garter stitch. This is a cuff. Next we do another 6 rubles. plat. elm. Then we add this:
- add 14 stitches on both sides: every other. 7 rows approx. 2 p. (38 p.)
- c) d) – every other 7th row. approx. 2 p. e) – every other 6 rows approx. 2 p.
After 25/28.5/32.5/36.5/39.5 cm, we close the armhole on both sides with 2 stitches together and begin to make the raglan. Decreases:
- in each 2nd row: *2 times 1 p., 1 time 2 p.* – from* to* 2 times, 3 p. 1 p. each
- *3 times 1 p., 1 time 2 p.*- from* to* 2 times, 2 p. 1 p. each
- 1 time for 2 sts, 10 times for 1 st.
- *3 times 1 p., 1 r. 2 p.* – from* to* 2 times, 4 times 1 p.
- *3 times 1 p., 1 time 2 p.* – 3 times, 1 p.
We close the top of the gate in the same way as on the right shelf. Make the left sleeve like the right one, symmetrically.
Assembly
Sew the side seams of the sleeves with a large needle (in the place where the cuff is - sew with a vertical knitted seam). Then sew the back and shelves. Lastly, we sew the sleeve into the armhole. After this, all that remains is to process the gate. Raise on 7 mm knitting needles. all stitches on the collar and knit 8 r. garter stitch. Close all gates. Sew buttons, make holes for the buttons (spreading the loops of the fabric with your finger, we make a hole. Secure the hole with stitches.)
The video shows how to make a fold when knitting.
How to knit counter pleats with knitting needles?
LiveInternetLiveInternet
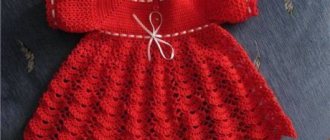
Aspen will knit, the country of mothers has taken up the initiative. coat for a girl This is the coat they knit in Osinka https://club.osinka.ru/topic-92757?highlight Here is a verbal description from Osinka. For a child 3-4 years old with a height of about 100cm and a chest circumference of around 54cm. Soufflé thread of Semenovskaya yarn 292m in 100g in two folds, knitting needles No. 5, knitting density is approximately 1.6 loops per cm, and 2 rows per 1cm. We knit the back and front panels with one fabric, for this we cast on 126 loops + 2 edge stitches and start knitting: Knit row – edge, 6 knit, 2 knit cross, *12 knit, 2 knit cross*, repeat ** 7 more times, 6 knit , edge. Purl row - edge, knit according to the pattern, do not knit those loops that crossed, thread before work, edge. We knit further with the main pattern. Make uniform decreases by two stitches in each diamond during the first 15 cm of knitting. We get that in each rhombus there are not 12 loops, but 10. In total, 108 + 2 loop edges remain in the work. At a height of 33-35cm we make closures for the sleeves. Since our front placket is not in the middle, we distribute our 110 loops as follows: 33 loops for the left front, 56 for the back and 21 for the right front.. We knit separately, for the armholes on the backs from the sides we make two decreases of 3 loops for a total of the work remains 44. In the left and right shelves on one side we make 3 decrease loops twice, in the end - the left shelf has 27 loops, and the right - 15 loops. We knit the back - at a height of 11-12 cm we leave the middle 14 loops, and the remaining loops on the left and right (15 loops each) we knit another 2 cm and close. The total length from the beginning of the sleeve armhole to the shoulder is 13-14 cm. The right front is knitted entirely to this height. We knit the left front to a height of 10-11 cm, leave 12 loops on the far right, and knit the remaining 15 another 3 cm and close. Sew the shoulder seams. Let's start knitting the collar. We take 12 loops from the left front, cast on 7 more loops to the shoulder seam, in total we get 19 loops from the left front, further along the back to the remaining 14 loops we cast on 6 loops and after another 6 loops to the right shoulder seam and 7 more loops after the shoulder seam along right shelf. In total we should have 52 loops. We knit them with a 2x2 elastic band about 10 cm and close them. The collar is ready. We knit the strips. We cast on 90 loops along the length of our coat and collar and knit with an elastic band of 2x2 5 cm, leaving holes for buttons on one of the strips. Sleeves. Using knitting needles No. 3, we cast on 42 loops in one thread (40 elastic bands + 2 edges) and knit with an elastic band 2x2 10 cm, then switch to knitting needles No. 5, add a second thread and knit with the main pattern. Every 6 rows we increase from both ends 1 loop 3 times and 1 time 1 loop every 8 rows. At a height of 25 cm from the elastic band, we begin to decrease twice by 3 loops, once by 2 loops, 5 times by 1 loop and 3 times by 2 loops. We close the remaining 12 loops once. The length of the sleeve with elastic is about 45 cm. We sew in the sleeves.
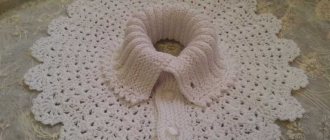
Buttoned poncho with hood
Awesome poncho for girls with buttons and a knitted hood. Suitable for girls 2-3 or more years old. The jacket with a hood is made with knitting needles 10 mm thick. from yarn with acrylic.
A knitted sweater for a girl is suitable for ages: a) 2-3 years, b) 4 years, c) 6-7 years, d) 8 years. , e) 10 years . In the photo: the product is knitted for girls from thick yarn with 10 mm knitting needles, knitting density - 10 p./12 r. = 10/10 cm. In the photo: size c) – 6-7 years, height 116-122 cm.
Let's start our master class by preparing:
- Lion Brand yarn (74 m/140 g, 100% acrylic).
- Knitting needles 10 mm thick.
- Buttons 6 pcs. 2.5 cm dia.
- Centimeter, scissors, thick needle.
- Markers, pins.
Pattern: garter stitch, stockinette stitch.
Pattern: 5 r. persons satin stitch, 1 r. - purl.
Knitting density 10 mm. persons Length: 10/10 cm = 10 p./12 rows.
Back
We cast on 10 mm thick knitting needles: a) 33 sts b) 36, c) 40, d) 43, e) 46 sts , knit 7 rows (6 cm) in garter stitch (knit only).
We knit with garter stitch:
1st row: knit the entire row. From 2nd to 7th r. - facial, at the beginning of the river. edge do not knit.
Next we will knit like this: 5 r. facial stitch, 1 r. purl.
8th row: knit 1, decrease with a tilt to the right, further knit. to the last 3 sts:
Last 3 sts: decrease with a tilt to the left, k1. (edge).
On knitting needles: 31-34-38-41-44 sts.
9th: purl. 10th: persons.. 11th: whole r. – purl (you will get a strip) 12th row - knit. 13th – persons. (it turned out to be a strip).
Then repeat from the 8th to the 13th row. We repeat this until the end of the back.
Decrease like this:
- Decrease to the right and left, stepping back from the edge 1 p. in every 3rd row. (10 times in total).
- Decrease in ex. and to the left in each. 3rd r. (12 times in total).
- Decrease in ex. and to the left in each. 3rd r. (14 times in total).
- Ub. vpr. and ow. in each 3rd r. (only 15 rubles).
- Ub. vpr. and to the left in each. 3rd r. (17 times in total).
Next, at a height from garter stitch a) 28 cm (33 rows), b) 32 cm (36 rows), c) 36 cm (72 rows), d) 39 cm (46 rows) remains to be closed for neckline: a) 10 p., b) 11 p., c) 12, d), e) 13 p.
Right shelf
Our children's jacket has a placket on the right and left front and buttons. We make the bar from 3 front stitches. Therefore, we must add 3 stitches to the right and left front for the bar. It is better to make buttonholes at the end of the work: push the rows apart with your finger and make a couple of stitches with thread. But as you work, the distance between the buttons will be: 6-6-7-8-9 rows.
Cast on 10 mm needles: a) 20 sts, b) 21 sts c) 23 d) 24 e) 26 sts.
Knit in garter stitch 7 r, k3 at the beginning. p. for the bar.
In the 8th row: 3 knits (plank), knit. entire p., penultimate 2 p. – decrease to the left.c
Next, regardless of the size, decrease in every 3rd row by 1 decrease to the left, moving 1 st from the edge.
Tie to height:
a) 24 cm (28 rubles), b) 28 cm (33 rubles), c) 32 (38), d) 35 (41), 39 (46).
Then close the gate on the right:
a) 4-2-1-1, b) 4-2-2-1, c) 4-2-2-1, d) 4-3-2-1, e) 4-3-2-1 p .
The left shelf is performed the same way as the right - symmetrically.
Right sleeve
Cast on:
a) 23 p., b) 27 p., c) 30, d) 43, e) 46 p.
Complete 7 p. garter stitch, then start decreasing: For all sizes, decrease in every 3rd row: 1 st, decrease to the right, to the last 3 sts. 3rd last. p: decrease to the left, 1 p. Next, we knit from garter stitch to height:
a) 26.5 cm (31 rubles), b) 30 cm (36 rubles), c) 34 (40), d) 37 (44), 41 (49).
Then close the gate on the right: a) 3-2-1, b) 3-2-1, c) 4-2-1, d) 4-3-1, e) 4-3-1 p.
We make the left sleeve the same way as the right one, symmetrically.
Hood
Cast on:
a) 18 p., b) 20 p., c) 22 p., d, e) 25 p. We knit with garter stitch (knitted). Kromochnye at the beginning of the river. we don't knit.
- 14 cm (17 r.), add 1 p. on the left in the 8th and 9 r.
- 15 cm (18 rubles), approx. 1 p. in the 8th and 10 p.
- 16.5 (20 rub.) approx. 1 in 10 and 10.
- 18 (21 r). approx. 1 at 10 and 11.
- 19.5 (24 rubles), approx. 1 at 12 and 12.
We knit 5 cm (6 r.) without approx., then at a height of 19 cm. (23 r.), 20 (24), 21.5 (26), 23 (28), 24.5 cm. (29 r. ) At seven p.m. decrease 1 p. in every 2nd row (-4 p.)
We are left with:
a) 14 p., b) 16, c) 19, d) e) 21 p. This is the middle of the hood. We knit the second half of the hood, repeating the first part. Close all items
Assembly
Sew the back of the hood. Sew sleeves with front and back. Mark the middle of the back with a marker and pin it together. We make sure that the seams along the neckline are aligned. Sew the hood to the neck hole using a quilt stitch. Sew buttons. Knitting a sweater for a girl is not at all difficult.
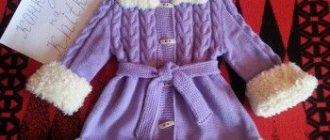
Jacket with a hood for girls
Cardigan for girls made of thick yarn for ages 4 to 12 years. The blouse is knitted very simply; only stockinette stitch and garter stitch are used here. The threads are voluminous, you can use any yarn, the length of which is from 50 to 100 m, and the weight is 100 g.
The jacket is made for a girl: a) 4 l., b) 6-7 l., c) 8 l. d) 10 l. e) 12 years of knitting.
You will need:
- Yarn Alize Superlana Maxi (75% acrylic, 25% wool, 100 gr./100 m.)
- Regular knitting needles 9 mm thick.
- Thick needle, centimeter, markers or pins.
- 6 buttons.
Knitting density: 10/10 cm = 9 p./12 rows
Back
We cast on 9 mm knitting needles. 33-36-38-40-44 sts and knit in garter stitch 3 cm (4 rows). Next is the front stitch. At a distance from the beginning of knitting 27-29-31-34-37 cm (32-34-37-40-44 r.) , mark the beginning of the armhole with a marker.
At a height of 39-43-46-50-54 cm from the beginning of knitting, create a neckline: close a) 11, b), c), d) 12, e) 14 central stitches, then continue each side separately.
At a height of 41-45-48-52-56 cm (49, 54, 57, 62, 67 r.) from the beginning of knitting, close off 11-12-13-14-15 sts for the shoulder. Finish the other side in the same way.
Right half front
Cast on 19-21-22-23-25 sts and knit in garter stitch 3 cm (4 p.). On the first three loops we continue garter stitch, on the others we continue with stockinette stitch. At a distance of 27-29-31-34-37 from the start of work, mark with a marker the beginning of the armhole on the left (arrow in the diagram). At a height of 37-40-45-47-50 cm from the beginning of knitting, make a neckline, closing on the right: a) 8, b), c), d) 9, e) 10 sts.
At a distance: 41-45-48-52-55 cm (49-54-57-58-66 r.) from the initial r. close off the remaining 11-12-13-14-15 stitches for the shoulder seam.
The left half of the front is knitted in a mirror image.
Sleeves
Cast on: a) 18 sts, b) 18 sts c) and d) 20 sts e) 22 sts using knitting needles 9 mm thick. and knit 3 cm (4 p.) in garter stitch. Next, persons. stitch, add on both sides:
- in each 6th row: 4 times 1 p.
- in each 6th row: 4 times 1 p., and then in each. 4th – 2 p.
- in each 6th row: 6 times 1 p.
- in each 6th row: 6 times 1 p., and then in each. 4th – 2 p.
- in each 6th: 7 times 1 p. and then in each. 4th – 2 p.
You will get 26-30-32-34-38 sts. At a height of 28.5-33-37-40.5-44.5 cm (34-40-44-48-53 rows) from the beginning of knitting, close off all the loops.
The other sleeve is knitted exactly the same way.
Hood
We cast on the knitting needles: a) 49, b) 52, c) 54, d) 56, e) 58 sts and knit 3 cm (4 p.) in garter stitch, then knit. smooth surface At a distance: a) 20.5 cm, b),c),d) 23.5, e) 25.5 cm from the beginning of knitting, close all stitches. Knitting a children's sweater is finished.
Assembly
Sew shoulder, sleeve and side seams using native thread and a thick needle. Sew the sleeves into the armholes. Fold the hood into point A and stitch the distance AB. Mark the middle of the back with a marker and combine this point with point A. Distribute the hood so that it does not reach the edge of the shelves by 2 loops. Make a tassel by cutting 14 pieces of yarn, 30 cm each, and sew the tassel to the hood. Make 6 buttonholes, at the same distance from each other (spread the stitches and grab the top and bottom of the loop with a simple thread). Sew on the buttons.
Blouse for a girl aged three years – master class:
Children's sweater with knitting needles // Raglan top with sprout // Part 1 // Calculation, knitting sprout
Children's sweater with knitting needles // Part 2 // Knitting a heart pattern
Children's jacket with knitting needles // Part 3 // Finishing the pattern // Knitting the sleeves
Fluffy jacket for a baby with a hood with knitting needles
Dimensions:
62-68 (74-80) 86-92
You will need:
yarn (100% polyester; 86 m/50 g) - 150 (200) 300 g pale bluish-gray and yarn (50% polyamide, 25% wool, 25% polyacrylic; 111 m/50 g) - 50 g steel color; knitting needles No. 3 and 5; fastener - zipper 55 (60) 70 cm long.
Facial surface:
front rows - front loops, purl rows - purl loops.
Purl stitch:
front rows - purl loops, purl rows - front loops.
Garter stitch:
knit front and back rows.
Knitting density:
stockinette stitch with bluish-gray yarn using knitting needles No. 5 - 14 sts x 23 r. = 10 x 10 cm.
Before:
cast on needles No. 5 with bluish-gray thread 44 (48) 54 p. and knit 2 cm between the edges in garter stitch. Then knit between the edges in stockinette stitch, while for side bevels in every 12 (14) 16th r. on both sides, subtract 3 x 1 p. After 19 (24) 30 cm from the bar for the armholes on both sides, close 1 x 2 p., then in every 2nd r. on both sides close 2 x 1 p. After 28 (34) 42 cm from the neckline bar, close the middle 6 p. and tie both shoulders to the end separately, while in every 2 r. along the edge of the neck close 2 (2) 3 x 2 p. and 1 (2) 1 x 1 p. After 31 (37) 45 cm from the bar for shoulder bevels along the outer edge close 1 x 4 p., then in the 2nd R. close 1 x 3 (4) 6 p. After 32 (38) 46 cm from the bar, all loops will be closed.
Left shelf:
cast on needles No. 5 with bluish-gray thread 23 (25) 28 stitches and knit 2 cm between edge stitches in garter stitch. Then knit between the edges in stockinette stitch, while for the side bevel in every 12 (14) 16th r. from the left edge, subtract 3 x 1 p. After 19 (24) 30 cm from the bar for cutting the armhole from the left edge, close 1 x 2 p., then in every 2nd r. from the left edge, close 2 x 1 p. After 31 (37) 45 cm from the bar for the neckline, from the right edge, close 1 x 9 (10) 11 p. At the same time, for shoulder bevels, from the left edge, close 1 x 4 p., then in 2nd r. close 1 x 3 (4) 6 p. After 32 (38) 46 cm from the bar, all loops will be closed.
Right shelf:
knit symmetrically with the left.
Sleeves:
cast on needles No. 5 with a bluish-gray thread for each sleeve for 30 (32) 34 stitches and knit between the edge stitches. For sleeve bevels for sizes 62-68 in every 12th r. on both sides add 2 x 1 p. (for size 74-80 in every 14th r. on both sides add 2 x 1 p.) for size 86-92 in every 10th r. on both sides add 4 x 1 p. After 14 (17) 20 cm from the initial row for the sleeve roll in every 2nd r. on both sides close 2 x Zp., 2 x 2 sts and 1 x Zp. After 18.5 (21.5) 24.5 cm from the initial row, close the remaining loops straight.
Hood:
cast on needles No. 5 with bluish-gray thread 60 (64) 64 p. and knit 2 cm between edges in garter stitch. Next, knit between the edge stitches. After 13 (15) 17 cm from the bar in every 2nd r. On both sides, close 4 x 5 sts and 2 x 4 sts. After 18 (20) 22 cm from the bar, close the remaining loops.
Pocket:
cast on needles No. 5 with bluish-gray thread 20 (24) 28 stitches and knit between the edge stitches in stockinette stitch. For side bevels in every 8th r. Decrease 2 x 1 p on both sides. After 9 (10) 12 cm from the initial row, bind off the remaining loops.
Assembly:
Lightly moisten the pieces, stretch them according to the dimensions indicated on the pattern and let them dry. Sew shoulder seams. Along the edges of the sleeves, on needles No. 3, cast on 50 (54) 58 stitches with steel-colored thread and knit 2.5 cm between the edge stitches in stockinette stitch. Close all loops. Fold the strip in half on the wrong side and sew. Along the side edges of the pocket, using needles No. 3, using steel-colored thread, cast on 23 (26) 30 stitches and knit 2.5 cm between the edge stitches in stockinette stitch. Close all loops. Fold the strips in half on the wrong side and sew. Sew the pocket to the front along the top and bottom edges. Sew the hood into the neckline. Sew in the sleeves so that the middle of the sleeve coincides with the shoulder seam. Sew side seams and sleeve seams. Sew a zipper fastener from the beginning of the hood to the bottom edge of the jacket. Make a tassel from steel yarn and sew it to the top of the hood. At the end of the work, lightly steam all seams.