Needlework
04/30/2018 Anastasia Prozheva
The beginning of spring is always a long-awaited and joyful time that gives us awakening and warmth. Lilies of the valley, as a symbol of spring, femininity and tenderness, do not leave anyone indifferent. We want to buy all the bouquets, decorate our rooms with them, and give them to mothers and grandmothers. But, unfortunately, this spring flower, like all the others, is not eternal and quickly fades. The best solution would be to make lilies of the valley from beads with your own hands. Weaving will wonderfully lift your spirits, and the result will delight you all year round!
Simple weaving option
Our master class begins with simple weaving of lily of the valley for beginners.
Necessary materials:
- green beads;
- white beads;
- pearl white beads;
- large green beads;
- copper wires (white and green);
- green threads.
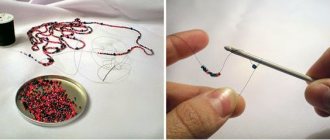
First you need to create lily of the valley flowers. To do this, you need to take 10 cm of wire and collect four white beads on it. Then bend the wire in half and make a small twist, and then start stringing one white bead onto it. We got a small white lily of the valley flower. Now you need to collect four large green beads. In one inflorescence you need to make nine separate flowers. The end result should be an inflorescence of beads and beads.
It is very important to make beaded lilies of the valley as similar to real flowers as possible. And as you know, real lilies of the valley consist of two main elements: leaves and inflorescences.
The inflorescences are already ready, all that remains is to weave the leaves. Lily of the valley leaves look larger than the flowers. For weaving leaves, the technique of French weaving with arcs is useful. This is one of the simplest techniques.
To do this, take a long piece of wire and collect 1 meter of small green beads on it. Measure 40 cm of wire and bend it in half, forming a loop. Place 20 cm of green beads onto the loop and distribute them on all sides. Twist the loop at the top and bottom. You should end up with two strands of beads twisted together. Continue adding arched beads. Place a length of beads on the loose wire that matches the length of the sheet. Attach one arc after another to the leaf. There are 10 such rows for one sheet.
Related article: Foamiran dolls: patterns with photos and video master classes
Give the leaf a curved appearance and complete the weaving by joining the leaf and inflorescences with floss threads. The lily of the valley is ready!
Let's create one branch of lily of the valley
1. Cut 35 cm of wire. String 1 bead, bend the wire in half and secure the bead in the center with a loop, making 3-4 turns.
Place the smallest size bead on the folded wire. Holding the wire at the base of the bead with tweezers (you can’t hold it with your fingers, because it rotates), make 3-5 fairly loose turns at the base with one half of the wire.
Then combine both halves of the wire and tighten them with a “screw” until the end. The result was a flower blank with the topmost “bell-bud”. This is the most painstaking work; it is better to immediately prepare all such preparations according to the number of flowers in the bouquet.
2. The making of the remaining bells is not much different. Cut a piece of wire 30 - 35 cm long. String 5 pieces on it. beads and secure them in the center of the wire with a loop. Form the loop tightly, 5-6 turns.
Bend the base of the loop so that the continuation of the wire is in the beads and will fit neatly to the bell bead. Place a medium-sized pearl bead and secure it with wire 5-7 turns, the same as in step 1. Tighten the ends with a simple “screw” to the base.
The flower will have three bells made of medium-sized beads.
3. Using the same principle, make two more blanks with medium-sized beads.
4. Make three blanks in the same way from beads and large-sized “pearl-like” beads.
5. Connecting all the elements is an important stage; it determines how neat and aesthetically pleasing your product will look. Take the blank with the “bell-bud” in your left hand and attach first medium-sized buds to it, and then large ones, one by one. From the topmost bud to the junction, retreat 1.5-2 cm.
We also do not attach the middle bud close to the stem, but leave at least 1 cm of the “leg” for a beautiful bend.
We fasten the wire of each workpiece to the stem with an ordinary “screw” to the very bottom.
6. Along the way, a dense stem with bells attached to it is formed. The bells need to be given the correct bend (using fingers or tweezers) so that they are tilted downwards.
7. Wrap the finished stem tightly, from top to bottom, with tape. Trim the ends of the wire at the same level.
8. Having made the required number of flowers, start making leaves. To do this, you will need to cut the satin ribbon into pieces of 18-20 cm. It is convenient to cut with a burner on a glass surface, then the edges of the ribbon will immediately be sealed and will not unravel.
You will need two cuts for each flower.
9. Leaf formation. Fold the piece of ribbon in half with the right side facing inward. Place a point 3 cm wide on the fold line. Using a metal ruler, use a burner to draw a diagonal from the corner to the marked point.
The resulting wedge is the future leaf. Turn the wedge right side out. Place the wide base on the wrong side and, holding it with tweezers, lightly solder it to the seam on the wrong side.
Steam the finished leaves with an iron, then they better hold the desired shape and do not curl along the seam.
10. Use the base of the leaf to clasp the stem 3 cm below the last bell and use a piece of tape to tightly attach the leaf to the stem.
Attach the second leaf 1-2 cm below the first, orient it in the opposite direction. Some flowers can be made with one leaf, so that there is no excess of “greenery” in the bouquet.
11. Collect the finished flowers into a bouquet and secure with a narrow pastel-colored satin ribbon (peach, pale blue or light pink). Decorate with ladybugs or butterflies.
The result is an original spring bouquet. Just a moment and you will feel the divine smell of spring flowers.
Examples in the video “Beaded Lilies of the Valley”
Large spring bouquet
A bouquet of lilies of the valley is made from the following materials:
- vase;
- ribbon for floristry;
- thin wire;
- small glossy white beads;
- small green beads.
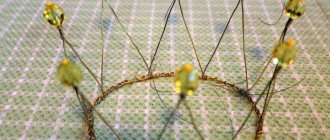
Two diagrams will be useful for work; they are shown in the photo below:
You need to start working by weaving leaves. For a bouquet you will need 2-3 sheets.
First you need to string three beads onto a wire. Then put 4 beads on one end of the wire and pass the other end through them. After this, place three beads on each end of the wire, and returning to the second row, fasten the wire between the beads, twisting it several times.
After this, insert one end of the wire through the three beads on the right side, and the other through those on the left. After this, twist the wire and put 4 beads on each end.
Having finished weaving the leaf, screw a thicker wire wrapped with ribbon onto it.
You need to start working on the flowers with six beads and gradually increase the number with each row. After completing the weaving of the bud, string about 4 green beads onto the wire and secure them. Next, scroll small branches with flowers to a thick wire and wrap it with floral ribbon. The number of buds on each branch should be different. You need to make 9 such branches.
At this stage, beading can be considered complete. All that remains is to place such a beautiful bouquet in a vase.
Learn to weave spring lilies of the valley from beads
First of all, prepare the following necessary materials for work:
- white mother-of-pearl and green beads;
- ribbon for floristry;
- wire with wire cutters;
- vase, sisal and foam.
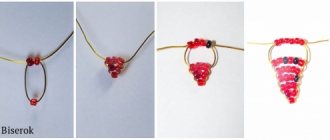
The length of each branch should not exceed thirteen centimeters, otherwise it will sag under the weight of the beads. Cut the wire above the mentioned length and string 10 white beads onto it. Pass one tip through 5 pieces so that you get a vicious circle. The beads should fit tightly together. If you do this, the lily of the valley bud will look as natural as possible and you will be able to hide the wire, which will not look aesthetically pleasing.
Connect the two ends of the main material, and then pass 1 large bead through them and push it tightly towards the bead circle. Then collect 8 emerald colored glasses. Next, you should secure the green beads by pulling 1 tip of the wire through the last glass. Finally, pull it together with your hands. In the photo you can see this process.
In exactly the same way, you need to weave at least a dozen more flowers. If you want the bouquet of lilies of the valley to look lush and voluminous, then you need to make a little more of these elements. After this, we move on to the formation of the branches themselves. Take a piece of the main material and start attaching the buds to it from the very top, creating corresponding turns around the axis.
Read
Rose hips from beads in a photo master class and patterns for weaving
You should try to arrange the lily of the valley flowers so that they are on one side of the branch, and the inflorescences are directed downwards. As you position the bud, leave the stem longer so that you can attach the elements as low as possible. In this case, the flower will be as similar as possible to the real original.
To hide the gaps between the white blanks, you need to use floral tape to wrap around the stem.
The branches must be supplemented with green foliage. Since this plant has a wide and long oval-shaped leaf, you must weave it using the French weaving technique, that is, in arcs. You need to collect beads on the axis and make 3 arcs with your own hands. Then form another one so that its length is equal to half the length of the leaf. In this case, the leaf will be wider in the center. Make 2 more arcs, and then fasten them.
The bouquet of spring flowers is almost finished. All that remains is to think about where to install it and how to do it. The flower arrangement will look organic in a miniature vase if you evenly distribute the branches with your own hands. The lower part of the craft can be decorated with sisal. If the vase has a very wide neck, then use foam that can be placed at the bottom of the vase.
Lilies of the valley, lilies of the valley...
biserok.org June 20, no »
This wonderful flower has an incredibly pleasant scent that, once smelled, is hard to forget. Beautiful delicate flowers will bloom forever on your windowsill if you weave them from beads.
Necessary materials and tools for weaving:
— Round white mother-of-pearl beads No. 12 — Round yellow mother-of-pearl beads No. 12 — Stem (you can use 2 mm aluminum wire) — 0.3 mm wire — Green floral tape — Green corrugated paper — Ribbons 0.5 cm wide — Pot — Plaster — Nippers - Scissors
Lily of the valley weaving pattern:
1. We begin weaving white lily of the valley flowers. To do this, pick up 9 white beads onto the wire, then step back the last one, go through the 8th bead, pick up 5 beads and go through the 2nd and 1st beads. You will get one petal (Fig. 1). 2 . Repeat 5 more of these petals next to each other so that you get a fan of petals as in Figure 2. 3 . Now, coming out of the top bead of the first petal, connect all the ends of the petals with wire and between each one, collect 2 white beads, close all the petals into a ring. Thus, you already have a flower in the form of a cup. All that remains is to decorate it and again go through the ends of each petal, but now collect 5 white beads between them (Fig. 3). One lily of the valley flower is ready. 4 . The first flowers should be slightly smaller than the lower ones, so weave 5 small flowers, then increase the petal by 1 bead on both sides of the loop and weave 4 medium flowers. Enlarge the bottom 4 flowers with a bead on each side of the petal. Make stamens from three yellow beads and insert them into the center of each flower. 5 . Green leaves just need to be cut out of corrugated paper. You can attach a cardboard model, trace and cut out 3 identical leaves. 6 . We collect lily of the valley. Screw all the flowers from small to large to a thick wire, guided by the photo of the finished work. Then wrap the leg with floral tape. Then dilute the plaster with water, place some paper in the pot, fill it with plaster and stick a lily of the valley with leaves into it. When the plaster has hardened, decorate its surface with satin ribbon grass. The lily of the valley is ready!
This lily of the valley is already made entirely of beads, unlike the first version. But this is not for everyone, and if you can devote a lot of time to beading, then of course it is better to make a lily of the valley entirely from beads, including large green leaves.
Necessary tools and materials for weaving:
— Round white mother-of-pearl beads No. 15 — Green beads No. 12 — Wire 0.3 mm — Green floral tape for winding — Scissors and wire cutters
How to weave a lily of the valley
1. So, each lily of the valley flower consists of five loops. Make loops of 7 beads each in three small flowers, 9 beads each in three medium ones, and 11 beads each in three large ones. 2 . Such flowers are attached to a double wire as shown in the diagram above, and then twisted. It turns out to be a leg. The flowers will need to be straightened at the end so that they hang in a row. 3 . The finished stem is wrapped with floral tape. Make another such branch. Now you need to start making green leaves. 4 . Using the French weaving technique with arcs, take the first main row approximately 3.5-4 cm in length, and then weave a pointed-type sheet. To ensure that the sheet is wide enough, make approximately 12-13 full turns (this is 24-26 arcs), but it also all depends on the size of your beads, so you should always be guided by the product. 5 . To keep the sheet in shape, it needs to be stitched. Make 3 more of the same leaves. Collect the finished parts into a bouquet. Lilies of the valley are ready!
The second method of weaving a bud
This is a simple and very cute way to weave a flower; for it you only need white and yellow beads and thin 0.2 mm wire.
For each flower we will need 6 pieces of wire, 30 centimeters each. For the first segment you need to collect 13 beads and place them in the center. Bend the wire with beads into a loop and twist the ends together at its base. This is one petal.
Next, take another piece and stretch it through the first five beads on one side. Fold the piece in half and place 8 beads on the top one. Twist this piece of wire near the base of the loop, so you get 2 petals. Repeat this action three more times.
The sixth piece of wire is the fastening one. In the same way, pull the wire through the first five beads, pick up three beads at the end and pull it through the 5 outer loops on the left side of the weave. By pulling out the ends and twisting the wire in the same way, you will get a small, neat bud. But don’t rush to twist all the ends of the wire together; we will make the core from the yellow beads.
We will need a 20 cm piece of wire; we need to put 2 yellow beads on it and place it in the middle of the piece. Holding the right bead in the center, pull the right end of the wire through the left bead in the opposite direction. Tighten the wire, so you get a small stamen. At one end of the wire you need to make the same stamen. Having collected 2 beads, pull the wire through the first bead in the opposite direction. Pull the wire tight, pressing the two stamens tightly together. At the other end, make exactly the same stamen and twist the wire together, lifting the stamens up. Insert it into the center of the petals and begin weaving the next flower.
One branch requires 7 flowers. Here is such a wonderful lily of the valley made of beads.
Beaded egg with lilies of the valley
April, end of April or May is the time when this beautiful fragrant flower blooms. Easter is one of the most favorite spring holidays; the sun is already warming up, and you want greenery, flowering trees and the scent of flowers more and more. A small Easter egg with beaded lilies of the valley will decorate the table for the holiday. This is a great decor and a cute gift.
What a beauty, I can't resist!
This wonderful video master class will help you weave such beauty with your own hands. It seems that the figurine itself evokes a spring mood with its snow-white buds and fresh leaves.
We hope you liked our options for weaving lilies of the valley from beads. You will get simple and very beautiful spring flowers if you follow our instructions. Weave bright beaded flowers to your heart's content and bring year-round spring to your home.