DIY bead panel on the wall
Only true needlewomen can know the real price of beads, which are sometimes compared to pearls and many precious stones. The important thing is that beads are translated exactly as pearls. In past centuries, only wealthy boyars could buy beads, since they were far from inexpensive and ordinary people simply could not afford them. Beadwork originated precisely from the nobles, as well as from their wards, the peasants, who were always located next to their masters. In those days, products and clothes began to be trimmed, and even the very first paintings from beads began to be created. In many history museums you can see items from the past, handmade jewelry found in castles and palaces.
Drawings with flowers will look most beautiful
Paintings and icons were embroidered with beads; interior items were woven with it, as well as lambrequins for curtains.
Now practically nothing has changed, since this material is used for the same purpose, but mainly in factories, since manual work is done extremely rarely.
Glass beads are glass beads with edges of various shapes and types. And it looks mostly transparent and shiny. Beads can be metal, plastic or porcelain. Naturally, their cost depends on their type and type, but what can you do for needlework and decorating your own home. Beads are now used to decorate clothes, hats and even shoes, and now it is considered a trend of the season.
Beaded compositions
Harmonious and original compositions made of beads will add a touch of warmth and comfort to any interior, and will also become a wonderful gift or souvenir for a loved one. You will not buy such an unusual homemade design made from multi-colored beads in any of the modern stores.
The styles of execution of this or that composition that exist in the modern world of floristry give you freedom of action in realizing any of your handmade fantasies and desires.
The most popular and natural style for flower beaded arrangements is the vegetative style. When using this style of floristry, an asymmetrical arrangement of flowers in a DIY composition is typical. The vegetative style requires a very careful selection of the materials and plants used.
A beaded composition of flowers, decorated using the vegetative style of floristry, can have not one, but two “growth points”. Compositions made of beads on a spring theme look especially advantageous. This style of making compositions is very reminiscent of the Japanese style of decorative elements.
Also, another very popular and unusual way to decorate a beaded composition with your own hands is the decorative style. It is characterized by the creation of a single whole from several disparate elements.
When making compositions in this style, you can combine plants from different seasons.
The most minimalist design style for finished beaded compositions can be called the linear style of work. Here, the linearity and evenness of the parts is of great importance, and not the number of plants used.
An original solution would be to use a large flower or other decorative element as a central element. Compositions made in a linear style fit perfectly into any room interior.
Creating a composition of flowers from beads: a detailed master class
To create absolutely any beaded bouquet you need to complete several stages of work.
First you need to make flower heads and buds, then green leaves and only then the flower is assembled onto a stem. The good thing about such bouquets is that you can come up with any combination of colors, create inimitable and unique flowers that do not exist in nature, and create the composition of your dreams.
Start your first experience with a simple master class. Carefully read the step-by-step instructions, buy all the necessary materials from the list and get started. It is advisable to accurately repeat all the recommendations so that the finished work does not disappoint the novice needlewoman.
Start by shaping the petals of the future flower. On a piece of wire, about 40 centimeters, string beads and sequins alternately. Beads should begin and end the beaded petal. For the petal, use fifteen sequins.
After all the elements are strung, you need to pull them tightly and twist the ends of the wire. The result is a flower petal.
Then string the elements of the second petal onto the long end of the wire using the same method. And secure it in the same way.
Collect five petals one at a time, then form the flower itself. Combine all the petals in a circle, closing the first and last petal.
For strength, clamp the wire in the middle of the flower using pliers and spread all the petals evenly.
Now it's time to create the core of the flower. You can vary the number of pestles. It looks beautiful when the core is quite lush. It is made of beads; match the color of the beads to the color of the petals. String three beads at a time and twist the wire to different lengths.
To ensure that the beaded bouquet is not monotonous, complement it with unopened flower buds. To do this you will need to collect three petals without a core. Fold the petals into the shape of a bud.
The stems and leaves of greenery are made in the same way as the petals, stringing beads and sequins alternately. It is best to make elongated leaves and just branches of greenery. After this, the entire flower arrangement is assembled from beads.
A selection of thematic videos for the article
After reading our article, we suggest watching a selection of thematic videos. This will allow us to study this issue in more depth. You can also learn other subtleties and tricks of making a composition from beads with your own hands. Enjoy watching!
Source: https://sdelala-sama.ru/biser/3363-kompozicii-iz-bisera.html
Anyone can make a panel of beaded flowers
The essence of beading is that beads are strung according to a specific pattern on threads or fishing lines.
The highest quality beads are made in the Czech Republic
In order to master the technique of such work, you must have:
- Patience;
- The desire to receive a beautiful and chic product;
- Beads;
- Lock for the product;
- Use a needle corresponding to the size of the bead connector;
- You may also need scissors, matches and a thimble.
You need to work in a well-lit place, and lay the beads on a fine-lined cloth so that the beads do not scatter on the table. At first, you should start weaving small accessories such as pendants, flowers and leaves. They can be used to hone the most basic principles of work and get results much faster than from making a wall panel of flowers.
Beadwork or embroidery with beads will appeal to both adults and children, in particular both men and women, and therefore you can visit the workshop to work with such material with the whole family.
The opinion that only women can engage in such work is considered erroneous. In fact, working with beads requires special precision and maximum concentration, which both representatives of the stronger half of humanity and women have. It is worth noting that beadwork or the formation of mosaics from beads is useful for relaxation and stress relief, as well as for developing motor skills fingers in children.
You can use a regular wooden picture frame as a frame for the panel.
The development of motor skills primarily affects the mind, and therefore it is worth taking care of this from childhood. You can practice beads with children from the age of five, since this is the very age when the child becomes serious, responsible and can really understand what is required of him.
In order to make, for example, a New Year's panel with your own hands, you need to prepare:
- Several types of beads;
- Wire;
- Floral tape to disguise the wire;
- Panel frame for bead embroidery.
In addition, you will need a tool to cut the wire and burn it. Often, special lamps are used when beading, which help to concentrate on work.
Technologies for working with beads
Beads, in every sense, are a multifaceted material.
Using it in your works, you can use various methods of making crafts.
- Beading. Traditional way of working with beads. To make this or that item you will need beads of the desired color and size, a strong thread or fishing line, and a thin needle for working with beads. If you are working with thread, it is also advisable to have a soap or a piece of wax nearby to give the tip rigidity. This is not necessary, but will make the job much easier. For beadwork, as for many types of needlework, there are diagrams that describe step by step the manufacture of the product. Many schemes are equipped with graphic keys for convenience.
- Beadwork. A fairly simple process, a little similar to traditional cross stitch or satin stitch. It is performed on a pre-prepared canvas, or directly on the selected product.
- Beadwork. The beads are laid out on a prepared canvas that has a special adhesive base. This technology requires more experience and dexterity than when working with a needle.
Bead panel master class
In the manufacture of such a product as a panel of beads, MK should be studied clearly and correctly, since following the instructions directly determines whether the desired object will be obtained or not.
In order for the process of embroidering a picture with your own hands to be competent, you should initially prepare every detail. If we are talking about a panel with flowers, then each flower should be embroidered separately and only then attached to the general background.
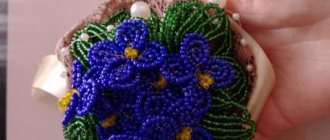
In order for the panel to look impressive, you should create large flowers
It is important to remember that the technique for making each flower is completely different, and requires labor, patience and painstakingness, since it will not be possible to create a gorgeous panel in a couple of days.
There are certain instructions and diagrams for wall panels that must be followed as strictly as possible.
A master class on making panels with flowers from beads includes many gradually completed stages:
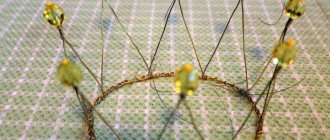
- In order for beaded roses to be more natural and attractive, it is worth not only making the bud itself separately from the overall picture, but also finishing each petal with special care. To get a luxurious flower, you need to string 9 beads onto a 60-centimeter wire to twist it into a drop. To secure it, you need to wrap the wire twice along the axis.
- After this, another 18 beads are collected and winding is repeated. Since beads in most cases can have different sizes, it is worth paying attention to ensure that each subsequent row is twice as wide as the previous one. For greater accuracy, you can measure it with a wire. Each petal requires 60 beads.
- After each petal has formed, you can begin collecting the bud. You can choose the number of petals according to your own preference, but it is important to get three large flowers. The petals should be bent outward, which will be easy, since the frame on which the beads are strung is a wire. The petals are connected to each other by threads, but so that they are not visible.
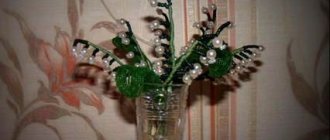
- The next stage is the preparation of sheets for decorating the panel. It is made from green beads. To make it, you need to put 7 beads on a 60-centimeter wire, then wrap the tip around the axis and wrap it 4 times.
- Ideally, you will need 24 leaves, after which they are connected in threes in one place. If you wish, you can dilute the design of the panel with sepals in the form of a clover flower.
Talisman of Wealth
This panel option is quite lightweight, so it’s perfect for beginners. The main thing is to carefully read the description and follow the diagrams.
Such a wonderful beaded money tree will bring only positive and successful energy to your home.
Necessary materials for work:
- small gold beads 70 g;
- crumb (carnelian) 45-50 cm long;
- golden wire (2 spools);
- knitting wire (15 pieces of 70 cm each);
- wire for frame 90 cm;
- bamboo support;
- watercolor paints;
- gypsum;
- PVA glue or super glue;
- car varnish.
To begin with, we collect pieces of bead wire 50-60 cm long. We collect 12 pieces of beads, make the first turn in the middle of the segment. Next, dial the next 20-22 pieces. beads and make the next round.
Leave the weaving in a loose state so that later you can make the upper part of the leaf sharper.
We also make the third turn - about 30-33 beads will be useful for it. We get a small leaf from three turns of beads. Squeeze the top part a little. Then twist the wire to a distance of 1-1.5 cm.
If you use longer pieces of wire, then you can make 5 leaves on a branch. In total we should have 50-55 small branches.
Article on the topic: Keychains made of rubber bands on a slingshot and on forks with photos and video tutorials
Let's start with the carnelian crumbs. If there is no such stone, you can use any other small size. String a pebble and fix it with a coil in the middle. Twist the wire at a distance of 1.5-2 centimeters and make the right one. Thus make the left turn. We produce 50-55 of these branches. Look at the photo:
Using a tying wire, collect all the round branches. Out of 52 small ones there should be 13 large branches.
Place the branch that we just made on a flower support and secure it with beaded wire.
Let's move on to decoration. Mix a small amount of plaster, glue and water to a medium consistency. Use a thin, hard brush to paint the trunk.
We leave everything to dry. Afterwards you need to cover it with brown paint. Open the work with aerosol acrylic varnish, straighten the leaves and attach the panel to the wall. Ready! To make the branches look even more original, you can additionally weave various interesting elements from beads, for example, arrange the branches with butterflies, berries or flowers.
Bead panels: master class (video)
The panel is assembled by screwing a thick wire in the form of a base onto the frame. Fastening can be done using various methods, as some use tape, others use wire knots. Before fastening, you need to assemble all the products together. A good option for preliminary fitting would be to place each element in its rightful place and only after that should you gradually sew on the blanks. Flowers can be placed in any order as you wish, since there is no specific rule for this action. In those places where the wire will be visible, it is worth laying masking tape. As soon as the work is completed, the panel is hung on the wall. It is not recommended to place such paintings under glass, as you will not get a smooth and beautiful panel.