Having mastered the technique of bead weaving, everyone will be able to create any craft that appears in their imagination. You can grow trees from beads on your table or flowers.
The technique also allows you to create a variety of jewelry, keychains and other small decorative elements. This can be used at home, or can be a gift for family or friends.
We suggest you start mastering the technique by studying a master class on beaded strawberries.
Before starting work, I would like to note that creating bead products is a rather painstaking task; it requires attentiveness, patience, and accuracy. But the result will certainly delight you with its brightness and beauty.
The composition, which will be described below, is created from beads. It consists not only of strawberries, but also of leaves and flowers.
Ripe berries
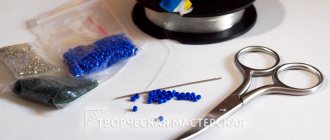
You need to prepare:
- red beads, about 10-15 g will be enough;
- black beads, the quantity depends on the number of berries, 10-15 pieces are needed for one;
- white beads will require a little less than red beads - about 10 g;
- green beads, like red beads, need 10-15 g;
- wire of red and silver colors, 0.3 mm thick; to create leaves, you can choose green;
- nippers or scissors.
You will also need the following diagram to work:
Creation sequence
Berry weaving. Our berry will consist of five interconnected sides. You need to cut five pieces from a coil of wire, at least 30 cm long. It’s better to make them a little longer so that you just have enough to make a side.
Please note that the popular parallel weaving technique is used to create the side.
Bend a piece of wire in half and place the first red bead in the middle. The edges of the wire need to be pulled through the next two beads, and the first two rows of weaving are immediately obtained. The photo clearly shows how it should be.
The first row consists of only one, and the second of two beads. The third row is performed similarly; three beads are placed on one edge of the wire and the other edge of the wire is passed through them. To obtain the best shape of the berry, it is recommended to thread the opposite ends of the wire through each row of weaving.
In the fourth row, the addition of black beads begins - one black, three red. Fifth row – all red beads. Sixth - red, black, red again, black, two reds. The seventh, eighth, ninth, tenth - consist of red beads.
The other four sides of the strawberry are done in a similar way, using the pattern presented above. You just need to remember that the edge of the new side must be woven into the edge of the previous side. This is done to ensure that the strawberries are whole and do not fall apart.
Before the last side is completed and the berry is closed, it is recommended to place a small folded piece of red paper or fabric inside. This will give durability to the shape and richness of color.
When working on other sides of the berry, the location of the black beads can be changed to create a more interesting look. Now the ends of the wire need to be tightly smoked together. And the strawberry can be said to be ready.
Weaving flowers. To create one flower you will need 25 cm of wire. The French weaving technique is used. The flower will consist of five leaves. The middle of each of them contains five pieces of beads. And an arc is made around them, which forms the outline of the petal. The ends of the wire also need to be twisted tightly.
The remaining four petals need to be done in the same way.
The middle is made of yellow beads. You will need 15 cm of wire. In the middle of this piece of wire you need to place 6 pieces of beads and make a loop. Place three beads on one edge of the wire.
The edge of the wire now needs to be threaded through the top bead. String three pieces again and thread the edge of the wire into the lower part of the flower. Twist the ends of the wire and insert it into the middle between the white petals.
And again twist all the ends of the wire tightly.
Weaving small leaves. You will need about 20 cm of wire and green beads. You need to step back 8 cm from the edge of the piece of wire and put 10 pieces of beads on it. The other edge needs to be threaded through the last bead.
Thus, a small leaf is obtained. For one berry you need to prepare five such leaves. The finished leaves are connected and a berry or flower is inserted between them and all ends of the wire are intertwined.
Weaving bush leaves. The leaves are woven using the French technique. We cut the wire 50 cm long, first we make the central part of the sheet from 10 pieces of beads. On the sides of it you need to make three arcs on each side.
The shape of the resulting leaf is rounded at the bottom and sharper at the top. To make a complete leaf, two more of the same are woven. Then all three leaves are connected to each other and curled. The strawberry leaf is ready.
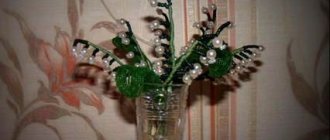
By connecting all the parts, we get the finished composition. The number of berries, flowers and leaves depends only on the intended result. This strawberry bush can be “planted” in a pot or vase.
Video on the topic of the article
- In the presented videos you can clearly see the discussed and other methods of creating a composition from beads.
Source: https://DekorMyHome.ru/rukodelie/master-klass-po-klybnike-iz-bisera-shema-s-foto-i-video.html
Weaving patterns for flower arrangements
Let's look at several patterns for weaving flowers in a basket with your own hands.
wild flowers
We weave lilies from beads. To do this, take a wire forty centimeters long.
Main stages of weaving:
- We string fifteen white beads on one edge, and nineteen on the second. Wrap it around.
- Next, we collect 19 pieces and twist them around the base. The first row of the flower petal is ready. We make three rows.
- For the second row we use thirty-two beads. Then we take the same amount and twist it around the base.
- Shape the petal.
We weave six of these. Now we make the middle of the lily. To do this, take thirty centimeters of wire and string twenty-one beige beads and 1 gold. We pass the edge through the entire row, leaving one bead. Twist the ends. We perform one more such row. We repeat five times.
Let's collect a flower. We twist two petals together and add a third. We fasten the middle. Add three more petals. Attach the flower to a bamboo stick. Wrap it with tape.
Bouquet of roses
The rosette will be small in size - three centimeters in diameter and ten centimeters in length. We start weaving from the central leaves. You will need a wire of 50-60 cm, string fifteen beads.
Next we weave according to the pattern:
- We wrap around a second loop consisting of twenty-five beads. After five millimeters we make the same petal. There should be five pieces.
- We begin weaving the second row. We repeat the process: the first loop consists of eighteen beads, and the second – of twenty-seven.
- Third row - twenty and thirty beads.
To make a stamen, string three beads onto a wire and twist them. We collect from the largest to the smallest row. For the trunk we use a bamboo stick and wrap it with thread. We make leaves as for other flowers.
Calla lilies
We start weaving from the base. The calla consists of three axes, since it is a large flower, so you will need 3 pieces of wire. We make arcs. We perform thirty-five full revolutions around the axes so that the petal becomes the desired size.
Let's start weaving the stamen. We carry out the work according to the scheme. You will need yellow beads for the leg. The stamen is six centimeters long.
All that remains is to make the leaves. Take green beads. We string nine pieces onto the center and weave arcs, fifteen from each edge. Add one bead between the rows to make the leaf sharp. We weave two leaves for a flower.
We wrap the leaf around the stamen. We fix it with wire. We wrap the leg with green thread.
Daisies
To make flowers from beads in a basket - daisies, you will need a wire twenty-five centimeters long. We string fourteen white beads. Then we thread the free edge into the first bead. Fix and twist the ends. The first chamomile petal is ready.
We perform the remaining petals of the flower in a similar way. To form a chamomile, six to seven petals are enough.
We weave the middle. To do this you will need a wire nine centimeters long. We collect six yellow beads. We thread the edge of the wire through the last three beads. We tighten it. We lower the edges and twist them.
We place the middle in the center of the flower and fix it well. The chamomile head is ready.
We weave three of these daisies and twist them together. For the stem we use a bamboo stick onto which we screw the flowers. Then we wrap the stick with green thread.
Strawberry beads
A beaded strawberry bush is a great way to decorate a wall shelf or kitchen table. This berry is always associated with summer and warmth. You can “grow” such a bush in just one evening. This could also be a good children's craft for school.
Beaded strawberries: master class
Before weaving strawberries from beads, you need to prepare the following materials:
- red and black beads for berries;
- green beads for leaves;
- white and yellow beads for inflorescences;
- wire;
- wire cutters
Some people use floral tape to wrap the stems. Now let's look at detailed instructions on how to make strawberries from beads.
- The pattern for weaving strawberries from beads is simple, the technique is called “parallel weaving”. The berry consists of five parts. The photo shows the stages of formation of the first “petal”.
- Then we begin to gradually add the second one. In this way we weave the first four parts of the berry.
- Now take a small red paper ball. By placing it inside, we will add volume to the berry and make its appearance more natural.
- We put it inside and begin to weave the last petal. In this case, you can collect a series of beads not by quantity, but as needed to achieve a beautiful shape.
- The first stage of the master class on weaving strawberries from beads is completed and the berry is ready.
- Now let's look at the pattern of weaving beaded leaves for strawberries. Everything is simple here. We string the first bead and make a loop. Then we collect the same amount on each end of the wire and connect them using the last bead.
- In this way we form five parts of the leaf.
- Two pieces of beaded strawberry bush are ready.
- Now we will weave an inflorescence. To work, you need to prepare beads of three colors: white, yellow and green.
- For the flower we use the French weaving technique. The photo shows the process of making petals. We form the middle from yellow beads.
- We will weave sepals from green beads. The manufacturing method is the same as for weaving a leaf, we simply string a smaller amount of beads.
- This is what our inflorescence looks like.
- The stem leaf consists of three parts. We will weave the first and last in the same way, and make the middle a little higher. To make this part of the bush we use the familiar French technique.
- Beaded strawberries are ready! Now, if desired, you can decorate the wire with floral ribbon.
You can weave many other crafts from beads: flowers, trees and decorations.
Source: https://womanadvice.ru/klubnika-iz-bisera
We weave different compositions from beads: floristry and a variety of styles
The most popular and natural style for flower beaded arrangements is the vegetative style. When using this style of floristry, an asymmetrical arrangement of flowers in a DIY composition is typical. The vegetative style requires a very careful selection of the materials and plants used.
A beaded composition of flowers, decorated using the vegetative style of floristry, can have not one, but two “growth points”. Compositions made of beads on a spring theme look especially advantageous. This style of making compositions is very reminiscent of the Japanese style of decorative elements.
Also, another very popular and unusual way to decorate a beaded composition with your own hands is the decorative style. It is characterized by the creation of a single whole from several disparate elements.
When making compositions in this style, you can combine plants from different seasons.
The most minimalist design style for finished beaded compositions can be called the linear style of work. Here, the linearity and evenness of the parts is of great importance, and not the number of plants used.
An original solution would be to use a large flower or other decorative element as a central element. Compositions made in a linear style fit perfectly into any room interior.
Creating a composition of flowers from beads: a detailed master class
To create absolutely any beaded bouquet you need to complete several stages of work.
First you need to make flower heads and buds, then green leaves and only then the flower is assembled onto a stem. The good thing about such bouquets is that you can come up with any combination of colors, create inimitable and unique flowers that do not exist in nature, and create the composition of your dreams.
Start your first experience with a simple master class. Carefully read the step-by-step instructions, buy all the necessary materials from the list and get started. It is advisable to accurately repeat all the recommendations so that the finished work does not disappoint the novice needlewoman.
Start by shaping the petals of the future flower. On a piece of wire, about 40 centimeters, string beads and sequins alternately. Beads should begin and end the beaded petal. For the petal, use fifteen sequins.
After all the elements are strung, you need to pull them tightly and twist the ends of the wire. The result is a flower petal.
Then string the elements of the second petal onto the long end of the wire using the same method. And secure it in the same way.
Collect five petals one at a time, then form the flower itself. Combine all the petals in a circle, closing the first and last petal.
For strength, clamp the wire in the middle of the flower using pliers and spread all the petals evenly.
Now it's time to create the core of the flower. You can vary the number of pestles. It looks beautiful when the core is quite lush. It is made of beads; match the color of the beads to the color of the petals. String three beads at a time and twist the wire to different lengths.
To ensure that the beaded bouquet is not monotonous, complement it with unopened flower buds. To do this you will need to collect three petals without a core. Fold the petals into the shape of a bud.
The stems and leaves of greenery are made in the same way as the petals, stringing beads and sequins alternately. It is best to make elongated leaves and just branches of greenery. After this, the entire flower arrangement is assembled from beads.
Beaded strawberries Vegetables, fruits, berries – Beads
In today's Master Class, I suggest you make ripe strawberries in a pot, which will decorate your home and will be ripe all year round. Beads are used to make strawberries. Our composition consists of the strawberry itself, its blossom and leaves. So let's start.
To make a strawberry or wild strawberry we will need:
- red beads 1 pack, - 10-15 pcs. black beads, - 0.3 mm thick wire (preferably red or silver), - scissors.
Materials provided by handmademart.net
First you need to cut 5 parts from the wire with a length of 30 cm. 5 parts, because 1 berry consists of 5 parts.
For weaving we will use the parallel weaving technique. And so, bend the wire in half and put on 3 red beads. Then, with the opposite edge, pull the wire through the two beads.
You should have two rows. The 1st row consists of one red bead, and the second of two. Next, put 3 red beads on one edge, and thread the second edge through them. This will be the third row.
Through all rows you need to thread both wires from opposite sides. Row 4 consists of one black and three red beads. Row 5 consists of five red beads.
- Row 6 do this: one red bead, one black, one red, one black, two red beads.
Strawberry from beads: weaving pattern and master class
A beautiful, juicy beaded strawberry, the weaving pattern of which you will find in today’s master class, will become a wonderful interior decor. Even though the berries are not real, their appearance alone brings back good memories and lifts your spirits.
Tools and materials Time: 45 minutes • Difficulty: 3/10
- wire for working with beads;
- beads of red, green and golden colors;
- strawberry-shaped foam blank.
If you were unable to buy a foam plastic blank, to create a strawberry from beads according to our scheme, you can use a handmade papier-mâché or polymer clay blank.
Step 1: start weaving
Everything is very simple. First, we fix the wire at the bottom of our strawberry and begin to string beads onto it.
Since any strawberry is not monochromatic, but has inclusions in the form of small seeds, we string the beads, alternating red and golden beads.
We strung a small number of beads in this combination, and then we can string the same number of plain red beads.
Step 2: braid the workpiece
You shouldn’t string a lot at once; it’s better to add the missing amount of beads as you work. Gradually we begin to wrap our foam blank with beaded rows, trying to ensure that the turns fit snugly against each other.
If the rows refuse to hold, then you can try using a glue gun with hot glue.
Step 3: weaving leaves
At the end, we fix the wire at the top of the strawberry and get to work on the leaves. The basis is the French technique of weaving with arcs, we focus our work on this diagram.
We connect the petals together as shown in the photo, twisting their tails together.
The finished strawberry tail can be wrapped with floral tape or you can use a regular green thread for this purpose.
That’s it, your beaded strawberry is ready, you can either put it on the table in a vase or carry it with you as a keychain reminiscent of summer. We really hope that our weaving pattern and master class helped you in your work. Such a cute little thing can also be presented to any friend as a cute souvenir.
Christina All posts by the author (1123)
Source: https://pleteniebiserom.ru/2014/12/klubnichka-iz-bisera/
LiveInternetLiveInternet
Quote from grigrevao's message
Read in full In your quotation book or community!
Wildflowers from beads, how to secure them in a basket
I wove a bouquet of wildflowers as a gift. Cornflowers, daisies, poppies, bluebells, tansy, yarrow, buttercups, chicory, wild cloves, dandelions, hedgehog, bluegrass, wheatgrass, timothy.
At first it was planned to make the composition in a wicker basket. I was wondering how to fix the flowers in the basket - there are a lot of them (I didn’t count exactly, more than 80), they were heavy, but the basket was light and “leaky.”
I had an experience - I stuck it into a floral sponge, but due to the weight, the flowers became loose over time. They advised to use polystyrene foam, but no such piece was found. There are recommendations to stick it into salt - it seemed to me that this was risky - you could drop the basket and everything would spill out. Plus, it was required that the fastening method would allow changing flowers in places during the composition process - well, I’m not a florist, so that everything would work out right the first time!
I got out of it this way - I took empty spools of thread (you can cut off pens, felt-tip pens or caps from them, etc.) and glued them together. You can insert flowers into the tubes and they stay there well. Ideally, the diameter of the tubes should be such that only one flower can be inserted, but it worked out well, I inserted 3-5 flowers each. Since the basket is too light to prevent the flowers from falling, we had to weigh down the structure with a glass cup made from the scraps of a bottle. How to cut a bottle using thread soaked in acetone can be found on the Internet (unfortunately, glass beer and champagne bottles are not suitable - the glass is too strong).
To secure the tubes in the cup, I poured a little plaster on the bottom and placed the tubes (there weren’t enough tubes to completely fill the cup). After drying, the tubes were firmly glued to the cup. Then, after drawing up the composition, it was planned to completely fill the glass with plaster to firmly fix the flowers, then glue the glass to the basket and decorate it with something so that the glass would not be visible. But then they gave me a clay jug in which the flowers looked better (although too crowded, so that not all the flowers are visible - and you can’t tell that there are 39 daisies in there), I had to leave my “craft” for other compositions.
Even earlier, I wove this basket with flowers as a gift (this is where I stuck the flowers into the floral sponge)
I also wove a wall composition “Happy Couple” and a basket with heather (here I secured it like this - I coated the inside of the container with self-hardening plasticine, inserted flowers and filled it with wax).
Almost all the flowers were woven according to the books by M. Lyaukina “Beads for Beginners” and T. Kossova “Flowers from Beads. Seasons. Summer. Wildflowers".
Series of messages “My works”:
Part 1 - Children's New Year's dresses Part 2 - Embroidery pattern for the panel "Dymkovo toys" ... Part 12 - Box with origami elements + pattern Part 13 - Beaded Christmas trees for the New Year. MK. Part 14 - Wildflowers made of beads, how to secure them in a basket