It's a rare girl who doesn't dream of becoming a princess. With age, this fabulous desire takes on a slightly different shade, but a beaded crown made for a costume party or other festive event continues to inspire delight.
Even a novice craftswoman can weave this luxurious wire product with her own hands. All that is needed for this is patience, perseverance, and strict adherence to the requirements of the master class.
Master class on making a crown from beads
Our master class will help you make a real princess crown with your own hands, in which it is not a sin to appear at both a narrow and elite party.
Developing the “skeleton”
In order to make a beautiful crown from wire, you need to prepare a skeleton base. The product diagram and our recommendations will help you quickly understand all the intricacies. You will need to act as follows:
- Make a circle out of wire, the size of which depends on the size of the future princess’s head;
- Cut a few more pieces of wire, each of which is no more than twelve centimeters long;
- Bend each piece in half, round the ends, and make “ears”;
- Secure (you can fill, for reliability, each of the joints with hot glue.
We decorate the crown with beads
Now you need to beautifully design the “skeleton” of the future crown. The advice our master class gives will help you do this. You will need to do the following manipulations:
- String one bead onto the wire, on top of which you need to attach a small bead;
- Pass one end of the wire through the hole of a large bead;
- Gently tighten the wire and attach a transparent bead to its top
.
Decorating the crown
Making an impressive design couldn't be easier. Our action plan will look like this:
- Using wire, wrap both sides of the product frame;
- String elements of different shades and sizes of beads onto the wire (if you find it difficult to make a choice, follow the tips that the photo illustration gives you);
- Starting from the very top, wrap the wire with the beads strung together;
- Decorate the entire corner in this way, adding beads as necessary;
- Cut another piece of wire, string multi-colored beads, beads, glass beads onto it (you can additionally use decorative flowers and ribbons);
- Weave the blanks in different directions on the frame of our crown;
- Do similar manipulations with all the beads, not forgetting to secure the corners and wrap them with wire.
Just a little more, and the magnificent crown for the princess, made with your own hands, will be ready. To eliminate existing defects, follow the recommendations that our master class offers. Here's what you'll need to do:
- Wrap the entire frame of the product with wire;
- Place several different beads on the working material (wire);
- Starting from the top, wrap the corner with working material with stringed beads;
- Decorate each of the five corners of the noble product in this way;
- To eliminate minor defects and irregularities, you can decorate the lower part of the product using light-colored organza.
Gold Crown
The first master class is devoted to creating a golden crown from beads and wire.
Required materials and tools:
- golden-colored cutting – about 40 grams;
- beads in tone No. 6 - 5 grams;
- matching glass beads – 5 pieces;
- beading wire with a diameter of 0.3 millimeters;
- strong wire with a diameter of 1 millimeter;
- pliers;
- wire cutters
We begin the crown weaving master class by creating a headband with our own hands. We take a strong piece of wire, put beads on it and twist the ends. Make the width of the rim as you wish. In this version, it is slightly larger in size than a jar lid.
The next step is to weave petal-shaped parts. We use the French weaving technique for this. The scheme is as follows: on a piece of wire seventy centimeters long, we string 15 pieces of golden cut, having previously formed a small loop at one of the sides. Now, you need to make a larger loop and continue beading with arcs. We form the next arc after 4 pieces. cutting and securing. We string another cutting and create an arc that will be inside. We twist the wires at the base of the leaf. This process can be seen step by step in the photo.
In this way, you will need to make the following arcs, gradually descending along the border of the leaf by increasing the indentation by 5-6 and 7 pieces of the base material (cutting), respectively. We fix the ends of the wire. We unfold a small loop at the top and string glass beads and beads onto it. We twist the end of the segment around the bead. You need to make several turns and cut off what is not necessary. That's the whole weaving pattern. We make five similar petals for the beaded crown.
Read
Elastomeric thread and other necessary materials for beading
At the next stage, the master class begins to assemble the crown. We take the blanks in the form of petals and attach them to the rim. The parts are connected to each other using beads, as in the photo.
This concludes the master class. In just a couple of evenings, even novice needlewomen will be able to make such a small masterpiece with their own hands.
Crown made of beads, stones and beads
Making a beaded crown that will allow you to shine at any party is quite simple. Even a novice craftswoman will spend no more than three hours on needlework. To make this crown you will need large gauge wire and working material for stringing beads. Our master class is ready to share with you the secrets of making this luxurious, noble product. Follow the recommendations and you will certainly succeed:
- Take a large section of wire in your hands and carefully wind it into a circle of the size you need;
- Fix the circle using thin working material;
- To make the top of your crown, bend the working material in waves (the order is arbitrary);
- Secure the workpiece with thin wire. The basis of the future crown is ready.
It is impossible to imagine a princess or queen whose crown would not be decorated and would not attract the attention of others. Our master class will help you design the product properly. You will need to do the following manipulations:
- On a thin working material, string several of the brightest elements you like (the order is arbitrary);
- Carefully braid the base of the product;
- Decorate the center with pearls or large beads.
The luxurious crown is ready! Having put it on your head, you can count on the fact that the attention of all those present will be focused only on the owner of that majestic and beautiful product.
We design the product
Well, you already hold the base of the wire crown in your hands. And now, relying on your imagination, you will need to design the “framework” of the creation. In order for everything to work out, rely on the following steps:
- take one large pebble and a bead of any color, the main thing is that the shades in the work are combined;
- pass one of the ends of the wire through it;
- then carefully twist the wire and attach a bead to its sharp end.
Related article: Do-it-yourself soft books for babies with patterns
Souvenir crown
Have all the holidays died down long ago? Then you can make a cute souvenir and give it to a loved one. Your actions will look like this:
- String eighteen red beads onto a thin wire;
- Carefully thread one end of the working material through the row as shown in the diagram and form a loop;
- Gently tighten the resulting loop;
- Cast on 18 more elements, tighten the loop. You've got a nice figure eight;
- Fold both rings and secure them carefully;
- To make the top, string the following elements: 7 white, 1 red, and then 7 white again;
- Use a wire to secure the dome and then carefully remove the end;
- Make a second dome. To do this, fasten a new wire next to the red bead and string seven white beads on each side;
- To make the top you will need blue beads. Then “arm yourself” with wire and make a loop.
Brooch bow made of beads “Versailles” Technique of weaving rivoli and Ndebele ribbons
Hello dear friends, welcome to the master class - brooch “Versailles”
Before we start weaving, it’s worth saying a few words about the product itself and the material. Many of you have already become acquainted with the Versailles set in the announcement.
After its release, it turned out that this design had a very specific author, which I had no idea about when I was inspired by a picture from the Internet. The name of the craftswoman who invented these brooches is Elena Shakirova. She has a store of similar exclusive jewelry; if you want to get a masterfully made brooch or don’t have the patience to make it yourself, you can easily purchase a ready-made version from her in the store - https://www.livemaster.ru/yelena-ka
And of course, we have settled all copyright issues and now I can show this master class to you with a pure heart. Thank you Elena for your inspiration and skill, I am very happy about our cooperation.
Now to the master class.
This bow is above average in difficulty.
It may be difficult for beginners in some places, but it all depends on perseverance - if you don’t like making mistakes and trying again, it’s better to postpone the work until later, when you gain experience.
So, several interesting solutions and techniques await you.
The first is the rivoli weave.
Here you should be especially careful with the number of rows - I remade it several times because there were few rows and the rivoli broke the cup or fell out.
And secondly, these are Ndebele ribbons.
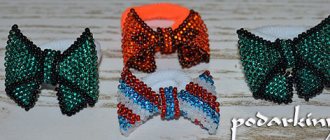
Such tapes are an interpretation of the classical Ndebele technique, I have never seen anything like this in my lessons. I think you will be interested in learning this unusual way of weaving ribbons. This can be applied to many of your future products. This is how they look on brooches.
We will attach all this beauty with wire to such a clasp
As a result, at the end of the lesson, you will definitely end up with an interesting and original decoration.
Scheme:
Since I made the brooch from a photo, I had to draw all the diagrams myself.
Click to enlarge
List of materials for the lesson on the brooch “Versailles”:
Pin with platform for fastening;
Faceted red oval cabochon diameter – 25 by 18;
Beads:
- Czech Republic round beads No. – 10 approximately red – 10 grams, black – 25 grams, transparent – 10 grams;
- Black beads No. 15 literally a pinch; Beads:
- drops – 8 mm about 100 pcs.
- faceted black – 6 mm – 9 pcs. ;
- faceted red – 8 mm – 7 pcs.;
Bicones:
- 3 mm black, red – 15 pcs;
- 6 mm red – 57pcs;
Red drop pendant – 1 piece;
Beading threads;
Monofilament;
Needles;
Wire;
Master Class
Dear masters, I will try to be active online for a few days, so feel free to write your questions, I will answer and help you in mastering the lesson;) I also came up with such a promotion - everyone who makes and sends me (uploads to the album of our group on VKontakte) a photo of their bow on lesson, will receive a Gift from me, an advanced training video course specifically for craftswomen in photographing jewelry.
Therefore, if you are planning to make a brooch, do not forget to share the result and receive your gift