Where to start
First, you need to choose a simple design for decoration, the production of which will not require a variety of consumables and complex techniques.
Simple models include leaves, butterflies, feathers, letters, snowflakes. Patterns need to be printed or redrawn. You should prepare your workplace so that everything you need is at hand. Good lighting is important so as not to strain your eyes when creating a brooch.
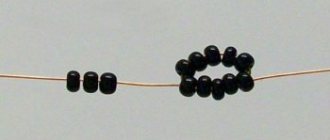
Before work, it is recommended to practice placing beads on a thread, making sure that the needles, threads, and the diameter of the beads correspond to each other.
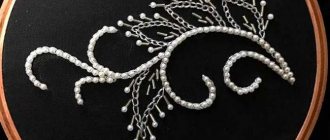
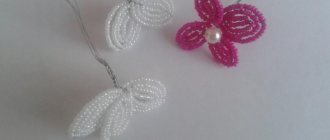
What are we going to embroider?
BroochCabochon
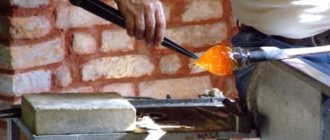
Required materials and tools
The basis of the decoration will be felt . In order for the brooch to serve for a long time and not stretch, you need to know the optimal parameters of felt for needlework. This material is non-woven, made by interlocking fibers.
Felt happens:
- Woolen . It is produced up to 5 mm thick, so a brooch made from it will be durable. The color does not play a special role, since one side will be sewn with beads, the other with leather. Pure wool felt must be wetted before work so that the material shrinks.
- Wool-blend felt with viscose admixtures is softer, bends and wrinkles better. You need to think about what size the product will be. If it's small, then it'll do. If it is larger, the material will not hold its shape.
- Simulated . This material can be given any shape, just wet it and then dry it.
- Acrylic is a product of plastic processing. Keeps its shape well and does not shrink. The cost is cheaper than natural materials.
- Felt polyester is the most wear-resistant. If you fold it in 2 - 3 layers, you don’t have to worry about it stretching or becoming frayed. Korean-made material is popular.
- Viscose . Does not shrink, durable.
For beaded brooches, polyester, viscose, acrylic or pure wool felt are suitable.
Beads
In addition to the base, you will need bugles - long or round beads. There are many options here:
- Shape : faceted, round, rectangular, in the form of a number 8.
- Color – glossy, matte, pearlescent.
- By size – large, small, wide.
- In terms of cost – elite, mid-price segment and cheap.
The most popular bead manufacturers are MIYUKI And TOHO (Japan), Preciosa Ornela (Czech Republic). Japanese collections for handicrafts offer a huge assortment of shapes and colors, good quality, and durability. Czech is much cheaper, but looks good in finished products. You can also choose Russian beads - they are inexpensive and last a long time.
To choose a specific option, you need to have a good idea of what the brooch should look like . Sometimes there are a lot of ideas in the store, so it’s better to first consider all the possibilities in terms of materials.
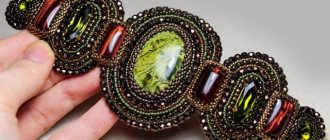
In addition to small beads, large sew-on crystals . These can be rhinestones or semi-precious stones. If you want to make something worthwhile, you can visit an exhibition of semi-precious materials and buy them for a brooch. Amber, moonstone, turquoise look good - everyone can choose a talisman that matches their zodiac sign. One problem is that you will have to drill holes if the materials are solid.
Editorial Voice
Matryona
Fan of embroidery and sewing
Ask a Question
It is not recommended to buy cheap Chinese goods . Such materials can discourage a novice craftswoman from doing needlework. Half of the beads will go to waste, since the hole for the needle is sealed - this is a waste. Of the remnants, some will break during operation or will deteriorate during wear.
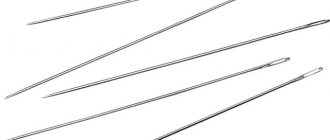
Needles and threads
A needle for beads needs to be thin and long .
If the thickness is greater than necessary, the glass beads will break. No. 10 - No. 15 will do. The higher the number, the thinner the needle. Optimal option No. 12. If you need to string several beads at once, you need a long needle of at least 4 cm.
The bead thread should pass freely through the eyelet . It is recommended to immediately buy a needle threader, since the eye of the beading needle is very small.
Choose a synthetic thread - it is stronger. The brooch is intended for long-term use, so the thread should not break when washed. Fishing line or silk will do.
Tools and materials needed for work.
Standard set of tools required for bead weaving:
- Paper. A work drawing is made from it.
- Pin. With its help, the brooch will be attached to clothes.
- A special glue that is designed to work with paper and felt. Often washes off easily with water.
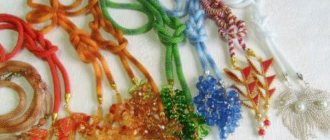
- Beading needle. Selected specifically for the diameter of the thread used.
- Bead thread or fishing line. The bead thread must have high wear resistance.
Bead thread can be:
- Natural. This thread is pleasant to the touch and has a wide color palette. Disadvantages: rots in high moisture and wears out quickly.
- Synthetic. It is highly resistant to external factors and hardly shrinks. Disadvantages: can cause allergic reactions.
- Reinforced. This thread is additionally braided with an additional thread, which increases wear resistance and strength. Disadvantages: high price and aggressive chemical composition.
Auxiliary tools: scissors, thread.
Standard set of required materials:
- Felt. Fabric consisting of wool fibers is the basis for embroidery. Its varieties:
- Natural. This fabric can be dyed and does not cause allergic reactions. Disadvantages: high cost, low resistance to physical deformation.
- Wool blend. Consists of wool and viscose in a ratio of 60:40. The material is unsuitable for making small brooches.
- Artificial. This felt is washable and will not lose its shape or fade.
- Beads. Small beads that are the main element of the brooch. The main requirement for beads: uniformity.
Beads come in the following types:
- Chinese. Not very high quality material, beads vary in size.
- Czech. Inexpensive, but at the same time very high quality material. The beads have an even shape and the same size. A small percentage of defects.
- Japanese. One of the highest quality beads in the world, in terms of quality and percentage of defects it is not inferior to Czech ones.
- Indian. Not very high quality beads, which have low strength.
There are 3 forms of beads:
- Ordinary. Round shape with a hole in the middle.
- Chopping. Short cylindrical beads (up to 2 millimeters).
- Bugles. Long cylindrical beads (up to 3 centimeters).
- Beads. Necessary to give the brooch more volume, used as decoration.
- Leather. For processing the reverse side.
- Ribbon. Used for finishing brooches with cuts.
Embroidery stitch options
An arched stitch is used when you need to place beads tightly in a row, with minimal distances between beads. This is done as follows:
- Secure the thread on the wrong side with a knot.
- String the required number of beads.
- Bring the needle to the wrong side.
- Return to the last bead, bring the needle to the front side and stitch it again. As a result, every last bead will be firmly attached.
The monastery stitch is designed to cover the fabric evenly with beads. You need to imagine a square, in the middle of which there should be a bead:
- Fasten the thread to the wrong side.
- From the bottom corner, bring the thread to the front side.
- String the beads.
- Insert the needle into the upper corner diagonally inside out.
- Sew the next bead close to the right in the same way.
It is important that the angle of the beads does not change, then evenness on the canvas is achieved.
If you need to make a fringe , it is better to use a long glass bead. To make it look neat, you need to do this:
- Fasten the thread from the wrong side and bring the needle to the front side.
- String the required amount of glass beads, for example 3 cm.
- Take 1 small bead and string it too.
- Unfold the needle and pull the thread in the opposite direction through all the beads.
- Pierce the fabric and bring the needle to the wrong side. A double thread will hold the beads more tightly.
Master class: voluminous bead brooch
By popular demand, I present a master class on creating a three-dimensional brooch. In the master class I created a silver-black brooch. You can repeat the presented design, or come up with your own. In the description I explain the principle of weaving a brooch 
So let's get started!
Equipment and materials:
— cylindrical beads Miyuki 11/0; — round beads Miyuki 15/0; — Czech beads 10/0; — rondels 2 mm; — bicones 4 mm; — Swarovski Rivoli 14 mm; - clasp for a brooch (I used a hat pin); - threads and needles; - cling film or a piece of cellophane (just a little); - a piece of cardboard; — leather, felt or other material for decorating the back of the brooch; - scissors; - glue (for example, “Moment”).
1. First we braid the rivoli . We cut the thread of a convenient length (I cut the thread long enough, since it is inconvenient to fasten it when it runs out), collect 36 cylindrical beads Miyuki 11/0 :
We close them in a ring :
2. Weave one row with a mosaic :
3. Next we weave two mosaic rows with a tag (Miyuki 15/0) :
4. We bring the thread to the reverse side , insert the rivoli and close the tags with two rows :
5. We bring the thread to the front side of the brooch and weave one row of Miyuki 11/0 :
This is what you should get:
6. We do the same on the back side of the brooch :
We get:
7. Now we bring the thread into the bead of the resulting row, put 3 beads 15/0 and pass into the next bead:
We get these teeth:
8. Do the same on the front side :
Side view:
9. We bring the thread to the tip of the clove and cast on one rondel . We thread the thread through the tip of the next clove:
We get the following series:
10. Then we sew the same row of rondels with the tops of the teeth on the reverse side of the brooch:
This way we give rigidity to our brooch. In principle, instead of rondels, you can use 3 mm bicones, but this “design” went in waves for me, so I settled on rondels.
11. Now we take the thread out of the rondel, string one 10/0 Czech bead and pass into the next rondel:
It turns out like this:
12. Next, we exit through the 10/0 bead, pick up 3 spots and thread the thread into the next bead:
Thus, another row is ready:
13. We leave the top of the clove, collect one tag, one bicone, one tag , go to the adjacent tip:
Next, we return to the tag that comes after the bicone :
That is, the bead stood perpendicular to the tooth:
Now each time we collect one bicone and one tag :
Closing the row, we collect one bicone and do it as shown in the photo:
14. In the next row, between adjacent bicones we pass one Czech bead , when the row ends, you need to pass the thread through it one more time and tighten it so that the brooch is stiffer:
And another row is ready! There's not much left
15. Now we collect five Miyuki 15/0 beads and pass them between adjacent beads of the previous row:
It turns out like this:
16. Let's move on... We leave the fourth spot, collect two Czech beads , pass the thread through the second, third and fourth spot of the adjacent tooth :
Pull up the row:
Have you noticed that the “structure” is starting to bend slightly? And here's what it looks like from the back:
17. But let’s return to our “rams”: Between pairs of Czech beads we pass five Miyuki 15/0 beads :
Now we have this “flower”:
We don't cut the thread!
18. Let's start filling our brooch. We cut off a small piece of cling film (you can use thin cellophane), roll it up like a snail and slightly flatten it so that it doesn’t stick out in all directions. This will be the “filling” of the brooch:
19. Now we cut out a circle of cardboard (about 3 cm in diameter), and then the same circle of leather:
20. Install the clasp for our brooch. In my version it looks like this:
On the back side:
21. To make the clasp hold better, glue it to the skin:
22. Now we will cover the “pornography” - the reverse side of our brooch. two Czech beads between the tips of adjacent teeth :
Next, we place cardboard and leather with a glued clasp inside the brooch on cellophane:
Just in case, I glued each of these rows
We tighten the bead row so that it lies on top of the skin. Once again we go through this row with thread and tighten it well:
We fasten the thread and hide it.
As a result, we get this beauty:
Thank you very much for your attention and for reading the master class to the end! I will be glad to answer your questions or explain points you don’t understand! When copying this master class, please indicate the author - Natalia Smetnyova.
Happy creativity!
Accessories for brooches made of beads
To fasten a brooch to clothing you need a pin .
It should be strong, preferably made of stainless steel. Oxidizing metal can leave marks on clothing, so cheap options are not suitable. If a flat cabochon is used, you can take a special frame - setting . The stone is secured to it with paws.
Depending on the idea, pendants, rings, jewelry nets, and spacers for separating beads may also be required.
Brooch Owl
To acquire the necessary skills, it is recommended to try making a beaded brooch on felt in the shape of an owl . To do this you will need:
- a small number of beads - one or more colors, as well as small pearls;
- two larger rhinestones for the eyes;
- eyebrow sequins;
- large crystal for the body;
- a piece of leather;
- pin;
- glue;
- felt.
First, a pattern is made for the body and round blanks for the eyes. The leather part is cut out using the same pattern.
A crystal is sewn in the center of the body according to the markings. Secure it with 3 - 4 stitches.
The outline of the crystal is sheathed so that its high metal side part is hidden by sequins. To do this, the sequin is strung with the convex side down and sewn with only one stitch.
Pearls are sewn around a row of sequins. First, the required number of beads is strung, then the row is secured with separate stitches so that the loop does not slip off. Gray pearls are sewn along the markings - these will be the eyes.
Two rows of small beads are sewn around the pearl in a circle. The contours of the eyes and head are trimmed with beads of a different color.
The empty spaces between the contours are filled with sequins. They must overlap each other, so a blind stitch is used. The empty spaces between the sequins and the outline are sewn up with beads. The outline of the head is sewn with small sequins so that the sequins overlap each other.
The contour of the body is trimmed with beads. Between the outline of the body and the pearls, the space is filled with beads. A rhinestone beak is sewn on. This is followed by a series of sequins along the contour of the body, alternating colors.
Next is a row of beads and again a row of sequins. The felt is cut along the contour.
The felt is sealed with paper on the back side using glue. Next, you need to cut out the leather piece and attach a pin to it, make marks, cut holes, insert a pin. Glue is applied to the paper and the leather part is glued. You need to smooth out the parts with your hands and let them dry.
The last step is to trim the edges with beads so that the layers of felt, leather and paper are not visible.
The operating procedure for other products remains the same, only the front picture changes.
Beaded brooch on felt “Cat, cat”
There are many variations of patterns for cats and cats; let’s consider a more complex type of pattern – the Siamese cat. The difficulty is this: in order for the brooch to match the species characteristics of the animal, it is necessary to observe the transition of the characteristic color of the coat. Before you begin, carefully study and think about which beads and which shades will be best combined and not merge.
Please note that the technique of embroidering brooches on felt with beads is the same, just set the specifics first. For example:
- Brooch “Beetle” - the role of the body is given to a large stone, or better yet, half a bead, which is glued to the base. A contour is made with beads, using weaving elements; the stone is, as it were, enclosed in a braid. The legs and antennae are made of wire, which is attached using the “Butterfly” brooch method to the base.
- Brooch “Owl” – the bird’s eyes are the most important element, so they are made bright and can be sewn or glued. Attention is paid to plumage. It is multi-colored, i.e. alternate the color of the beads.
- Brooch "Bird". It does not always have to be completely embroidered with beads. Sometimes it is enough to select colored felt and embroider individual ornaments or contours. In this case, do not apply the contours with a pen; it is better to do it with soap. We have a detailed tutorial on how to create such a brooch on our website.
- Brooch "Lips". Please pay attention to two points: one color of beads poses a danger in merging the pattern. Therefore, the upper and lower lips are embroidered, repeating the corresponding contour line and bends. The second point is that to add volume, the outline is first embroidered with beads (the first layer). When it has shrunk, a new layer of felt is glued to its size, then only filled with beads.
Beads make beautiful not only brooches, but also necklaces, belts, collars, the latter are especially gaining popularity and are in trend.
Video lessons
Brooch with a large stone
It is proposed to make a simple brooch with a large “ tiger eye ” stone.
For this work you will need the following materials and tools:
- Brown beads No. 11 and No. 15.
- Beads of turquoise color No. 15. The color can be changed at your discretion.
- Large stone - it may differ from what is shown in the picture.
- A piece of felt.
- Glue moment.
- The needle for sewing on beads is thin.
- Transparent threads.
- A piece of leather to seal the product.
- Pin for fastening.
First you need to degrease the stone and coat it with glue. Glue to felt. Cover the contour of the stone with beads No. 11.
Each subsequent row of beads should be positioned higher than the previous one so that the edges of the stone are completely hidden. To do this, a needle with stringed beads is inserted through one - in this case it will lie between the two beads located below.
Cover the stone with 4 – 5 rows of beads. The last inner row is made with turquoise beads No. 15.
The next row is pearls. In this case, a bronze shade. Through two pearls it is necessary to make bridges from bronze beads No. 15 smaller than the one with which the stone was sheathed.
Trim the felt so as not to damage the threads. This should be done with sharp-tipped nail scissors.
Next, the leather part is cut out, a pin is sewn in, and glued to the embroidered felt. Lastly, the edges of the brooch are trimmed using a row of beads.
Jewelry made from beads, pearls and rhinestones for beginners
Preparatory stage accessories and materials
To create something so beautiful and original we will need:
- Pearl number ten and gold size fifteen.
- Pearls – 4 millimeters and one large bead.
- Rhinestone ribbon.
- Scissors.
- Tweezers.
- Monofilament.
- Awl.
- Glue for gluing rhinestones.
- Pieces of cardboard, non-woven fabric, artificial leather.
- Beading needles.
- Pin for fastening.
Using an iron, we glue the interlining into six layers.
Glue a large pearl bead to the workpiece and hold it with your fingers for a few seconds.
Leave for twenty minutes until the adhesive completely hardens.
It is necessary to glue the rhinestone tape. Immediately measure the required length of the tape and cut it.
Using a pointed tube, carefully apply glue around the entire pearl.
Using tweezers, place the rhinestones around the pearl.
We form an even and neat circle.
Leave the work for 20 minutes until the glue dries completely. Then we take a needle and thread and draw it from the inside to the face, closer to the rhinestones. We string two beads and bring it to the wrong side.
We lead between two beads and pass it forward into the second bead with a needle.
The process of forming the second row is repeated. Thus, we sew until the end of the circle. To more securely fix the elements, we go around the circle again with a needle and thread. We thread it inside out, tie a knot and cut the line.
Next, we cut out the embroidery, retreating one millimeter from the edge.
Then we take cardboard, trace the completed product and cut out a slightly smaller circle. Glue it to the back of the future decoration.
Next, we make a round blank from zama leather, cut holes for pin clamps, insert them into the flap and press with pliers. We glue the pin on the leatherette to the product. After the glue has completely dried, we continue the exciting creative process. We pass the needle through all the layers to the wrong side and make the first overcast seam, carefully tightening the fishing line.
We collect one bead and insert it between the elements of the previous row, bringing it out from the wrong side and tightening the thread.
The process is repeated until the end of the row.
We move on to golden weaving. We string three elements and pass the needle in the direction of the fishing line through one fragment of the previous row.
We collect three more pieces of glass and go through one element of the third row.
Using this method we sew the entire row.
At the end, we place the needle in the middle golden element.
We collect one golden bead, one large bead and one golden glass and pass the needle through the second element of the next three. Thus, we continue working until the very end of the row.
As a result of painstaking work, we have made a wonderful pearl brooch, which is very suitable as a gift.
Pearl brooch and earrings, DIY jewelry
Knowing the theory of the manufacturing process of the jewelry described above, you can create your own unique and inimitable products. You just need to add a little personal imagination. Brooches with pearls are made in the same way as earrings (watch the video), we only replace the fastenings of the product.