Home » Brooch » Beading the edge of the brooch
Brooch
Irina Vyshivaikina 07/18/2019
1
All needlewomen who are going to start making accessories from beads need to pay special attention to edge processing. Covering the edge with beads is the final stage in creating a piece of jewelry that will look much neater and more beautiful. You can choose the most convenient method by first familiarizing yourself with the master classes.
Why is jewelry processed?
Processing the edges of a beaded product allows you to strengthen it, the craft will not fray or crumble, in addition, any accessory takes on a finished look, and you can use it as a gift for a loved one or make your style original and unique.
In order not to accidentally spoil the product, beginners are advised to practice on small unnecessary pieces of suede or felt, choosing the most convenient method for processing the edge.
Methods for processing the edge of a brooch with beads
There are three main methods in beading that allow you to process the edge of a product:
- Russian closed seam - this method involves small gaps between the beads, so they can move freely;
- American - similar to a buttonhole stitch, but decorative material is added to it;
- looped - allows you to imitate a frame for stones in jewelry, therefore it is most often used for edging large rhinestones or cabochons.
Experienced craftswomen trim the edges of the product with fringe or gimp, but these methods are more difficult to implement.
These methods are suitable for all beaded jewelry that has a soft base. These can be earrings, brooches, pendants or hairpins. If you add beads to the usual edging stitch, the accessory will become much more beautiful.
Russian closing or closed seam
How to trim the edge of a brooch with beads? The Russian seam, used for processing edges with beads, is suitable for beginner needlewomen.
- We select materials. To cover a brooch or other accessory, artificial or natural leather, felt, beads of a suitable color, a bead needle, fishing line or cotton thread, “Crystal” glue or other super glue are used.
- Preparing the stencil. We glue felt to the back of the accessory using “Crystal”; you can also glue slightly smaller paper between the product and the felt so that the craft holds its shape well.
- We make the first row of sheathing. To do this, you need to hide the knot between the layers. First we pierce the needle through the felt, then we form a loop and again pass the needle in the same place, but from the front side to the wrong side. We pull out the thread so that there remains a small loop through which you need to thread the needle from right to left. There should be small gaps between the beads.
Next, the needle should be passed from the front to the back side, and the loop should be tightened between the last and penultimate beads.
- We fasten the beaded bottom. After the fishing line or thread has been threaded through the last bead, the needle should be threaded through all the beads again.
- Let's form a row further. You should again thread more beads onto the needle and repeat the step of processing the edge with beads in a similar way. Once the needle has been passed, there is no need to hide it anywhere. When a full circle is formed, we reduce the number of beads in each row so that the edge of the brooch does not become deformed.
- Making fringe. If desired, the edge can be left as is or decorated with fringe, if appropriate.
To make the accessory look neat, the knots must be even and identical, and it is better to use a long thread, because it will run out quickly. The beads should also be the same size to ensure a perfect edge.
If the seam does not come out smoothly, there is a way to correct the situation: you need to thread the needle through the entire row of beads, and then fasten it to smooth out the unevenness.
What is needed to make a brooch
For a brooch you don’t need as many materials as you might think. Even if there are no beads, you can embroider with threads on felt. There are such products. Beads can be used matte or shiny, depending on the effect you want.
So, before you make a beaded brooch with your own hands, you need to prepare all the necessary materials:
- The base is in the form of felt, it should be of medium thickness, in no case thin;
- Beads, you can add sequins or beads to the embroidery if desired;
- Cardboard and a piece of leather, the size of the future brooch;
- Scissors, matching threads, fishing line for lining;
- Glue – for leather “Moment Crystal” and for felt, silicone in a gun;
- Base for a brooch (pin).
Read here - DIY gift for grandfather - TOP ideas for birthday gifts from grandchildren. Examples of homemade gifts for grandfather. 110 photos of original gifts
American way
In the American method of beading, the beads will be placed with the holes facing up, and the row of beads will be very dense.
This method will look beautiful and neat on bracelets or brooches.
How to trim the edge of a brooch with beads: step-by-step master class:
- Pass the needle with thread or fishing line through the base and back, it should pass through the main pattern of the accessory and the outline of the last bead row.
- Thread a needle and thread and put two beads on it. Stick it through the back of the felt, bringing it out to the front side.
- Pull the thread through the second bead so that it sits with the hole facing up. The bead will unfold and lie on its side.
- Add another bead, repeating the process until the row is completely braided.
- To make the accessory even more voluminous, you can add a row.
As a result, we get a row of beads based on an overlock stitch, which is done by hand. The brooch looks finished and neat. The advantage of the American method is that the thread will not be visible from the outer edge.
Tools and materials needed for work.
Standard set of tools required for bead weaving:
- Paper. A work drawing is made from it.
- Pin. With its help, the brooch will be attached to clothes.
- A special glue that is designed to work with paper and felt. Often washes off easily with water.
- Beading needle. Selected specifically for the diameter of the thread used.
- Bead thread or fishing line. The bead thread must have high wear resistance.
Bead thread can be:
- Natural. This thread is pleasant to the touch and has a wide color palette. Disadvantages: rots in high moisture and wears out quickly.
- Synthetic. It is highly resistant to external factors and hardly shrinks. Disadvantages: can cause allergic reactions.
- Reinforced. This thread is additionally braided with an additional thread, which increases wear resistance and strength. Disadvantages: high price and aggressive chemical composition.
Auxiliary tools: scissors, thread.
Standard set of required materials:
- Felt. Fabric consisting of wool fibers is the basis for embroidery. Its varieties:
- Natural. This fabric can be dyed and does not cause allergic reactions. Disadvantages: high cost, low resistance to physical deformation.
- Wool blend. Consists of wool and viscose in a ratio of 60:40. The material is unsuitable for making small brooches.
- Artificial. This felt is washable and will not lose its shape or fade.
- Beads. Small beads that are the main element of the brooch. The main requirement for beads: uniformity.
Beads come in the following types:
- Chinese. Not very high quality material, beads vary in size.
- Czech. Inexpensive, but at the same time very high quality material. The beads have an even shape and the same size. A small percentage of defects.
- Japanese. One of the highest quality beads in the world, in terms of quality and percentage of defects it is not inferior to Czech ones.
- Indian. Not very high quality beads, which have low strength.
There are 3 forms of beads:
- Ordinary. Round shape with a hole in the middle.
- Chopping. Short cylindrical beads (up to 2 millimeters).
- Bugles. Long cylindrical beads (up to 3 centimeters).
- Beads. Necessary to give the brooch more volume, used as decoration.
- Leather. For processing the reverse side.
- Ribbon. Used for finishing brooches with cuts.
Loop stitch
A loop seam is relevant if the brooch has a cabochon, which also needs sealing. The cabochon is processed separately.
How to sheathe the edge of a product with beads: stages of the process:
- The edge of the brooch should be processed from right to left. First you need to pierce the needle inside out, hiding the knot between the two parts. Next, we form a loop and again bring the needle out in the same place, bringing it from the front to the wrong side.
- We pull out the thread, leaving a small loop, and pass it through the needle in the same direction. We tighten the thread completely and get the first tack.
- To trim the edges with decor, we collect one bead on a needle. We pierce the product from the front side to the back. Don't pull the thread all the way through to form a loop.
- The needle should be passed through the loop. The beads should be to the left of the main thread.
- We tighten the thread and carry out the procedure in a similar way until the entire row is braided.
Finally, you need to secure the thread and hide the knot. The same method is suitable for making an openwork bead row.
Variety of options
Model with beads
To embroider a brooch with beads, we need to select a base. Usually non-woven fabrics, felt, suede and leather are used. Mark out the desired pattern and embroider it with beads along the contours. Then the product is cut out, reinforced with cardboard and the leather with a brooch pin is glued to the back side. You can add a variety of items to your work.
Brooch with ribbons
There is no doubting the amazing beauty of shibori ribbon brooches, but there is a lot of effort and a little talent waiting for us here. Silk ribbon is quite expensive, but since we need very little of it for work, and the products turn out chic, there is a chance to get aesthetic satisfaction and interest fashionable customers in such a product.
You need to put a lot of effort into making brooches, so we buy the most beautiful stones and beads; the brightness of rivoli in such a brooch will be appropriate.
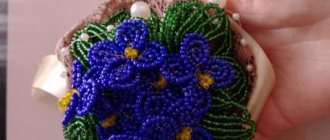
We will need a Shibori ribbon, a Rivoli crystal, glass beads, a base for embroidery, beads, and transparent monofilament. What is very important is that ordinary threads should not stick out in the product, this greatly reduces the cost of the product. You also need thin leather for the reverse side and a brooch mount. An example of the finished product is visible in the photo below.
Related Article: How to Make an Ottoman with Your Own Hands - Ideas for Inspiration
Draw a design on felt and insert it into the hoop. First of all, we sew the tape along the edges so that the fibers are gathered like an accordion in the middle, and slightly straightened along the edges.
We sew along the contour with beads.
We braid the rivoli with small size 15 beads.
Sew rivoli and glass beads randomly on the surface of the brooch and ribbon.
Now we fill the empty spaces with beads. And we cut out the product.
To seal, we glue cardboard or other dense fabric, slightly smaller in size than the brooch itself, at an intermediate stage of assembly. Cut out the wrong side of the leather and thread the pin blank there. We collect the parts and glue them together.
For a neat finished look, we trim the edges with beaded loops.
Another option for brooches. Braid the rivoli with beads, add a drop of beads and gather the ribbons into a bow.