Needlework
07/11/2018 Anastasia Prozheva
The article will answer the question of how to weave an “Angel Heart” bracelet from rubber bands. Handicraft is not only a way to make an interesting thing or an opportunity to earn money, it is also a way to take a break from the hustle and bustle, enjoy working on your own or with family and friends. It is probably not in vain that children in kindergarten and school try to instill a sense of taste through labor classes from a very early age. This is an opportunity to discover new talents and learn the unknown. Not so long ago, another interesting weave of rubber bands appeared, called Rainbow Loom. This is a completely easy job that requires attention and responsibility. Products are usually created using scrap materials, for example, forks. But such a tool is suitable only for the simplest crafts - earrings, figurines. For more complex products, you need to use special materials that are sold together with rubber bands or simply in craft stores.
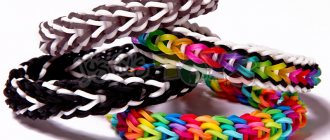
Let's try to make not an ordinary bauble or a simple bracelet, but a “Heart of an Angel”, which has been enchanting with its originality and beauty for a long time.
Gradual work
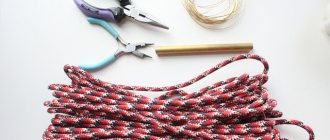
What do you need for work? Firstly, the product is created using a slingshot. But not a regular one, but a special one for weaving. Secondly, you will need two colors of rubber bands. Thirdly, crochet hook No. 4. It is sold in knitting stores, it is best to use plastic or metal. And fourthly, an S-shaped clip-fastener.
For this master class you need:
- 25 green rubber bands;
- 50 yellow ones.
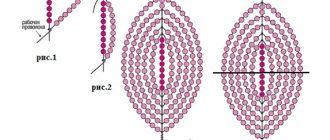
Clear your work area of unnecessary things and put everything in front of you. Here we need a step-by-step work diagram.
- Let's take the tool in our hand so that the open part of the columns is in front of our eyes. We put the green thing on two columns, twisting it in a figure eight.
Article on the topic: Crochet summer jackets for overweight ladies with patterns and description of work
- There is no need to twist the yellow thing; we put it on the instrument.
- We hook the green one on the left column, throwing it into the middle of the product, i.e. placing it between the columns.
- We hook the yellow rubber band from the right to the left column and throw it over.
- Let's put the new yellow thing on two posts again.
- We hook it with a hook and move the green thing located on the right to the center of the craft.
- Then remove the top yellow one, throwing it to the right. Look how it looks in the photo.
- We put on a new green one.
- We throw the top yellow ones into the center from all ends.
- A difficult stage begins. The actions will be repeated all the time. Let's put the yellow thing on both posts.
- Remove the yellow one on the bottom left, moving it to the center.
- Remove the yellow one from the right, throwing it to the left.
- Let's put a yellow thing on both columns.
- On the right we remove the lower yellow one, dropping it into the middle of the product, and then remove the upper yellow one from left to right.
- We wear green. We transfer the top yellow ones from the two columns alternately to the center.
- We insert the hook into the center of the yellow one on the left column, hook the bottom green one, moving it to the center.
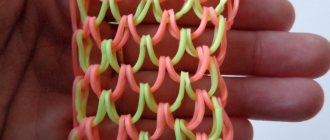
- We repeat everything on the right, inserting the hook under the yellow thing, pulling out the bottom green one and moving it to the center. Now repeat steps 10 to 17 until the desired product size is achieved.
- We fix it. There will be two things on the instrument, remove them in the center, throwing off the lower rubber bands from each column.
- Throw the top loop onto the second column. We pull the product so that the work is stretched, straighten all the loops. We will secure the outermost one with a clasp.
This beauty is obtained at the end of the work:
New beauties
By the way, a similar product can be woven on your fingers. It will be more difficult because there will only be one working hand left. But real craftswomen are not afraid of even such inconveniences! You can work on a machine that will make working even easier.
Related article: Do-it-yourself cereal panels for children: master class with photos
Following the step-by-step master class, you will get another version of the bracelet:
We move the blue one to the center, the pink one to the right. We'll put another pink one on top, a blue one in the center, and a pink one from right to left.
Note! Without a machine it will not be possible to make such a product, so it is better to purchase a tool.
Let's put on the blue one, throw the top pink ones in the center, throw on another pink one: the bottom one in the middle, the top one to the left, and add pink on top.
We'll throw the bottom one to the center, the top one to the right. Let's put on another blue one, throw the top pink one in the middle, and hook the bottom blue one, throwing it to the center.
We'll put the pink one on two columns, the bottom pink one on the center, the top pink one on the left, and then the bottom pink one on the center.
We repeat all the steps, gradually removing the rubber bands, throwing them to the center.
Then we secure the end of the product with a clasp.
Don't be upset if the first products don't turn out well. You definitely need to try even harder, then you will get beautiful work. In addition, craftsmen advise paying attention to various subtleties that are the basis of the product.
Angel Heart rubber band bracelet: how to weave
Is it impossible to be fashionable, bright and not spend a lot of money on it? The Angel Heart rubber band bracelet proves the opposite. The materials are inexpensive, the technology is accessible, and the result is gorgeous.
Such jewelry looks great on both a child’s hand and older girls. Do not deny yourself the pleasure of being different from everyone else.
The content of the article:
Despite its simplicity, and even some primitiveness, rubber band weaving instantly won the hearts of people all over the world. And not only teenage girls, but also their mothers and even boys are interested in this type of needlework. And all because it is really simple, and everyone can feel like an artist.
Having mastered even the simplest weaving techniques, you can already create cute bracelets. And no one suffers from lack of talent anymore; everyone here succeeds. And, of course, the fact that such rubber bands are very cheap also plays a role.
Now parents can breathe easy and not worry that huge amounts of money are spent on their child’s hobby. Plus, weaving develops motor skills, which is important at a young age.
By the way, in order to create cute bracelets, it is not at all necessary to acquire complex machines and endlessly study weaving techniques. There is one piece of jewelry that literally takes half an hour to an hour to create, but the end result is something airy, elegant and stunningly beautiful.
This is an Angel Heart bracelet made from rubber bands, which any novice fan of this needlework can create.
Consumables and necessary accessories for the Angel Heart rubber band bracelet
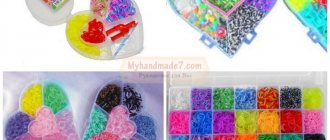
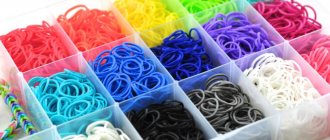
Naturally, in order to weave a bracelet from Angel Heart rubber bands, the first thing you will need is these same rubber bands. There will definitely not be any difficulties with the purchase, since they are sold in any store today. Still, try not to buy them in transitions and similar places.
There is no guarantee that you will not be given an unsafe product, which can then cause skin irritation or, even worse, poisoning. Therefore, pay a little more, but buy rubber bands in a store where you can see the certificate. And it’s better to immediately buy bags of rubber bands of different colors.
Surely you will be fascinated by weaving bracelets from rubber bands, like the Heart of an Angel, and it will be a shame to be left without the necessary material at the moment when you want to create.
If you are thinking about how to weave an Angel Heart bracelet from rubber bands and have already decided to go to the store, try to immediately think about what shades will be used. For this decoration you will need only two colors, but it is advisable that they still be combined with each other.
And immediately decide which color will be the core; for it you will need half as many rubber bands.
In addition to the main material, you will also need a special slingshot and hook. Weaving the Heart of an Angel from rubber bands can, of course, be done on your fingers, but with a slingshot it is simply more convenient.
Yes, and it turns out more accurate. But the machine is completely optional here, since weaving bracelets from Angel Heart elastic bands is carried out on two posts.
So purchasing a machine for this purpose is not advisable. But, if it already exists, then you can use it.
Well, in order to secure the Angel Heart decoration made from rubber bands, you will need a plastic lock in the shape of the letter S. Again, buy only high-quality locks so that at the most inopportune moment, your bracelet does not fall off your hand.