Pictures of flowers are well suited for both beginners and professionals who do decoupage
In decorative and applied arts, various pictures are used for decoupage: flowers, butterflies, house plants and other natural motifs. They gained their popularity due to the versatility of the image. Mother Nature made sure that the human eye receives pleasure from contemplating her creations. It should not be surprising that, for example, an elegant hydrangea or a sensual peony.
Combination of colors in drawings for decoupage
Everything in life has a certain place, so it's worth brushing up a little on your school botany course before you start. In addition to the obvious compatibility in color and shape, the picture needs to create a composition that is harmonious in all respects. Passionate roses should not be placed next to delicate violets, and irises or tulips will never decorate a gift for a young lady. Of course, not everyone believes in such semantics of colors, but still one should not discount it.
The flowers in the picture for decoupage should be harmoniously combined in color and shape with each other
Before you print the picture you like, you need to pay attention to the following:
- If you need to quickly make a beautiful craft, but you won’t be able to devote a lot of time to this issue, then you should pay attention to decorative napkins. To create them, you will need thin office paper soaked in warm water for 5-7 minutes. After this, it is covered with layers of varnish, on top of which hydrangeas or violets are placed.
- The size of the flower arrangement depends on several factors. Firstly, large images of representatives of the flower kingdom look appropriate when decorating furniture. Secondly, to decorate small glass surfaces, an elongated floral strip is used, emphasizing the shape of the product.
Depending on what motifs are planned to be conveyed in the work, colors and shades are selected. A vase or box decorated with wildflowers will decorate the living room. Pastel colors are appropriate in a children's room or bedroom. The optimal means of expression in this case are daisies.
We create pictures for decoupage: flowers on a white background
A blank slate for a beginner is a source of subconscious fear. Where should I start? Where is the composition center? What colors should you use? The listed questions seem like an insurmountable obstacle, although, in fact, there is nothing complicated.
Masters working in the decoupage technique urge you to start with choosing a compositional solution. Depending on the final goal or preferences of the immediate recipient.
After this, a picture is selected on the global network. It is desirable that it have a density of 650-850 dpi, and a size of at least 2 thousand pixels in width. Such an image after application will not seem artificially stretched.
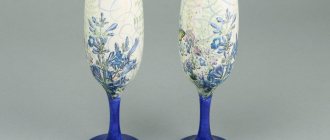
Flowers on a white background are well suited for decoupage of glass surfaces, for example, jars
The following recommendations will help beginners get the job done faster:
- A ribbon or frame made in the form of patterns creates the necessary background for a future craft;
- Birds can be placed in the lower left and upper right corners, which will become visual boundaries of the compositions;
- If you can’t find something similar online, Photoshop will help you combine the individual parts.
If we are talking about a decorative craft, the main purpose of which is to decorate the interior, then beautiful wildflowers can be placed on a non-white background.
Beautiful pictures for decoupage: lavender and rose
The choice of means of expression is determined by the ultimate goal. For example, a gift for a loved one would be an elegant rose or a whole bouquet. A similar gift would be appropriate at a wedding. There are many options. A congratulatory inscription or bouquet is placed on a white background, personifying sincerity and purity.
A slightly more discreet option will be preferable when it comes to another decoration for your home or office, or as a gift for a colleague or friend.
In this case, attention should be paid to lavender and lilies. Both flowers are recognized symbols of tenderness, sophistication and beauty.
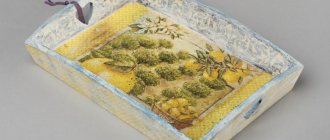
A plate made using the decoupage technique, on which a rose is depicted, is an excellent gift
With their help, a variety of compositions are created:
- Your beloved grandmother will be pleased to receive a flowerpot decorated with red poppies or hydrangeas as a gift.
- A bottle of wine decorated with silhouettes of Paris will suit a romantic travel fan.
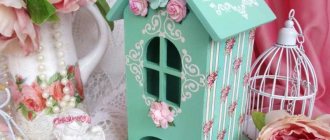
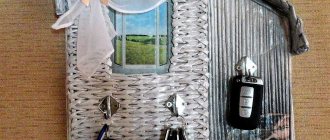
A handmade decorative box decorated with lavender will suit your bosom friend. On the one hand, it may seem that this option is more suitable for the fair sex, but, on the other hand, such a box will fit perfectly into the interior. Instead, you can use any other decorative wooden object that your friend likes.
Decoupage in black and white
Black and white decoupage is a method of decorating surfaces, which is based on the use of vintage themes in monochrome colors.
As you probably remember from our previous lessons, by vintage we mean subjects that refer us to the past. Among them are: birds, insects, Putti angels, children, royal symbols, etc.
It is believed that monochrome decoupage refers to the French style of decoration, which is often characterized by a lack of brightness in products and unnecessary details. That is why the main surface on which we apply the drawing will always be painted in a light tone.
Often on such products you can see a whole ensemble of scenes, accompanied by inscriptions. They are usually written in calligraphic handwriting, also in black and white (or soft brown) colors.
The main message that comes from this type of decoupage is French charm, expressed succinctly.
I give the most popular examples of decorations used in monochrome decoupage.
As always, you can purchase ready-made decor in professional stores (which is easiest), order it on the Internet (which is usually cheaper) or print it yourself on a laser printer (which at first may be a little difficult for beginning craftswomen). For this category of our readers, I will tell you about printouts in a little more detail.
It is advisable to use a laser printer - ink does not flow. It’s better, of course, if you know Photoshop – you can adjust the image yourself and convert it to black and white.
It is important to understand that not every picture found on the Internet is suitable for printing.
∎ Enter the required query in the search engine. For example: “Pictures for decoupage of a titmouse.”
∎ From the many images that open, select only those with a resolution of at least 500 inches. In the final version, the picture should open in full screen.
∎ Save it in a separate folder. A little hint: further you can work both in the Word program and in its analogue Open office.
∎ We place the uploaded image on the file page, trying to occupy the entire area and not distort the original proportions. If desired, the borders of the picture can be expanded in the program.
If you need to make decoupage from smaller images:
Let's say you needed an image of a round shape to decoupage the lid of a box with a 12-centimeter diameter. To do this, remaining in the selected program, we reduce the image to the desired size (anything unnecessary will be cropped off later).
If you use a photograph, be careful that its proportions are not distorted when working.
And one more important nuance: in order to save paper, you can place a small image in the corner, copying it many times.
Printing:
Our pictures for black and white decoupage are ready. They may look dark and we will need to lighten them. Why is this being done?
The fact is that with further coating of the finished product with decoupage varnish, our image will turn out to be even darker. You and I are achieving the opposite effect.
Therefore, in the “properties” section of the program (we are talking about Open Office), select “advanced settings” and then “color correction”. A color wheel will open in front of us, next to which you will see brightness, contrast, saturation and intensity controls.
I advise you to choose a brightness of approximately 20 units, and take a negative value for intensity.
Using a color wheel will also give a good effect.
Let's print out our picture. If it turns out dark, then it’s better to go back to the software settings and modify them.
Decoupage bottles in black and white
We will need:
∎ Ordinary glass bottle
∎ Napkins for decoupage (or printed yourself) in black and white
∎ Acrylic white paint (washable or moisture resistant)
∎ Acrylic black paint (or black tint, it can be added to white paint)
∎ Any PVA glue
∎ Acrylic varnish
∎ Tassels
Before getting started, I’ll dwell on what to do if the bottle you like is clogged with a plastic dispenser (they are often found in the case of strong alcoholic drinks). This bottle looks unsightly.
Therefore, to begin with, we cut off the hard metal label that is attached to the neck of the bottle with a sharp knife (we work with the knife on our own!). We remove the plastic dispenser from the bottle with a regular bottle opener.
However, it’s worth considering that you won’t be able to screw the cap onto this bottle in the future, so you need to take care of a nice cork in advance.
Let's start decoupage:
∎ Wash the bottle, degrease, dry
∎ Cover with two layers of white acrylic paint (allow an interval between coats, leaving the previous layer to dry completely)
∎ Use sandpaper to sand the bottle
∎ We tear off the picture for decoupage with our hands. This will create a softer and more natural transition from paper to glass.
∎ We attach our picture for decoupage
Two important tips: - Try to use liquid glue so that the whole picture is thoroughly wet, otherwise it may peel off and begin to bubble.
— If the paper is very thick and printed on a laser printer, then it must first be moistened with water. If on jet - pay attention! Do not soak under any circumstances!
∎ We paste our picture on the bottle. For a better result, you can cover the picture with a plastic file and iron it on top with a plastic card. If the bottle has a raised top and the picture is puffy for this reason, make several cuts along its upper edge. The paper will lie flat.
∎ Leave our decor until completely dry.
∎ Cover with acrylic varnish and leave again until completely dry.
∎ All that remains is to paint the bottom of the bottle with black acrylic.
Finally, I will give you some general tips that may be useful in the future.
Tips for working with paper and paint:
∎ Sometimes, when tearing off a picture with our hands, we may need very thin paper. You can thin it out in the following way: glue the tape overlapping onto the back side of the paper and then, carefully holding the edge, tear it off.
∎ If you apply acrylic paint with a sponge and are afraid of getting your hands dirty, then you need to press the sponge with a clothespin.
∎ The finished decor along the contour can be additionally coated with acrylic paint using a sponge. In this case, the paint should be applied with light pressing movements, going slightly into the picture.
∎ Don't forget that black can come in many shades. Therefore, do not be afraid to tint various elements of your picture with black paint. The play of shades will add expressiveness to it and evoke more emotions.
Well that's all for today. Finally, I’ll tell you where and under what circumstances you could also use the black and white decoupage technique.
As we have already said, monochrome decoupage will be indispensable if you decide to decorate the interior of your home in a vintage style. Very suitable for decoration: furniture, wall clocks, photo frames, coat hangers (which we have already decorated earlier)…
The main thing here is not to overdo it with items. After all, black and white decoupage is indispensable if you need to emphasize accents.
Additional decorative elements for decoupage flowers
Everything in nature is interconnected, so it is impossible to imagine rose or lily of the valley flowers without a graceful butterfly. In order to add it to the selected picture, you can do it in two ways. The easiest one is to select the original image where it is already present.
If none of the viewed pictures are “catchy”, then software for processing media files will come to the rescue.
Various pieces of furniture, such as a chair, are suitable as decorative elements in colors.
After this, the design is printed and applied to the surface.
Following the recommendations below will help you avoid mistakes:
- Applying floral arrangements to glass is preceded by mandatory surface treatment with sandpaper. If the surface is wooden, then a primer is applied.
- The absence of pellets, traces of contamination and chips is a prerequisite, otherwise the quality of fixing the paper base to the surface will deteriorate.
The work uses PVA glue or a glue gun. In the first case we are talking about a wooden surface, and in the second – about a glass surface. The fixative is applied in a small amount, otherwise the resulting drips will spoil the printouts of the picture, for example, with yellow irises.
Trying the vintage style
For this type, as a rule, old maps, postcards and photographs are used.
They often depict all kinds of lace, flowers and ornaments.
You can often see images of Paris. As a rule, the French capital is depicted in light retro motifs.
To decorate an item in a vintage style, take a three-ply napkin with a themed design and cut it out. Then glue it onto the cleaned base, level it and coat it with water-based varnish.
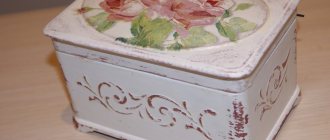
Decoupage box in vintage style:
As a rule, of all the wedding paraphernalia, glasses are often the material for decoupage decoration. For this purpose, lace, ribbons, flower petals, rhinestones and beads are used.
But if you decide to give the newlyweds something of your own, we bring to your attention wedding pictures for decoupage that will decorate a box, a photo frame, and even some piece of furniture.
Monochrome images are becoming very popular. We offer you pictures for scrap and decoupage.
If you want to refresh your kitchen and surprise your guests with originality, use the following thematic examples:
Provence
Provençal herbs will perfectly refresh your kitchen items
Tea theme
New Year's pictures for decoupage surprise you with their variety.
If you want to make a drawing of a cat in a New Year theme, this drawing will suit you
Related article: Do-it-yourself soft pouf
A painting depicting a Christmas tea party will be an excellent gift for the Christmas tree.
Please your loved ones with original gifts featuring a shabby rose.
Children's pictures in decoupage style will perfectly decorate your child's room.
A gift with an image of a beautiful lady will be remembered for a long time.
If you want to make a small thing so that you can take it with you everywhere, we suggest neat round designs.
A clock made of butterflies will look very interesting.
The pictures presented are great for printing. You can also download pictures for decoupage for free.
Adding lavender: stylish pictures for decoupage
Multi-colored ribbons, rhinestones, beads and even lavender are used as additional decorative elements.
Fantasy should not be limited here. At the same time, it is worth remembering stylistic compatibility.
A decorative element made using the decoupage technique, which depicts lavender, will add cool shades to any interior
Firstly, round buds are always balanced by irregularly shaped flowers. Secondly, you should not place a large number of details in the foreground. In addition, you should closely monitor the color combination.
In addition, the following nuances are taken into account:
- Small buds or individual petals can be fixed in the corners of the composition;
- If we are talking about the central part, then in this case 2-3 intertwining buds look harmonious.
In addition to the size and quantity, you need to choose the color and its saturation - pastel shades will come in handy.
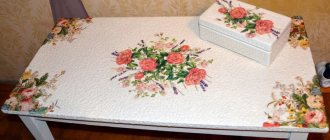
Decorating the table
We offer you, as an example, the principle of processing a table using the decoupage technique. To work you need the following tools:
1) Sandpaper. 2) Synthetic brush. 3) Brush with hard bristles. 4) Brush for the template. 5) Stationery knife or scissors. 6) A simple pencil and ruler. 7) Office file in A4 format. Bowl of water.
Necessary materials:
1) B/W images printed on thin paper. 2) Thick office glue. 3) Acrylic primer, varnish, paints (white and black).
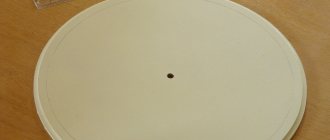
So let's get started! 1) Wash the countertop thoroughly with plain soap. It is advisable to use only this . After complete drying, we sand it with sandpaper to completely remove the old varnish and paint.
2) Apply acrylic primer to the lid and wait half an hour for it to dry thoroughly.
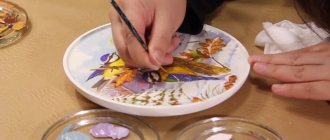
3) Lay out the printed pictures on the surface. Using a ruler and pencil, mark the order of their placement.
4) Place one printout in a bowl of water for thirty seconds, then place it face down on the file.
Related article: How to make a photo collage with your own hands: step-by-step instructions with photos and videos
5) Using your finger, carefully roll off the excess layers of paper from the back of the printout, leaving only the one on which the design is located. We spread this layer with glue.
6) Turn the file over and place it in the desired place on the countertop. Carefully smooth out the picture, pushing out the air.
7) Cover the remaining surface with white acrylic paint, using a brush with stiff hairs . Let it dry thoroughly.
To consolidate the result, cover the surface of the entire tabletop with acrylic varnish three times . We wait twenty-four hours and boldly begin listening to compliments about the wonderful work!
Making pictures for decoupage: irises
Irises are mistakenly called a symbol of sadness, which is based on a repeatedly repeated image in literature. In fact, the flower is usually attributed to a historically established image that emphasizes a person’s individuality. Even without significant experience in the field of needlework, you can convey something similar on paper.
In order for a composition made using the decoupage technique to turn out beautiful, you should look for good quality pictures
The following tips will help with this:
- Colors that are too bright, “flashy” and “toxic” are prohibited;
- The maximum flower size is 1/4 of the size of the application area;
- Maximum quantity – up to 4.
Benefits of printed pictures
Unfortunately, the choice of decoupage cards and napkins is limited; it is not always possible to find a design that suits your taste. To realize your ideas on a decorative element, you can easily print the image on a printer.
Main features of printed pictures:
- A wide range of designs and styles on the Internet;
- Ability to edit images individually;
- Removing unnecessary inscriptions, stripes and other components;
- Adding text as you wish;
- Any drawing can be printed the required number of times.
Pictures for printing should be chosen of good quality and certain parameters. It is necessary to take into account high resolution so that the image does not blur when applying maximum magnification.
The design is selected taking into account the purpose of the decoration item. The decoupage technique is used to transform furniture, walls, paintings, accessories, and decorate gifts.