Imagine that it is possible to create the most unique things from items that you use absolutely every day! Such activities are especially useful for children - they learn to create beauty out of practically nothing! Invite them to create wonderful angels with their own hands from cotton pads for removing cosmetics. These kids will help you decorate the Christmas tree, decorate the house and bring comfort and warmth to your home. And the child will be proud that the “angel” crafts that decorate the house were made by him!
Required tools and materials
So, together with the children we make angels from cotton pads!
To do this, you need to stock up on absolutely simple hygiene items - it’s better if there is the same pattern on both sides - it’s easier to assemble the angel. Useful for creativity:
- Hygienic pads made of cotton wool.
- Several cotton swabs.
- Glue (do not use something with a strong smell like “Moment” or “Titanium”; PVA is best).
- White cardboard.
- Velvet cardboard in a light shade.
- White threads.
- Scissors.
- Styrofoam ball.
- Glitter nail polish with a thin brush.
- Pencil.
- Ribbon for loops.
- Beads.
- Pieces of lace.
- Glitter.
An easy way to create a toy
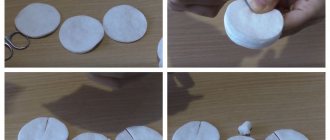
To create a simple angel from cotton pads with your own hands, you need to make blanks from a hygienic pad.
Just split it into 2 parts. Wrinkle one up and put it in the middle of the other, straightening out the folds and tying it with white thread under the resulting ball. Spread the free edges in different directions and trim the edge with a wave - these are the future wings. Taking the second disk, fold it in half and roll it into a funnel shape. Now we need to connect the head and wings with the funnel body. Apply glue to the back, first glue a loop of braid, and then press it to the wings so that the head is in contact with the body of the angel. All that remains is to do the most interesting thing - decorate the angel. Cover it with rhinestones, beads, sequins, and draw a pattern on the wings with varnish. Make a halo out of a small rubber band by painting it with glitter and gluing it on top of the head. So the little guardian of family happiness is ready!
Figurine for table decoration
How to make an angel from cotton pads that can stand on its own on a holiday table or in a miniature garden? This baby will be a wonderful decorative decoration and will create a magical atmosphere in the room.
It is done in exactly the same way as the first one, only it is necessary to strengthen the torso. To do this, make a frame from white cardboard. Place the cotton pad on a piece of cardboard and trace around it. Then cut this circle along the contour and cut along the radius. Roll into a funnel shape and seal the edges. Next, when you make the body from a cotton pad, simply put the cardboard blank inside. It will give rigidity, and the angel will be able to stand.
Large product
A figurine made from cotton pads can be an excellent decoration for a Christmas composition. It will look organic both with protrusions on the windowsill, and on a shelf or under the Christmas tree. Let's look at the process of creating such a figure step by step.
To make this beautiful creation, take:
- Styrofoam ball or wooden bead;
- Scissors;
- Cardboard;
- White and yellow yarn;
- PVA glue;
- Cotton pads;
- Metal ring (can be made from wire);
- Sheet of cardboard;
- Yellow hair tie;
- Decorative elements.
To make an angel's body, draw a circle on a piece of cardboard and cut out a third of it. The photo shows a height of 10 cm, but you can take any. Cut off the top of the piece and glue it into a cone.
The base for the dress is ready, you can start gluing it. Layer each disk into two parts and glue them to the cone with an overlap. There should be no gaps on the dress. After filling with disks, leave the cone to dry.
As a head, you can use either a large bead (pictured) or a foam ball of a suitable size. First decorate the bead with white yarn.
Glue the hair onto the head and send the part to dry.
Let's move on to the wings. The simplest option for making it is a heart-shaped template, but you can use absolutely any shape. Tear cotton pads into pieces and fill the space of the cardboard template with them on both sides.
Related article: 155 Stencils for Painting on Furniture and Walls
Make tapered sleeves by rolling up a cotton pad.
Put the pieces together.
Come up with decor for an angel's dress.
Create a halo by wrapping a hair tie around a wire ring.
The beautiful figurine is ready!
Craft “Angel” with arms and legs
First, create a dress for the angel. To do this, roll the disk with its edges towards the center and glue them. Now make legs from cotton swabs, covering one edge with glue and fixing them inside the dress. The location is arbitrary, depending on your imagination. The next stage of work is to form the wings. You can cut them out of a cotton pad or velvet cardboard. Glue them to the back, putting a loop in the middle for hanging on the Christmas tree, and attach handles from a cotton swab cut in half.
Now it's the head's turn. It is made in the same way as already described above - from a divided cotton pad. One half is crumpled into a ball, inserted into the other and tied with thread. Cut the free part of the disk, the one under the thread, in the form of a collar. Place some glue in the middle and apply it to the desired location. The figurine of an angel made from cotton pads is ready, all that remains is to decorate it with various decorations.
Christmas tree made of cotton pads
Another attribute of the New Year and Christmas is a Christmas tree, which can also be assembled from ordinary cotton pads. If you don’t have the opportunity to put up a real Christmas tree, you can always make a miniature forest beauty from scrap materials with your own hands. You can put up such a Christmas tree at home to bring a little magic and a festive atmosphere to the interior, and schoolchildren can take the craft to the New Year’s school exhibition. The next master class will tell you in detail about the technique of making the product.
- Make “needles” for the future spruce: fold a cotton pad in four, and then secure it with a stapler. You will need a lot of such parts, mainly depending on the size of the craft.
- Make a cone out of cardboard. If you want to make a larger Christmas tree, make two such cones and place one on top of the other, securing the resulting figure with glue.
- Start by gluing the bottom strip and gradually fill the entire cone with rows of folded cotton pads.
- If desired, the Christmas tree can be decorated using various beads, scattering them among the “needles”. The beads are attached with a glue gun or regular PVA glue.
- Cut out a small star from a piece of paper to place on top of the craft. Now bend each ray of the star in half, giving it volume. If desired, you can trim the edges of the star with a thin strip of tinsel. Attach a stick to the back of the craft (roll a thick tube from a small sheet of paper and secure it with glue) and, carefully making a small hole in the top of the cardboard Christmas tree, put the star in place.
Now you know how to make an angel from cotton pads and decorate your Christmas tree and your home with it. Such angels, made with your own hands using the master classes described above, will not only fit perfectly into the Christmas interior, but will also be an excellent gift for family and friends. A Christmas tree made from cotton pads will also do its job perfectly and give any room an atmosphere of celebration and magic, making it more comfortable .
Flying angel with fluffy wings
Such products look incredibly cute and tender. The method of creating them is somewhat more complicated than the previous ones, but the result is worth it!
So, an angel made of cotton pads, master class.
We make the head using absolutely the same method as before. The dress is made from a disk folded in half. We wrap it around the ponytail located under the place where the head is tightened. Trim the angel's robe with lace pieces.
For sleeves, cut the disk into 4 parts and take 1 quarter. We form a pointed cone on a pencil and glue the free edges. In this way we make 2 sleeves and glue them to the sides of the dress.
Now it’s the turn of the wings: they need to be very carefully cut out according to a cardboard template (options are presented below, before work they need to be reduced and transferred to cardboard).
After cutting, the edges turn out to be very disheveled, so they will need to be glued with glue. Very carefully draw a contour inside the disk and press. Now the edges are smooth. Attach the finished part to the back.
For decoration, use beads, ribbons, rhinestones.
Fluffy wings
Angels with large wings look very harmonious. They are able to show all the beauty of these heavenly creatures and give the craft lightness and originality. We offer you a master class that will help you create an angel with very beautiful wings. With which? It's up to you to decide!
To create a craft you will need:
- Cotton pads;
- PVA glue;
- Scissors;
- White bobbin thread;
- Automatic pencil;
- Decorative elements - beads, ribbons, sequins, lace.
To create the head of a celestial inhabitant, you need to split a cotton pad into two halves. Using gentle movements, collect the cotton wool, leaving only the base. It will be used to stuff the head. Place cotton wool in one half of the disk and wrap it with threads.
Attention! Do not pull the cotton shell too tightly; it is quite thin and may tear.
You will make the angel dress from the second half of the disk. Lubricate half of the circle with glue along the bottom edge and fold the disk.
Now wrap the resulting blank around the tail remaining from the head. You need to first glue one half, then tuck the second half as shown in the photo.
The dress needs beautiful sleeves. They are made from a quarter of a disk, wrapping it in a cone around a suitable object. Use an automatic pencil; its head has a suitable shape. Roll and glue two conical pieces.
Now you need to attach the item of clothing in place.
It's time to create the fluffy wings. Use one of the cutting templates below, after cutting it down to the size you need.
Transfer the template onto cardboard, attach it to the disk and cut it out.
Related article: Eggshell carving for beginners at home with video
After cutting, the two halves of the disk began to stick out in different directions, showing the sloppy filling.
To smooth the edges, place glue between them and press them together. A clear and even contour immediately appears.
Glue the feathering to the back.
Decorate the angel to your liking. You can use any materials, because both beads and ribbons are suitable for this craft. If you do not glue the celestial to the base, make a pendant from a lace or rope.