topiary from pine cones master class
Pine cones are a traditional decoration for winter holidays. Here you will learn how to make topiary from cones , a decorative tree from natural and other materials. The craft is ideal for decorating any interior; it is beautiful, stylish, and also has a lot of advantages. A topiary made from cones, like a flower in a pot, pleases the eye, but does not require attention.
Today this stylish craft is very popular; for the New Year holidays, if you add a little colorful decor, it can replace a Christmas tree. The rest of the time it will delight you, creating a cozy atmosphere in the house; it’s not for nothing that the second name of topiary is “tree of happiness.” In general, here are 15 examples with step-by-step photos on how to make topiary from cones with your own hands , look and be inspired.
Autumn craft: topiary made of pine cones and chestnuts
There is no need to invent a separate master class. The actions will be similar, because the work differs only in the presence of these same chestnuts.
How can you achieve beautiful decoration of chestnuts:
- Again, spray paints often come to the rescue. With gilding and silver - your case.
- A scattering of chestnuts can be decorated with dot painting. The same one that paints smooth sea pebbles. It looks very original; the work on such painting (it doesn’t matter whether it’s stones or chestnuts) is almost like jewelry.
- You can simply highlight the chestnut caps with a different color.
Chestnuts have a smooth structure, try to emphasize it.
Topiary from cones “Green chrysanthemums” (video master class)
Elegant trees - topiaries are beautiful not only in the photo. They look festive, elegant, neat, and they exude something kind and fairy-tale. Try it yourself and you won't regret it.
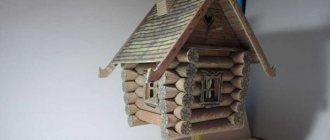
Topiary from pine cones: master class step by step
Once you have a pot, a foam base and a stem of branches inserted into it, it’s time to prepare the pine cones with your own hands. Ideally, they are small in size and approximately the same.
You can find a separate master class on how to decorate pine cones. The methods are very different. For example, you can cover them with white paint, then, after waiting for them to dry, apply PVA glue with a sponge, and sprinkle sea salt on top of the cones. You will get these snow cones.
You can paint the pine cones with spray paint. Which color is better to take, look at the photo. If this is a New Year's topiary, golden and silver colors are appropriate.
Returning to MK, the actions will be as follows:
- Insert the crown ball on the branch into the pot . This can be a pot already filled with earth, or filled with fresh plaster. Whatever you want, the trunk of the branches must sit firmly in the pot.
- You need to decorate the top with some earth or plaster . It can be artificial grass if the topiary is still autumn. You can also throw a couple of miniature maple leaves there. You can see the ideas in the photo.
- Next, the master class instructs you to make a crown . Namely, to glue the cones. The elements are fixed with hot glue in a circle. Try to ensure that there are no voids, otherwise you will have to fill them with something. Or initially paint the workpiece with the same silver spray.
- New Year's topiary involves snowy decor . Cotton wool, tinsel, the same sea salt, felt snowflakes, silver threads - you can make the most incredible snowball with your own hands. Or take artificial snow for such a topiary made from cones.
The master class offers the following points to choose from. A topiary with cones can be decorated with beads, satin ribbons, voluminous snowflakes, and even Christmas tree decorations.
New Year's topiary made of pine cones (video)
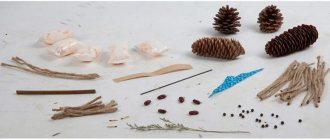
List of materials for chestnut topiary
- Newspapers in large quantities to create a base.
- Glue "Joiner".
- Threads to fix the shape of the base.
- Stick for the trunk.
- Flower pot. It is needed to create a stand.
- Gypsum, which is useful for filling the stand, will improve the stability of the tree.
- Twine for decorating a flower pot.
- Chestnuts for creating a topiary crown.
- Thermal gun.
- Bronze paint and tea (they are needed for decorating wood).
Creating the basis for the product
The creation of this kind of crafts always begins with a base - a ball or other figure, onto which decorative elements are attached to create a crown. For the base, you can use a foam ball or just make one yourself from newspapers. To do this, you need to take a large amount of paper and form it into a ball. After this, glue all the irregularities. “Stolyar” glue is well suited for this. Next, you need to wrap the future base with threads, it will become denser.
The barrel and the base attached to it
Like any tree, topiary must have a trunk. It can be made from thick wire or Chinese sticks tied together. The simplest option is a simple, straight stick. In order to attach the base to the trunk, take a ball and make a hole in it 3 - 5 cm deep, without damaging the threads with which the base was strengthened. Pour glue inside and insert a stick.
Preparing the Tree Stand
The topiary stand can be absolutely anything: a beautiful mug, a bucket, an old box, etc. But this craft will stand in a flower pot. To prevent the tree from tilting or falling, it is necessary to strengthen the stand with some kind of filler. There are many options, ranging from ordinary pebbles (gravel) to gypsum. This is exactly what should be used in this work; of course, more time will be spent, but the topiary will be more stable. Mix the solution according to the instructions and wait until it begins to harden little by little. Insert the barrel with the base into the center and press slightly so that the structure is fixed. Leave for half an hour.
Decorating the stand, trunk and crown formation
After the plaster has hardened, you can begin the basic design of the tree. The stand can be decorated using various methods: glitter, acrylic paint, decorative paper and much more. In this case, twine is used, which is tightly wrapped around the pot. In order for this decor to fit tightly to the walls, you need to glue it every 4 cm.
Now it's time to start laying out the base. The chestnuts are glued from the center using a heat gun.
What this tool is and how to use it is described in detail here:
After all the chestnuts are glued, you need to close the gaps, they are very clearly visible in this photo:
This master class uses tea. Coat all empty areas on the base with “Joiner” glue and sprinkle tea on top of them and press. You need to make sure that there is not a single gap left, otherwise the work will look sloppy.
We do the same with the inside of the stand: we lubricate the plaster and walls with glue, and then sprinkle it with a thick layer of tea.
The final touch: applying bronze-colored paint to the edges of the stand and decorating the walls with pieces of coffee-dyed twine in the form of curlicues. You can place a chestnut under the trunk of the topiary, after getting rid of the excess tea leaves. The chestnut needs to be planted with glue.
In order to diversify the chestnut tree, you can add another natural element to the composition - cones. But how to make topiary from cones and chestnuts? Very simple! We do everything as described above, up to point 4. Now, when you start gluing the chestnuts to the base, you should make the gaps between them a little wider. And instead of tea, use small cones so that they do not stick out too much against the background of chestnuts.
You can also add them inside the stand on both sides of the chestnut.
Interior crafts from autumn materials
Autumn is rich in its gifts. Cones, needles, chestnuts, acorns, colorful leaves - it’s tempting to decorate your home with them. What beautiful and useful crafts can you make with your child?
Read also: Stealing tomatoes in a dream
Wreath of pine cones
Making such a wreath is not at all difficult. The most difficult thing is to decide on its basis. This can be a ring made of cardboard, or a circle of elastic twigs collected on the street.
To tie the branches you will need twine or strong thread, and to attach decorations it is most convenient to use a glue gun.
Having made a circle, begin to place pine cones, spruce branches, and leaves on it using glue, filling the main space of the wreath. It's better not to use a lot of material at once. Let there be no more than three main components. The cones can be pre-painted in the desired color, entrusting this important task entirely to the child.
When the wreath is almost ready, all that remains is to decorate it. If your craft has a completely autumn theme, then you can add bunches of rowan berries, rose hips or hawthorn to it as a bright accent.
If your wreath has a New Year's theme, then you can entwine it with colored beads, add tiny Christmas balls, and paint the cones silver.
This craft looks good not only on the door, but also on the coffee table.
Bouquet of maple leaves
Making this craft is the most suitable activity for joint creativity with your child. The technique of making roses can be well practiced, since there are plenty of consumables on the streets. And having learned to twist such a charm, the child will be able to prepare bouquets on his own as a gift to his grandparents.
To make a rose you will need a large number of bright (not dry!) maple leaves and adhesive tape, preferably green.
Such beauty will last long enough in your home and will remind you of last autumn with its warm, bright mood.
Topiary of leaves and berries
The history of making topiary is rooted in the art of landscape design of Ancient Rome. And if in those days it was fashionable to give tree crowns regular geometric shapes, now topiary has partially moved from garden plots to the interior.
Autumn topiary can be made from any gifts of nature. In addition to cones and leaves, these can be spices: even anise stars, coffee beans, cinnamon sticks. In addition to aesthetic pleasure, they will bring an unforgettable aroma to the room.
Making topiary is a technologically more complex process than making wreaths and bouquets. Here you will need: a pot; floral sponge, or polystyrene foam; stem cutting; glue gun; twine or strong threads: decorations of your choice.
The photos below show the step-by-step process of making topiary from autumn leaves and berries.
A floral sponge or polystyrene foam is needed to secure the cutting in the pot, as well as to form the crown. But, as shown in this master class, you can also use a simple paper ball.
So, by spending a little time and showing your imagination, you can decorate a nursery or living room with your own hands, or make a gift for your family with your child. Don't miss autumn, even if it's cloudy and damp outside, but at home it's warm and bright from sunny things!
When preparing the material, illustrations from the sites kapushka.ru, www.best-mother.ru were used
Forest wonders
Forest materials are arranged very beautifully among themselves. You can decorate pots with small twigs, like a small fence, and acorns instead of beads. Small master classes on topiary from cones and acorns of various variations.
1) Cones, rowan berries and juniper branches, a straight stick for the trunk, acorns, moss.
The basics we have are a foam ball and a mayonnaise bucket, plaster and glue. Small branches are collected in a fence. We line the bucket with it. Glue the acorns on top with hot glue. We attach all our natural ingredients with glue or insert them into a foam ball. We attach the ball to the trunk and send it to the pot. Pour the gypsum mixture and wait for it to harden, then put the moss in the pot and plant acorns on the glue.
2) Cones, acorns, chestnuts, nuts can be coated with paint, and tree berries can be coated with transparent varnish.
The shelf life of such topiary will be extended, the appearance is not so natural, but in some interiors, in modern design styles, it is sometimes appropriate to use imitations of living nature.
3) Topiary made from forest materials can be combined with spices; such trees retain their aroma and I feel nature next to them. It will create a very warm atmosphere not only in the kitchen at home, but also in restaurants and cafes. This is an excellent gift for lovers of nature and environmentally friendly materials, complemented with natural fabrics in confirmation of pure intentions.
4) It is important to decorate a house with such a tree at the beginning of autumn, as a symbol of productivity, fertility, adding berries and leaves. And decorated with bright glossy boxes and balls, it will become a replacement for a bulky Christmas tree.
Related article: How to decorate jeans with your own hands